DROPS Alpaca
DROPS Alpaca
100% Alpaca
from 4.85 $ /50g
DROPS Kid-Silk
DROPS Kid-Silk
75% Mohair, 25% Silk
from 6.75 $ /25g
Get the yarn to make this pattern from 51.25$.

The yarn cost is calculated from the pattern’s smallest size and the yarn’s cheapest product type. Looking for an even better price? You might find it on the DROPS Deals!

DROPS SS24

Buttercream Swirls Sweater

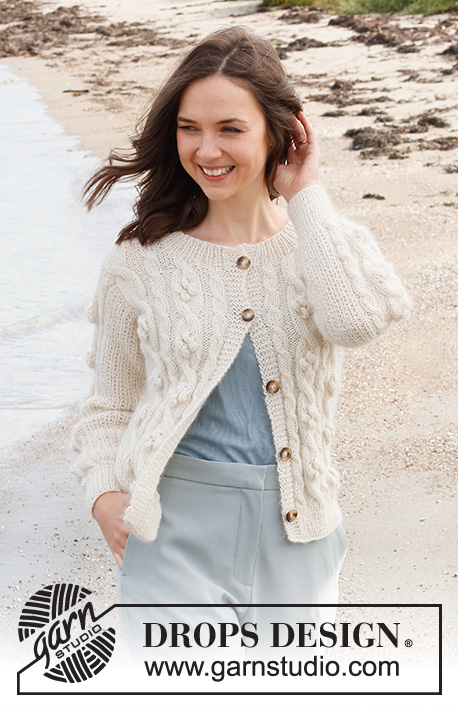
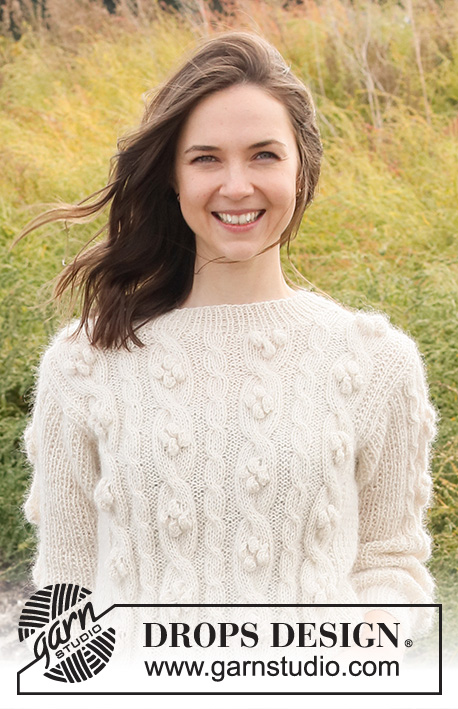
Knitted sweater with DROPS Alpaca and DROPS Kid-Silk. The piece is worked with cables and bobbles. Sizes S - XXXL.

DROPS 221-16
DROPS Design: Pattern no z-927
Yarn group A + A or C
-------------------------------------------------------

SIZES:
S - M - L - XL - XXL – XXXL

Finished measurements:
Chest measurements: 98-108-112-124-136-150 cm = 38½"-42½"-44"-48¾"-53½"-59"
Full length: 52-54-56-58-60-62 cm = 20½"-21¼"-22"-22¾"-23⅝"-24⅜"
All measurements in charts are in cm.

MATERIALS:
DROPS ALPACA from Garnstudio (belongs to yarn group A)
250-300-350-350-400-450 g color 100, off white
DROPS KID-SILK from Garnstudio (belongs to yarn group A)
100-125-125-150-150-175 g color 38, chalk

KNITTING GAUGE:
17 stitches in width and 22 rows in height with stockinette stitch and 1 strand of each quality = 10 x 10 cm = 4" x 4".

NEEDLES:
DROPS DOUBLE POINTED NEEDLES SIZE 5 MM = US 8.
DROPS CIRCULAR NEEDLE SIZE 5 MM = US 8: Length 40 cm = 16" and 80 cm = 32".
DROPS DOUBLE POINTED NEEDLES SIZE 4 MM = US 6.
DROPS CIRCULAR NEEDLE SIZE 4 MM = US 6: Length 40 cm = 16" and 80 cm = 32" for rib.
DROPS CABLE NEEDLE – for cables
Needle size is only a guide. If you get too many stitches on 10 cm = 4", change to a larger needle size. If you get too few stitches on 10 cm = 4", change to a smaller needle size.

-------------------------------------------------------

Alternative Yarn – See how to change yarns here
Yarn Groups A to F – Use the same pattern and change the yarn here
Yarn usage using an alternative yarn – Use our yarn converter here

-------------------------------------------------------

DROPS Alpaca
DROPS Alpaca
100% Alpaca
from 4.85 $ /50g
DROPS Kid-Silk
DROPS Kid-Silk
75% Mohair, 25% Silk
from 6.75 $ /25g
Get the yarn to make this pattern from 51.25$.

The yarn cost is calculated from the pattern’s smallest size and the yarn’s cheapest product type. Looking for an even better price? You might find it on the DROPS Deals!

Pattern instructions

NOTE: This pattern is written in American English. All measurements in charts are in cm. For conversion from inches to cm - click here. There are different terms for crocheting in American and British English. If this pattern includes crochet, click for "crochet terms" here. For this pattern in British English, please click here.
-------------------------------------------------------

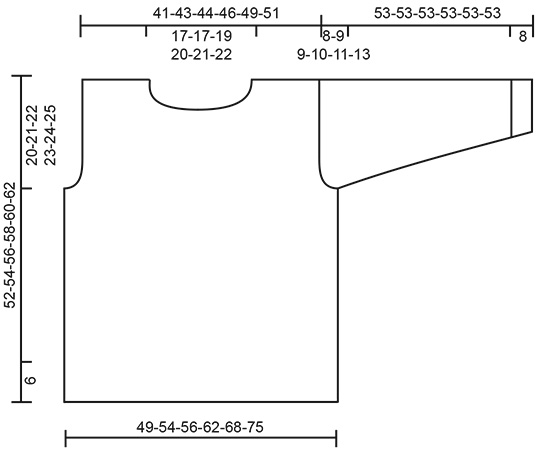
EXPLANATIONS FOR THE PATTERN:

-------------------------------------------------------

PATTERN:
See diagrams A.1 to A.5. The diagrams show all rows in the pattern seen from the right side.


INCREASE TIP-1 (evenly spaced):
To work out how to increase evenly, count the total number of stitches on the needle (e.g. 166 stitches) and divide by the number of increases to be made (e.g. 21) = 7.9.
In this example, increase by making 1 yarn over after alternately each 7th and 8th stitch (approx.). On the next round work the yarn overs twisted to avoid holes.

INCREASE TIP-2 (for sleeves):
Start 1 stitch before the marker-stitch, make 1 yarn over, knit the marker-stitch and make 1 yarn over. On the next round work the yarn overs twisted to avoid holes. Then work the new stitches into A.5.

-------------------------------------------------------

START THE PIECE HERE:

-------------------------------------------------------

SWEATER – SHORT OVERVIEW OF THE PIECE:
The piece is worked in the round with circular needle as far as the armholes, then divided and the front and back pieces finished separately back and forth on the needle. The sleeves are worked in the round with double pointed needles/short circular needle.
The sweater is worked with 1 strand Alpaca and 1 strand Kid-Silk (= 2 strands).

BODY:
Cast on 166-182-190-208-230-254 stitches with short circular needle size 4 MM = US 6 and 1 strand Alpaca and 1 strand Kid-Silk. Knit 1 round, then work rib (knit 1, purl 1) for 6 cm = 2⅜". Change to circular needle size 5 MM = US 8 and knit 1 round where you increase 21-21-21-25-25-25 stitches evenly spaced – read INCREASE TIP-1 = 187-203-211-233-255-279 stitches. Continue as follows:
Sizes S-M-L:
Work A.1 over the first 16-20-22 stitches, purl 2, A.3 (= 8 stitches), purl 4, A.2 (4 stitches), purl 4, A.4 (= 8 stitches), purl 4, A.2, purl 4, A.3, purl 4, A.2, purl 4, A.4, purl 2, A.5 over the last 99-111-117 stitches.

Sizes XL-XXL-XXXL:
Work A.1 over the first 20-26-32 stitches, purl 2, A.2 (= 4 stitches), purl 4, A.3 (= 8 stitches), purl 4, A.2, purl 4, A.4 (= 8 stitches), purl 4, A.2, purl 4, A.3, purl 4, A.2, purl 4, A.4, purl 4, A.2, purl 2, A.5 over the last 125-141-159 stitches.

Continue this pattern. REMEMBER THE KNITTING GAUGE! When the piece measures 32-33-34-35-36-37 cm = 12½"-13"-13⅜"-13¾"-14¼"-14½" bind off for the armholes – adjust so this is an odd round in A.2/A.3/A.4 (important to avoid cabling from the wrong side when the front and back pieces are continued back and forth): Bind off the first 3 stitches on the round, work pattern as before over the next 98-106-110-122-134-146 stitches ( = front piece), bind off the next 6 stitches for the armhole, work the next 77-85-89-99-109-121 stitches (= back piece) and bind off the last 3 stitches. Each part is finished separately, back and forth. Place the first 77-85-89-99-109-121 stitches on a thread and continue working the last 98-106-110-122-134-146 stitches on the front piece.

FRONT PIECE:
= 98-106-110-122-134-146 stitches. Continue the pattern and bind off for the armholes at the beginning of each row on both sides as follows: 2 stitches 1-2-2-3-4-5 times and 1 stitch 2-2-3-4-5-7 times = 90-94-96-102-108-112 stitches. When the piece measures 49-51-53-55-57-59 cm = 19¼"-20"-21"-21⅝"-22½"-23¼", work the next row as follows – from the right side: Work as before over the first 27-25-25-27-29-30 stitches, work the next 36-44-46-48-50-52 stitches, AT THE SAME TIME as you decrease 2 stitches in each A.2 and 4 stitches in each A.3/A.4, work the last 27-25-25-27-29-30 stitches (a total of 10-14-14-14-14-14 stitches decreased over the cables). On the next row place the middle 18-22-24-26-28-30 stitches on a thread = 31-29-29-31-33-34 stitches on each shoulder; the shoulders are finished separately. Continue the pattern, AT THE SAME TIME bind off for the neck on every 2nd row as follows: 2 stitches 1 time and 1 stitch 2 times = 27-25-25-27-29-30 stitches. Continue working until the piece measures 51-53-55-57-59-61 cm = 20"-21"-21⅝"-22½"-23¼"-24", decrease 2 stitches in A.2 and 4 stitches in A.3/A.4 = 21-21-21-21-23-24 stitches left on the shoulder. Bind off the when the piece measures 52-54-56-58-60-62 cm = 20½"-21¼"-22"-22¾"-23⅝"-24⅜".
Work the other shoulder in the same way.

BACK PIECE:
= 77-85-89-99-109-121 stitches. Continue the pattern and bind off for the armholes at the beginning of the row on both sides as follows: 2 stitches 1-2-2-3-4-5 times and 1 stitch 2-2-3-4-5-7 times = 69-73-75-79-83-87 stitches. When the piece measures 50-52-54-56-58-60 cm = 19¾"-20½"-21¼"-22"-22¾"-23⅝" bind off the middle 25-29-31-35-35-37 stitches for the neck and each shoulder is finished separately. On the next row bind off 1 stitch from the neck = 21-21-21-21-23-24 stitches. Bind off the when the piece measures 52-54-56-58-60-62 cm = 20½"-21¼"-22"-22¾"-23⅝"-24⅜".
Work the other shoulder in the same way.

SLEEVE:
The sleeve is worked bottom up, with double pointed needles/short circular needle. The piece is then divided for the sleeve cap and finished back and forth.
Cast on 40-42-44-46-48-50 stitches with double pointed needles size 4 MM = US 6 and 1 strand Alpaca and 1 strand Kid-Silk (= 2 strands). Knit 1 round then work rib (knit 1, purl 1) for 8 cm = 3⅛". Change to double pointed needles size 5 MM = US 8 and knit 1 round where you increase 13 stitches evenly spaced = 53-55-57-59-61-63 stitches. Then continue as follows: A.5 over the first 13-13-15-15-17-17 stitches, purl 2, A.2 (= 4 stitches), purl 4, A.4 (= 8 stitches), purl 4, A.2 (= 4 stitches), purl 2, A.5 over the last 12-14-14-16-16-18 stitches. Insert 1 marker thread in the first stitch on the round (mid under sleeve).
Continue the pattern, AT THE SAME TIME when the piece measures 10 cm = 4", increase 1 stitch on each side of the marker-stitch – read INCREASE TIP-2. Increase like this every 3½-3-3-2½-2-1½ cm = 1¼"-1⅛"-1⅛"-1"-¾"-½" a total of 10-11-12-13-15-16 times = 73-77-81-85-91-95 stitches. When the piece measures 45-44-44-43-42-40 cm = 17¾"-17¼"-17¼"-17"-16½"-15¾", bind off 3 stitches each side of the stitch with the marker thread and the stitch with marker thread (= 7 stitches bind off under sleeve) and finish the sleeve back and forth. Bind off for the sleeve cap at the beginning of each row on both sides as follows: 2 stitches 3 times, 1 stitch 1-2-2-3-4-6 times. Then bind off 2 stitches on each side until the piece measures 52 cm = 20½" in all sizes, bind off 3 stitches 1 time, AT THE SAME TIME as you are binding off the last time, decrease 4 stitches in A.4 and 2 stitches in each A.2. On next row bind off the remaining stitches. The sleeve measures approx. 53 cm = 21" in all sizes. Work the other sleeve in the same way.

ASSEMBLY:
Sew the shoulder seams and sew in the sleeves.

NECK:
Start at one of the shoulder seams and, using short circular needle size 4 MM = US 6, knit up 80 to 90 stitches around the neck (including the stitches from the thread); the number of stitches must be divisible by 2. Work rib (knit 1, purl 1) for 4 cm = 1½". Bind off with knit over knit and purl over purl.

Diagram

All measurements in charts are in cm.

symbols = knit from right side, purl from wrong side
symbols = purl from right side, knit from wrong side
symbols = place 2 stitches on cable needle in front of piece, knit 2, knit 2 from cable needle
symbols = place 4 stitches on cable needle in front of piece, knit 4, knit 4 from cable needle
symbols = bobble: Knit 1, 1 yarn over, knit 1 in same stitch (= 3 stitches), work 5 rows of stockinette stitch over these 3 stitches, on row 6 knit all 3 stitches together = 1 stitch.
diagram
diagram

Each of our patterns has specific tutorial videos to help you.

Do you have a question? See a list of frequently asked questions (FAQ)

Knitting tension is what determines the final measurements of your work, and is usually measured per 10 x 10 cm. It is provided like so: number of stitches in width x number of rows in height - eg: 19 stitches x 26 rows = 10 x 10 cm.

The knitting tension is very individual; some people knit/crochet loosely while others work tightly. You adjust the knitting tension with the needle size, which is why the suggested needle size only serve as a guide! You need to adjust this (up or down) to ensure that YOUR knitting tension matches the knitting tension provided in the pattern. If you work with a different knitting tension than provided you will have a different yarn consumption, and your work will have different measurements than what the pattern suggests.

The knitting tension also determines which yarns can replace each other. As long as you achieve the same knitting tension you can replace one yarn with another.

See DROPS lesson: How to measure your tension/gauge

See DROPS video: How to make a gauge tension swatch

The required amount of yarn is provided in grams, eg: 450 g. To calculate how many balls you’ll need you first need to know how many grams are in 1 ball (25g, 50g or 100g). This information is available if you click on the individual yarn quality on our pages. Divide the amount required with the amount of each ball. For example, if each ball is 50g (the most common amount), the calculation will be as follows: 450 / 50 = 9 balls.

The important thing when changing from one yarn to another is that the knitting/crochet tension remains the same. This is so that the measurements of the finished piece will be the same as on the sketch provided. It is easier to achieve the same knitting tension using yarns from the same yarn group. It is also possible to work with multiple strands of a thinner yarn to achieve the knitting tension of a thicker one. Please try our yarn converter. We recommend you to always work a test swatch.

Please NOTE: when changing yarn the garment might have a different look and feel to the garment in the photo, due to individual properties and qualities of each yarn.

See DROPS lesson: Can I use a different yarn than the one mentioned in the pattern?

All our yarns are categorised into yarn groups (from A to F) according to thickness and knitting tension – group A contains the thinnest yarns and group F the thickest. This makes it easier for you to find alternative yarns to our patterns, should you wish to switch yarn. All yarns within the same group have a similar knitting tension and can easily replace each other. However, different yarn qualities have different structures and properties which will give the finished work a unique look and feel.

Click here for an overview of the yarns in each yarn group

At the top of all our patterns you’ll find a link to our yarn converter, which is a helpful tool should you wish to use a different yarn than suggested. By filling in the yarn quality you wish to replace, the amount (in your size) and number of strands, the converter will present good alternative yarns with the same knitting tension. Additionally it will tell you how much you’ll require in the new qualities and whether you’ll need to work with multiple strands. Most skeins are 50g (some are 25g or 100g).

If the pattern is worked with multiple colours, every colour will have to be converted separately. Similarly, if the pattern is worked with several strands of different yarns (for example 1 strand Alpaca and 1 strand Kid-Silk) you will have to find alternatives for each, individually.

Click here to see our yarn converter

Since different yarns have different qualities and textures we have chosen to keep the original yarn in our patterns. However, you can easily find options among our available qualities by using our yarn converter, or simply pick a yarn from the same yarn group.

It is possible that some retailers still have discontinued yarns in stock, or that someone has a few skeins at home that they would like to find patterns for.

The yarn converter will provide both alternative yarn as well as required amount in the new quality.

If you think it's hard to decide what size to make, it can be a good idea to measure a garment you own already and like the size of. Then you can pick the size by comparing those measures with the ones available in the pattern's size chart.

You'll find the size chart at the bottom of the pattern.

See DROPS lesson: How to read size chart

The needle size provided in the pattern serves only as a guide, the important thing is to follow the knitting tension. And since knitting tension is very individual, you will have to adjust the needle size to ensure that YOUR tension is the same as in the pattern – maybe you’ll have to adjust 1, or even 2 needle sizes, up or down to achieve the correct tension. For this, we recommend that you work test swatches.

Should you work with a different knitting tension than the one provided, the measurements of the finished garment might deviate from the measurement sketch.

See DROPS lesson: How to measure your tension/gauge

See DROPS video: How to make a gauge tension swatch

Working a garment top-down provides more flexibility and room for personal adjustment. For example it is easier to try the garment on while working, as well as making adjustments to length of yoke and shoulder caps.

The instructions are carefully explaining every step, in the correct order. Diagrams are adjusted to the knitting direction and are worked as usual.

The diagram depicts all rows/rounds, and every stitch seen from the right side. It is read from bottom to top, from right to left. 1 square = 1 stitch.

When working back and forth, every other row is worked from the right side and every other row is worked from the wrong side. When working from the wrong side, the diagram will have to be worked reversed: from left to right, knit stitches are purled, purl stitches are knit etc.

When working in the round every round is worked from the right side and the diagram are worked from right to left on all rounds.

See DROPS lesson: How to read knitting diagrams

The diagram depicts all rows/rounds, and every stitch seen from the right side. It is worked from bottom to top, from right to left.

When working back and forth every other row is worked from the right side: from right to left and every other row is worked from the wrong side: from left to right.

When working in the round, every row in the diagram are worked from the right side, from right to left.

When working a circular diagram you start in the middle and work your way outwards, counter clockwise, row by row.

The rows usually start with a given number of chain stitches (equivalent to the height of the following stitch), this will either be depicted in the diagram or explained in the pattern.

See DROPS lesson: How to read crochet diagrams

Instructions for working several diagrams after each other on the same row/round, will often be written like so: “work A.1, A.2, A.3 a total of 0-0-2-3-4 times". This means you work A.1 once, then A.2 is worked once, and A.3 is repeated (in width) the number of times provided for your size – in this case like so: S = 0 times, M = 0 times, L=2 times, XL= 3 times and XXL = 4 times.

The diagrams are worked as usual: begin with the first row in A.1, then work the first row in A.2 etc.

See DROPS lesson: How to read knitting diagrams

See DROPS lesson: How to read crochet diagrams

The total width of the garment (from wrist-to-wrist) will be larger in the larger sizes, despite the actual sleeves being shorter. The larger sizes have longer sleeve caps and wider shoulders, so there will be a good fit in all sizes.

The measurement sketch/schematic drawing provides information regarding the full length of the garment. If it’s a jumper or a jacket the length is measured from the highest point on the shoulder (usually closest to the neckline), and straight down to the bottom of the garment. It is NOT measured from the tip of shoulder. Similarly, the length of yoke is measured from the highest point on the shoulder and down to where yoke is split into body and sleeves.

See DROPS lesson: How to read a schematic drawing

Diagrams are often repeated on the round or in height. 1 repeat is the diagram the way it appears in the pattern. If it says to work 5 repeats of A.1 in the round, then you work A.1 a total of 5 times after/next to each other in the round. If it says to work 2 repeats of A.1 vertically/in height you work the entire diagram once, then begin again at the start and work the entire diagram one more time.

Chain stitches are slightly narrower than other stitches and to avoid working the cast-on edge too tight, we simply chain more stitches to begin with. The stitch count will be adjusted on the following row to fit the pattern and measurement sketch.

The rib edge is more elastic and will contract slightly compared to, for example, stocking stitch. By increasing before the rib edge, you avoid a visible difference in width between the rib edge and the rest of the body.

It’s very easy to cast off too tightly, and by making yarn overs while casting off (and simultaneously casting these off) you avoid a too tight cast off edge.

See DROPS video: How to bind off with yarn overs (yo)

To achieve an even increase (or decrease) you can increase on, for example: every 3rd and 4th row alternately, like so: work 2 rows and increase on the 3rd row, work 3 rows and increase on the 4th. Repeat this until the increase is complete.

See DROPS lesson: Increase or decrease 1 st on every 3rd and 4th row alternately

Should you prefer to work in the round instead of back and forth, you may of course adjust the pattern. You’ll need to add steeks mid-front (usually 5 stitches), and follow the instructions. When you would normally turn and work from the wrong side, simply work across the steek and continue in the round. At the end you’ll cut the piece open, pick up stitches to work bands, and cover the cut edges.

See DROPS video: How to knit steeks and cut open

Should you prefer to work back and forth instead of in the round, you may of course adjust the pattern so you work the pieces separately and then assemble them at the end. Divide the stitches for the body in 2, add 1 edge stitch in each side (for sewing) and work the front and back pieces separately.

See DROPS lesson: Can I adapt a pattern for circular needles into straight needles?

Pattern repeats can vary slightly in the different sizes, in order to get the correct proportions. If you’re not working the exact same size as the garment in the photo, yours might deviate slightly. This has been carefully developed and adjusted so that the complete impression of the garment is the same in all sizes.

Make sure to follow instructions and diagrams for your size!

If you have found a pattern you like which is available in women’s size it’s not very difficult to convert it to men’s size. The biggest difference will be the length of sleeves and body. Start working on the women size that you think would fit across the chest. The additional length will be worked right before you cast off for the armhole/sleeve cap. If the pattern is worked top-down you can add the length right after the armhole or before the first decrease on sleeve.

Regarding additional yarn amount, this will depend on how much length you add, but it is better with a skein too many than too few.

All yarns will have excess fibres (from production) that might come off as lint or shedding. Brushed yarns (ie hairier yarns) have more of these loose, excess fibres, causing more shedding.

Shedding also depends on what is worn under or over the garment, and whether this pulls at the yarn fibres. It’s therefore not possible to guarantee that there will be no shedding

Below are some tips on how to get the best result when working with hairier yarns:

1. When the garment is finished (before you wash it) shake it vigorously so the looser hairs come off. NOTE: do NOT use a lint roller, brush or any method that pulls at the yarn.

2. Place the garment in a plastic bag and put it in your freezer - the temperature will cause the fibres to become less attached to each other, and excess fibres will come off easier.

3. Leave in the freezer for a few hours before taking it out and shaking it again.

4. Wash the garment according to the instructions on the yarn label.

Pilling is a natural process that happens to even the most exclusive of fibers. It's a natural sign of wear and tear that is hard to avoid, and that is most visible in high friction areas of your garment like a sweater's arms and cuffs.

You can make your garment look as new by removing the pilling, using a fabric comb or a pill/lint remover.

Still can't find the answer you need? Then scroll down and leave your question so one of our experts can try to help you. This will be done normally within 5 to 10 working days.
In the meantime, you can read the questions and answers that others have left to this pattern or join the DROPS Workshop on Facebook to get help from fellow knitters/crocheters!

You might also like...

Post a comment to pattern DROPS 221-16

We would love to hear what you have to say about this pattern!

If you want to leave a question, please make sure you select the correct category in the form below, to speed up the answering process. Required fields are marked *.

Comments / Questions (13)

country flag Ruth wrote:

Sorry i meant to write that i messed up my sleeve increases, not decreases.

18.03.2024 - 00:07

country flag Ruth wrote:

Hi, i messed ip my sleeve decreases, and instead of decreasing on both sides of a first stitch of a row, i decreased on both sides of the last stitch of a row, i think this shifted my sleeve centre to the left, and now i have to do cast off’s, i really don’t want to frog my sleeve and start all over again. I try to figure out if i should cast off middle 7 stitches of A.5? Will this disturb the structure of my sleeve too much that it will be visible in your opinion?

18.03.2024 - 00:05

DROPS Design answered:

Dear Ruth, if you displaced the decreases then the center of the sleeve could be displaced one stitch. However this was displaced one stitch at most, so it shouldn't be too visible. Now, when you cast off for joining with the body you need to cast off in the center of the sleeve according to the pattern and not with your displaced center. It may look slightly twisted in your case but since that part is hardly visible then it shouldn't affect the rest of the pattern. Happy knitting!

18.03.2024 - 01:03

country flag Ruth wrote:

Hi, i have a question about the decreases of the front piece when working on a shoulder. I knit size M. I counted everything right, i have 29stch on each shoulder and 22stch in the middle.Later pattern says i have to decrease stitches in A2 and A3/A4, but fact of the matter i don’t have A2 anymore because i had to cast off 4 stch in total, which “ate” my A2. Nevertheless just by doing A3/A4 decrease i will be left with 21 stitch, so i wonder is this a mistake in pattern.

12.03.2024 - 23:41

DROPS Design answered:

Dear Ruth, in size. M just decrease the 4 sts in A.3/A.4 as there are no A.2 anymore, there are then 21 sts left: 29 sts for shoulder. - 2 sts - 2x1 st for neck - 4 sts in A.3/A.4 = 21. Happy knitting!

13.03.2024 - 08:38

country flag Michael Harish wrote:

Hi, I want to knit this pattern on 2 straight needles but having a problem working out how to divide stiches as back and front are different amounts. Seems not to be diveded equally as you have suggested in tutorial for adapting fro circular to straight needles.

08.01.2023 - 10:41

DROPS Design answered:

Dear Mrs Harish, you will have to check the pattern on the front piece regarding the dividing on the piece for your size then check the number of sts worked in each pattern/diagram for front and back piece. Happy knitting!

09.01.2023 - 10:01

country flag Frederike wrote:

Dit mooie truitje zou ik graag breien. Nu mag ik dus wol gaan kiezen. Dat vind ik soms zo lastig vanaf een scherm. Kan ik ook voor 2 draden kid silk gaan zodat de draden goed samen kleuren, of mist het dan wel echt wat ‘body’ voor de kabels enz? Of is dat gewoon ook weer net zo persoonlijk als een kleur kiezen? Soms als ik 2 kleuren combineer vanaf mijn scherm, en bestel is het heel mooi en kloppend, en soms echt niet.. vandaar mijn vraag. Vriendelijke groet, frederike

19.07.2022 - 12:28

DROPS Design answered:

Dag Frederike,

Je kan zeker voor 2 draden Kid-Silk kiezen. Het breiwerk wordt dan wat lichter omdat Kid-Silk lichter is. We hebben ook patronen voor damestruien met 2 draden Kid-Silk. Om de kabels mooi uit te laten komen is het mooi om lichte kleuren te kiezen die dicht bij elkaar liggen.

19.07.2022 - 19:05

country flag Sara Mereu wrote:

Salve ho un dubbio riguardo le diminuzioni nelle trecce. Si dovrebbero fare 2 diminuzioni in ogni A2, e 4 diminuzioni in ogni A3/A4, quindi: - A2 si lavora 3 volte= 2 diminuzioni x 3 -A3/A4 si lavorano 4 volte = 4 diminuzioni x 4 = 22 diminuzioni totali nelle trecce Nel modello però c'è scritto che le diminuzioni totali nelle trecce sono 10. E' corretto o ho capito male io? Grazie

06.11.2021 - 11:02

DROPS Design answered:

Buonasera Sara, le diminuzioni sulle trecce si lavorano sul davanti solo sulle 36 maglie indicate, che contengono 1 diagramma A.4, 1 diagramma A.2 e 1 diagramma A.3, per un totale di 10 diminuzioni. Buon lavoro!

10.11.2021 - 23:21

country flag Claire wrote:

Bonjour. Merci pour vos retours qui m’aident à continuer mon tricot. Dans les instructions pour les manches il écrit à la fin « jusqu’à ce que l’ouvrage mesure 52 cm dans toutes les tailles, rabattre ensuite 1 fois 3 mailles » dois-je rabattre que d’un seul côté ou des 2 cotés ? Si d’un seul côté, cela veut il donc dire que je dois rabattre le côté opposé pour l’autre manche ? Merci !

30.04.2021 - 21:38

DROPS Design answered:

Bonjour Claire, quand la manche mesure 52 cm, vous rabattez 3 mailles au début des 2 rangs suivants, autrement dit 3 mailles de chaque côté (= sur l'endroit et sur l'envers). Bon tricot!

03.05.2021 - 07:28

country flag Claire wrote:

Bonjour - merci de votre premier retour qui m’ont permis de finir le devant / dos. Je m’attaque maintenant aux manches. J’ai du mal à comprendre ce passage «  A.5 au-dessus des 13-13-15-15-17-17 premières mailles ». En effet A5 est sur 2 mailles (nombre pair) et la j’ai un nombre impair de mailles (dans mon cas 13). Je fais 6 fois A5 (12 mailles) - comment je tricote la treizième maille ? Merci d’avance !

17.04.2021 - 14:07

DROPS Design answered:

Bonjour Claire, tricotez la 13ème maille comme la 1ère de A.5, ainsi le motif est symétrique: il commence et se termine par la 1ère m du motif/diagramme. Bon tricot!

19.04.2021 - 08:00

country flag Claire wrote:

Dans les instructions relatifs au devant il n’est pas précisé comment sont fait les diminutions ni ou elles doivent être placés dans chaque A2, A3/A4. Quand il est indiqué diminuer en même temps 4 mailles dan chaque A3/A4, faut il comprendre qu’il faut tricoter 4 mailles en même temps ? Et si oui doit on le faire est-ce au milieu ? Sur les mailles 3,4,5 et 6 de A3/A4 ? Merci d’avance (ça serait dommage de se tromper après tout ce travail !)

12.04.2021 - 21:16

DROPS Design answered:

Bonjour Claire, on doit diminuer le nombre de mailles de chaque diagramme pour que les mailles rabattues ne soient pas plus larges que les torsades: A.2=4 m, on doit diminuer 2 m= on tricote 2x 2m ens à l'end (=il reste 2 m). A.3 et A.4 =8 m; on doit diminuer 4m= on tricote 4x 2 m ens à l'end (= il reste 4m). Bon tricot!

13.04.2021 - 07:29

country flag Laila wrote:

Erilainen palmikko - kiva

19.01.2021 - 23:36