
Popular categories
Looking for a yarn?


Comments / Questions (43)
![]() Annelies Rennert wrote:
Annelies Rennert wrote:
Hallo, bekomme das zick zack Muster nicht hin. Durch die zunahme verschiebt sich ja alles. Welche masche muss ich abheben u d welche stricke und welche drüber ziehen Danke
26.02.2023 - 20:46DROPS Design answered:
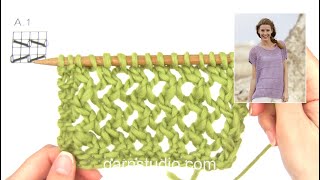
Liebe Frau Rennert, dieses Video zeigt ab ca 06:30 wie so ein Lochmuster gestrickt wird -beachten Sie nur hier, daß das Lochmuster wegen Raglanzunahmen nicht verschoben wird, so daß die 2 Maschen in A.1 immer übereinander gestrickt werden und abwechslungsweise in der Höhe zusammen rechts/mit 1 M abheben, 1 M re und die abgehobene M über die gestrickte M überziehen. Viel Spaß beim stricken!
27.02.2023 - 11:02
![]() Kroner wrote:
Kroner wrote:
Hallo wenn ich das Muster in runden stricke dann geht mir das Muster immer nicht aus.was mache ich falsch?
10.02.2023 - 10:38DROPS Design answered:
Liebe Frau Kroner, das Muster sollen Sie immer über die selben 2 Maschen in der Höhe wiederholen, dh nach der 1. Zunahmen für den Raglan stricken Sie diese Zunahme rechts, dann stricken Sie das Muster wie zuvor, nach der 2. Zunahmen, können Sie 1 Extra Muster nach den Raglanmaschen + 1 Extra Rapport vor den Raglanmaschen stricken. Viel Spaß beim stricken!
10.02.2023 - 13:16
![]() Wilma wrote:
Wilma wrote:
Even een vraagje, bij dit patroon moet je met dubbele draad brushed silk breien, klopt dan de naald keuze van 4,5 en 5,5 ? Bij een enkele draad is de naaldkeuze nl. Ook 4,5 en 5,5. Ik hoor het graag van je
04.02.2023 - 13:37DROPS Design answered:
Dag Wilma,
De aanbevolen naalddikte in het patroon is 5,5 en bij het garen staat 5 mm. Het patroon is een combinatie met Kid-Silk. Je zou inderdaad een dikkere naald verwachten, maar soms is dat niet het geval om een bepaald effect te bereiken. Het belangrijkste is dat jouw stekenverhouding overeenkomt met de stekenverhouding zoals aangegeven in het patronen. Dus het is aan te raden om een proeflapje te breien en, indien nodig, de naalddikte aan te passen.
05.02.2023 - 10:53
![]() Evelyne wrote:
Evelyne wrote:
Bonjour, les diagrammes portent à confusion. Une case blanche = m. end. Donc sur les rangs pairs (envers du travail) on tricote à l'endroit ? Ou bien "1 maille endroit" signifie sur l'endroit du travail, on voit une maille endroit, donc on tricote du jersey endroit, donc des mailles à l'envers sur les rangs pairs ? Sur la video mentionnée en réponse à Annelies vous tricotez bien à l'envers. D'autres diagrammes sont plus explicites.
31.01.2023 - 13:03DROPS Design answered:
Bonjour Evelyne, ce pull se tricote entièrement en rond, on n'a donc pas de rangs sur l'envers, et on va tricoter toutes les mailles du diagramme à l'endroit aux rangs impairs. Dans la vidéo, le point fantaisie est tricoté en rangs, donc on tricote à l'envers sur l'envers aux rangs pairs, mais ici on tricote en rond, donc tout à l'endroit comme l'indique le diagramme. Bon tricot!
31.01.2023 - 17:08
![]() Evelyne wrote:
Evelyne wrote:
Bonjour, les diagrammes portent à confusion. Une case blanche = m. end. Donc sur les rangs pairs (envers du travail) on tricote à l'endroit ? Ou bien "1 maille endroit" signifie sur l'endroit du travail, on voit une maille endroit, donc on tricote du jersey endroit, donc des mailles à l'envers sur les rangs pairs ? Sur la video mentionnée en réponse à Annelies vous tricotez bien à l'envers. D'autres diagrammes sont plus explicites.
31.01.2023 - 13:03
![]() Ines wrote:
Ines wrote:
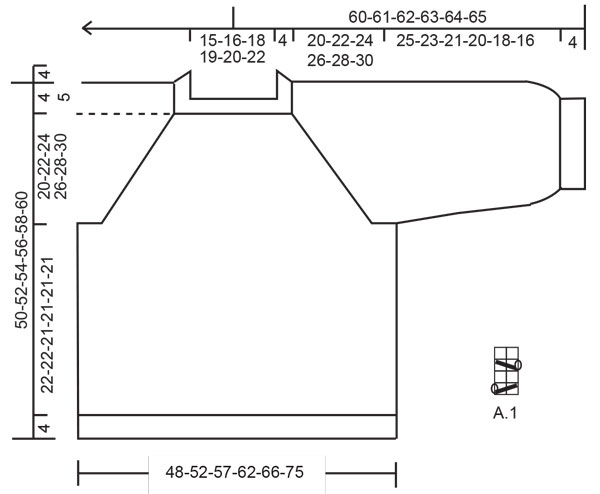
Bitte stellen Sie das Diagramm A 1 zu der Anleitung, Es fehlt! Danke
15.01.2023 - 09:11DROPS Design answered:
Liebe Ines, das Diagramm A.1 finden Sie neben der Maßskizze, unter dem Ärmel. Viel Spaß beim stricken!
16.01.2023 - 09:02
![]() Annelies Rennert wrote:
Annelies Rennert wrote:
Hallöchen, wie muss ich das Diagramm A1 stricken? Ist nicht beschrieben. Danke Annelies Rennert
30.10.2022 - 12:14DROPS Design answered:
Liebe Frau Rennert, A.1 finden Sie nehmen der Maßskizze, unter der Ärmel, es wird über 2 Maschen und 4 Reihen gestrickt. Viel Spaß beim stricken!
31.10.2022 - 09:04
![]() Annelies Rennert wrote:
Annelies Rennert wrote:
Hallöchen, das Diagramm ist schlecht erklärt. Sind es immer neue Reihen, zb. 2 MA RECHTS zusammen stricken, dann nächste Reunde 1 MA abheben, 1 MA stricken die abgehoben darüber ziehen, oder wie verstehe ich das? Fehlt bei dem Diagramm etwas. Mfg. Annelies Rennert
09.09.2022 - 17:56DROPS Design answered:
Liebe Frau Rennert, 1 Kästchen im Diagram = 1 Masche x 1 Runde so stricken ,Sie A.1: 1. R = (2 M rechts zs, 1 Umschlag), von (-) wiederholen; 2. + 4. R = alle Maschen rechts stricken; 3. R = (1 Umschlag, 1 Masche abheben, die nächste Masche rechts stricken und die abgehobene Masche über die gestrickte Masche ziehen) von (bis) wiederholen. Die 4 Reihen wiederholen. Dieses Video zeigt auch ab ca 06:40 (mit A.4 im Video) wie dieses Diagram (A.1 in dieser Anleitung) gestrickt wird. Viel Spaß beim stricken!
12.09.2022 - 09:09
![]() Claudia wrote:
Claudia wrote:
Hola tienen un diagrama de los puntos? No entiendo cuando debe seguirlo escrito . Me es más fácil a través de un diagrama . Gracias !
01.09.2022 - 19:53DROPS Design answered:
Hola Claudia, no tenemos un diagrama de puntos de todo el patrón, pero puedes encontrar el diagrama A.1 bajo la manga, en el esquema de medidas.
01.09.2022 - 23:40
![]() Gisela Bongart wrote:
Gisela Bongart wrote:
Ich verstehe den Satz im Bereich Passe nicht : "Nun Diagramm A1 in der ganzen Runde stricken, dabei je 1 M rechts beidseitig jedes der 4 Markierer stricken." Die Maschen zwischen den Markierern (2 x 12 + 2 x 22 M) sind je durch 2 teilbar. Laut A1 stricke ich ja immer 2 M zusammen. Zwischen den ersten beiden Markierern stricke ich also 6 x 2 M rechts zusammen plus 6 Umschläge. Wie soll ich dann vor und hinter den Markierern nur 1 M rechts stricken? Da ist doch 1 M zu wenig oder 1 zuviel?
22.03.2022 - 22:51DROPS Design answered:
Liebe Frau Bongart, nach der 1. Raglanzunahme stricken Sie die Umschläge rechts, nach der 2. Raglanzunahmen können Sie dann A.1 über diese 2 neuen Maschen stricken; so stricken Sie ein ganzes Muster A.1 nach jede 2 Zunahmen. Kann das Ihnen helfen?
23.03.2022 - 07:48
|
|||||||||||||
Cooling Creek#coolingcreeksweater |
|||||||||||||
 |
 |
||||||||||||
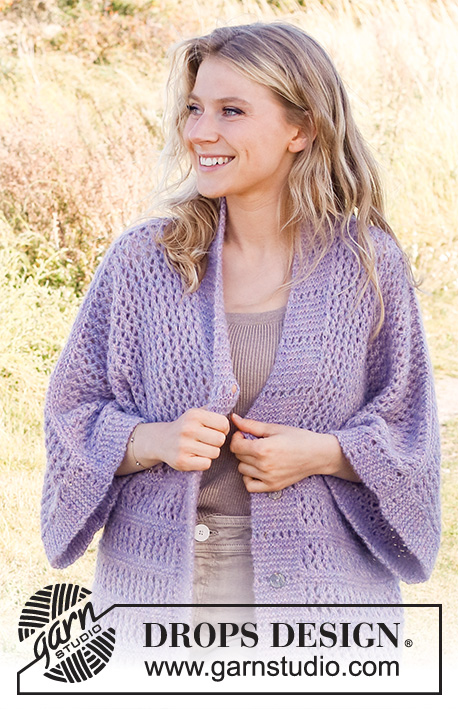
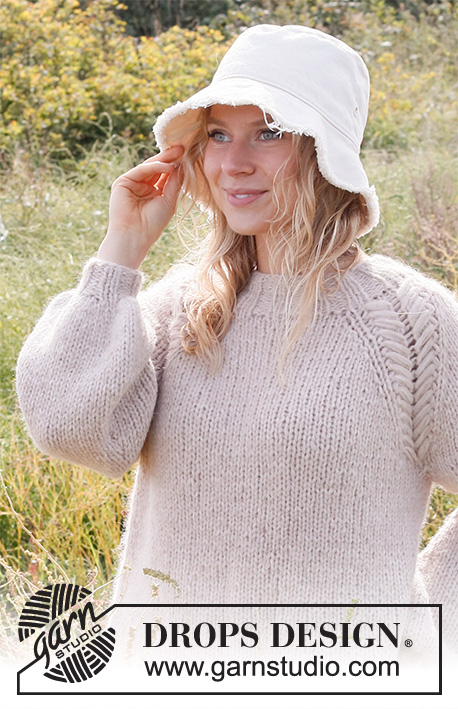
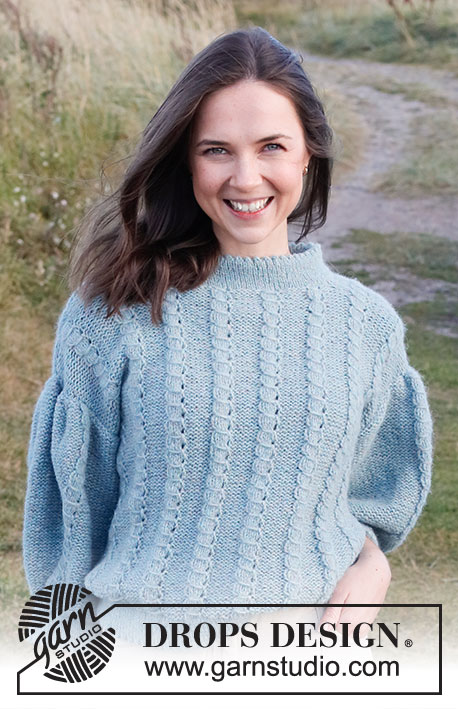
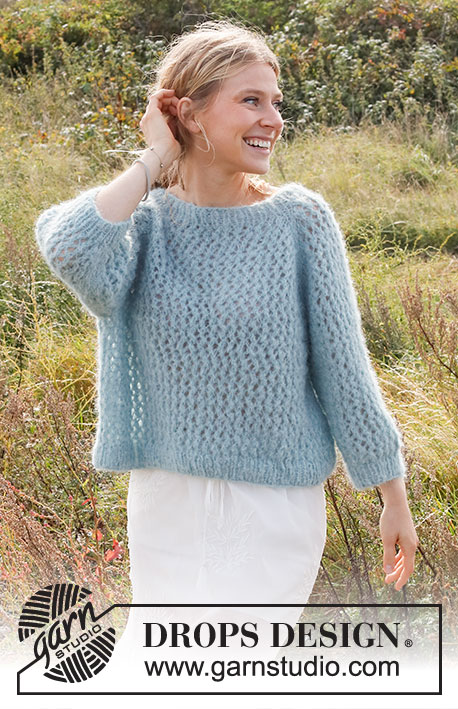
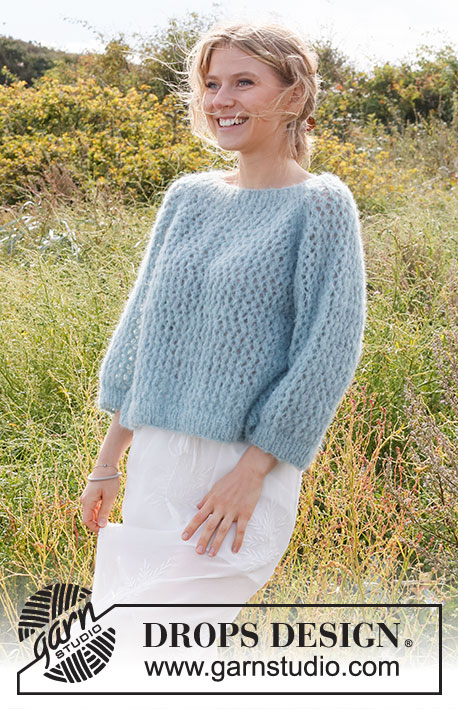
Knitted jumper in 2 strands DROPS Brushed Alpaca Silk or 1 strand DROPS Melody. The piece is worked top down with raglan, lace pattern and ¾-length sleeves. Sizes S - XXXL.
DROPS 222-27 |
|||||||||||||
|
------------------------------------------------------- EXPLANATIONS FOR THE PATTERN: ------------------------------------------------------- PATTERN: See diagram A.1. INCREASE/DECREASE TIP (evenly spaced): To work out how to increase/decrease evenly, count the total number of stitches on needle (e.g. 76 stitches), and divide by the number of increases/decreases to be made (e.g. 16) = 4.8. In this example, increase by making 1 yarn over after approx. each 5th stitch. On the next round work the yarn overs twisted to avoid holes. When decreasing, knit together approx. each 4th and 5th stitch. RAGLAN: Increase 1 stitch on each side of the marker thread as follows: Work until there is 1 stitch left before the marker thread, make 1 yarn over, knit 2 (marker thread sits between these 2 stitches), 1 yarn over. On the next round knit the yarn overs twisted to avoid holes. Then work the new stitches in stocking stitch until there are enough stitches to work another complete width of A.1. DECREASE TIP (for sleeves): Decrease 1 stitch on either side of the marker thread as follows: Work until there are 3 stitches left before the marker thread, knit 2 together, knit 2 (marker thread sits between these 2 stitches), slip 1 stitch as if to knit, knit 1 and pass the slipped stitch over the knitted stitch. CASTING-OFF TIP: To avoid the cast-off edge being tight you can cast off with a larger size needle. If the edge is still tight, make 1 yarn over after approx. each 6th stitch at the same time as casting off; the yarn overs are cast off as normal stitches. ------------------------------------------------------- START THE PIECE HERE: ------------------------------------------------------- JUMPER – SHORT OVERVIEW OF THE PIECE: The neck and yoke are worked in the round with circular needle, top down from the transition between back piece and right sleeve. The yoke is divided for body and sleeves and the body continued in the round with circular needle. The sleeves are worked in the round with short circular needle/double pointed needles. NECK: Cast on 68-72-76-80-82-88 stitches with short circular needle size 4.5 mm and 2 strands Brushed Alpaca Silk or 1 strand Melody. Knit 1 round. Then work rib (knit 1, purl 1) in the round for 4 cm. Knit 1 round where you increase 0-0-16-24-26-28 stitches evenly spaced – read INCREASE/DECREASE TIP = 68-72-92-104-108-116 stitches. Knit 1 round (yarn overs knitted twisted). Change to circular needle size 5.5 mm. Insert a marker here; the yoke is measured from this marker! YOKE: Now insert 4 other markers, without working the stitches. These markers should be a different colour from the marker on the neck: Insert a marker at the beginning of the round (= in transition between back piece and right sleeve), skip 12-12-16-16-16-16 stitches, insert a marker here (in transition between right sleeve and front piece), skip 22-24-30-36-38-42 stitches, insert a marker here (in transition between front piece and left sleeve), skip 12-12-16-16-16-16 stitches, insert a marker here (in transition between left sleeve and back piece), there are 22-24-30-36-38-42 stitches left after the last marker. Work A.1 on the whole round, with 1 knitted stitch on either side of all 4 markers (= 2 knitted stitches in each transition between body and sleeves). AT THE SAME TIME on the 2nd round (i.e. a knitted round) start to increase to RAGLAN – read description above. Increase like this every 2nd round a total of 16-18-18-18-20-24 times = 196-216-236-248-268-308 stitches. Continue working until the piece measures 20-22-24-26-28-30 cm from the marker on the neck. Now divide for the body and sleeves on the next round as follows: Place the first 44-48-52-52-56-64 stitches on a thread, cast on 8 stitches (= in side under the sleeve), work the next 54-60-66-72-78-90 stitches (= front piece), place the next 44-48-52-52-56-64 stitches on a thread, cast on 8 stitches (= in side under the sleeve), work the next 54-60-66-72-78-90 stitches (= back piece). Body and sleeves are finished separately. THE PIECE IS NOW MEASURED FROM HERE. BODY: = 124-136-148-160-172-196 stitches. Continue in the round with A.1. The pattern should match the pattern on the yoke. When the piece measures 22-22-21-21-21-21 cm from the division (adjusting so you finish after a knitted round), knit 1 round where you increase 18-20-22-24-26-30 stitches evenly spaced = 142-156-170-184-198-226 stitches. Change to circular needle size 4.5 mm and work rib (knit 1, purl 1) for 4 cm. Cast off with knit over knit and purl over purl – read CASTING-OFF TIP. The jumper measures approx. 50-52-54-56-58-60 cm from the shoulder down. SLEEVES: Place the 44-48-52-52-56-64 stitches from the thread on the one side of the piece on short circular needle/double pointed needles size 5.5 mm and knit up 1 stitch in each of the 8 stitches cast on under the sleeve = 52-56-60-60-64-72 stitches. Insert a marker thread in the middle of the 8 new stitches (= mid under sleeve). Start the round here and work pattern as follows: Knit 1, A.1 as before over the next 50-54-58-58-62-70 stitches, knit 1. Continue this pattern in the round. When the sleeve measures 2 cm, decrease 1 stitch on each side of the marker thread – read DECREASE TIP. Decrease like this every 2-2-2-1½-1½-1 cm a total of 4-4-4-4-4-6 times = 44-48-52-52-56-60 stitches. Continue working until the sleeve measures 25-23-21-20-18-16 cm from the division. Try the jumper on and work to desired length; there is 4 cm left to finished length. Knit 1 round, where you decrease 6-8-10-8-10-12 stitches evenly spaced = 38-40-42-44-46-48 stitches. Change to double pointed needles size 4.5 mm and work rib (knit 1, purl 1) for 4 cm. Cast off with knit over knit and purl over purl – remember CASTING-OFF TIP. The sleeve measures approx. 29-27-25-24-22-20 cm from the division. Work the other sleeve in the same way . |
|||||||||||||
Diagram explanations |
|||||||||||||
|
|||||||||||||
 |
|||||||||||||
Have you finished this pattern?Tag your pictures with #dropspattern #coolingcreeksweater or submit them to the #dropsfan gallery. Do you need help with this pattern?You'll find 28 tutorial videos, a Comments/Questions area and more by visiting the pattern on garnstudio.com. © 1982-2026 DROPS Design A/S. We reserve all rights. This document, including all its sub-sections, has copyrights. Read more about what you can do with our patterns at the bottom of each pattern on our site. |
|||||||||||||


With over 40 years in knitting and crochet design, DROPS Design offers one of the most extensive collections of free patterns on the internet - translated to 17 languages. As of today we count 325 catalogues and 12298 patterns translated into English (UK/cm).
We work hard to bring you the best knitting and crochet have to offer, inspiration and advice as well as great quality yarns at incredible prices! Would you like to use our patterns for other than personal use? You can read what you are allowed to do in the Copyright text at the bottom of all our patterns. Happy crafting!
Post a comment to pattern DROPS 222-27
We would love to hear what you have to say about this pattern!
If you want to leave a question, please make sure you select the correct category in the form below, to speed up the answering process. Required fields are marked *.