
Popular categories
Looking for a yarn?


Comments / Questions (53)
![]() Abigail wrote:
Abigail wrote:
Do you need to block this after finishing?
02.04.2026 - 18:29DROPS Design answered:
Hi Abigail, If your garment looks a little irregular, this can be corrected by blocking. Otherwise it is not necessary. Happy Easter! Regards, Drops Team.
03.04.2026 - 07:03
![]() Bethan wrote:
Bethan wrote:
The correction describes doing eyelets to elevate the back at 1.5cm of the body. The directions say to measure the body from where front and back are joined and the correction has eyelets across the entire front and back so I don't understand the purpose of adding eyelets. Is it just decorative? It is not just on the back if I am reading correctly
23.03.2026 - 23:05DROPS Design answered:
Hi Bethan, The row of eyelet holes is to thread the ties through at the waist when the romper suit is finished and the holes are on both the front and back piece. The elevation is a number of extra rows at the back, to give the body a better shape, Regards, Drops Team.
24.03.2026 - 06:15
![]() Connie Rossing wrote:
Connie Rossing wrote:
I oppskriften står det at jeg til bakstykke skal legge opp 16 masker og så øke med 2 masker på slutten av hver pinne totalt 9 ganger. 9x2+16 blir jo 34 ikke 52. Hvor kommer de resterende maskene inn?
09.09.2025 - 16:57DROPS Design answered:
Hej Connie. Du ska lägga upp 2 maskor 9 gånger i varje sida. 16+(9x2)+(9x2)=52 maskor. Mvh DROPS Design
10.09.2025 - 10:47
![]() Maria wrote:
Maria wrote:
Enter første forhøjning på bagstykket, skal man skifte til pind 3, og strikke en omgang som før. Men strikkes der da endnu en omgang med forhøjning?
14.06.2025 - 21:05DROPS Design answered:
Hej Maria, du strikker forhøjningen først, skifter til pind 3 og fortsætter rundt :)
17.06.2025 - 15:11
![]() Carolin wrote:
Carolin wrote:
Hallo! Eine Frage zum Rückenteil. Dort steht: "GLEICHZEITIG je 2 neue Maschen am Ende jeder Reihe insgesamt je 9-9-9-10 x beidseitig anschlagen." Das verstehe ich nicht. Sollen in jeder Hin- und Rückreihe am Anfang und am Ende jeweils zwei Maschen zugenommen werden? Also nach der ersten bzw. vor der letzten Masche? (Rechts- bzw. linksgeneigt.) Oder sollte man nicht gleich mehr Maschen anschlagen?
12.02.2025 - 10:39
![]() Helle Morre Skovborg wrote:
Helle Morre Skovborg wrote:
Hvorfor kan man ikke udskrive opskriften
01.02.2025 - 08:05
![]() Grace wrote:
Grace wrote:
Is there a matching cardigan pattern for this romper?
25.11.2024 - 21:38DROPS Design answered:
Hi Grace, We do not have a cardigan for this particular pattern, but if you click on Free Patterns at the top of the page, then Baby and Cardigans, you could use one of the other patterns with the same yarn as you have used for the romper. Good luck and happy knitting!
26.11.2024 - 06:56
![]() Hannah wrote:
Hannah wrote:
Klopt het dat nadat je de gaatjes aan de voorkant gebreid hebt en je verder moet aan de achterkant dat er in de beschrijving voor de achterkant 1 omslag mist ? Nu staat er 1 recht 1 averecht en 2 samen breien maar dan minder je volgens mij teveel steken voor het eind aantal. En je kan dan het touwtje er niet door heen reigen als er aan de achterkant geen gaatjes zitten.
02.11.2024 - 18:22DROPS Design answered:
Dag Hannah,
Vlak voordat je 2 steken samen breit maak je een omslag. Deze omslag wordt als een steek gebreid op de volgende naald, waardoor je weer hetzelfde aantal steken hebt.
03.11.2024 - 11:41
![]() Diane wrote:
Diane wrote:
Hallo! Ich bin beim Rumpfteil. Dort steht nach 17cm ab dem Anschlagrand beginnt die Erhöhung. Wo genau muss ich die 17cm messen? Ab dem Rand vom Vorderteil? Vom Hinterteil? Oder gemessen von der Seite vom A1 ?
07.09.2024 - 15:09DROPS Design answered:
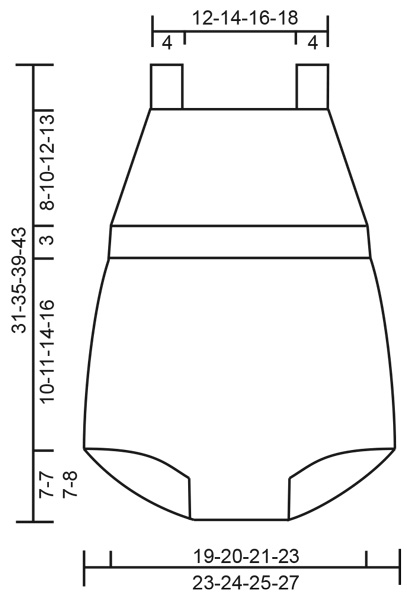
Liebe Diane, die Arbeit misst 10 cm ab den Markierern und ca. 17 cm ab dem Anschlagrand flach gemessen - siehe auch Maßskizze. Viel Spaß beim Stricken!
09.09.2024 - 09:37
![]() Sofie Andersen wrote:
Sofie Andersen wrote:
Hei. Jeg forstår ikke bol avsnitt 3: skift til pinne nr 3.. Samtidig som det økes 1 m mellom hver A.1=86 masker. Skjønner ikke hvordan eller hvorfor? Omgangen starter nå midt mellom A.1 sto det i forje avsnitt etter forhøyning bak, der jeg brukte german short rows som metode. Fortsett med A.2 over de første 8 maskene, strikk vrbord over de neste 27 maskene. Jeg har 26 m mellom mønsterraporten. Har fulgt oppskriften rett fram til dette. Hva skal jeg gjøre?
27.02.2024 - 23:30DROPS Design answered:
Hei Sofie. Du strikker A.1 i hver side og glattstrikk mellom A.1 (foran og bak). Bytt til rundpinne 3 og strikk 1 omgang der du øker 1 maske mellom hver A.1, altså øk 1 maske foran (der det strikkes glattstrikk) og 1 maske bak (der det strikkes glattstrikk). Du har nå det maskeantallet det trengs for at vrangborden går opp/stemme med 1 rett/1 vrang. Fortsett med A.2 over de første 8 maskene, strikk vrbord over de neste 27 maskene (du har nå 27 masker siden det er økt med 1 maske). mvh DROPS Design
04.03.2024 - 13:05
|
|||||||||||||
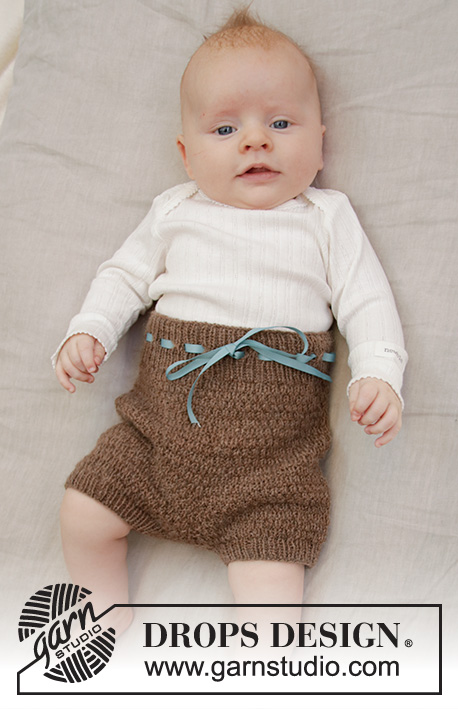
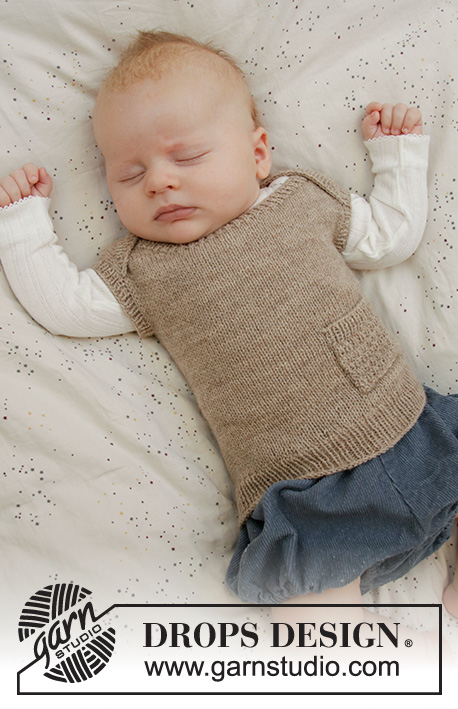
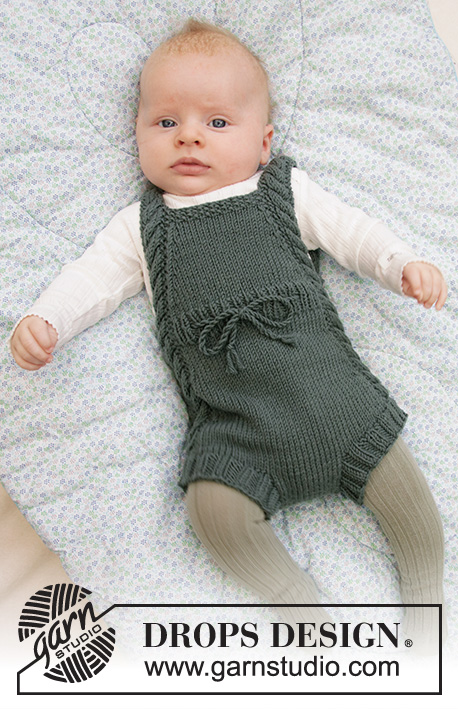
Ready to Play Romper#readytoplayromper |
|||||||||||||
 |
 |
||||||||||||
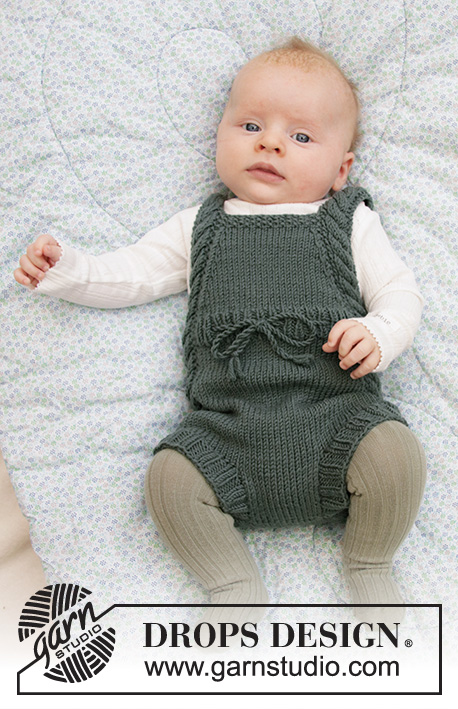
Knitted play suit for baby with cables and moss stitch in DROPS Merino Extra Fine. Size 1 - 24 months.
DROPS Baby 33-21 |
|||||||||||||
|
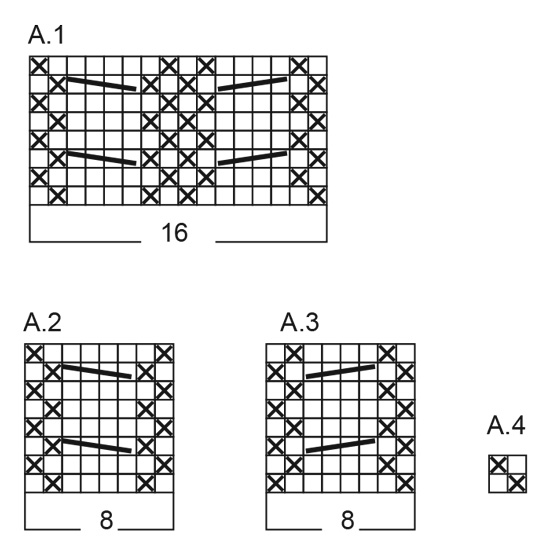
---------------------------------------------------------- EXPLANATION FOR THE PATTERN: ---------------------------------------------------------- GARTER STITCH (worked in the round): 1 ridge = 2 rounds. Knit 1 round and purl 1 round. GARTER STITCH (back and forth): 1 ridge = knit 2 rows. PATTERN: See diagrams A.1 to A.4 DECREASE TIP: Work until 2 stitches remain before A.1, decrease as follows: Knit 2 together, work stitches in A.1, slip 1 stitch knitwise, knit 1, pass slipped stitch over. ---------------------------------------------------------- START THE PIECE HERE: ---------------------------------------------------------- PLAY SUIT – SHORT OVERVIEW OF THE PIECE: Piece is worked back and forth in 2 parts, bottom up to after leg opening. Then work piece in the round before dividing at the waist, and finishing front piece back and forth on needle. BACK PIECE: Cast on 14-16-18-20 stitches on circular needle size 3.5 mm with Merino Extra Fine and work in stocking stitch back and forth. AT THE SAME TIME cast on 2 new stitches at the end of every row 9-9-9-10 times in total in each side = 50-52-54-60 stitches on needle and piece measures approx. 6-6-6-7 cm. Put piece aside and work the front piece. FRONT PIECE: Cast on 14-16-18-20 stitches on circular needle size 3.5 mm with Merino Extra Fine and work in stocking stitch back and forth for 5-5-5-6 cm. SIZE 1/3 months - 6/9 months - 12/18 months: Now cast on 6 new stitches at the end of every row 3 times in total each side. SIZE 24 months: Cast on 6 new stitches in each side at the end of every row 2 times, then 8 new stitches in each side 1 time = 50-52-54-60 stitches on needle and piece measures approx. 7-7-7-8 cm. BODY: Slip stitches from front and back piece on to same circular needle = 100-104-108-120 stitches on needle. Insert 1 marker in each side (= 50-52-54-60 stitches between markers) - NOW MEASURE PIECE FROM HERE. Continue to work - beginning of the round should be 8 stitches before first marker thread. Work A.1 (= 16 stitches), stocking stitch over the next 34-36-38-44 stitches in stocking stitch, A.1 (= 16 stitches), stocking stitch over the next 34-36-38-44 stitches in stocking stitch. Marker threads are in the middle of A.1 in each side. Continue this pattern in the round. When piece measures 2-3-5-7 cm, decrease 1 stitch on each side of both A.1 - READ DECREASE TIP (= 4 stitches decreased). Repeat decrease every 2 cm 4 times in total = 84-88-92-104 stitches on needle. When piece measures 10-11-14-16 cm from markers (piece measures approx. 17-18-21-24 cm from cast-on edge) work an elevation at the back as follows – NOTE: To avoid holes at every turn pick up loop between 2 stitches and knit twisted together with next stitch on needle: work knit over knit and A.1 over A.1 as before over the first 58-60-62-68 stitches, i.e. until after the second repetition of A.1 (= front piece), knit until 5 stitches remain before A.1 at the beginning of round, turn and purl back until 5 stitches remain before A.1 in the other side, turn piece. Knit until 10 stitches remain before A.1, turn piece and purl until 10 stitches remain before A.1 in the other side. Turn piece and knit until the middle of the first A.1. Switch to circular needle size 3 mm and work 1 round as before over all stitches, AT THE SAME TIME increase 1 stitch between every A.1 = 86-90-94-106 stitches. Work next round as follows: Continue with A.2 over the first 8 stitches (= make sure to begin on same row that should have been worked in A.1), work rib purl 1/knit 1 over the next 27-29-31-37 stitches, work A.3 over the next 8 stitches (= make sure to begin on same row that should have been worked in A.1), work rib purl 1/knit 1 over the next 43-45-47-53 stitches. When piece measures 1 ½ cm, work a row eyelet holes as follows: Work as before over the first 8 stitches, purl 1, * knit 1, purl 1, 1 yarn over, knit 2 together*, repeat from *-* over the next 24-28-28-36 stitches, work 10-8-10-8 stitches as before, purl 1, * knit 1, purl 1, 1 yarn over, knit 2 together*, repeat from *-* over the next 40-44-44-52 stitches, work 2-0-2-0 stitches as before. Then continue pattern and rib as before, until 1 round remains before rib measures 3 cm. Work next round as follows: Work over the first 43-45-47-53 stitches (= front piece), LOOSELY cast off the next 43-45-47-53 stitches with knit over knit and purl over purl (= back piece). FRONT PIECE: Insert 1 marker, NOW MEASURE PIECE FROM HERE! Switch to circular needle size 3.5 mm and work first row from right side as follows: Continue A.2 over the first 8 stitches on needle, 27-29-31-37 stitches in stocking stitch, A.3 over the last 8 stitches on needle. Continue like this back and forth. AT THE SAME TIME when piece measures 1-0-0-1 cm, decrease 1 stitch in each side - READ DECREASE TIP. Repeat decrease every 2nd-4th-6th-6th needle 7-7-6-6 times in total = 29-31-35-41 stitches remain on needle. When piece measures 7-9-11-12 cm from marker - adjust so that next row is from right side), work 6 rows with A.4 over stitches between A.2 and A.3 in each side. Work next row as follows from right side: work 8 stitches (= A.2) and slip these stitches on 1 stitch holder for shoulder strap, cast off the next 13-15-19-25 stitches and work the last 8 stitches (= A.3, shoulder strap). SHOULDER STRAP: Continue in A.3 back and forth until shoulder strap measures approx. 18 to 24 cm (or desired length). Cast off. Continue in A.2 back and forth until the other shoulder strap measures approx. 18 to 24 cm (or desired length). Cast off. ASSEMBLY: RIB EDGE: Pick up from right side approx. 50 to 58 stitches along one opening for leg on circular needle size 3 mm with Merino Extra Fine. Purl 1 row from wrong side AT THE SAME TIME increase evenly to 58-62-66-70 stitches. Then work rib = knit 2/purl 2 back and forth with 1 edge stitch in garter stitch in each side. When edge measures 2-4 cm, loosely cast off with knit over knit and purl over purl. Repeat along the other leg. Sew opening between legs inside 1 edge stitch - i.e. sew together one rib edge, then sew seam between leg openings and finally the other rib edge. Fasten a button at the bottom on each shoulder strap. Use holes in eyelet row on rib to button. TIE: Cut 2 lengths Merino Extra Fine yarn of approx. 3 metres. Twine the strands tog until they resist, fold the string double so that it twines again. Make a knot at each end. Begin mid front and thread tie up and down through eyelet row on rib in waist. |
|||||||||||||
Diagram explanations |
|||||||||||||
|
|||||||||||||
 |
|||||||||||||
 |
|||||||||||||
Have you finished this pattern?Tag your pictures with #dropspattern #readytoplayromper or submit them to the #dropsfan gallery. Do you need help with this pattern?You'll find 24 tutorial videos, a Comments/Questions area and more by visiting the pattern on garnstudio.com. © 1982-2026 DROPS Design A/S. We reserve all rights. This document, including all its sub-sections, has copyrights. Read more about what you can do with our patterns at the bottom of each pattern on our site. |
|||||||||||||


With over 40 years in knitting and crochet design, DROPS Design offers one of the most extensive collections of free patterns on the internet - translated to 17 languages. As of today we count 324 catalogues and 12290 patterns translated into English (UK/cm). 12290
We work hard to bring you the best knitting and crochet have to offer, inspiration and advice as well as great quality yarns at incredible prices! Would you like to use our patterns for other than personal use? You can read what you are allowed to do in the Copyright text at the bottom of all our patterns. Happy crafting!
Post a comment to pattern DROPS Baby 33-21
We would love to hear what you have to say about this pattern!
If you want to leave a question, please make sure you select the correct category in the form below, to speed up the answering process. Required fields are marked *.