
Popular categories
Looking for a yarn?


Comments / Questions (93)
![]() Sandrine wrote:
Sandrine wrote:
Bonjour, faut il couper le fil à chaque changement de couleur ou les faire suivre le long du tricot ? Merci
26.04.2025 - 17:50DROPS Design answered:
Bonjour Sandrine, vous pouvez faire suivre les fils au fur et à mesure et/ou les couper si les rayures sont trop hautes, cf vidéo. Bon tricot!
28.04.2025 - 08:05
![]() Sophie wrote:
Sophie wrote:
Bonjour, Je souhaite faire ce pull d'une seule couleur. Combien de pelotes dois-je prévoir? Merci d'avance
06.04.2025 - 14:42DROPS Design answered:
Bonjour Sophie, comme ce modèle a été tricoté avec des rayures, nous n'avons que les quantités nécessaires pour chaque couleur - et nous n'avons plus ce modèle. Vous pouvez additionner la totalité des couleurs, vous en aurez probablement besoin d'un peu moins - vous pouvez vous inspirer d'un modèle similaire en Melody (pensez à bien vérifier la tension et les mesures correspondantes) - votre magasin pourra également vous aider si besoin, même par mail ou téléphone. Bon tricot!
07.04.2025 - 08:45
![]() Marie wrote:
Marie wrote:
Hey, Wenn ich jeweils nur eine Runde einer Farbe stricke und dann zu einer neuen Farbe wechsele entsteht ein „Loch“ bzw. eine Spalte am Rundennanfang. Wie kann ich das vermeiden? Gibt es hierzu ein Video? Vielen Dank! :)
15.03.2025 - 21:15DROPS Design answered:
Liebe Marie, in diesem Video zeigen wir, wie man Streifen in Runden ohne Stufe stricken kann Viel Spaß beim Stricken!
17.03.2025 - 08:29
![]() Petra wrote:
Petra wrote:
Hallo Ist das Modell auch zum Stricken für Anfänger geeignet? Woran erkenne ich auf der HP den Schweregrad der Modelle?
26.02.2025 - 15:38DROPS Design answered:
Liebe Petra, lesen Sie die ganze Anleitung, sollten Sie Fragen haben, dann können Sie sie gerne hier stellen, wir werden uns dann bemühen, Ihnen zu helfen. Viel Spaß beim Stricken!
26.02.2025 - 18:01
![]() Patricia wrote:
Patricia wrote:
Bonjour, je ne comprends pas : placer les 12-14-14-16-16-18 mailles centrales en attente sur un fil pour l'encolure et terminer chaque épaule séparément. Rabattre ensuite les mailles tous les rangs à partir de l'encolure: 1 fois 2 mailles et 2 fois 1 maille = 19-20-23-24-27-30 mailles pour l'épaule. On rabat les mailles centrales, après avoir tricoté les épaules et comment? Je fais la taille M. merci
03.12.2024 - 23:55DROPS Design answered:
Bonjour Patricia, pour que l'encolure devant soit suffisamment souple, on ne rabat pas les mailles centrales pour l'encolure mais on les met en attente, et on termine chaque épaule séparément en rabattant 1 x 2 m et 2 x 1 m côté encolure (début de rang sur l'endroit pour le devant droit/début de rang sur l'envers pour le devant gauche). Bon tricot!
04.12.2024 - 07:46
![]() Monica Kugelberg wrote:
Monica Kugelberg wrote:
Vore bra om diagrammen vore lite större. Inte lätt att se vilken färg som markeringar avser.
02.12.2024 - 15:50
![]() Lucia Bandirali wrote:
Lucia Bandirali wrote:
Se volessi farlo di 1 solo colore, tg xs, quanto filato servirebbe, grazie
02.12.2024 - 15:33DROPS Design answered:
Buonasera Lucia, per un'assistenza così personalizzata, può rivolgersi al suo rivenditore DROPS di fiducia. Buon lavoro!
03.12.2024 - 22:42
![]() Patricia wrote:
Patricia wrote:
Bonjour, que signifie "Continuer en rabattant 1 maille au rang suivant à partir de l'encolure = 19-20-23-24-27-30 mailles. Continuer en jersey jusqu'à ce que l'ouvrage mesure 54-56-58-60-62-64 cm (= 18-19-20-21-22-23 cm depuis la maille rabattue de chaque côté pour les emmanchures), rabattre. " Comment passe t'on de 23 à 20 mailles pour la taille M par exemple? je ne comprends ça ni "de chaque côté" Merci
02.12.2024 - 01:24DROPS Design answered:
Bonjour Patricia, vous avez 68 m pour le dos en taille M, vous rabattez les 20 m centrales = vous avez 24 mailles pour chaque épaule. Au début du rang suivant à partir de l'encolure (en début de rang sur l'endroit pour l'épaule gauche/ en début de rang sur l'envers pour l'épaule droite), vous rabattez 1 maille = il reste 23 mailles. Vous tricotez jusqu'à ce que l'ouvrage mesure 58 cm = soit 20 cm depuis les mailles rabattues pour les emmanchures (à 38 cm). Bon tricot!
02.12.2024 - 10:49
![]() Ute Kruth wrote:
Ute Kruth wrote:
Kann ich die Wolle für dieses Modell bei Ihnrn bestellen?
06.11.2024 - 13:54DROPS Design answered:
Liebe Frau Kruth, sicher, schauen Sie mal bei der Farbkarte und klicken Sie auf "Bestellen" so sehen Sie die Liste von den Läden, die Melody online verkaufen, dann wählen Sie Ihr Laden und klicken auf "Bestellen" rechts von der Name. Viel Spaß beim Stricken!
06.11.2024 - 16:08
![]() Anna Wiberg wrote:
Anna Wiberg wrote:
Hej! Använder jag alltså rundstickor nr 9, 40 cm till ärmar och 60 cm till kroppen? Strumpstickor nr 8 till resår ärmar? Vad använder jag till resår halsringning? Strumpstickor nr 8 eller rundsticka nr 8? Vilken längd i så fall på rundsticka? Vad använder jag till resår nederkant? Rundsticka nr 8?vilken längd? Mvh Anna
08.10.2024 - 21:41DROPS Design answered:
Hej Anna. Du använder kort rundsticka och strumpstickor till ärmar och halsringning( strumpstickor när rundstickan blir för lång). Lång rundsticka används till kroppen. Mvh DROPS Design
14.10.2024 - 11:13
|
|||||||||||||||||||
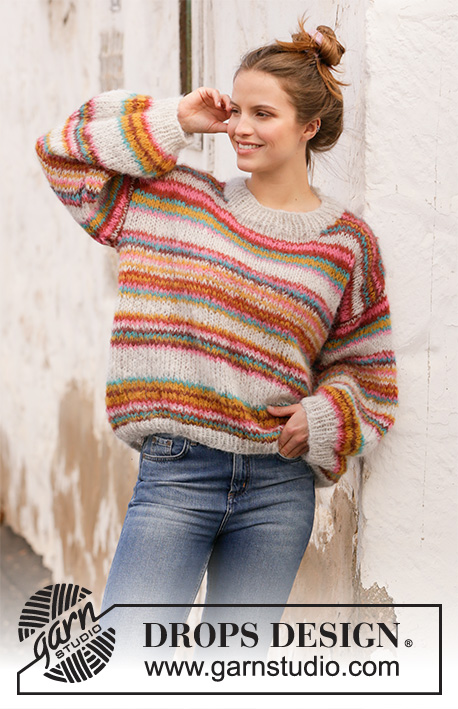
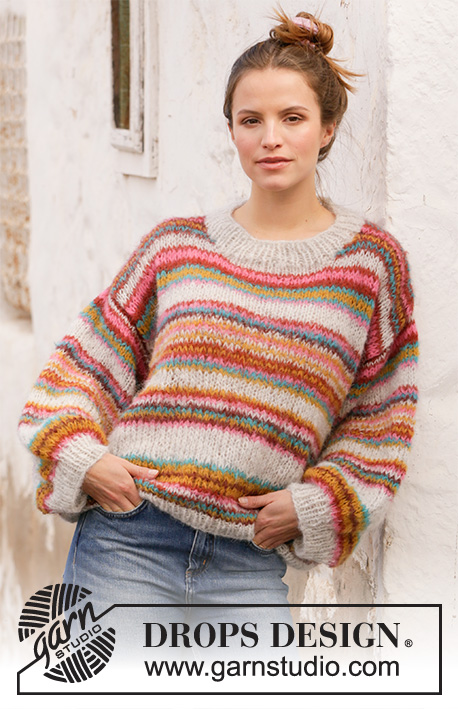
Moroccan Market Muse#moroccanmarketmusesweater |
|||||||||||||||||||
 |
 |
||||||||||||||||||
Knitted jumper with stripes in DROPS Melody. Sizes XS - XXL.
DROPS 212-20 |
|||||||||||||||||||
|
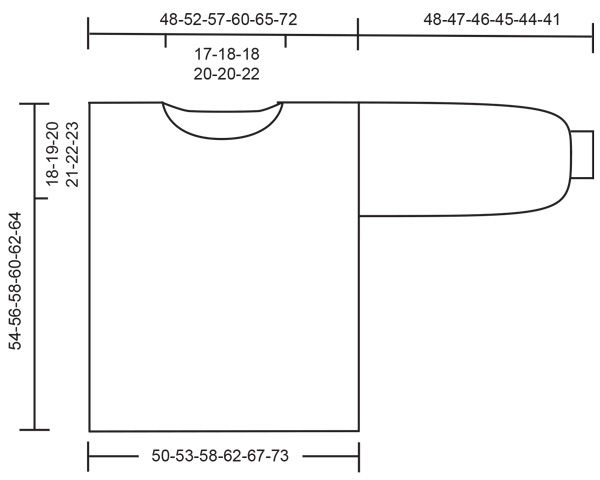
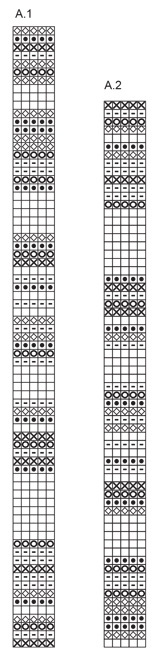
------------------------------------------------------- EXPLANATIONS FOR THE PATTERN: ------------------------------------------------------- PATTERN: See diagrams A.1 and A.2. Repeat A.1 in height to finished length. INCREASE TIP: Increase by making 1 yarn over on each side of the marker thread + 1 stitch on each side. On the next round work the yarn overs twisted to avoid holes. DECREASE TIP (evenly spaced): To work out how to increase evenly, count the total number of stitches on the needle (e.g. 50 stitches) and divide by the number of increases to be made (e.g. 20) = 2.5. In this example, knit alternately each 1st and 2nd and each 2nd and 3rd stitch together. ------------------------------------------------------- START THE PIECE HERE: ------------------------------------------------------- JUMPER – SHORT OVERVIEW OF THE PIECE: The body is worked in the round with circular needle, bottom up. The piece is divided for the sleeves and finished back and forth on the needle. The sleeves are worked in the round with double pointed needles/short circular needle, top down. BODY: Cast on 120-128-140-148-160-176 stitches with circular needle size 8 mm and pearl grey. Knit 1 round, then work rib as follows: * knit 1 / purl 1 *, repeat from *-*. Work rib for 4 cm, then change to circular needle size 9 mm. Continue with stocking stitch and stripes according to A.1 to finished length. REMEMBER THE KNITTING TENSION! When the piece measures 36-37-38-39-40-41 cm, work the next round as follows: Cast off 1 stitch, work 58-62-68-72-78-86 stitches, cast off 2 stitches, work 58-62-68-72-78-86 stitches and cast off 1 stitch. Each piece is now finished separately, back and forth on the needle. Place the first 58-62-68-72-78-86 stitches on a thread and continue working the last 58-62-68-72-78-86 stitches for the back piece. BACK PIECE: = 58-62-68-72-78-86 stitches. Continue with stocking stitch and stripes. When the piece measures 52-54-56-58-60-62 cm, cast off the middle 18-20-20-22-22-24 stitches for the neck and each shoulder is finished separately. Continue by casting off 1 stitch on the next row from the neck = 19-20-23-24-27-30 stitches. Continue with stocking stitch until the piece measures 54-56-58-60-62-64 cm (= 18-19-20-21-22-23 cm from where you cast off 1 stitch on each side for the armhole), cast off. Work the other shoulder in the same way. FRONT PIECE: = 58-62-68-72-78-86 stitches. Continue with stocking stitch and stripes. When the piece measures 47-49-51-53-55-57 cm, place the middle 12-14-14-16-16-18 stitches on a thread for the neck and each shoulder is finished separately. Then cast off stitches on each row from the neck as follows: Cast off 2 stitches 1 time and 1 stitch 2 times = 19-20-23-24-27-30 stitches on the shoulder. Continue with stocking stitch until the piece measures 54-56-58-60-62-64 cm (= 18-19-20-21-22-23 cm from where you cast off 1 stitch on each side for the armholes), cast off. Work the other shoulder in the same way. ASSEMBLY: Sew the shoulder seams. SLEEVES: The sleeves are worked with double pointed needles/short circular needle, top down. Pick up 44-46-48-50-52-54 stitches around the armhole in the outermost loop of the outermost stitches with circular needle size 9 mm and brick –start where the piece was divided for front and back pieces and pick up 22-23-24-25-26-27 stitches as far as the shoulder seam, pick up 22-23-24-25-26-27 stitches from the shoulder seam and down to the division again. Insert 1 marker thread mid under the sleeve. Work stocking stitch and A.2. When the piece measures 30-29-28-27-26-23 cm, increase 1 stitch on each side of the marker thread – read INCREASE TIP. Increase like this every 5 cm a total of 3 times in all sizes = 50-52-54-56-58-60 stitches. Continue with stocking stitch and A.2 until the piece measures 44-43-42-41-40-37 cm. Now finish the sleeve with pearl grey. Knit 1 round where you decrease 20-22-20-22-20-22 stitches evenly spaced = 30-30-34-34-38-38 stitches. Change to double pointed needles size 8 mm and work rib (knit 1 / purl 1) for 4 cm. Cast off with knit over knit and purl over purl when the sleeve measures 48-47-46-45-44-41 cm. Work the other sleeve in the same way. NECK: Start from the right side with pearl grey and short circular needle size 8 mm. Knit up 60-80 stitches (including the stitches on the thread – the number should be divisible by 2). Work rib (knit 1 / purl 1) for 4 cm. Cast off with knit over knit and purl over purl. |
|||||||||||||||||||
Diagram explanations |
|||||||||||||||||||
|
|||||||||||||||||||
 |
|||||||||||||||||||
 |
|||||||||||||||||||
Have you finished this pattern?Tag your pictures with #dropspattern #moroccanmarketmusesweater or submit them to the #dropsfan gallery. Do you need help with this pattern?You'll find 24 tutorial videos, a Comments/Questions area and more by visiting the pattern on garnstudio.com. © 1982-2026 DROPS Design A/S. We reserve all rights. This document, including all its sub-sections, has copyrights. Read more about what you can do with our patterns at the bottom of each pattern on our site. |
|||||||||||||||||||


With over 40 years in knitting and crochet design, DROPS Design offers one of the most extensive collections of free patterns on the internet - translated to 17 languages. As of today we count 325 catalogues and 12298 patterns translated into English (UK/cm). 12298
We work hard to bring you the best knitting and crochet have to offer, inspiration and advice as well as great quality yarns at incredible prices! Would you like to use our patterns for other than personal use? You can read what you are allowed to do in the Copyright text at the bottom of all our patterns. Happy crafting!
Post a comment to pattern DROPS 212-20
We would love to hear what you have to say about this pattern!
If you want to leave a question, please make sure you select the correct category in the form below, to speed up the answering process. Required fields are marked *.