
Popular categories
Looking for a yarn?


Comments / Questions (37)
![]() Barbara Peterson wrote:
Barbara Peterson wrote:
My question is not how much yardage is in each skein but the total amount of yardage it takes to complete the pattern? I have the yarn to make it, just need to know if I have enough before starting the project.
22.01.2023 - 08:38DROPS Design answered:
Hello again, Barbara, Depending on the size you are working, you need the number of skeins stated in the pattern. This will give you the total yardage when you multiply the number of skeins by 55. Happy knitting!
22.01.2023 - 12:31
![]() Barbara Peterson wrote:
Barbara Peterson wrote:
I don't see the yardage required for this pattern. I must be missing something?
21.01.2023 - 23:05DROPS Design answered:
Hi Barbara, Drops Snow has approx. 55 yards per skein. Happy knitting!
22.01.2023 - 08:25
![]() Janne wrote:
Janne wrote:
Hello, I have been alternating the instructions between English and Estonian. There is a mistake in the Estonian version doesn't specify when stitches for the sleeve should be cast off. Both instructions don't clarify my question- states to cast on stitches, start with moss stitches and then it directs to follow the pattern. But when the pattern directs to cast on sleeve stitches it states to continue 5 stitches in moss stitch, which wasn't mentioned before. Could you please clarify?
01.09.2021 - 00:20DROPS Design answered:
Dear Janne, the stitches for the sleeves are cast on when the piece measures 21-23-25-26 cm. From here on, the farthest 5 stitches on each side are worked in moss stitch for the sleeve edges. When the piece measures 36-40-44-46 cm, cast off stitches for the sleeves and continue working only the pattern. Happy knitting!
01.09.2021 - 13:11
![]() Marie Lefèvre wrote:
Marie Lefèvre wrote:
Bonjour, merci bcp pr ce très joli modèle. Je suis arrivée aux augmentations 1, mais je ne comprends pas à quel moment je peux ajouter un nouveau motif ajouré. J'ai déjà 105m en aillant rabattu 2 fois les 4mailles pr de riz. Pourriez-vous m'aider svp ? Merci d'avance pour votre bonne attention
19.08.2021 - 11:27DROPS Design answered:
Bonjour Mme Lefèvre, vous devez tricoter les nouvelles mailles en point fantaisie ajouré. En début de rang, il vous faudra avoir augmenté 2 m (= 1 motif ajouré toutes les 3 m) pour la 1ère moitié du diagramme et après avoir augmenté 6 m pour la 2ème moitié du diagramme (= 1 motif ajouré = 5 m, espacés chacun de 3 m). Bon tricot!
19.08.2021 - 14:35
![]() Vineeta Bhandari wrote:
Vineeta Bhandari wrote:
This is a pretty design for the cocoon shrug. Can I knit this design on straight needles. If so can you please can you share the written instructions instead of pictorial as I find it easier to work with the written instructions for the pattern. Thank you.
09.08.2021 - 09:33DROPS Design answered:
Hi Vineeta, The reason we recommend circular needles is the number of stitches used when working the shawl. Sadly, we don't have written instructions for this pattern at the moment. Kind regards, Drops Team.
09.08.2021 - 09:52
![]() Morgane Tralala wrote:
Morgane Tralala wrote:
Bonjour. Votre modèle est vraiment très beau mais je ne suis pas sure d’avoir bien compris. Après avoir tricoter les 10cm en point de riz, on vient tricoter A1, puis A2 le nombre de fois nécessaire selon la taille du modèle choisi puis terminer avec A3. Est-ce que c’est bien ça ?
14.06.2021 - 12:01DROPS Design answered:
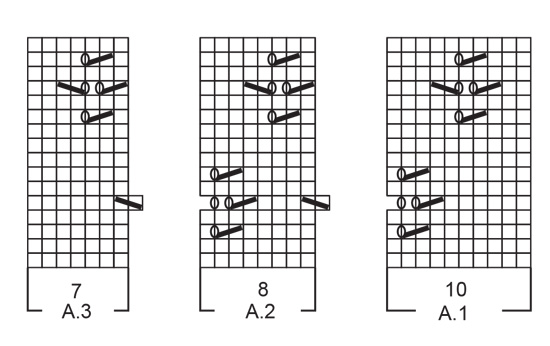
Bonjour Mme Tralala, pas exactement, vous tricotez d'abord vos 10 cm point de riz, puis vous tricotez les diagrammes ainsi, vu sur l'endroit: 1 maille lisière au point mousse, puis les 10 mailles suivantes en suivant le diagramme A.2, puis vous répétez A.2 jusqu'à ce qu'il reste 8 mailles (on répète 9 à 12 fois A.2 en largeur selon la taille) et on termine le rang par A.3 (= 7 mailles) et 1 maille lisière au point mousse. Cette leçon explique comment tricoter plusieurs diagrammes à suivre sur un seul rang. Bon tricot!
14.06.2021 - 16:27
![]() Cathy wrote:
Cathy wrote:
I love this pattern but I am allergic to wool. Which acrylic yarn would be a good match?
06.05.2021 - 11:44DROPS Design answered:
Dear Cathy, please understand, that these patterns are made available to support DROPS yarns, so we cannot advise you on other brands. From the DROPS selection, you might find something suitable, with the help of THIS lesson. Happy Crafting!
06.05.2021 - 12:11
![]() Saloua Ben Romdhane wrote:
Saloua Ben Romdhane wrote:
Bonsoir, j’ai presque terminé le travail, mais je n’ai pas compris compris la manière de le coudre ! Vous dîtes « faire la couture sous les manches et celles des côtes d’une seule traite » puis-je avoir une explication plus simple merci
06.12.2020 - 21:23DROPS Design answered:
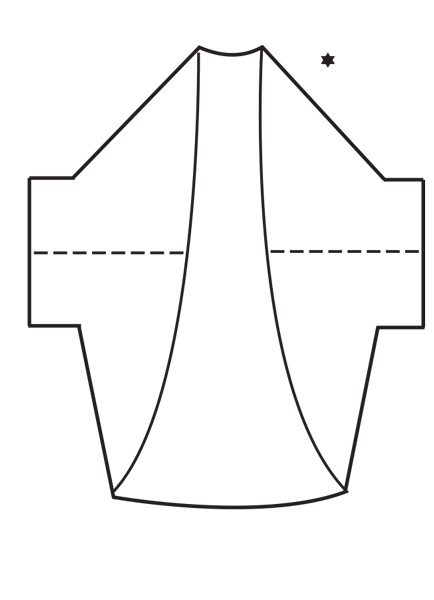
Bonjour Mme Ben Romdhane, la couture correspond aux lignes pointillés du schéma: commencez par la bordure des manches (les mailles montées et rabattues de chaque côté) jusqu'au bout des manches puis prolongez cette couture en assemblant les côtés. Bonnes finitions!
07.12.2020 - 08:41
![]() Eila Kaja wrote:
Eila Kaja wrote:
Jag kan inte komma på hur man sätter ihop västen. Kan jag få en beskrivning steg för steg hur man monterar.? Jag kanske inte har förstått norska så bra. Stickar man västen i ett stycke.
25.11.2020 - 23:39DROPS Design answered:
Hej. Du ska sy en söm mitt under ärmarna och sidsömmar i ett som du ser på skissen längst ner på mönstret. Om du ser på det första kortet på modellen med västen på så ser du att det är en söm mitt fram på kanten på plagget, det är alltså där den är i hopsydd. Hoppas det hjälper dig att förstå. Mvh DROPS Design
26.11.2020 - 08:08
![]() Melanie wrote:
Melanie wrote:
Hallo, ich verstehe die Anleitung nicht ganz und hänge an folgender Stelle: ich habe beidseits 4 Maschen für die Ärmel zugenommen. Das behalte ich doch jetzt eigentlich bei bis 52 cm. Aber es steht noch da dass ich gleichzeitig bei 36 cm wieder 4 Maschen abketten soll? Heißt das ich stricke von 36 bis 52 cm wieder mit meinen 91 Maschen? Vielen Dank für die Hilfe!
12.10.2020 - 13:08DROPS Design answered:
Liebe Melanie, die Zunahmen werden innerhalb die beidseitige 5 Maschen beginnen nach 52 cm in die 1. Größe - die 4 Maschen ketten Sie ab nach 36 cm ab dem Anschlagen der Ärmel-Maschen - nicht von der Anschlagskante (mit91 M am Anfang der Arbeit). Viel Spaß beim stricken!
12.10.2020 - 13:29
|
||||||||||||||||
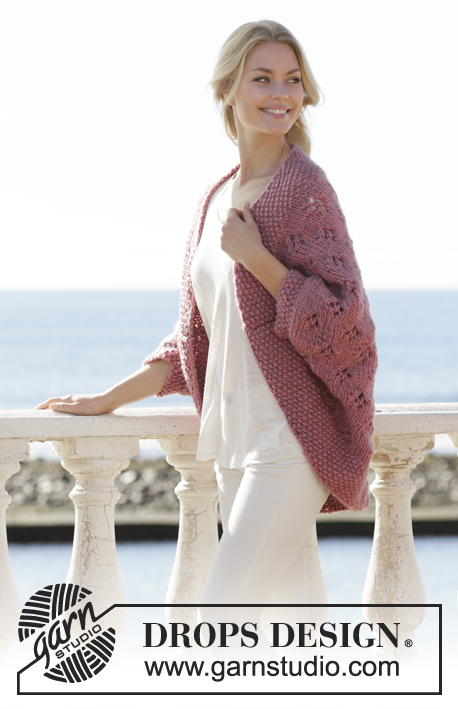
Summer Cocoon#summercocoonjacket |
||||||||||||||||
 |
 |
|||||||||||||||
Knitted vest in DROPS Snow. The piece is worked back and forth with lace pattern and moss stitch. Sizes S - XXXL.
DROPS 202-35 |
||||||||||||||||
|
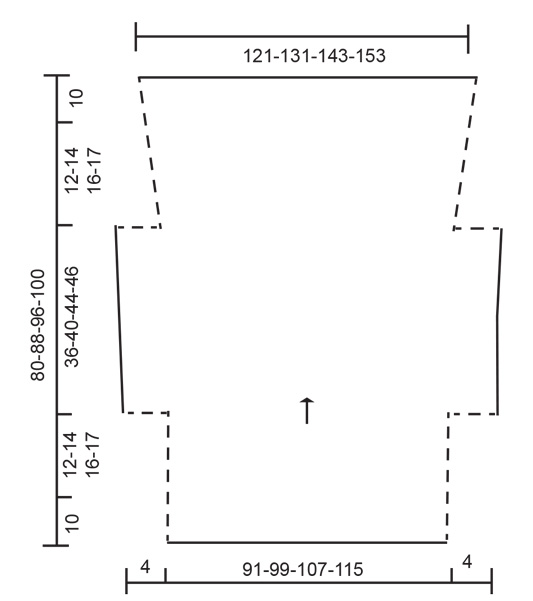
------------------------------------------------------- EXPLANATIONS FOR THE PIECE: ------------------------------------------------------- RIDGE/GARTER STITCH (worked back and forth): 1 ridge = Knit 2 rows. PATTERN: See diagrams A.1 to A.3. The diagrams show all the rows in the pattern seen from the right side. MOSS STITCH: ROW 1: * Knit 1, purl 1 *, work from *-*, until there is 1 stitch left on row, knit 1. ROW 2: Purl over knit and knit over purl. Repeat row 2. INCREASE TIP-1: All increases are worked from the right side! Increase 1 stitch inside the 5 moss stitches in each side. Increase 1 stitch by making 1 yarn over. On the next row (wrong side) purl the yarn overs twisted to avoid holes. Then work the new stitches in stocking stitch – until there are enough stitches to work a complete repeat of the lace pattern on each side of the piece. NOTE: there should always be at least 2 stitches in stocking stitch inside the 1 edge stitch in garter stitch, before working another repeat of lace pattern, as shown on row 13 in patterns A.1 and A.3. INCREASE TIP-2 (evenly spaced): To work out how to increase evenly, count the total number of stitches on the needle (e.g. 111 stitches) minus 1 edge stitch in garter stitch on each side (= 2 stitches) and divide the remaining stitches by the number of increases to be made (e.g. 10) = 10.9. In this example, increase by making 1 yarn over after approx. each 11th stitch. On the next row work the yarn overs twisted to avoid holes. ------------------------------------------------------- START THE PIECE HERE: ------------------------------------------------------- VEST - SHORT OVERVIEW OF THE PIECE: The piece is worked back and forth with circular needle, top down and sewn together in the sides under the sleeves. VEST: Cast on 91-99-107-115 stitches with circular needle size 9 mm and Snow. Work MOSS STITCH - see description above, for 10 cm – adjust so that the next row is worked from the right side. Now work pattern as follows: 1 edge stitch in GARTER STITCH – read description above, A.1 over the next 10 stitches, A.2 until there are 8 stitches left on the row (= 9-10-11-12 repeats in width), A.3 over the next 7 stitches, 1 edge stitch in garter stitch. Continue this pattern back and forth. REMEMBER THE KNITTING TENSION! When the piece measures 21-23-25-26 cm cast on 4 new stitches at the end of the next 2 rows for sleeves = 99-107-115-123 stitches. Continue with pattern as follows: 5 stitches in moss stitch, pattern as before until there are 5 stitches left on row, 5 stitches in moss stitch. When the piece measures 52-60-66-70 cm increase 1 stitch inside the 5 stitches in moss stitch on each side - read INCREASE TIP-1. Increase like this every row from the right side a total of 10-10-11-11 times, AT THE SAME TIME when the piece measures 36-40-44-46 cm from where you cast on stitches for the sleeves, cast off the first 4 stitches on the next 2 rows (= 1 edge stitch in each side. This edge stitch is worked in garter stitch). Continue increases inside 1 edge stitch in garter stitch in each side. When all increases are finished there are 111-119-129-137 stitches on the row. Continue with pattern and 1 edge stitch in garter stitch on each side until the piece measures 11-13-15-16 cm from where stitches were cast off for sleeves – but adjust so that the pattern ends after a complete lace pattern in height (i.e. after row 8 or row 16 in the diagrams). If there is not room for a complete lace pattern in height, work stocking stitch for a few rows before continuing as follows: Knit 1 row from the right side where you increase 10-12-14-16 stitches evenly spaced – read INCREASE TIP-2 = 121-131-143-153 stitches. Now work moss stitch back and forth over all stitches for 10 cm. The piece measures approx. 80-88-96-100 cm. Cast off, but to avoid the cast-off edge being tight make 1 yarn over after approx. each 4th stitch (the yarn overs are cast off as normal stitches). ASSEMBLY: Sew the under-sleeve and side seams in one go – see broken line on sketch. Sew inside the 1 edge stitch in garter stitch on each side. Cut and fasten the strand. |
||||||||||||||||
Diagram explanations |
||||||||||||||||
|
||||||||||||||||
 |
||||||||||||||||
 |
||||||||||||||||
 |
||||||||||||||||
Have you finished this pattern?Tag your pictures with #dropspattern #summercocoonjacket or submit them to the #dropsfan gallery. Do you need help with this pattern?You'll find 21 tutorial videos, a Comments/Questions area and more by visiting the pattern on garnstudio.com. © 1982-2026 DROPS Design A/S. We reserve all rights. This document, including all its sub-sections, has copyrights. Read more about what you can do with our patterns at the bottom of each pattern on our site. |
||||||||||||||||


With over 40 years in knitting and crochet design, DROPS Design offers one of the most extensive collections of free patterns on the internet - translated to 17 languages. As of today we count 324 catalogues and 12290 patterns translated into English (UK/cm). 12290
We work hard to bring you the best knitting and crochet have to offer, inspiration and advice as well as great quality yarns at incredible prices! Would you like to use our patterns for other than personal use? You can read what you are allowed to do in the Copyright text at the bottom of all our patterns. Happy crafting!
Post a comment to pattern DROPS 202-35
We would love to hear what you have to say about this pattern!
If you want to leave a question, please make sure you select the correct category in the form below, to speed up the answering process. Required fields are marked *.