
Popular categories
Looking for a yarn?


Comments / Questions (30)
![]() Aleta wrote:
Aleta wrote:
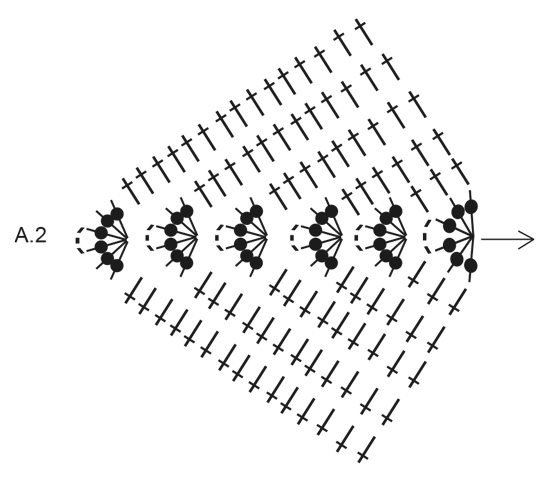
Grazie per la vostra risposta! Un'ultima domanda: nel diagramma A.2, tra la terza e la quarta maglia alta intorno all'anello di catenelle, devo fare 3 catenelle? Grazie e complimenti per i vostri video tutorial.
08.06.2019 - 18:48DROPS Design answered:
Buongiorno Aleta. Sì ci sono 3 catenelle tra la terza e la quarta maglia alta. Buon lavoro!
08.06.2019 - 21:27
![]() Aleta wrote:
Aleta wrote:
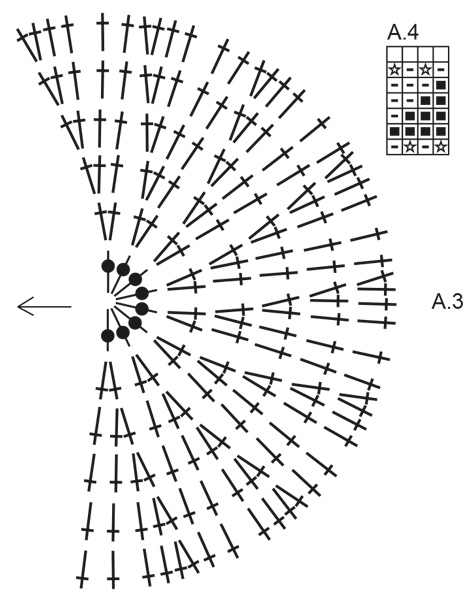
Buongiorno, come mai nel diagramma A.2 le maglie alte da lavorare intorno all'anello di catenelle sono 6 e invece nel diagramma A.3 sono 8? Grazie mille
08.06.2019 - 08:55DROPS Design answered:
Buongiorno Aleta. La parte dove lavora il diagramma A.2 è quella del davanti, mentre quella del diagramma A.3 è quella del dietro: la parte dietro deve essere più ampia di quella del davanti e quindi necessita di un numero maggiore di maglie. Buon lavoro!
08.06.2019 - 09:45
![]() Yvonne wrote:
Yvonne wrote:
Was bedeutet bei der Krempe "je 1 Stäbchen in die 7-7 ersten Stäbchen" die 7-7? Etwa je 1 Stäbchen in die 7 ersten Stäbchen, etc? Vielen Dank im vorraus
17.05.2019 - 19:15DROPS Design answered:
Liebe Yvonne, die Mütze kommt in 2 Größe deshalb wird es 2 Mal hier "7" geschrieben, in beiden Größen werden Sie je 1 Stäbchen in die 7 ersten Stäbchen häkeln, aber am Ende der Runde haben Sie entweder 126 Stb (=1. Größe) oder 135 Stäbchen (= 2. Größe). Viel Spaß beim häkeln!
20.05.2019 - 09:07
![]() Dinja wrote:
Dinja wrote:
Klopt het dat je met haaknaald 3 moet haken? Drops Paris haak je eigenlijk met haaknaald 5. Het is ook best lastig haken. En in welk video zie ik de rand om de hoed, dat je zowel door de lus van de steek op de verkeerde kant van het werk haak en door de steek/stokje zelf? Alvast bedankt!
05.05.2019 - 19:46DROPS Design answered:
Dag Dinja,
Ja, dat klopt. Deze hoed wordt met opzet met een kleinere haaknaald gehaakt, zodat hij wat stijver wordt.
En is helaas geen video voor de techniek, maar het is als volgt bedoelt: Je haakt eerst een toer waarbij je alleen in de voorste lus van de steek haakt. De toer daarna haak je in beide lussen alle steken plus de lus van de toer daarvoor waarin je niet had gehaakt.
09.05.2019 - 22:04
![]() Josi wrote:
Josi wrote:
Hallo, wozu brauche ich " je 1 Kettmasche in die ersten 10 Luftmaschen der Reihe, "? Funktioniert ohne auch. Danke
05.05.2019 - 16:03DROPS Design answered:
Liebe Josi, es müsste: 1 Kettmasche in die 10. Luftmaschen (der 14 Lm) sein - Deutsche Anleitung wird korrigiert. Viel Spaß beim häkeln!
06.05.2019 - 15:52
![]() Lisa wrote:
Lisa wrote:
Kurzes Hallöchen, ich möchte wissen, wozu ich diese Kettmaschen brauche, lt. Anleitung: "je 1 Kettmasche in die ersten 10 Luftmaschen der Reihe,"? Ich habe das Modell ohne diese gehäkelt und es fehlt eigentlich nichts! Übrigens ein sehr toller Hut :-) - ich habe ihn aus Bomull-Lin gemacht, sehr angenhmes Tragegefühl. Liebe Grüße Lisa
05.05.2019 - 13:03DROPS Design answered:
Liebe Lisa, es sollten 1 Kettmasche in der 10. Luftmasche (nicht in die ersten 10 Luftmaschen), deutsche Anleitung wird korrigiert. Viel Spaß beim häkeln!
06.05.2019 - 15:52
![]() Michi wrote:
Michi wrote:
Hallo, bitte wie ist folgende Zeile zu verstehen: "in beide Maschenglieder der Vor-Runde und zusätzlich in das Mascheinglied, das auf der Rückseite der Arbeit sichtbar ist, einstechen" Ich hab leider keine Idee welches Maschenglied ich hier sehen soll :(
20.08.2018 - 16:47DROPS Design answered:
Hallo Michi, damit ist das Maschenglied gemeint, in das in der vorherigen Runde nicht eingestochen wurde. Sie haben ja in der Runde davor nur in das vordere Maschenglied eingestochen, das hintere Maschenglied liegt noch auf der Rückseite der Arbeit. Wenn Sie auch noch in dieses Maschenglied einstechen, wölbt sich die Stäbchenrunde, die Sie aktuell häkeln, etwas nach vorne bzw. bekommt eine leichte Rundung und führt dadurch zu dem etwas markanteren Rand. Gutes Gelingen und viel Spaß mit dem Hut!
24.08.2018 - 10:44
![]() Monica wrote:
Monica wrote:
Hola. No tengo claro como realizar la 2ª vuelta de la orilla, donde dice " adicionalmente, a través del bucle del punto visible en el lado revés de la pieza". Muchas gracias por toda vuestra ayuda. Saludos.
16.08.2018 - 22:30DROPS Design answered:
Hola Monica. Para marcar más la parte de la orilla del sombrero pinchamos en lugar de en los dos bucles del punto (como habitual) un poco más abajo, cogiendo el tercer bucle del punto ( que es más visible por el lado revés). Es decir, si le das la vuelta a la labor y la miras por el lado revés, el primer bucle de ese punto que se vea sería el que hay que trabajar
18.09.2018 - 11:16
![]() Loly Aguilar Araujo wrote:
Loly Aguilar Araujo wrote:
Hola! Quisiera saber si en la segunda vuelta de la orilla en la parte de arriba alrededor del sombrero ,si está vuelta también la tengo que empezar con tres cadenas gracias . Podríais poner un vídeo con esta explicación porque aunque explicas muy bien ,para las que somos principiantes nos cuesta entender .siempre que hago algo vuestro compro vuestros hilos pero a través de internet
12.08.2018 - 22:04DROPS Design answered:
Hola Loly. EN TODA LA LABOR las vueltas con puntos altos comienzan con 3 puntos de cadeneta y las vueltas con puntos bajos empiezan con 1 punto de cadeneta.
14.08.2018 - 20:09
![]() Pilar Diaz wrote:
Pilar Diaz wrote:
Hola. Que debo hacer para adaptarlo a un hilo de más grosor?
18.07.2018 - 18:20DROPS Design answered:
Hola Pilar. Para usar un hilo con mayor grosor vas a necesitar menos vueltas para trabajar cada parte del sombrero. Elige el tamaño de ganchillo adecuado para el hilo con que vayas a trabajar.
31.07.2018 - 11:48
|
||||||||||||||||||||||||||||||||||
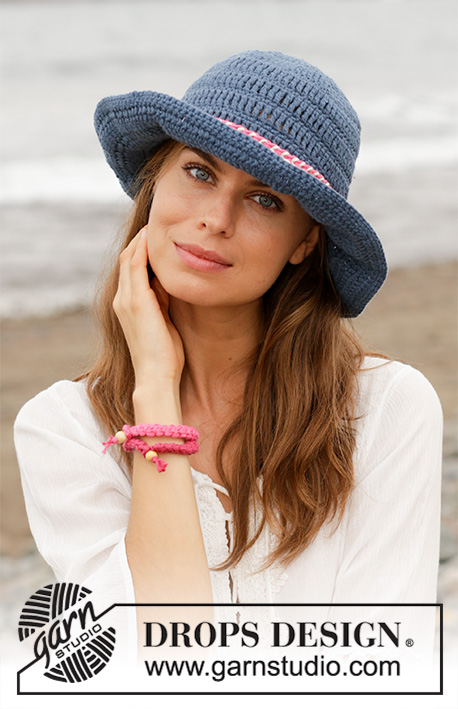
Sweet Fedora#sweetfedorahat |
||||||||||||||||||||||||||||||||||
 |
 |
|||||||||||||||||||||||||||||||||
Crocheted hat with edge in multi-coloured pattern. Piece is crocheted in DROPS Paris.
DROPS 190-35 |
||||||||||||||||||||||||||||||||||
|
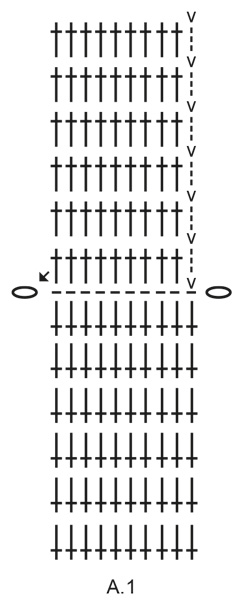
INFORMATION FOR PATTERN: CROCHET INFO: Replace first treble crochet on round with 3 chain stitches, finish round with 1 slip stitch in third chain stitch at beginning of round. Replace first double crochet on round with 1 chain stitch, finish round with 1 slip stitch in first chain stitch at beginning of round. COLOUR PATTERN: See diagram A.4. Diagram shows colours in pattern. 1 square = 1 double crochet. COLOUR CHANGE TIP: When changing colour work as follows: Work last double crochet with first colour but wait with last pull through, switch to next colour and work last pull through with the new colour, then work next double crochet. This way there will be a nice transition when changing colour. When working with two colours place strand for the colour not worked over stitches from previous round, work around the strand so that it is hidden and follows when working. ---------------------------------------------------------- HAT: Work in the round top down. Begin with a flat, oval top, then work down the hat (crown) before working an edge in multi-coloured pattern and then the brim. TOP OF HAT: Read CROCHET INFO! Begin at the arrow in the middle of A.1 and work on hook size 3 mm with white as follows: 4 chain stitches, form a ring with 1 slip stitch in the first chain stitch worked, work 14 chain stitches, work 1 slip stitch in 4th chain stitch from hook. You now have a chain stitch row with a loop in each end. Work next round as follows: 1 slip stitch in the first of the 10 chain stitch on row, 3 chain stitch (= 1 treble crochet), 1 treble crochet in each of the next 9 chain stitches, work A.2 around loop (begin with 1st row in diagram), work 1 treble crochet in each of the 10 chain stitch (i.e. on opposite side of where 10 treble crochets were worked first), work A.3 around loop in the other side and finish with 1 slip stitch in 3rd chain stitch at beginning for round. Continue the pattern like this until 6 rounds have been worked in total. A.1 to A.3 are now done and there are 104 treble crochets on round in both sizes. Then work an edge at the top around the hat as explained below. EGDE AT THE TOP AROUND HAT: Work 1 round treble crochets with 1 treble crochet in every treble crochet and 4 treble crochet in the chain space in the middle of A.2 (work 1 treble crochet in both the first and the last chain stitch and 2 treble crochets in the middle chain stitch), but on this round work only in front loop of stitch (stitch loop closest to you) = 108 treble crochets on round. Insert 1 marker thread between 2 treble crochets in the middle of A.2 (= mid front of hat) and move the marker thread upwards when working. Work 1 more round with treble crochets but now work every treble crochet through both the treble crochet from previous round (through both front and back loop) and in addition through stitch loop visible on the wrong side of piece. This gives a more distinct edge around the top part of hat. Then work the crown as explained below: CROWN: Work treble crochets in the round with 1 treble crochet in every treble crochet (work through both stitch loops). AT THE SAME TIME on 1st round increase 1 treble crochet mid front by working 2 treble crochets in last treble crochet before marker thread. Increase like this 4-8 times in total in S/M: On every other round, and in L/XL: On every round = 112-116 treble crochets. NOTE: When increasing work 2 treble crochets alternately in first treble crochet after marker thread and last treble crochet before marker thread. When piece measures 6-7 cm from edge at the top, work COLOUR PATTERN – see explanation above (= 28-29 repetitions of 4 stitches) and read COLOUR CHANGE TIP. NOTE: On 2nd and 7th round work in back loop of stitch from previous round. AT THE SAME TIME on last round in A.4 increase 0-4 double crochets evenly (increase 1 double crochet by working 2 double crochets in 1 stitch) = 112-120 double crochets. When A.4 is done, work the brim with white as explained below. BRIM: Remember CROCHET INFO! ROUND 1: * Work 1 treble crochet in the first 7-7 double crochets, 2 treble crochets in next double crochet *, repeat from *-* the entire round = 126-135 treble crochets. ROUND 2: Work 1 treble crochet in every treble crochet. ROUND 3: * Work 1 treble crochet in the first 8-8 treble crochets, 2 treble crochets in next treble crochet *, repeat from *-* the entire round = 140-150 treble crochets. ROUND 4: * Work 1 treble crochet in the first 9-9 treble crochets, 2 treble crochets in next treble crochet *, repeat from *-* the entire round = 154-165 treble crochets. ROUND 5: Work 1 treble crochet in every treble crochet. ROUND 6: Work 1 double crochet in every treble crochet = 154-165 double crochets. Fasten off. Brim measures approx. 5 cm. |
||||||||||||||||||||||||||||||||||
Diagram explanations |
||||||||||||||||||||||||||||||||||
|
||||||||||||||||||||||||||||||||||
 |
||||||||||||||||||||||||||||||||||
 |
||||||||||||||||||||||||||||||||||
 |
||||||||||||||||||||||||||||||||||
Have you finished this pattern?Tag your pictures with #dropspattern #sweetfedorahat or submit them to the #dropsfan gallery. Do you need help with this pattern?You'll find 13 tutorial videos, a Comments/Questions area and more by visiting the pattern on garnstudio.com. © 1982-2026 DROPS Design A/S. We reserve all rights. This document, including all its sub-sections, has copyrights. Read more about what you can do with our patterns at the bottom of each pattern on our site. |
||||||||||||||||||||||||||||||||||


With over 40 years in knitting and crochet design, DROPS Design offers one of the most extensive collections of free patterns on the internet - translated to 17 languages. As of today we count 324 catalogues and 12290 patterns translated into English (UK/cm). 12290
We work hard to bring you the best knitting and crochet have to offer, inspiration and advice as well as great quality yarns at incredible prices! Would you like to use our patterns for other than personal use? You can read what you are allowed to do in the Copyright text at the bottom of all our patterns. Happy crafting!
Post a comment to pattern DROPS 190-35
We would love to hear what you have to say about this pattern!
If you want to leave a question, please make sure you select the correct category in the form below, to speed up the answering process. Required fields are marked *.