
Popular categories
Looking for a yarn?


Comments / Questions (48)
![]() Laurent wrote:
Laurent wrote:
D accord donc comme une diminution ce fait en 3 rangs je les fait les unes à la suite des autres c est ça ?
14.02.2019 - 12:39DROPS Design answered:
Bonjour Laurent, si ces 3 rangs = 4 cm alors oui, ajustez bien pour que vos diminutions soient faites toutes les 4 cm. Bon crochet!
14.02.2019 - 14:46
![]() Laurent wrote:
Laurent wrote:
D ACCORD après je dois faire 1 diminution tous les 4 cm …..1 diminution = 3 cm donc 6 * 3 = 18 cm + 5 fois les 4 cm entre chaque diminutions soit un total de 38 cm …..or je dois avoir 28 cm je comprend pas ou est l erreur
14.02.2019 - 11:33DROPS Design answered:
Bonjour Laurent, vous commencez la 1ère diminution à 2 cm, puis la 2ème à 6 cm, la 3ème à 10 cm, la 4ème à 14 cm, la 5ème à 18 cm et la 6ème à 22 cm = vous avez diminué 6 fois au total et l'ouvrage mesure 22 cm. Continuez sans diminuer jusqu'à 28 cm. Bon crochet!
14.02.2019 - 11:48
![]() Laurent wrote:
Laurent wrote:
Bonjour , je viens de finir la bordure trèfle , faisant une taille XL je dois faire 246 brides . Dois-je les faire uniquement entre les 2 mailles en l air ou aussi sur chaque brides qui séparent les mailles en l air ?
13.02.2019 - 22:08DROPS Design answered:
Bonjour Laurent, après la bordure trèfle, vous crochetez le long du côté de la bordure (sur le côté gauche du diagramme), c'est-à-dire autour des 3 ml du début des rangs de A.1 et autour des brides des fins de rangs de A.1, crochetez autour de ces mailles tout autour de la bande jusqu'à ce que vous ayez 246 brides, ajustez le nombre de mailles autour de chaque brides pour qu'elles soient régulièrement réparties. Bon crochet!
14.02.2019 - 11:17
![]() Laurent wrote:
Laurent wrote:
Le schéma A4 pour les diminutions ce fait sur 3 rangs ?
11.02.2019 - 12:58DROPS Design answered:
Bonjour Laurent, tout à fait. Bon crochet!
12.02.2019 - 09:14
![]() Laurent wrote:
Laurent wrote:
Bonjour. après avoir fait la bordure on doit faire 2 cm ( pour moi c est equivalent à 2 rangs ) et on commence les diminutions il faut en faire 6 à gauche et 6 à droite ? soit un total de 12
11.02.2019 - 09:17DROPS Design answered:
Bonjour Laurent, on va diminuer soit 3 brides soit 1 bride + 2 ml de chaque côté en fonction du rang, sur les groupes de 3 brides, on diminue 2 groupes par tour = 6 brides en moins par tour (= 1 fois de chaque côté = 3 brides de chaque côté), 6 fois au total = on diminue 36 brides au total. Bon crochet!
11.02.2019 - 11:46Susan R wrote:
I have a question about the decrease. A.4. I started by doing what I thought it said, decreasing every 1 1/2\" every other side of marked stitches. But now after looking at the diagram I am wondering if I am supposed to be doing the whole 4 row decrease every 11/2\". Also, says to measure and should be 10 5/8\"-11\" should this be measured from the clover rows or from the bottom of rounds? Thanks in advance for your help.
03.09.2018 - 06:04DROPS Design answered:
Dear Susan, sorry for late answer - you measure now piece from where it says THE PIECE IS NOW MEASURED FROM HERE, ie from the beginning of piece worked in the round. Happy crocheting!
24.09.2019 - 14:09
![]() Deloustal wrote:
Deloustal wrote:
Merci pour vos explications! J’aurais peut etre encore besoin de vous pour la suite....;-)
13.08.2018 - 19:16
![]() Deloustal wrote:
Deloustal wrote:
Bonjour’ je ne comprends pas le diagramme A4 pour faire les diminutions pouvez vous m.expliquer svp?
12.08.2018 - 17:37DROPS Design answered:
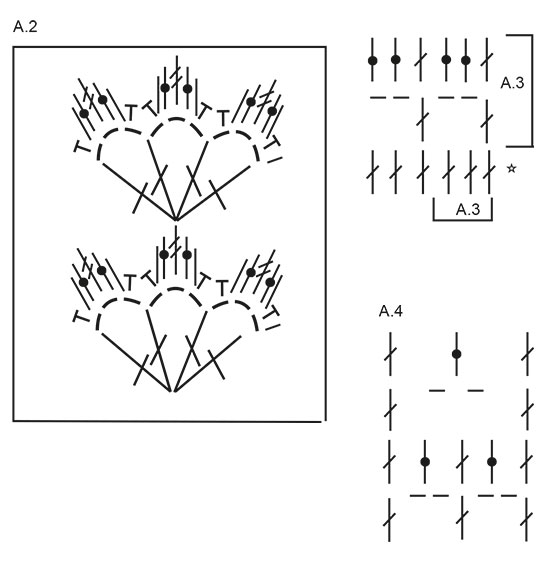
Bonjour Mme Deloustal, au 1er rang de A.4, on crochète sur 2 groupes (= 1 B, 2 ml, 1B, 2 ml, 1B), au rang 2, on crochète 1 B dans chaque B et 1 B autour de chaque arceau (au lieu de 2 B dans A.3). Au rang 3, on crochète 1 B dans la B, 2 ml, on saute les 3 brides et on termine par 1 B dans la B suivante), au 4ème rang, on crochète 1 B dans la B, 1 B dans l'arceau et 1 B dans la B suivante = on a diminué 3brides. Bon crochet!
13.08.2018 - 10:09
![]() Barbara E Goldstein wrote:
Barbara E Goldstein wrote:
I am having difficulty with the A.1 pattern. I have done the first set of crochets but don\'t know where to go from here. Is there a better way to describe how this area is crocheted? Thanks
08.08.2018 - 20:07DROPS Design answered:
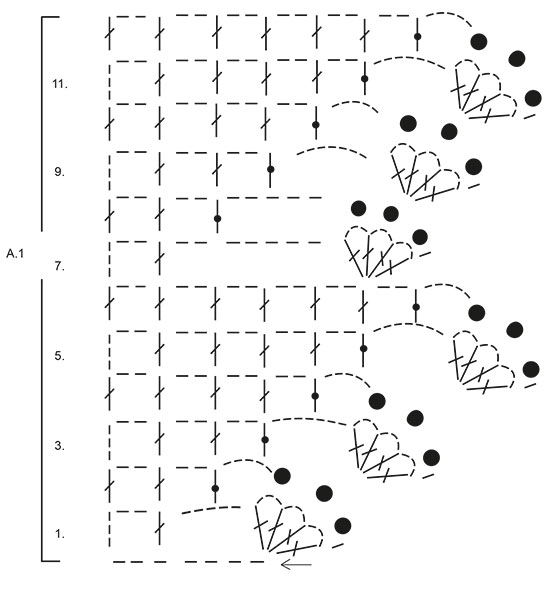
Dear Mrs Goldstein, after you have worked A.1 one time in height (= to row 12 included), start again with row 7 (read row 7 from the left towards the right) and repeat row 7 to 12 until measurement for your size, but make sure to finish after a row 12. Happy crocheting!
09.08.2018 - 08:36
![]() Marian wrote:
Marian wrote:
Haciéndolo así pasamos de 7 puntos a 3, es decir, se disminuyen 4 puntos no 3. Al hacer esto 6 veces a cada lado disminuimos 48 en total y nos quedamos con 174 puntos una vez finalizamos las disminuciones no 186 como dice. Algo no está correcto o no acabo de entenderlo.
31.07.2018 - 12:52DROPS Design answered:
Hola Marian. Mandé tu pregunta al departamento de diseño para que revisen el diagrama. Cuando, por ejemplo, te toca disminuir en la fila de 1 punto alto + 2 puntos de cadeneta tienes que saltar 5 puntos altos de la vuelta anterior, es decir, trabajas 1 punto alto en el punto alto de la vuelta anterior + 2 puntos de cadeneta, saltas 5 puntos altos ( 3 puntos altos de un grupo y 2 puntos altos que sustituyen 2 puntos de cadeneta ) y trabajas el siguiente punto alto en el sig punto alto. El arco queda más grande por eso se hacen las disminuciones a cada lado en modo alterno.
07.08.2018 - 21:16
|
|||||||||||||||||||||||||
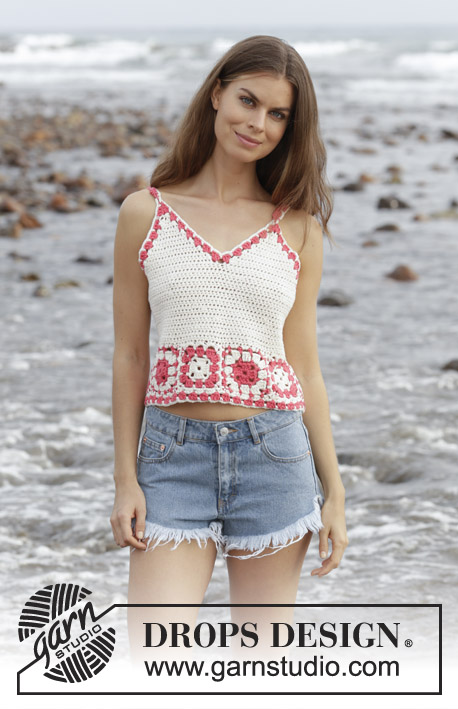
Ipanema#ipanematop |
|||||||||||||||||||||||||
 |
 |
||||||||||||||||||||||||
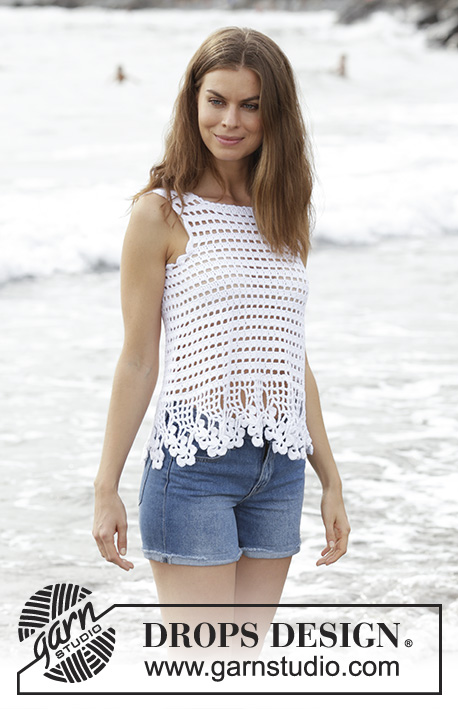
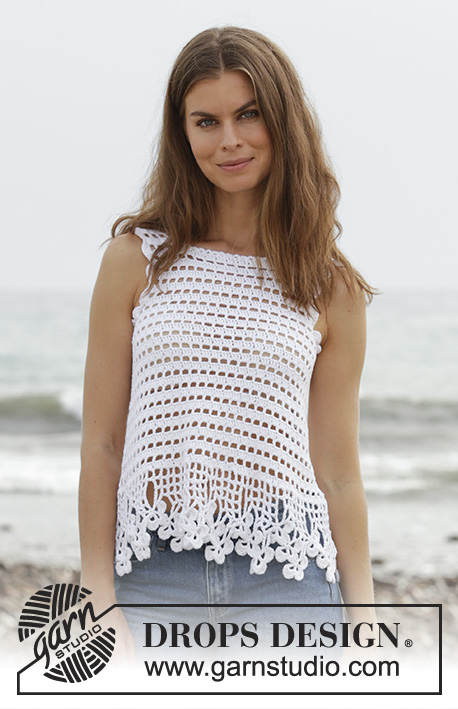
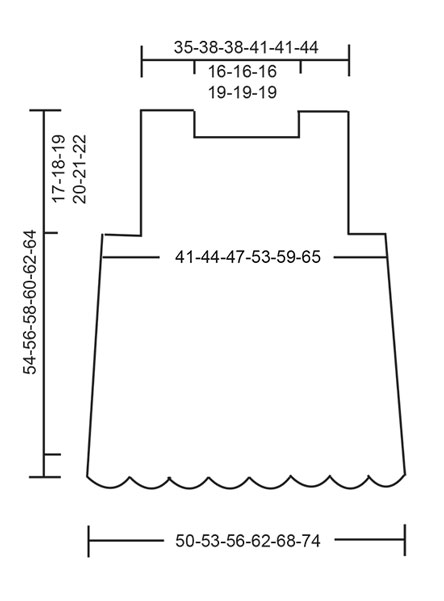
Crocheted top with clover and lace pattern. The piece is worked in DROPS Cotton Light. Sizes S - XXXL.
DROPS 190-2 |
|||||||||||||||||||||||||
|
INFORMATION FOR THE PATTERN: PATTERN: See diagrams A.1 to A.4. CROCHET INFO-1: The first row on each clover leaf (= 1 treble crochet, 3 chain stitches, 1 treble crochet, 3 chain stitches, 1 treble crochet, 3 chain stitches, 1 treble crochet in the same treble crochet) is worked in the middle double treble crochet of the previous clover leaf - see A.2. CROCHET INFO-2: The first treble crochet at the beginning of the row/round is replaced by 3 chain stitches. Finish the row/round with 1 slip stitch in the 3rd chain stitch at the beginning of the row/round. The first double crochet at the beginning of the row is replaced by 1 chain stitch. ---------------------------------------------------------- TOP: First the clover pattern is worked from side to side at the bottom, then the top is worked upwards in the round as far as the armholes. Here the piece is divided and the front and back pieces are worked separately. Work 12 chain stitches (including 5 chain stitches to turn) with Cotton Light and hook size 3.5 mm. Read CROCHET INFO-1! Continue by working according to A.1 until you have worked 1 repeat in height. Then repeat rows 7-12 until the piece measures approx. 100-106-112-124-136-148 cm – finish after row 12. Sew the clover edge together to make a ring (seam = side of the top). Then continue working upwards in the round, THE PIECE IS NOW MEASURED FROM HERE! Crochet up 198-210-222-246-270-294 treble crochets around the treble crochets from the long-side in A.1. Then work according to A.3 – read CROCHET INFO-2. Continue this pattern upwards. Insert 2 marker threads in the piece, 1 at the beginning of the round and 1 after 99-105-111-123-135-147 treble crochets (= sides). When the piece measures 2 cm decrease 1 treble crochet group (= 3 treble crochets or 1 treble crochet + 2 chain stitches) in each side, decrease before both marker threads. Diagram A.4 shows how to decrease in the pattern. Repeat the decrease upwards every 4 cm; decrease alternately before and after the marker threads in the sides, i.e. the first time you decrease 1 treble crochet group before the marker threads, the second time you decrease 1 treble crochet group after both marker threads. Decrease a total of 6 times in each side of the top = 162-174-186-210-234-258 treble crochets/chain stitches. When the piece measures 25-26-27-28-29-30 cm, adjust so that the next round to be worked is the first round in A.3, divide the piece for the front and back pieces. Cut the strand. FRONT PIECE: Skip the first 6-6-9-12-18-21 treble crochets, work A.3 over the next 70-76-76-82-82-88 treble crochets (= 23-25-25-27-27-29 repeats of A.3 + 1 treble crochet). Turn and work back. Continue this pattern upwards. When the piece measures 36-38-40-42-44-46 cm work over just the first 19-22-22-22-22-25 treble crochets/chain stitches on the row = right shoulder. Continue until the piece measures 42-44-46-48-50-52 cm, cut and fasten the strand. Work the left shoulder in the same way, i.e. work over just the last 19-22-22-22-22-25 treble crochets/chain stitches on the row. The 32-32-32-38-38-38 treble crochets/chain stitches not worked = neck. The piece measures a total of 54-56-58-60-62-64 cm. BACK PIECE: Skip the first 11-11-17-23-35-41 treble crochets after the front piece, work A.3 over the next 70-76-76-82-82-88 treble crochets (= 23-25-25-27-27-29 repeats of A.3 + 1 treble crochet). Turn and work back (there are now 11-11-17-23-35-41 treble crochets in each side which are not worked (= armholes). Continue A.3 upwards. When the piece measures 30-32-34-36-38-40 cm divide the back piece so that you have a split mid back. RIGHT BACK PIECE: Now work over just the first 35-38-38-41-41-44 treble crochets; work A.3 over the first 33-36-36-39-39-42 treble crochets/chain stitches and finish with 2 treble crochets towards mid back. When the piece measures 36-38-40-42-44-46 cm work over just the first 19-22-22-22-22-25 treble crochets/chain stitches on the row = right shoulder. The 16-16-16-19-19-19 treble crochets not worked = neck. Continue until the piece measures 42-44-46-48-50-52 cm, cut and fasten the strand. LEFT BACK PIECE: Now work over just the last 35-38-38-41-41-44 treble crochets; work 1 treble crochet towards mid back, work A.3 over the next 33-36-36-39-39-42 treble crochets/chain stitches and finish with 1 treble crochet towards the side. When the piece measures 36-38-40-42-44-46 cm work over just the last 19-22-22-22-22-25 treble crochets/chain stitches on the row = left shoulder. The 16-16-16-19-19-19 treble crochets not worked = neck. Continue until the piece measures 42-44-46-48-50-52 cm, cut and fasten the strand. ASSEMBLY: Sew the shoulder seams. CROCHET EDGE AROUND THE ARMHOLES: Start at bottom of armhole. Work 1 double crochet,* skip forward approx. 2 cm, work 7 treble crochets around the next treble crochet, skip forward approx. 2 cm, work 1 double crochet around the next treble crochet *, repeat from *-* and finish with 1 slip stitch in the double crochet at the beginning of the round. Work in the same way around the other armhole. CROCHET EDGE AROUND THE NECK: Start mid back. Work 1 double crochet, * 3 chain stitches, skip forward approx. 1 cm, work 1 double crochet *, repeat from *-*. ASSEMBLY -2: Sew a button to the top of the split mid back; the button is buttoned through 2 treble crochets. |
|||||||||||||||||||||||||
Diagram explanations |
|||||||||||||||||||||||||
|
|||||||||||||||||||||||||
 |
|||||||||||||||||||||||||
 |
|||||||||||||||||||||||||
 |
|||||||||||||||||||||||||
Have you finished this pattern?Tag your pictures with #dropspattern #ipanematop or submit them to the #dropsfan gallery. Do you need help with this pattern?You'll find 10 tutorial videos, a Comments/Questions area and more by visiting the pattern on garnstudio.com. © 1982-2026 DROPS Design A/S. We reserve all rights. This document, including all its sub-sections, has copyrights. Read more about what you can do with our patterns at the bottom of each pattern on our site. |
|||||||||||||||||||||||||


With over 40 years in knitting and crochet design, DROPS Design offers one of the most extensive collections of free patterns on the internet - translated to 17 languages. As of today we count 324 catalogues and 12290 patterns translated into English (UK/cm). 12290
We work hard to bring you the best knitting and crochet have to offer, inspiration and advice as well as great quality yarns at incredible prices! Would you like to use our patterns for other than personal use? You can read what you are allowed to do in the Copyright text at the bottom of all our patterns. Happy crafting!
Post a comment to pattern DROPS 190-2
We would love to hear what you have to say about this pattern!
If you want to leave a question, please make sure you select the correct category in the form below, to speed up the answering process. Required fields are marked *.