
Popular categories
Looking for a yarn?


Comments / Questions (86)
![]() Maria wrote:
Maria wrote:
Hello, I am a bit confused. It say in the beginning that you work around, but the in the description it seams like you working from side to side. When will I join the back and front? Is it at the end?
15.08.2025 - 09:46DROPS Design answered:
Dear Maria, yoke is worked in the round, crochet one extra chain then join in the round, starting with 3 chains, crochet 1 treble crochet (UK English) in the next chain and continue as explained for your size. Design will be noticed about this. Thanks for noticing. Happy crocheting!
15.08.2025 - 12:31
![]() Babeth wrote:
Babeth wrote:
Bonjour Si je comprends bien, je fais par exemple au premier rang d augmentation ,à la fin de mon demi dos 2 brides d augmentation et tout de suite avant A1 ,les 2 brides des manches et idem ensuite Ce qui fait que j augmente en tout 16 brides augmentées sur ce premier rang Merci Est ce ça ?
02.10.2024 - 17:36DROPS Design answered:
Bonjour Babeth, si vous devez augmenter 2 brides de chaque côté du dos/le devant et 2 brides de chaque côté des manches, alors oui tout à fait, vous augmenterez 16 brides au total sur ce tour. Bon crochet!
03.10.2024 - 09:03
![]() Babeth wrote:
Babeth wrote:
Bonjour Je ne comprends pas bien les augmentations A l empiècement, faut il faire à la fois le raglan et l augmentation des manches et aussi pour les dos et devants ?
01.10.2024 - 20:37DROPS Design answered:
Bonjour Babeth, vous augmentez simultanément pour le dos/le devant et pour les manches mais pas forcément au même rythme ni le même nombre de mailles, autrement dit, vous allez augmenter soit 2 brides soit 1 bride, cf descriptif correspondant à votre taille. Bon crochet!
02.10.2024 - 08:28
![]() Lucia Xavier wrote:
Lucia Xavier wrote:
Hello, I have another question. In the pattern says "MEERDER ALS VOLGT OP HET VOORPAND EN ACHTERPAND: meerder 2 stk elke toer 3-4-7-9-13-16 keer in totaal, dan 1 stk elke toer 12-12-10-9-6-5 keer in totaal. MEERDER ALS VOLGT OP DE MOUWEN: meerder 2 stk elke toer 0-0-1-3-4-4 keer in totaal, dan 1 stk elke toer 15-16-16-15-15-17 keer in totaal. DENK OM DE STEKENVERHOUDING!" Do I increase at the same time I increase for the raglan or after? Cordially, Lucia
16.08.2024 - 08:35DROPS Design answered:
Dear Lucia, remember that you can select your desired language at the top of the pattern, between the materials section and the pattern instructions. About your question: The increases for the raglan are explained above, in the RAGLAN section. In these paragraphs it only explains how many times you need to work the RAGLAN increases in each piece. They aren't extra increases. Happy crochetting!
18.08.2024 - 20:34
![]() Lucia Xavier wrote:
Lucia Xavier wrote:
Hello, it is not clear to me how to put the markeerdraad. How many stoks should be in between markeerdraad? Thank you for your attention.
14.08.2024 - 15:25DROPS Design answered:
Dear Mrs Xavier, you insert the marker threads in the middle of the 8 new stitches crocheted under sleeve when dividing piece, so that you will have 4 of the new chains/stitches on each side of both markers (sides of the jumper). Happy crocheting!
16.08.2024 - 07:11
![]() Bettina Klamer wrote:
Bettina Klamer wrote:
Raglanzunahme ist einmal mit 2 Stäbchen vor und nach dem Muster beschrieben und dann mit 1 Stäbchen vor und nach dem Muster. Wann nehme ich die 2 Stäbchen zu und wann 1 Stäbchen. Wann nehme ich am Vorder- und Rückteil zu?
05.08.2024 - 10:34DROPS Design answered:
Liebe Frau Klamer, es wird zuerst 2 Stäbchen dann 1 Stäbchen zugenommen - je nach der Größe, siehe Absatz: WIE FOLGT AM VORDER- und RÜCKENTEIL ZUNEHMEN: + WIE FOLGT AN DEN ÄRMELN ZUNEHMEN. Viel Spaß beim Häkeln!
05.08.2024 - 15:27
![]() Christine Wolfe wrote:
Christine Wolfe wrote:
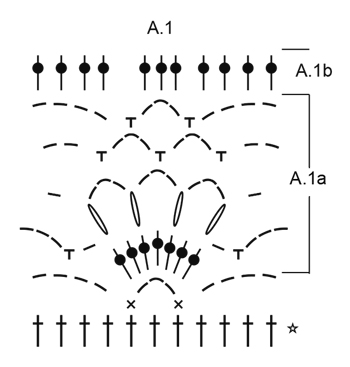
Hello, I would like some clarification, please, on completion and repeats of A1. Should the whole of A1 be completed, including A1b, (ie 7 rounds) before repeating with A1a? Thank you
11.05.2024 - 15:14DROPS Design answered:
Dear Christine, yes, when it says A.1 it means the whole chart (A.1a and A.1b). Then, you just repeat one section of the chart, specifically A.1a. Happy knitting!
12.05.2024 - 20:46
![]() Valérie wrote:
Valérie wrote:
Merçi pour votre réponse. NÉANMOINS je ne TROUVE tj pas ds explications info crochet : si on dois au début Joindre la 1ère maille de la chainette avec la dernière si comne vous dite ce modèle est crocheté en rond..
02.04.2024 - 16:50DROPS Design answered:
Bonjour Valérie, le tout premier rang est bien un rang, pas un tour: vous crochetez 1 bride dans la 4ème maille en l'air à partir du crochet, puis 1 bride dans les mailles en l'air suivantes (pensez bien à sauter celles indiquées), puis vous joignez à la fin de ce rang par 1 maille coulée dans la 3ème maille en l'air à partir du crochet (cf info crochet) et continuez en rond (tours). Bon crochet!
03.04.2024 - 08:28
![]() Val wrote:
Val wrote:
Bonjour. Je ne vois pas ds explications s'il faut au début joindre les mailles chainettes en rond par mc puisque çe modèle se crochète de haut en bas..il n'y a pas non plus d'explications à la fin pour coudre les côtés. Merçi de clarifier svp
25.03.2024 - 13:17DROPS Design answered:
Bonjour Val, ce modèle se crochète en rond (pas de coutures côté), retrouvez sous INFO CROCHET au tout début des explications comment commencer/terminer les tours. Bon crochet!
02.04.2024 - 09:34
![]() Laura wrote:
Laura wrote:
Non ho capito quando va chiuso in cerchio il lavoro. All’inizio viene lavorato in piano?
16.08.2023 - 17:41DROPS Design answered:
Buongiorno Laura, la lavorazione inizia subito in tondo. Buon lavoro!
17.08.2023 - 10:00
|
||||||||||||||||||||||
Warm Apricot |
||||||||||||||||||||||
|
|
||||||||||||||||||||||
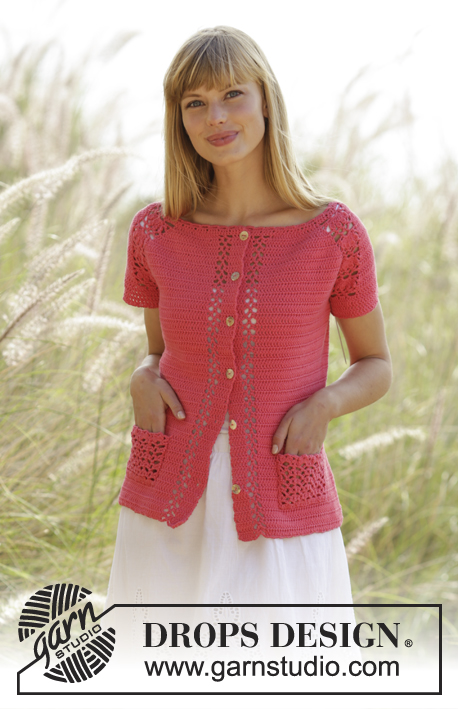
Crochet DROPS top with lace pattern and raglan in ”Safran”. The piece is worked top down. Size: S - XXXL.
DROPS Extra 0-1287 |
||||||||||||||||||||||
|
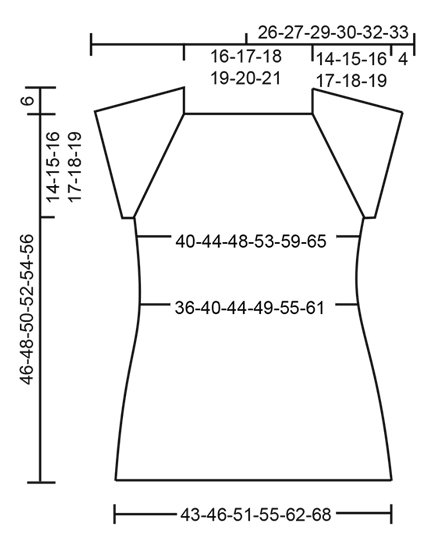
PATTERN: See diagrams A.1. CROCHET INFO: Replace first tr at on every tr round with 3 ch, finish the round with 1 sl st in 3rd ch from beg of round. On every dc round, replace first dc with 1 ch and finish round with 1 sl st in 1st ch from beg of round. INCREASE TIP-1: Inc 1 tr by working 2 tr in same tr. INCREASE TIP-2 (applies to sides of body): Work until 3 tr remain before marker thread, work 2 tr in next tr (= 1 tr inc), work 1 tr in each of the next 4 tr (marker thread is in the middle of these sts), work 2 tr in next tr (= 1 tr inc). RAGLAN: Inc for raglan on each side of A.1. Inc 2 sts BEFORE A.1 as follows: Work until 2 tr remain before A.1, work 2 tr in each of the next 2 tr (= 2 tr inc). Inc 2 sts AFTER A.1 as follows: Work 2 tr in each of the first 2 tr after A.1 (= 2 tr inc). Inc 1 sts BEFORE A.1 as follows: Work until 1 tr remains before A.1, work 2 tr in next tr (= 1 tr inc). Inc 1 sts AFTER A.1 as follows: Work 2 tr in first tr after A.1 (= 1 tr inc). The inc on body and sleeves are uneven as explained in pattern. DECREASE TIP: Work until 4 tr remain before marker thread, work the next 2 tr tog as follows: Work 1 tr in next tr but wait with last pull through (= 2 sts on hook), work 1 tr in next tr, but on last pull through pull yarn through all sts on hook - 1 tr have been dec, work 1 tr in each of the next 4 tr (marker thread is between these sts), work the next 2 tr tog (= 1 tr dec). ---------------------------------------------------------- YOKE: The piece is worked top down. Work 160-165-170-175-180-185 ch on hook size 3.5 mm with Safran and join in the round with 1 sl st in the first ch. Read CROCHET INFO and crochet next round as follows: * 1 tr in each of the first/next 4 ch, skip next ch*, crochet from *-* all the round = 128-132-136-140-144-148 tr. Then work next round as follows: Work 1 tr in each of the first 18-19-20-21-22-23 tr AT THE SAME TIME inc 4-5-5-6-7-8 tr evenly – READ INCREASE TIP-1 – (= half back piece), A.1 over the next 11 tr, 2 tr in next tr, 1 tr in each of the next 4 tr, 2 tr in next tr, A.1 over the next 11 tr (= sleeve), 1 tr in each of the next 36-38-40-42-44-46 tr AT THE SAME TIME inc 8-10-10-12-14-16 tr evenly (= front piece), A.1 over the next 11 tr, 2 tr in next tr, 1 tr in each of the next 4 tr, 2 tr in next tr, A.1 over the next 11 tr (= sleeve), 1 tr in each of the last 18-19-20-21-22-23 tr AT THE SAME TIME inc 4-5-5-6-7-8 tr evenly. On front and back piece there are now 44-48-50-54-58-62 tr and on sleeve there are A.1, 8 tr and A.1. On next round inc for RAGLAN – see explanation above! INC AS FOLLOWS ON FRONT AND BACK PIECE: Inc 2 tr every round 3-4-7-9-13-16 times in total, then 1 tr every round 12-12-10-9-6-5 times in total. INC AS FOLLOWS ON SLEEVES: Inc 2 tr every round 0-0-1-3-4-4 times in total, then 1 tr every round 15-16-16-15-15-17 times in total. REMEMBER THE CROCHET TENSION! When A.1 have been worked 1 time vertically, repeat A.1a over A.1. After all inc there are 80-88-98-108-122-136 tr on front piece and back piece, on sleeve there are A.1, 38-40-44-50-54-58 tr and A.1. Piece measures approx. 14-15-16-17-18-19 cm. Work next round as follows: Work 1 tr in each of the first 40-44-49-54-61-68 tr, work 8 ch (= under sleeve), insert 1 marker thread in the middle between the new ch, skip: A.1a, 38-40-44-50-54-58 tr and A.1a (= sleeve), work 1 tr in each of the next 80-88-98-108-122-136 tr, 8 ch (= under sleeve), insert 1 marker thread in the middle of the new sts, skip: A.1a and 38-40-44-50-54-58 tr and A.1a (= sleeve), work 1 tr in each of the next 40-44-49-54-61-68 tr = 160-176-196-216-244-272 tr and 16 ch. Insert 1 marker in piece, NOW MEASURE PIECE FROM HERE. Move marker threads when working, leave the marker in piece. BODY: Work 1 tr in every tr and 1 tr in every ch. There are 88-96-106-116-130-144 tr between marker threads on back piece and front piece. When piece measures 3 cm (measured from marker), dec 1 st on each side of each marker threads in the side (= 4 sts dec) - READ DECREASE TIP! Repeat dec every 4-4-3½-4½-4½-4½ cm 3-3-4-3-3-4 more times = 160-176-192-216-244-268 tr in total. When piece measures 17-18-19-20-21-22 cm (measured from marker), inc 1 st on each side of each marker thread (= 4 tr inc) – see INCREASE TIP-2. Repeat inc every 1½ cm 6-6-7-6-6-7 more times = 188-204-224-244-272-300 tr. Continue with 1 tr in every tr until piece measures 32-33-34-35-36-37 cm (measured from marker). Piece measures approx. 46-48-50-52-54-56 cm in total from neck edge. Work 1 edge around the top as follows: Work * 1 dc in first/next tr, 4 ch, skip approx. 1 cm *, repeat from *-* around the entire top. Fasten off. SLEEVE EDGE: Sleeve is worked in the round, top down. Beg by working mid under sleeve as follows: Work 1 dc in 5th ch of the 8 ch worked in armhole on body. Work 3 ch (= 1 tr). Then work with 1 tr in each of the next 3 ch, A.1a as before, 1 tr in each of the next 38-40-44-50-54-58 tr, A.1a as before, 1 tr in each of the last 4 ch under sleeve, finish with 1 sl st in 3rd ch at beg of round. Work 1 tr in every tr and A.1a until 1 whole repetition of A.1a has been worked. Then work 1 tr in every tr, work A.1b over A.1a = 68-70-74-80-84-88 tr. On next round work 1 tr in every tr AT THE SAME TIME dec 12 tr evenly = 56-58-62-68-72-76 tr. Work 1 tr in every tr until sleeve edge measures approx. 4 cm. Work * 1 dc in first/next tr, 4 ch, skip approx. 1 cm *, repeat from *-* around the entire sleeve. Fasten off. Work a sleeve edge around the other sleeve. NECK EDGE: Beg mid back. Work 1 ch, * 1 dc in first/next tr, 4 ch, skip approx. 1 cm *, repeat from *-* around the entire neck, finish with 1 sl st in first ch, make sure to avoid a tight neck edge. |
||||||||||||||||||||||
Diagram explanations |
||||||||||||||||||||||
|
||||||||||||||||||||||
 |
||||||||||||||||||||||
 |
||||||||||||||||||||||
Have you finished this pattern?Tag your pictures with #dropspattern or submit them to the #dropsfan gallery. Do you need help with this pattern?You'll find 13 tutorial videos, a Comments/Questions area and more by visiting the pattern on garnstudio.com. © 1982-2026 DROPS Design A/S. We reserve all rights. This document, including all its sub-sections, has copyrights. Read more about what you can do with our patterns at the bottom of each pattern on our site. |
||||||||||||||||||||||


With over 40 years in knitting and crochet design, DROPS Design offers one of the most extensive collections of free patterns on the internet - translated to 17 languages. As of today we count 324 catalogues and 12290 patterns translated into English (UK/cm). 12290
We work hard to bring you the best knitting and crochet have to offer, inspiration and advice as well as great quality yarns at incredible prices! Would you like to use our patterns for other than personal use? You can read what you are allowed to do in the Copyright text at the bottom of all our patterns. Happy crafting!
Post a comment to pattern DROPS Extra 0-1287
We would love to hear what you have to say about this pattern!
If you want to leave a question, please make sure you select the correct category in the form below, to speed up the answering process. Required fields are marked *.