
Popular categories
Looking for a yarn?


Comments / Questions (222)
![]() Foiratier wrote:
Foiratier wrote:
Bonjour. Je suis arrivée au 11eme tour et vos explications précisent qu'il y a suffisamment de place pour 19'motifs. Je ne comprends pas pourquoi avec les 163 brides du rang précédent on ne peut mettre que 19 motifs car en respectant les intervalles entres chaque motifs je peux en mettre une quarantaine. Où ai-je ait une erreur SVP. Merci d'avance pour votre réponse. Madame foiratier.
10.02.2017 - 12:14DROPS Design answered:
Bonjour Mme Foiratier, entre les arceaux du milieu devant et du milieu dos, vous aurez: A.3b (= sur 6 B), A.2 (= sur 8 B x 19 motifs = 152 B), A.3b (= sur 4 B) soit: 6 + 152+ 4 + A.1b = 163 B. Bon crochet!
10.02.2017 - 13:06
![]() Mariah wrote:
Mariah wrote:
I have just started the mesh and I don't know if I am supposed to be following A.5 (and which part) (or even where it starts as there is no indication of a foundation row on the diagram) or A.4a or the written instructions for the mesh pattern which seem to reference the diagram but no in anyway that lines up. I am so confused and any help would be appreciated
05.02.2017 - 13:33DROPS Design answered:
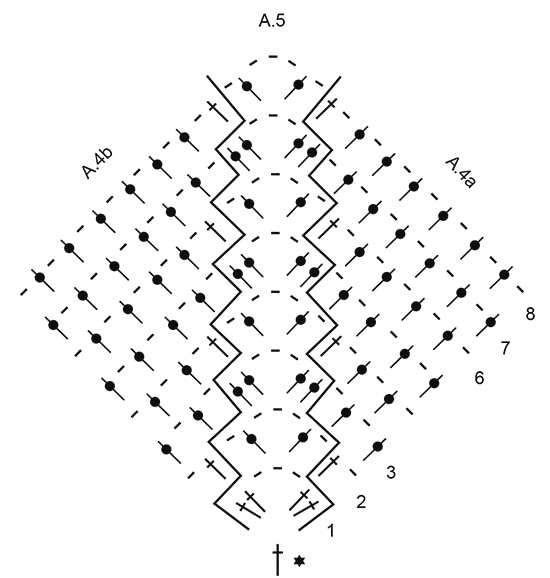
Dear Mariah, when working the mesh pattern you are working A.4a to the corner, then work A.5, then work A.4b. A.5 is showing how to crochet in the corners and inc at the same time, while A.4a and A.4b are showing how to crochet the mesh pattern before/after the corners. Happy crocheting!
06.02.2017 - 10:24
![]() Michal Levy wrote:
Michal Levy wrote:
Hi! At the end of A2.a I have 179 dc, but in the 1st row of A2.b I have 22 pattern repetitions. How do I get only 21 repetitions? Maybe I should skip the Inc 8 in the previous row? That would give me 21 repetitions in the 1st row of A2.b.
27.11.2016 - 10:46Michal Levy wrote:
I am on row 4 of A.2b and I have increased 3 on each side. I have 199 dc on each side instead of 185. When I started A.2b, I had 21 repeats on each side (when you count 2 clusters before each corner as part of A.3b, not as part of the pattern). Where did it go wrong?
22.11.2016 - 10:27Michal Levy wrote:
It would be nice if there was a forum where crocheters could help each other out. I see a lot of questions on this board that I could answer.
21.11.2016 - 08:43DROPS Design answered:
Dear Mrs Levy, please feel free to help customers writing any comment there. Thank you, happy crocheting!
21.11.2016 - 10:46
![]() Cathy Volonnino wrote:
Cathy Volonnino wrote:
In first row in 2b I have 20 repititions instead of 19 stated in the pattern. Can you please double check the pattern? Could the pattern be incorrect?
18.11.2016 - 04:52DROPS Design answered:
Dear Mrs Volonnino, check number of inc worked previously, you should have 19 repeats of A.2b on each side of A.3. Happy crocheting!
18.11.2016 - 13:06
![]() Michal Levy wrote:
Michal Levy wrote:
In A2a, maat XXL/XXXL, moet ik bij toer 4 uitkomen met 149 stokjes aan elke kant tusen de l-lussen. Hoe kan dat als ik net 37 x 4 stokjes heb gehaakt in toer 3? Dat is 148 stk. Waar komt dat ene extra stk vandaan? En vervolgens moet ik in toer 4 18 patroon herhalingen maken tussen beide l-lussen. Maar ik heb plaats voor 18,5 herhalingen. Hoe zit dat?
17.11.2016 - 18:35DROPS Design answered:
Hoi Michael. 37 x 4 stokjes? Toer 3 van A.2a zijn lossen + vasten. Als je meer herhalingen hebt dan 18 heb je meer gemeerderd dan nodig. Ik kan helaas niet zien hoe je hebt gehaakt, maar ik denk dat je voor toer 3 al fout ben gegaan.
21.11.2016 - 15:21
![]() Cathy Volonnino wrote:
Cathy Volonnino wrote:
Thanks for all the help. I started A2a in the 10th dc and ended up with an extra cluster. Instead of 13 reputations I have 13.5 (1 cluster extra). Please check and let me know if I should just adjust so I only have 13. I want to make sure I am accurate so my next rows will all work out.
03.11.2016 - 19:06DROPS Design answered:
Dear Mrs Volonnino, you should start with 13 repeat on one side, then work 14 repeats along the other side and finish with 1 repeat = 14 repeats on both sides. Happy crocheting!
04.11.2016 - 09:01
![]() Cathy Volonnino wrote:
Cathy Volonnino wrote:
When will the new changes be available? And is that the only change?
01.11.2016 - 03:09DROPS Design answered:
Hi Cathy. The pattern US pattern will be changed asap when our translator is finished. The UK pattern has been edited. We consider the pattern now complete.
01.11.2016 - 09:45
![]() Cathy Volonnino wrote:
Cathy Volonnino wrote:
Adding on to my last question, if I am doing it correctly (as explained in my previous question), I end up with an extra cluster right before mid back. ( not a double cluster over 8 D.C., just one cluster so I have 14.5 reps instead of 14. Please help. This is my second attempt at this pattern!
31.10.2016 - 01:16
|
|||||||||||||||||||||||||||||||||||||||||||||||||
Light's Embrace#lightsembraceponcho |
|||||||||||||||||||||||||||||||||||||||||||||||||
 |
 |
||||||||||||||||||||||||||||||||||||||||||||||||
Crochet DROPS poncho with lace pattern, worked top down in ”Paris”. Size S-XXXL.
DROPS 169-4 |
|||||||||||||||||||||||||||||||||||||||||||||||||
|
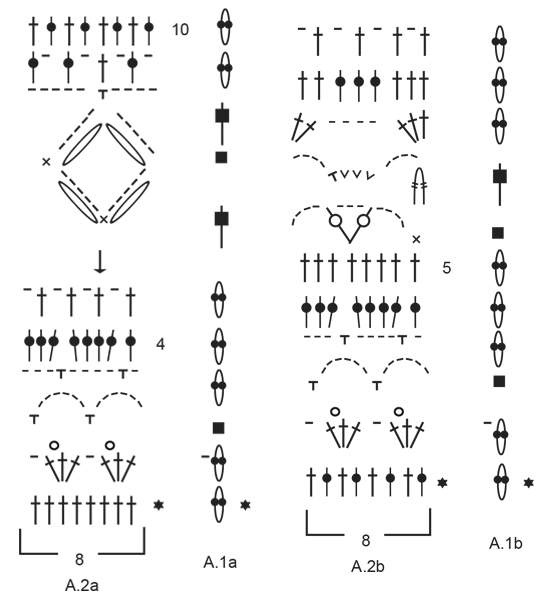
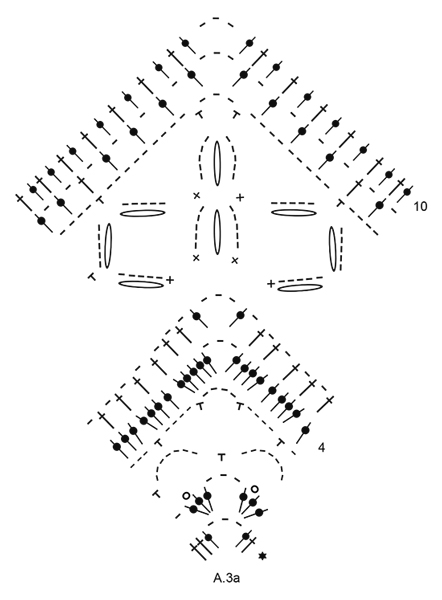
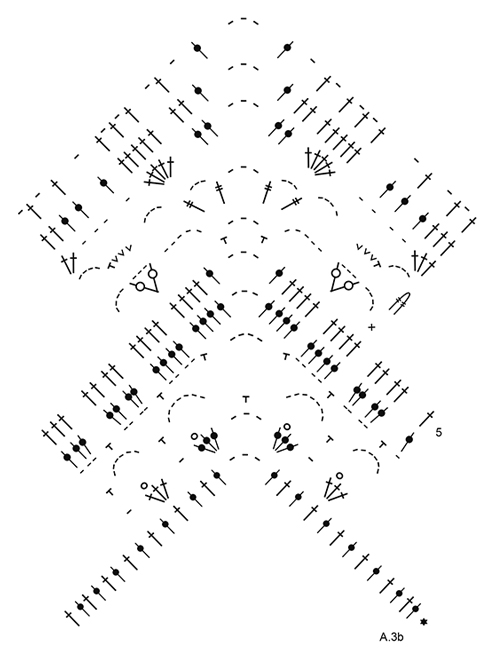
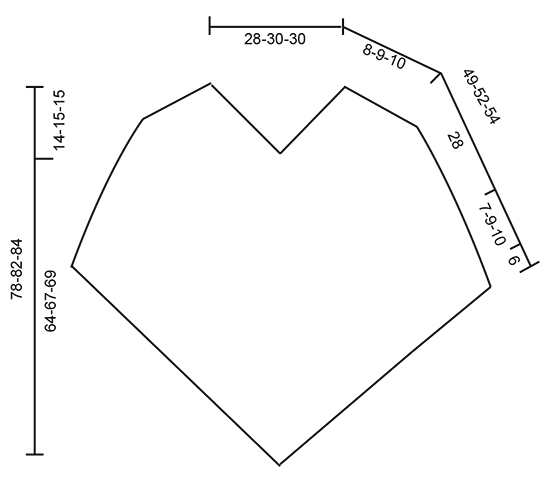
PATTERN: See diagrams A.1 to A.5. Diagrams A.1a and A.1b show how round beg and ends. CROCHET INFO: Beg every tr round with 3 ch (these ch do not replaces first tr). At the end of round work 1 sl st in 3rd ch at beg of round. NOTE: When working A.5 beg round with 3 ch. At the end of round work 1 tr in first st worked on round (i.e. st with the 3 ch in), then 1 sl st in 3rd ch at beg of round. WORK 2 DTR TOG: Work 1 dtr around ch-space below but wait with last pull through (= 2 loops on hook), skip 1 dc and work 1 dtr around next ch-space but on last pull through, pull yarn through all loops on hook. WORK 3 DTR TOG: Work 1 dtr but wait with last pull through (= 2 sts on hook), work 1 more dtr but wait with last pull through (= 3 loops on hook), work 1 more dtr but on last pull through, pull yarn through all loops on hook. MESH PATTERN: ROUND 1: * Start with 1st row of A.5, work the 4 tr in first/next tr with marker, work (1 ch, ship 1 tr, 1 tr in next tr) until 1 tr remains before next marker, work 1 ch, skip next tr *, repeat from *-* 3 times more. There is now 4 repeats of A.5 on round. ROUND 2: * Work A.5 around first/next ch-space with marker, then work 1 tr in next tr, 1 ch, 1 tr around first ch-space, (1 ch, skip 1 tr, 1 tr in next ch-space) until 1 ch-space remains before next repeat of A.5, work 1 ch, 1 tr in next tr *, repeat from *-* 3 times more. ROUND 3: * Work A.5 around first/next ch-space with marker, then work (1 ch, skip 1 tr, 1 tr around next ch-space) until next repeat of A.5, 1 ch *, repeat from *-* 3 times more. ---------------------------------------------------------- PONCHO: Worked in the round, top down. First inc mid front, mid back and on each shoulder, then inc only mid front and mid back. Work 153-163-163 ch on hook size 4.5 mm with Paris and form a ring with 1 sl st. Work 3 ch – see CROCHET INFO! Then work 1 tr in each of the next 3-1-1 ch, * skip 1 ch, 1 tr in each of the next 5 ch *, repeat from *-* 24-26-26 more times on round = 128-136-136 tr + 3 ch on round. Now insert 4 markers from beg of round without working: Insert 1 marker in 1st tr on round (= mid back), skip 31-33-33 tr, insert 1 marker in next tr (= shoulder), skip 31-33-33 tr, insert 1 marker in next tr (= mid front), skip 31-33-33 tr, insert 1 marker in next tr (= shoulder), there are now 31-33-33 tr between last marker and beg of round. Now work MESH PATTERN - see explanation above. When 1st-3rd round have been worked, repeat 2nd and 3rd round until 6-7-8 rounds with mesh pattern have been worked - see diagram A.4a and A.4b to see how to work the whole inc in each side of A.5. REMEMBER THE CROCHET TENSION! Piece measures approx. 8-9-10 cm. Work next round as follows AT THE SAME TIME dec 0-8-8 tr evenly (= 0-4-4 tr dec on each side of mid back and mid front): *Work (2 tr, 3 ch, 2 tr) around ch-space (= mid back on 1st repetition and mid front on 2nd repetition), then work 1 tr in every tr and 1 tr around every ch until next inc tr-group, work 3 tr around ch-space (= shoulder), work 1 tr in every tr and 1 tr around every ch until inc tr-group (mid front on 1st repetition and mid back on 2nd repetition)*, repeat from *-* 1 more time. There are now 117-125-133 tr between ch-space mid front and mid back (= 234-250-266 tr in total on round + 2 ch-space). Cut the yarn. NOTE: Then do not inc on each shoulder but only mid front and mid back on poncho. Work 1 sl st in the 10th st from ch-space mid back and work pattern as follows: Work A.1a (shows how round beg and end, does not replace first st), A.2a (= 8 tr) 13-14-15 times in width, A.3a (= inc mid front), continue with A.2a 14-15-16 times in width, A.3a (= inc mid back) and A.2a 1 time in all sizes. On 4th round in A.3a there are 133-141-149 tr between ch-space mid front and mid back. Continue with pattern as before (there is now room for 16-17-18 repetitions A.2a on each side of A.3a). On 10th round inc 8 tr evenly on each side of A.3a (= 16 tr in total on round) = 163-171-179 tr on each side of ch-space mid front and mid back. Continue with pattern as before, but now work A.1b over A.1a, A.2b over A.2a and A.3b over A.3a (there is now room for 19-20-21 repetitions A.2 on each side of A.3). On 4th round inc 3 tr evenly between every repetitions of A.3 (i.e. 6 tr in total on round) = 169-177-185 tr between each ch-space mid front and mid back. Continue pattern (there is now room for 21-22-23 repetitions A.2 on each side of A.3). When entire diagram has been worked vertically, piece measures 36-37-38 cm. Cut the yarn. Now work mesh pattern as at beg of piece. Beg in ch-space mid back, and work mesh pattern from 3rd round in mesh pattern. Repeat 2nd and 3rd round until 6-8-10 rounds in total have been worked (incl last round in A.2 and A.3). Work next round as follows: * Work (2 tr, 3 ch, 2 tr) around ch-space (= mid back), then work 1 tr in every tr and 1 tr around every ch until next repeat of A.5 *, repeat from *-* 1 more time = 193-209-225 tr between ch-space mid front and mid back. Cut the yarn. Now work pattern A.1a, A.2a and A.3a as follows: Work 1 sl st in 12th tr from ch-space mid back and work pattern as follows: Work A.1a (shows how round beg and end, does not replace first st), A.2a until 2 tr remain before ch-space mid front, A.3a (= inc mid front), continue with A.2a until 2 tr remain before ch-space mid back, A.3a (= inc mid back) and A.2a 1 time in all sizes. When 4th row has been worked vertically, poncho measures 49-52-54 cm. Fasten off. |
|||||||||||||||||||||||||||||||||||||||||||||||||
Diagram explanations |
|||||||||||||||||||||||||||||||||||||||||||||||||
|
|||||||||||||||||||||||||||||||||||||||||||||||||
 |
|||||||||||||||||||||||||||||||||||||||||||||||||
 |
|||||||||||||||||||||||||||||||||||||||||||||||||
 |
|||||||||||||||||||||||||||||||||||||||||||||||||
 |
|||||||||||||||||||||||||||||||||||||||||||||||||
 |
|||||||||||||||||||||||||||||||||||||||||||||||||
Have you finished this pattern?Tag your pictures with #dropspattern #lightsembraceponcho or submit them to the #dropsfan gallery. Do you need help with this pattern?You'll find 13 tutorial videos, a Comments/Questions area and more by visiting the pattern on garnstudio.com. © 1982-2026 DROPS Design A/S. We reserve all rights. This document, including all its sub-sections, has copyrights. Read more about what you can do with our patterns at the bottom of each pattern on our site. |
|||||||||||||||||||||||||||||||||||||||||||||||||


With over 40 years in knitting and crochet design, DROPS Design offers one of the most extensive collections of free patterns on the internet - translated to 17 languages. As of today we count 324 catalogues and 12290 patterns translated into English (UK/cm). 12290
We work hard to bring you the best knitting and crochet have to offer, inspiration and advice as well as great quality yarns at incredible prices! Would you like to use our patterns for other than personal use? You can read what you are allowed to do in the Copyright text at the bottom of all our patterns. Happy crafting!
Post a comment to pattern DROPS 169-4
We would love to hear what you have to say about this pattern!
If you want to leave a question, please make sure you select the correct category in the form below, to speed up the answering process. Required fields are marked *.