
Popular categories
Looking for a yarn?


Comments / Questions (44)
![]() Nina CH wrote:
Nina CH wrote:
Hello, This is my first project and I am sorry if my questions are silly. I tried to research first but found no help. 1. When knitting Yoke, do I use stocking stitch (one round K, next round P)? 2. I really don't understand increases. What does "K2 in next stitch" mean? I understood it as knit 2 stitches in one but then it's a decrease! I read a similar question below but don't understand. Appreciate your help!
24.03.2025 - 12:30DROPS Design answered:
Hi Nina, The jumper is worked in the round to begin with, which means, for the stocking stitch, you knit all rounds. When you work back and forth later, for the split in each side, you knit from the right side and purl from the wrong side. Knit 2 in one stitch means you first knit 1 stitch in the front loop, then knit 1 stitch in the back loop of the same stitch so that 1 stitch becomes 2 (an increase). Happy knitting!
25.03.2025 - 06:48
![]() Kristine Bergsland wrote:
Kristine Bergsland wrote:
Hei, skulle gjerne sett flere bilder av denne modellen. Fra bakside, og et bedre bilde av hvordan den ser ut nederst. Vh. Kristine
25.02.2024 - 10:09
![]() Nora wrote:
Nora wrote:
Nora wrote a correction:: Oh no! I was doubling the 2 Xtra stitches for the body ineases, at each side of each PLACE MARKER instead of 4 inside the each body sections and 2 on each side of each sleeve section = 12 total.! That is why the raglan line did not line up !! :( I will have to unravel and only double the 2 stitches inside the body panes and only double one on the slee e sides.!!! Thank you for your patience. I just dont want to give up yet.
18.10.2023 - 22:15
![]() Nora wrote:
Nora wrote:
Oh no! I was doubling the 2 Xtra stitches for the body ineases, at each side of each!!! That is why the raglan line did not line up !! :( I will have to unravel and only double the 2 stitches inside the body panes only!!!
17.10.2023 - 20:55
![]() Nora wrote:
Nora wrote:
Thank you for your answer about the raglan increases! It helped :) Now, about the body increases. So there are 2 increases (1 on each side of the sleeve markers, totaling 8 stitches added for a certain number of rows per size. Then, it changes time only 2 increases on each side of the markers for a total of 4 increases, for a certain number of rows, correct?
16.10.2023 - 17:21DROPS Design answered:
Dear Nora, correct the increases are done on a different rhythm on body and on sleeves, but you will increase either 2 sts or 1 stitch on body and only 2 st on each sleeve, so when increasing 2 sts on body you will increase 12 sts (2 sts at the beg of front/back piece + 2 sts at the end of front/back piece + 1 st at the beg of sleeves + 1 st at the end of sleeves). Then you will increase only 1 stitch at the beg + 1 st at th end of front/back piece (and still 1 st on each side of sleeve). Happy knitting!
17.10.2023 - 09:15
![]() Nora wrote:
Nora wrote:
I don't understand the body increases: Before 1st and 3rd marker: Work until 3 sts remain before marker, K 2 in next st, 1 YO, K 2. After 2nd and 4th marker: K 2, 1 YO, K 2 in next st. K2 in next stitch means that you k and k through the back loop? And add a nee stitch in addition to yhe YO?
14.10.2023 - 06:43DROPS Design answered:
Dear Nora, yes, you knit 1 stitch in the front loop and 1 stitch in the back loop. And yes, you will have 2 new stitches for every marker (As shown in the RAGLAN BODY tip, you inc 2 sts on each marker). Happy knitting!
16.10.2023 - 00:28
![]() Jasmine L Copeland wrote:
Jasmine L Copeland wrote:
Hi it is unclear to me when to do inc 1 or inc 2 for the raglan body. I am knitting a small
18.03.2023 - 12:05DROPS Design answered:
Dear Jasmine, the first 8 times (rounds) that you increase on the body, you will increase 2 stitches, before the 1st and 3rd markers and after the 2nd and 4th markers (as indicated in RAGLAN BODY). After having worked these increases 8 times, the next time you increase on the body you will increase only 1 stitch at each marker. You will continue with this increase 7 times in total (so 6 more times). Happy knitting!
19.03.2023 - 20:25
![]() Pat Lampron wrote:
Pat Lampron wrote:
Now I get it !!! Sorry, really dumb when it comes to math (and I’m knitting???) anyway it finally clicked after reading your explanation several times and the instructions a few dozen!!! One less sweater I have to rip out... thanks so much!!!
15.10.2020 - 18:31
![]() Pat Lampron wrote:
Pat Lampron wrote:
In answer to your question I’m working on a large and then will be making a medium...
15.10.2020 - 11:25DROPS Design answered:
Dear Mrs Lampron, in size L you cast on 85 sts and increase 21 sts evenly = 106 sts - you then increase for raglan: 2 sts on each sleeve a total of 17 times = 2 x17x2 sleeves = 68 sts inc. Then on body: 4 sts x 12 x 2 (front/back) = 96 sts + 2 sts x 5 x 2 (front/back) = 20 sts = 106+68+96+20=290 sts. Hope this will help you!
15.10.2020 - 11:58
![]() Pat Lampron wrote:
Pat Lampron wrote:
I’m working on this pattern and numbers don’t seem to be adding up in regard to the increases - still working on the beginning before putting sleeve stitches on a holder. If I do the increases the number of times listed, the front and backs definitely don’t add up. Can you look at this and give me some clarification?
14.10.2020 - 21:37DROPS Design answered:
Dear Mrs Lampron, sure we can explain you, just tell us which size you are working on.
15.10.2020 - 09:04
|
|
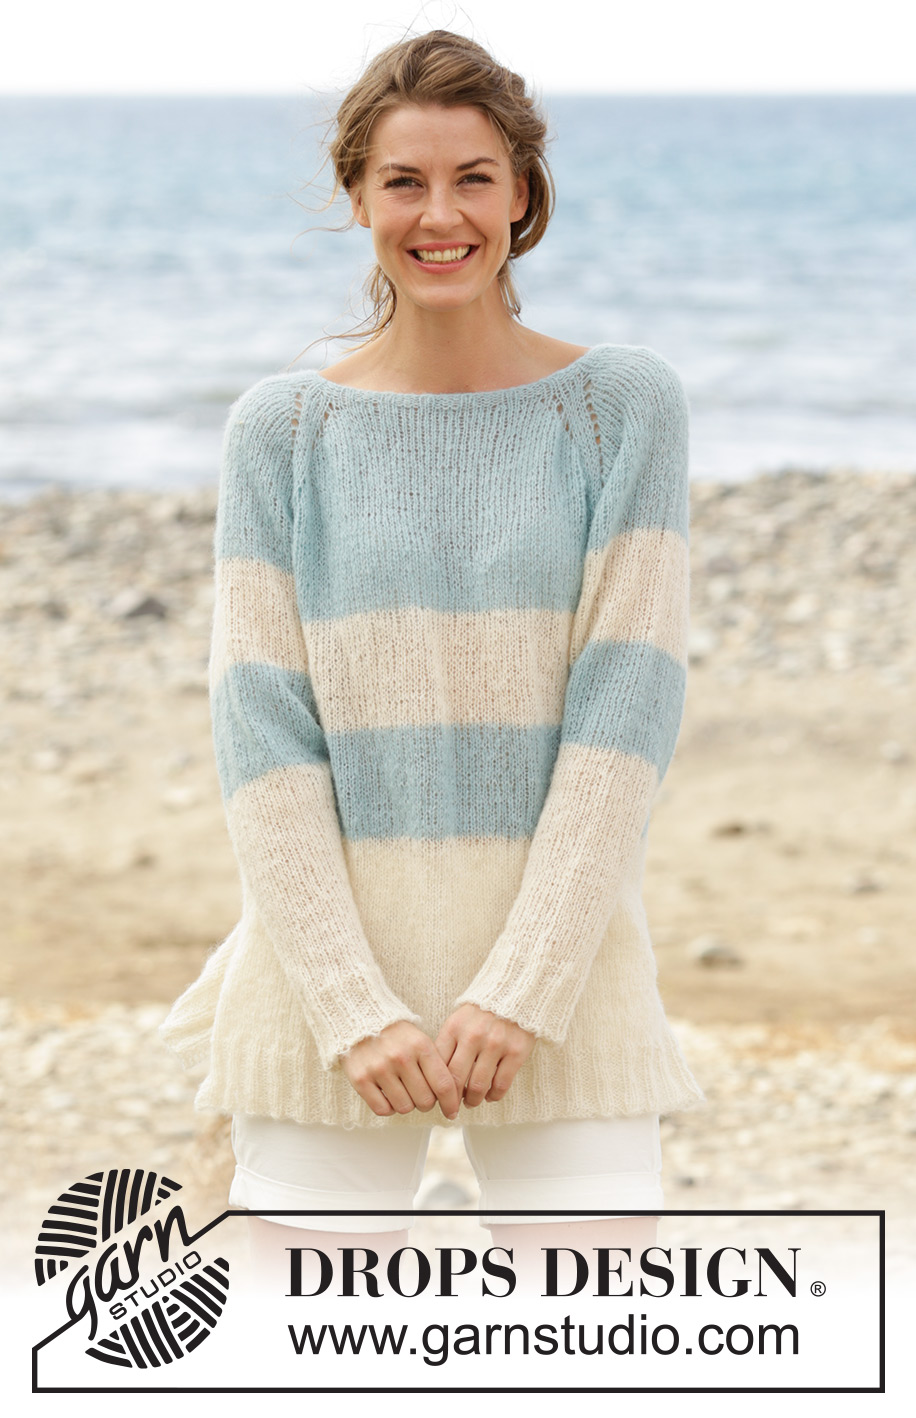
Weekend Getaway#weekendgetawaysweater |
|
|
|
|
Knitted DROPS jumper with raglan, vent in the sides and stripes, worked top down in ”Brushed Alpaca Silk”. Size S-XXXL.
DROPS 169-7 |
|
|
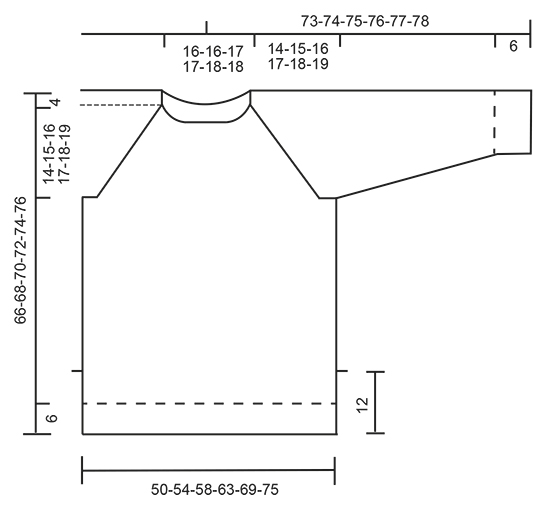
GARTER ST (worked in the round): 1 ridge = 2 rounds. * K 1 round and P 1 round *, repeat from *-*. GARTER ST (back and forth): K all rows. 1 ridge = 2 rows K. STRIPES: Work stripes as follows on body and sleeves: Work 9-9-10-10-11-11 cm with off white. Work 9-9-10-10-11-11 cm with light sea green. Then work with off white until finished measurements. RAGLAN BODY: NOTE: K all YOs on next round to make holes. Inc 2 sts as follows: Before 1st and 3rd marker: Work until 3 sts remain before marker, K 2 in next st, 1 YO, K 2. After 2nd and 4th marker: K 2, 1 YO, K 2 in next st. Then inc 1 st as follows: Before 1st and 3rd marker: Work until 2 sts remain before marker, 1 YO, K 2. After 2nd and 4th marker: K 2, 1 YO. RAGLAN SLEEVE: Inc 1 st after 1st and 3rd marker as follows: K 2, 1 YO. Inc 1 st before 2nd and 4th marker as follows: Work until 2 sts remain before marker, 1 YO, K 2. On next round K the YO to make hole. DECREASE TIP: Dec as follows before marker: Work until 3 sts remain before marker, K 2 tog, K 1. Dec as follows after marker: K 1, slip 1 st as if to K, K 1, psso ---------------------------------------------------------- JUMPER: Worked in stocking st in the round, from the top and down to vent on body. Then divide the piece in front and back piece and continue back and forth until finished measurements. NOTE: Beg round = mid back. YOKE: Cast on 80-80-85-85-90-90 sts on circular needle size 4.5 mm with light sea green. K 1 round. Then work 4 rounds rib (= K 2/P 3). Switch to circular needle size 5 mm and work 1 round in stocking st while inc 18-20-21-25-24-30 sts evenly = 98-100-106-110-114-120 sts. Now insert 4 markers in the piece as follows: Work the first 15-16-16-16-17-18 sts (= half back piece), insert 1st marker, work the next 18-18-20-22-22-24 sts (= sleeve), insert 2nd marker, work the next 31-32-33-33-35-36 sts (= front piece), insert 3rd marker, work the next 18-18-20-22-22-24 sts (= sleeve), insert 4th marker, work the remaining 16-16-17-17-18-18 sts (= half back piece). On next round beg inc for raglan. NOTE: Inc differently on sleeves and body - READ RAGLAN BODY and RAGLAN SLEEVE. Inc as follows: Work until 3 sts remain before 1st marker, K 2 in next st, 1 YO, K 4 (marker is in the middle of these sts), 1 YO, work until 2 sts remain before 2nd marker, 1 YO, K 4 (marker is in the middle of these sts), 1 YO, K 2 in next st, work until 3 sts remain before 3rd marker, K 2 in next st, 1 YO, K 4 (marker is in the middle of these sts), 1 YO, work until 2 sts before 4th marker, 1 YO, K 4 (marker is in the middle of these sts), 1 YO, K 2 in next st, work the remaining sts on round. REMEMBER THE KNITTING TENSION Repeat inc on every other round as follows: On sleeves 14-15-16-17-19-20 more times (= 15-16-17-18-20-21 times in total), on body with 2 sts 7-9-11-14-16-20 more times (= 8-10-12-15-17-21 times in total) and then on body with 1 st 7-6-5-3-3-0 times. When all inc are done, there are 250-268-290-314-342-372 sts on round and piece measures 14-15-16-17-18-19 cm from the neck mid front and down. Now work as follows: Work the first 38-42-45-49-54-60 sts (= half back piece) slip the next 48-50-54-58-62-66 sts on a stitch holder (= sleeve), cast on 8 sts under sleeve, work the next 77-84-91-99-109-120 sts (= front piece), slip the next 48-50-54-58-62-66 sts on a stitch holder (= sleeve), cast on 8 sts under sleeve, work the remaining 39-42-46-50-55-60 sts on needle (= half back piece). NOW MEASURE THE PIECE FROM HERE. BODY: There are now 170-184-198-214-234-256 sts on round. Continue in the round in stocking st and STRIPES - see explanation above. When piece measures 35-36-37-38-39-40 cm, work as follows: Work 39-43-46-50-55-61 sts in stocking st, work 6 sts in GARTER ST - see explanation above, work 79-86-93-101-111-122 sts in stocking st, work 6 sts in garter st, work stocking st over the remaining 40-43-47-51-56-61 sts. Continue like this until 2 ridges have been work over the 6 sts in each side (= over vents). Now divide the piece into front and back piece as follows: Work the first 42-46-49-53-58-64 sts as before (i.e. stocking st with 3 sts in garter st in the side), turn and work back over 85-92-99-107-117-128 sts (work the first and last 3 sts in garter st) = back piece. Slip the remaining 85-92-99-107-117-128 sts on a stitch holder for front piece. Continue back and forth over sts on needle until piece measures 42-43-44-48-46-47 cm. On next row from RS switch to circular needle size 4.5 mm and inc 13-16-19-21-21-25 sts evenly (but not over the 3 outermost sts) = 98-108-118-128-138-153 sts. Work 1 row from WS as before, then work rib (K 2/P 3) with 3 sts in garter st in each side. NOTE: Beg and end with K 2 inside the 3 sts in garter st in each side. When rib measures 6 cm, cast off with K over K and P over P. Piece measures 66-68-70-72-74-76 cm in total from shoulder. Slip sts from stitch holder back on needle and work as back piece. SLEEVE: Work sleeve in stocking st in the round on double pointed needles. There are 48-50-54-58-62-66 sts for each sleeve. Slip sts from stitch holder back on double pointed needles size 5 mm and cast on 8 new sts under sleeve = 56-58-62-66-70-74 sts. Work in stocking st and stripes as on body in the round, AT THE SAME TIME insert a marker in the middle of the new sts under sleeve (i.e. 4 new sts on each side of marker). NOW MEASURE THE PIECE FROM HERE. When piece measures 4 cm, dec 1 st on each side of marker - READ DECREASE TIP. Repeat dec approx. every 4-4-3-3-2½-2½ cm 10-10-12-13-14-15 more times = 34-36-36-38-40-42 sts. When sleeve measures 45-45-45-45-44-44 cm (NOTE: Shorter measurements in the larger sizes because of longer yoke), switch to double pointed needles size 4.5 mm and inc 6-4-9-7-5-8 sts evenly on next round = 40-40-45-45-45-50 sts. Work rib = K 2/P 3 for 6 cm. When sleeve measures 51-51-51-51-50-50 cm, cast off with K over K and P over P. Work the other sleeve the same way. ASSEMBLY: Sew the openings under the sleeves. |
|
 |
|
Have you finished this pattern?Tag your pictures with #dropspattern #weekendgetawaysweater or submit them to the #dropsfan gallery. Do you need help with this pattern?You'll find 27 tutorial videos, a Comments/Questions area and more by visiting the pattern on garnstudio.com. © 1982-2026 DROPS Design A/S. We reserve all rights. This document, including all its sub-sections, has copyrights. Read more about what you can do with our patterns at the bottom of each pattern on our site. |


With over 40 years in knitting and crochet design, DROPS Design offers one of the most extensive collections of free patterns on the internet - translated to 17 languages. As of today we count 324 catalogues and 12290 patterns translated into English (UK/cm). 12290
We work hard to bring you the best knitting and crochet have to offer, inspiration and advice as well as great quality yarns at incredible prices! Would you like to use our patterns for other than personal use? You can read what you are allowed to do in the Copyright text at the bottom of all our patterns. Happy crafting!
Post a comment to pattern DROPS 169-7
We would love to hear what you have to say about this pattern!
If you want to leave a question, please make sure you select the correct category in the form below, to speed up the answering process. Required fields are marked *.