
Popular categories
Looking for a yarn?


Comments / Questions (104)
![]() Lusia wrote:
Lusia wrote:
Hallo, Ich habe Schwierigkeiten bei der Raglanabnahme. In der Anleitung der Passe heißt es, dass in jeder 2. Runde abgenommen werden soll, die Raglanabnahme hat jedoch Abnahmen in Hin- und Rückreihen. (Verschiedene Abnahmen) Ich habe es nach Angaben der Raglanabnahme gestrickt und dabei wird Passe am Ärmel (Größe M) zu eng. Haben Sie eventuell einen Tipp hierbei für mich?
27.02.2020 - 09:22DROPS Design answered:
Liebe Luisa, stimmt Ihre Maschenprobe? Wenn Sie keine 32 Reihe = 10 cm haben, dann sollen Sie ab un zu extra Runden/Reihen ohne Abnahmen zwischen die Runden/Reihen mit Abnahmen, damit die Höhe stimmt und der Raglan nicht zu eng wird. Für M muss man in jeder 2. Runde/Reihe 25 Mal und 5 Mal in jeder Reihe abnehmen. Viel Spaß beim stricken!
27.02.2020 - 09:51
![]() Lydia wrote:
Lydia wrote:
Wenn ich den Anschlag des Rumpfteils mit einer Nadelstärke von 3,0mm statt 2,50mm mache, wie kann ich die benötigte Maschenanzahl berechnen, da im Diagramm nicht angegeben ist, wie breit der Anschlag ist. Maschenprobe ist 23 M x 30 R. Liebe Grüße
02.02.2020 - 17:00DROPS Design answered:
Liebe Lydia, leider können wir nicht jede Anleitung nach jeder individueller Wunsch umrechnen. Denken Sie daran, Ihre Maschenprobe zu spannen um sie noch mal zu messen. Am besten immer die Maschenproben erreichen, hier lesen Sie mehr. Viel Spaß beim stricken!
03.02.2020 - 10:21
![]() Héloïse wrote:
Héloïse wrote:
Bonjour, Je me pose une question pour la taille S, entre la partie empiècement et encolure. On part de 354 mailles, on fait 25x8 diminutions puis 5x8 diminutions. Il reste donc 114 mailles après l'empiècement. Dans la partie encolure, je ne compte que 7 diminutions (2 fois 2m et 3 fois 1m). Or on doit arriver à 83 mailles à la fin des diminutions du raglan et de l'encolure. Quelles sont les autres diminutions à faire pour arriver à 83 mailles ? Merci d'avance
20.01.2020 - 22:11DROPS Design answered:
Bonjour Héloïse, il vous manque les 17 mailles mises en attente pour l'encolure: 354 - 240 m raglan = 114 - 17 m mises en attente - 14 m pour l'encolure = 83 m. Bon tricot!
21.01.2020 - 09:54
![]() Kristina wrote:
Kristina wrote:
Meine Mama hat mir den Pulli zum Geburtstag stricken wollen und nun sind wir beide sehr frustriert: Trotz exakt genauer Maschenprobe sind bei dem Pullover mit den für Größe L angegebenen Maschenanzahlen alle Maße für Größe M rausgekommen und der aufwendig gestrickte Pullover ist mir so zu klein. Hat schon mal jmd. den Pulli in Größe L gestrickt und das gleiche Problem gehabt?
17.11.2019 - 16:20DROPS Design answered:
Liebe Kristina, haben Sie bemerkt, daß für dieses Modell Grösse L ist 4. Grösse und nicht 3. wie üblich, denn die Anleitung auch in XS ist? In Grösse L sollen Sie dann (nach A.1 und Abnahmen) 248 Maschen haben = ca 103 cm, dh ca 52 cm wie bei der Maßskizze, Größe L. Viel Spaß beim stricken!
18.11.2019 - 10:29
![]() Giedre Bøttcher wrote:
Giedre Bøttcher wrote:
Hvordan bliver der 184 masker efter A1 møster? I selve møstret (A1) tages der ingen masker ind, så jeg har stadig 222 masker efter jeg har strikket A 1 færdig og hartaget de 8 masker ind.
13.11.2019 - 17:50DROPS Design answered:
Hei Giedre! I siste omgang av mønster A.1 felles det 2 masker per mønsterrapport slik: sett 2 m på flettep foran arb, 2 rett sammen, 2 vridd rett sammen fra flettep. Det vil da felles 46 masker og maskeantallet vil tilsvare 184 masker. Lykke til!
14.11.2019 - 11:39
![]() Eb wrote:
Eb wrote:
Bonjour Madame, je commence le modèle taille L, et vais commencer le premier diagramme mais je n'arrive pas à comprendre comment passer de 448 puis 320 pour finir à 256 mailles. J'ai diminué comme écrit à 3 et 4 cm mais quand diminuer, ensuite SVP? Merci beaucoup de votre aide! Cordialement.
21.10.2019 - 11:27DROPS Design answered:
Bonjour Eb, vous tricotez les 448 mailles en répétant 64 fois (2 m end, 5 m env). À 3 cm, vous diminuez 1 m env dans toutes les sections 5 m env et continuez ainsi en côtes (2 m end, 4 m env) x 64= 384 m. Vous diminuez ensuite encore 1 m envers (2 m end, 3 m env) x 64 = 320 m. On tricote ensuite 32 fois A.1 (= 10 m au 1er rang). Quand A.1 est terminé, il reste 8 m (cf dernier symbole) soit 8x32=256 m. Bon tricot!
21.10.2019 - 11:57
![]() TATIANA wrote:
TATIANA wrote:
Bonsoir, Serait-il possible d'avoir les explications pour des aiguilles droites car je ne tricote pas avec des aiguilles circulaires et ce modèle me plaît terriblement. Même si c'est payant je suis preneuse,je comprendrai tout à fait . dans l'attente de votre répose Cordialement tatiana
15.08.2019 - 01:03DROPS Design answered:
Bonjour Tatiana, nous ne sommes malheureusement pas en mesure de pouvoir adapter chacun de nos modèles à chaque demande, vous trouverez toutefois ici, comment adapter un modèle sur aiguilles droites. Votre magasin DROPS pourra volontiers vous assister, même par mail ou téléphone. Bon tricot!
15.08.2019 - 10:19
![]() Cornelia wrote:
Cornelia wrote:
Nachdem ich alle Teile auf einer Rundnadel aufgebracht habe, lassen sich die Armteile nicht mehr vernünftig abstricken, weil die Rundungen zu eng sind. Bei mir sind die Lücken ca. 8 cm groß. Dadurch sind die Rundungen für die Nadespitzen zu eng.
11.07.2019 - 22:01DROPS Design answered:
Liebe Cornelia, für die ersten Runden können Sie die Maschen beiden Ärmel mit einem anderen Rundnadel oder immer mit den Nadelset stricken - oder mit Magic loop, nach einigen Runden wird es einfacher. Viel Spaß beim stricken!
12.07.2019 - 08:34
![]() Helena wrote:
Helena wrote:
Als beginner heb ik deze trui gebreid en het is me meteen goed gelukt! Dankzij jullie goede en duidelijke beschrijving! Ik ben heel blij met het resultaat, ik heb ook veel complimenten voor mijn trui gekregen. Bedankt!
26.03.2019 - 15:05
![]() Nadine wrote:
Nadine wrote:
Uit mijn vraag blijkt natuurlijk mijn onervarenheid: is dit patroon te doen voor een beginner? Kun je met het patroon, de Drops video's en wat doorzettingsvermogen deze prachtige trui maken?
24.03.2019 - 21:04DROPS Design answered:
Dag Nadine,
Van afstand is het lastig te beoordelen of dit patroon voor jou goed te doen is en ik weet ook niet precies hoeveel ervaring je hebt, maar met behulp van de video's, lessen e.d. kom je een heel eind. Als je twijfelt kan je bijv. ook eerst een proeflapje maken van het patroontje of anders eerst iets breien uit de makkelijke patronen.
25.03.2019 - 08:46
|
||||||||||||||||||||||||||||
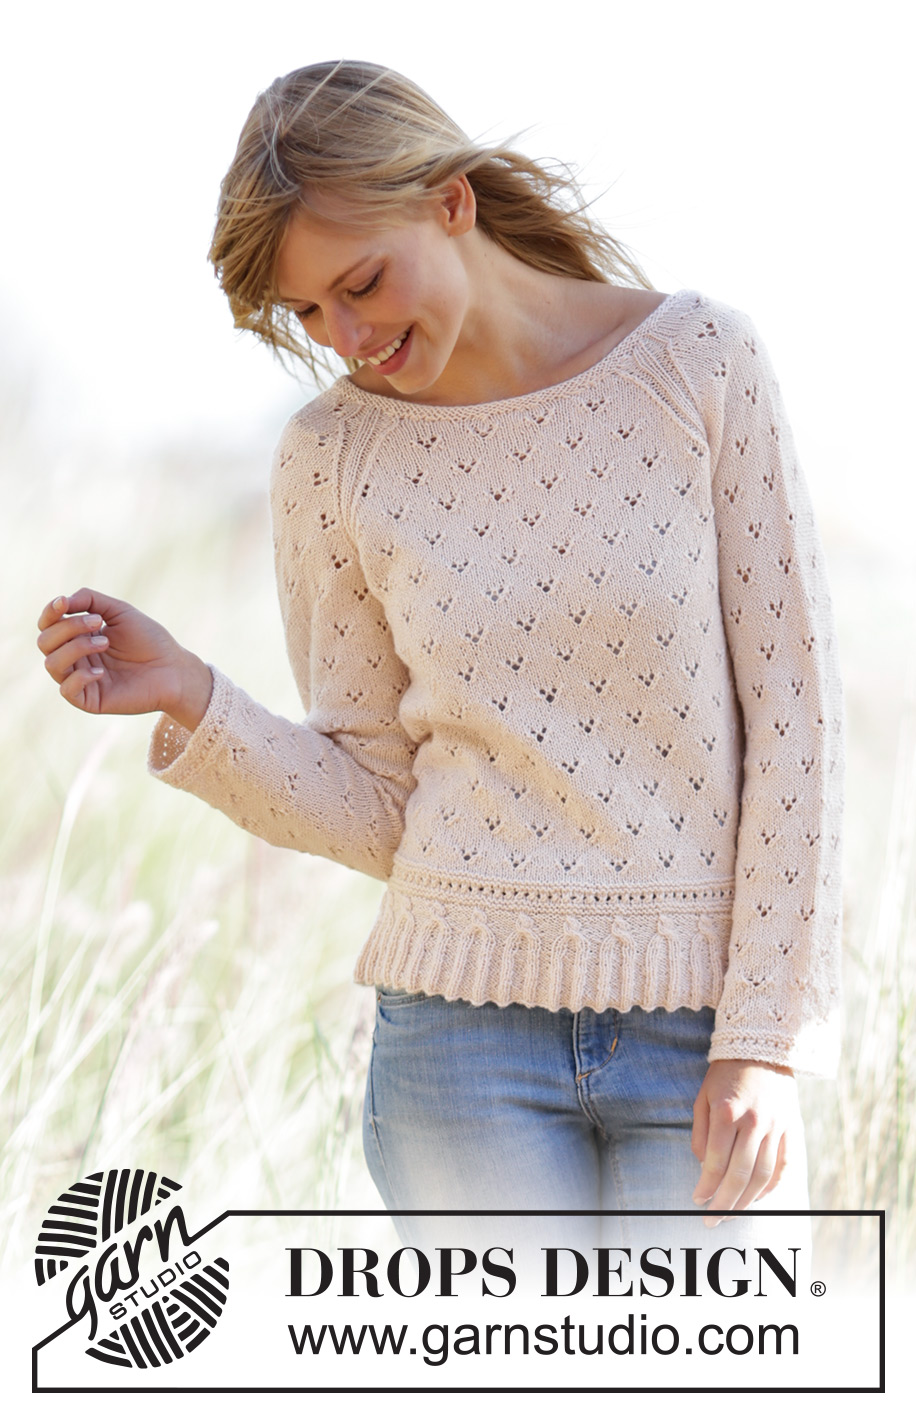
Vintage Charmer#vintagecharmersweater |
||||||||||||||||||||||||||||
|
|
||||||||||||||||||||||||||||
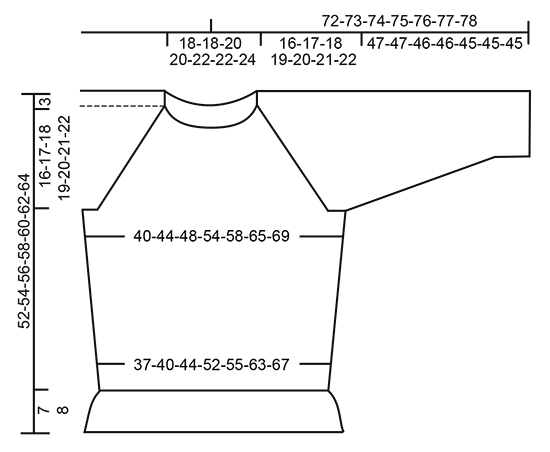
Knitted DROPS jumper with a small cable edge, lace pattern and raglan in ”BabyMerino” or "DROPS ♥ You #7". Size: XS - XXXL.
DROPS 169-10 |
||||||||||||||||||||||||||||
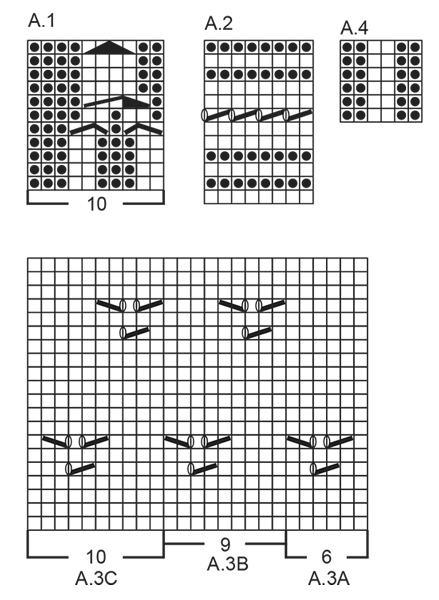
|
GARTER ST (worked in the round): 1 ridge = 2 rounds. * K 1 round and P 1 round *, repeat from *-*. PATTERN: See diagrams A.1 to A.4. INCREASE TIP: Inc 1 st on each side of marker as follows: Work until 1 sts remain before marker: Make 1 YO, work 2 sts in stocking st (marker is in the middle of these 2 sts), make 1 YO. On next round K YOs twisted to avoid holes - NOTE: Work inc sts in stocking st until they fit the pattern. RAGLAN: Dec for raglan on each side of A.4 in every transition between sleeves and body. DEC AS FOLLOWS FROM RS: Beg 2 sts before A.4, K 2 tog, A.4 (= 6 sts), slip 1 st as if to K, K 1, psso (= 2 sts dec). DEC AS FOLLOWS FROM WS: Beg 2 sts before A.4, P 2 twisted tog, A.4 (= 6 sts), P 2 tog (= 2 sts dec). DECREASE TIP (applies to neck edge): To calculate how often dec should be done, use the total no of sts on row (e.g. 114 sts) and divide by no of dec to be done (e.g. 10) = 11.4. I.e. in this example work alternately approx. every 10th and 11th st and every 11th and 12th st tog. ---------------------------------------------------------- BODY: Worked in the round on circular needle. Cast on 322-350-378-448-476-546-574 sts on circular needle size 2.5 mm with Baby Merino or DROPS ♥ You #7. K 1 round. Then work rib = K 2/P 5. When piece measures 3-3-3-3-4-4-4 cm, dec 1 st in every P-section by working the first 2 sts in every P-section P tog. Repeat dec when piece measures 4-4-4-4-5-5-5 cm, but now work the last 2 sts in every P-section P tog = 230-250-270-320-340-390-410 sts on needle. Now work pattern in the round according to diagram A.1 (= 23-25-27-32-34-39-41 repetitions of 10 sts). When A.1 has been worked vertically, 184-200-216-256-272-312-328 sts remain on needle and piece measures approx. 7-7-7-7-8-8-8 cm. K 1 round while at the same time dec 8-6-4-8-6-10-8 sts evenly = 176-194-212-248-266-302-320 sts. Switch to circular needle size 3 mm and work pattern in the round according to diagram A.2. After A.2 insert 1 marker at beg of round and 1 marker after 88-97-106-124-133-151-160 sts. Then work as follows: * Work A.3A (= 6 sts), repeat A.3B over the next 72-81-90-108-117-135-144 sts (= 8-9-10-12-13-15-16 repetitions of 9 sts), work A.3C (= 10 sts), marker *, repeat from *-* one more time. Continue pattern like this. REMEMBER THE KNITTING TENSION When piece measures 12 cm, inc 1 st on each side of marker in each side - READ INCREASE TIP (= 4 sts inc). Repeat inc every 5-5-6-8-10-10-10 cm a total of 4-4-4-3-3-3-3 times = 192-210-228-260-278-314-332 sts - NOTE: Work inc sts in stocking st until they fit the pattern. When piece measures 33-34-35-36-37-38-39 cm, work next round as follows: Cast off 3-3-4-4-5-5-5 sts for armhole, work 90-99-106-122-129-147-156 sts (= back piece), cast off 6-6-8-8-10-10-10 sts for armhole, work 90-99-106-122-129-147-156 sts (= front piece) and cast off the last 3-3-4-4-5-5-5 sts for armhole. Put piece aside and knit the sleeves. SLEEVE: Worked in the round on double pointed needles. Cast on 52-52-61-61-61-70-70 sts on double pointed needles size 2.5 mm with Baby Merino or DROPS ♥ You #7. K 1 round. Then work pattern in the round according to diagram A.2 - NOTE: On 7th round in A.2 K last st on round (applies to size M + L + XL). When A.2 has been worked, switch to double pointed needles size 3 mm. Insert 1 marker at the beg of the round. Work next round as follows: Work A.3A (= 6 sts), work A.3B over the next 36-36-45-45-45-54-54 sts (= 4-4-5-5-5-6-6 repetitions of 9 sts) and finish with A.3C (= 10 sts). Continue pattern like this. When piece measures 5-6-6-7-5-9-9 cm, inc 2 sts mid under sleeve - READ INCREASE TIP. Repeat inc every 3-2½-3-2½-2½-2½-2½ cm 14-16-13-15-16-14-17 times in total = 80-84-87-91-93-98-104 sts – NOTE: Work inc sts in stocking st until they fit the pattern again. Work until piece measures approx. 47-47-46-46-45-45-45 cm (NOTE: Shorter measurements in the larger sizes because of longer yoke) – adjust to work the same length in repetition of A.3 as on back body before dec for armholes. Work next round as follows: Cast off 3-3-4-4-5-5-5 sts, work 74-78-79-83-83-88-94 sts and cast off the remaining 3-3-4-4-5-5-5 sts. Put piece aside and knit another sleeve. YOKE: Slip sleeves on to same circular needle size 3 mm as body where armholes were cast off (without working them first) = 328-354-370-410-424-470-500 sts. Insert 1 marker in every transition between sleeves and body = 4 markers. Continue pattern as before and work in addition A.4 in every transition between body and sleeves (markers are in the middle of A.4). AT THE SAME TIME on first round beg dec for RAGLAN – see explanation above (= 8 sts dec). Repeat dec for raglan every other round a total of 24-25-28-29-32-34-34 times and then every round a total of 4-5-2-3-0-0-3 times - NOTE: Work sts that do not fit A.3 in stocking st when dec. NECK: AT THE SAME TIME when piece measures 46-48-50-51-53-54-56 cm, slip the middle 12-17-24-28-35-43-46 sts on 1 stitch holder for neck and finish piece back and forth on needle (in some sizes dec for raglan from both RS and WS). Continue with pattern and raglan as before and cast off for neck at beg of every row from the neck as follows: Cast off 3 sts 0-0-0-1-1-2-2 times, 2 sts 2 times and 1 st 3-3-3-4-4-4-4 times. After all dec and cast offs for raglan and neck, 78-83-92-104-111-127-130 sts remain on needle. NECK EDGE: Pick up from RS approx. 104-114-130-154-168-198-204 sts (incl sts on stitch holder at the front) on a short circular needle size 2.5 mm. P 1 round. K 1 round while dec evenly to 102-104-120-122-132-136-140 sts (i.e. dec approx. 2-10-10-32-36-62-64 sts) – READ DECREASE TIP. Work 2 ridges in GARTER ST - see explanation above, then loosely cast off. ASSEMBLY: Sew the openings under the sleeves. |
||||||||||||||||||||||||||||
Diagram explanations |
||||||||||||||||||||||||||||
|
||||||||||||||||||||||||||||
 |
||||||||||||||||||||||||||||
 |
||||||||||||||||||||||||||||
Have you finished this pattern?Tag your pictures with #dropspattern #vintagecharmersweater or submit them to the #dropsfan gallery. Do you need help with this pattern?You'll find 31 tutorial videos, a Comments/Questions area and more by visiting the pattern on garnstudio.com. © 1982-2026 DROPS Design A/S. We reserve all rights. This document, including all its sub-sections, has copyrights. Read more about what you can do with our patterns at the bottom of each pattern on our site. |
||||||||||||||||||||||||||||


With over 40 years in knitting and crochet design, DROPS Design offers one of the most extensive collections of free patterns on the internet - translated to 17 languages. As of today we count 324 catalogues and 12290 patterns translated into English (UK/cm). 12290
We work hard to bring you the best knitting and crochet have to offer, inspiration and advice as well as great quality yarns at incredible prices! Would you like to use our patterns for other than personal use? You can read what you are allowed to do in the Copyright text at the bottom of all our patterns. Happy crafting!
Post a comment to pattern DROPS 169-10
We would love to hear what you have to say about this pattern!
If you want to leave a question, please make sure you select the correct category in the form below, to speed up the answering process. Required fields are marked *.