
Popular categories
Looking for a yarn?


Comments / Questions (19)
![]() Åse Halonen wrote:
Åse Halonen wrote:
Er det mulig å få brystvidde / overvidde på oppskriftene? Det er ikke bestandig at X og XL osv er lik fra oppskrift til oppskrift, eller fra leverandørene. Det er veldig lett å velge str når f.eks XL = f.eks 112 cm
15.01.2016 - 07:56DROPS Design answered:
Hej. Längst ner på alla våra oppskrifter hittar du en måleskiss. Lycka till!
19.01.2016 - 10:06
![]() Michela Sali wrote:
Michela Sali wrote:
Non so usare i ferri circolari, come posso trasformare le spiegazioni per usare i ferri diritti? Grazie
13.11.2015 - 17:13DROPS Design answered:
Buonasera Michela, per il cardigan non è un problema perchè non viene lavorato in tondo, per cui può utilizzare i ferri dritti, per il cappello la lavorazione richiede l'uso dei ferri circolari e non è molto fattibile con i ferri dritti: potrebbe in alternativa utilizzare il gioco di ferri. Buon lavoro!
14.11.2015 - 22:13
![]() Stacey wrote:
Stacey wrote:
The pattern says start A2 on a RS row and complete A2 which u get 301 sts and then start RS row increase but I counted and their are 35 rows so the next row would be an WS row. So I'm slightly confused ? X
05.11.2015 - 11:37
![]() Stacey wrote:
Stacey wrote:
The pattern says start A2 on a RS row and complete A2 which u get 301 sts and then start RS row increase but I counted and their are 35 rows so the next row would be an WS row. So I'm slightly confused ? X
05.11.2015 - 09:23DROPS Design answered:
Dear Stacey your question has been forwarded to our Design team. Thank you in advance for your patience.
05.11.2015 - 14:14
![]() Elly wrote:
Elly wrote:
Nog een vraag over de pas: wordt er met de raglan gestart in dezelfde naald waarin met telpatroon A3 wordt begonnen? Of start ik met de raglan in de daarop volgende naald aan de goede kant? (Dus in de derde naald van telpatroon A3.) B.v.d., Elly
30.08.2015 - 14:12DROPS Design answered:
Hoi Elly. Ja, je begint met het meerderen voor de raglan TEGELIJKERTIJD als je het patroon A.3 breit.
01.09.2015 - 17:04
![]() Elly wrote:
Elly wrote:
Ik ben bij de pas, bij telpatroon A3 en de raglan. Er staat 'brei de gemeerdere steken in patroon'. Moet ik bij de raglan dan niet steeds 5 antracietgrijze steken tussen de witte steken breien? Klopt het dat ik bij de raglan moet 'smokkelen' om in de rest van het vest een regelmatig patroon in de witte steken te hebben? Bij voorbaat dank, met vriendelijke groet, Elly
30.08.2015 - 13:55DROPS Design answered:
Hoi Elly. Ik begrijp je verwarring. Maar zoals ik het zou doen zou ik de panden/mouwen als 5 verschillende "delen" zien: voorpand, mouw, achterpand, mouw, voorpand. Je hebt het patroon gebreid over alle steken en gaat nu meerderen 1 st aan elk voorpand, 2 op de mouwen en het achterpand. Bij elk overgang moet je dan de nieuwe st meebreien in het patroon - en dan nu "afzonderlijk en niet gewoon achter elkaar zoals in de eerste naald. Op deze manier hou je ook de symmetrie middenvoor een op de mouwen.
01.09.2015 - 17:09
![]() Elly wrote:
Elly wrote:
Mooi patroon. Ik ga eraan beginnen. Voor het eerst met rondbreinaalden!
21.08.2015 - 18:46
![]() José wrote:
José wrote:
Prachtig patroon. Mooi fijn werk.
13.06.2015 - 16:32Mirka wrote:
Milujem "vypletance" ! Práca pribúda ani neviem ako.
01.06.2015 - 15:26
|
|||||||||||||||||||
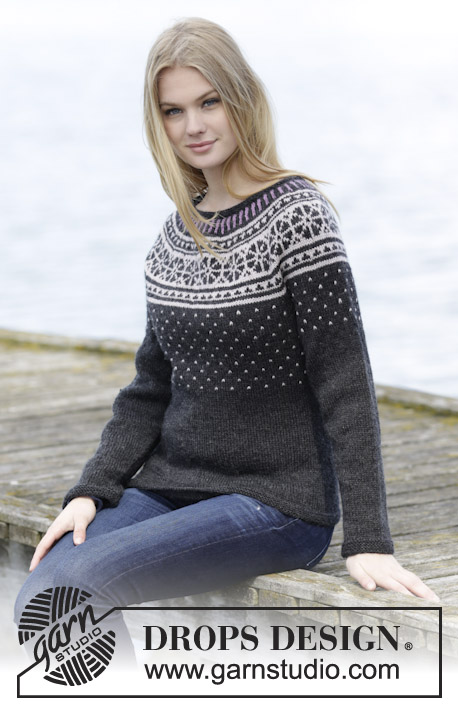
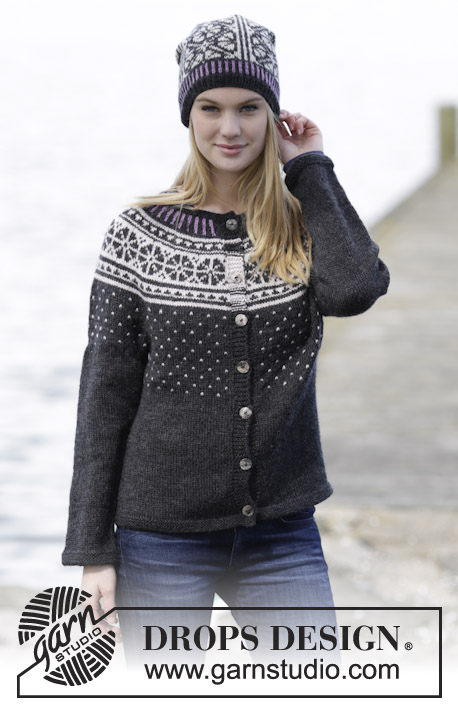
Starry Night#starrynightcardigan |
|||||||||||||||||||
 |
 |
||||||||||||||||||
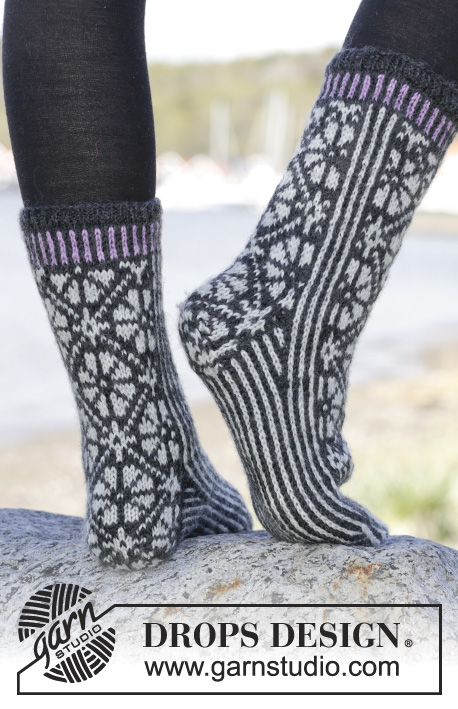
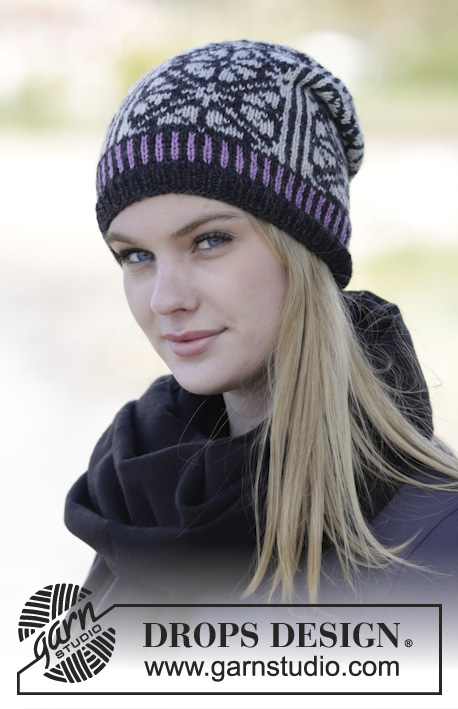
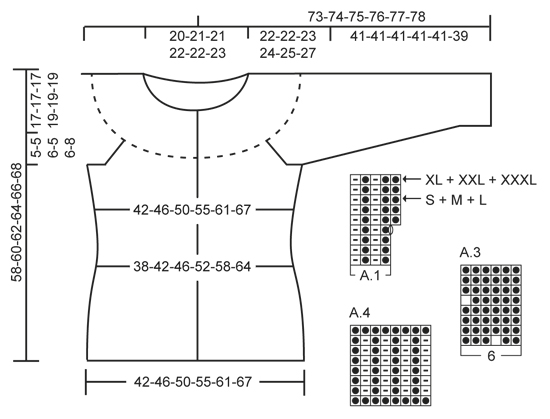
Set consists of: Knitted DROPS jacket with round yoke and Nordic pattern, worked top down and hat with Nordic pattern in ”Karisma”. Size: S - XXXL.
DROPS 166-24 |
|||||||||||||||||||
|
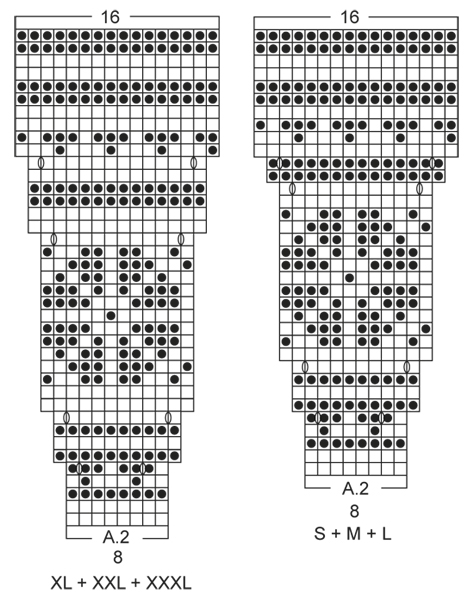
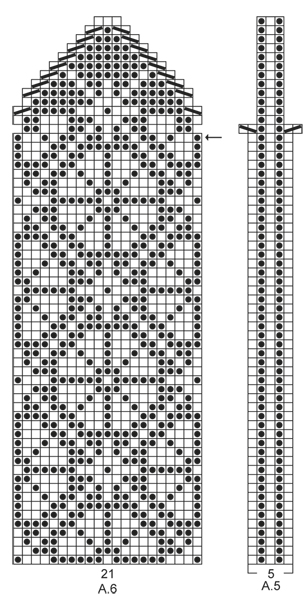
JACKET: GARTER ST (back and forth): K all rows. 1 ridge = 2 rows K. GARTER ST (worked in the round): * K 1 round and P 1 round *, repeat from *-*. 1 ridge = 2 rounds. PATTERN: See diagrams A.1 to A.3. The diagrams show all rows in pattern seen from RS. Work entire pattern in stocking st. KNITTING TIP: To avoid the knitting tension to tighten when working pattern on yoke, it is important not to tighten the strands on back side of piece. Switch to a higher needle no when working pattern if the pattern is somewhat tight. INCREASE TIP-1: All inc are done from RS. Inc 1 st by making 1 YO. On next round P YO twisted to avoid holes. INCREASE TIP-2 (applies to sides of body): Inc on each side of marker: All inc are done from RS as follows: Work until 2 sts remain before marker: Make 1 YO, K 4 (marker is in the middle of these 4 sts), make 1 YO (= 2 sts inc). On next row P YO twisted to avoid holes. RAGLAN: Inc for raglan on each side of marker in every transition between sleeves and body. All inc are done from RS as follows: Work until 1 sts remain before marker: Make 1 YO, K 2 sts (marker is in the middle of these 2 sts), make 1 YO (= 2 sts inc). On next round P YOs twisted to avoid holes. DECREASE TIP (applies to sides on body and mid under sleeve): Dec on each side of marker. All dec are done from RS as follows: Beg 4 sts before marker and K 2 tog, K 4 (marker is between these 4 sts), slip 1 st as if to K, K 1, psso (= 2 sts dec). BUTTONHOLES: Dec for buttonholes on right band. 1 buttonhole = work until 4 sts remain on needle (seen from RS), make 1 YO, K 2 tog and finish with K 2. Dec for buttonholes when piece measures (measured from cast-on edge): SIZE S: 2, 10, 18, 27, 36, 45 and 54 cm SIZE M: 2, 11, 20, 29, 38, 47 and 56 cm SIZE L: 2, 11, 20, 29, 38, 48 and 58 cm SIZE XL: 2, 10, 18, 26, 34, 42, 51 and 60 cm SIZE XXL: 2, 10, 18, 26, 34, 42, 51 and 60 cm SIZE XXXL: 2, 10, 18, 26, 35, 49, 53 and 62 cm ---------------------------------------------------------- JACKET: Work back and forth on circular needle from mid front, work top down. YOKE: Cast on 110-116-116-118-122-124 sts (incl 6 band sts each side towards mid front) on circular needle size 3 mm with anthracite. Work 2 ridges in GARTER ST - see explanation above. K 1 row from RS with anthracite while inc 3-9-9-19-23-33 sts evenly - READ INCREASE TIP-1 (do not inc over band sts) = 113-125-125-137-145-157 sts. Switch to circular needle size 4 mm and work as follows from WS: 6 band sts in garter st, work A.1 until 7 sts remain, work first st in A.1 and finish with 6 band sts in garter st. Continue pattern and inc on 4th row as shown in diagram (inc also before last st before band so that pattern beg and ends the same inside band in each side) = 26-29-29-32-34-37 sts inc and 139-154-154-169-179-194 sts on needle – REMEMBER KNITTING TENSION and remember BUTTONHOLES on right band – see explanation above. When A.1 has been worked (finish after a row marked with arrow for correct size), K 1 row from RS with anthracite while inc 2-3-3-4-2-3 sts evenly (do not inc over bands) = 141-157-157-173-181-197 sts. P 1 row from WS with anthracite (work band in garter st). Work next row as follows from RS: 6 band sts in garter st, work pattern according to diagram A.2 until 7 sts remain on row (choose diagram for correct size 16-18-18-20-21-23 repetitions of 8 sts), work first st in A.2 (so that pattern beg and ends the same way inside band in each) and finish with 6 band sts in garter st. Continue pattern like this and inc as shown in diagram. REMEMBER THE KNITTING TENSION When diagram A.2 has been worked, there are 269-301-301-333-349-381 sts on needle and piece measures approx. 17-17-17-19-19-19 cm from cast-on edge. P 1 row from WS, and K 1 row from RS while inc 6-4-4-8-10-2 sts evenly in last row (do not inc over bands) = 275-305-305-341-359-383 sts. Work next row as follows from WS with anthracite: Work the first 43-47-49-55-60-65 sts (= right front piece), insert a marker, work the next 57-64-60-66-65-67 sts (= sleeve), insert a marker, work the next 75-83-87-99-109-119 sts (= back piece), insert a marker, work the next 57-64-60-66-65-67 sts (= sleeve), insert a marker, work the remaining 43-47-49-55-60-65 sts (= left front piece). READ ALL OF THE FOLLOWING SECTION BEFORE CONTINUING! Work next row as follows from RS: 6 band sts in garter st, work pattern according to diagram A.3 until 11 sts remain on row, work the first 5 sts in A.3 (so that pattern beg and ends the same inside band in each side) and finish with 6 band sts in garter st. Continue pattern like this. AT THE SAME TIME on next row from RS inc for RAGLAN – see explanation above. Repeat inc for raglan every 4th row (i.e. every other row from RS) 3-3-4-3-4-5 times in total – NOTE: Work the inc sts in pattern but always work 1 st on each side of each marker with anthracite. After inc for raglan there are 299-329-337-365-391-423 sts on row and piece measures approx. 22-22-23-24-25-27 cm from shoulder. Now work next row from WS as follows (continue pattern as before): Work the first 46-50-53-58-64-70 sts (= right front piece), slip the next 63-70-68-72-73-77 sts on a stitch holder (= sleeve), cast on 8-8-10-10-12-12 new sts on needle (= in the side of body), work the next 81-89-95-105-117-129 sts (= back piece), cast on 8-8-10-10-12-12 new sts on needle (= in the side on body), slip the next 63-70-68-72-73-77 sts on a stitch holder (= sleeve) and work the remaining 46-50-53-58-64-70 sts as before (= left front piece). BODY: = 189-205-221-241-269-293 sts. Insert 1 marker, NOW MEASURE PIECE FROM HERE! Insert 1 marker 50-54-58-63-70-76 sts in from each side (= 89-97-105-115-129-141 sts between markers on back piece). Continue back and forth as before with pattern according to diagram A.3 and 6 band sts in garter st in each side towards mid front - NOTE: Continue pattern on yoke - work the sts that do not fit the pattern in the sides of body in anthracite. AT THE SAME TIME when piece measures 4-4-4-5-5-5 cm, dec on each side of marker in the sides of body - READ DECREASE TIP (= 4 sts dec). Repeat dec in each side every 3-3-3-5-6-6 cm a total of 4-4-4-3-3-3 times = 173-189-205-229-257-281 sts - NOTE: Work sts that do not fit the pattern when dec in anthracite. AT THE SAME TIME when piece measures 8-9-10-11-12-13 cm, finish A.3 and work with anthracite until finished measurements. AT THE SAME TIME when piece measures 18-18-19-21-23-23 cm (piece measures approx. 40-40-42-45-48-50 cm from shoulder), inc on each side of markers in the sides of body - READ INCREASE TIP-2 (= 4 sts inc). Repeat inc every 4-4-4-5-5-5 cm a total of 4-4-4-3-3-3 times = 189-205-221-241-269-293 sts. When piece measures 34-36-37-38-39-39 cm (piece measures approx. 56-58-60-62-64-66 cm from shoulder), switch to circular needle size 3 mm. Work 4 ridges and LOOSELY cast off. Jacket measures approx. 58-60-62-64-66-68 cm from shoulder. SLEEVE: Worked in the round on double pointed needles. Slip sts from stitch holder in one side of piece on double pointed needles size 4 mm. Continue pattern in the round as before and cast on 8-8-10-10-12-12 new sts at the end of first round = 71-78-78-82-85-89 sts. Insert 1 marker in the middle of the 8-8-10-10-12-12 new sts (= mid under sleeve) – NOW MEASURE PIECE FROM HERE. NOTE: Continue pattern on yoke - work the sts that do not fit the pattern mid under sleeve in anthracite. When piece measures 2-3-3-3-3-4 cm, dec on each side of marker – REMEMBER DECREASE TIP (= 2 sts dec). Repeat dec every 3-2-2-2-2-1½ cm a total of 11-14-14-15-16-17 times = 49-50-50-52-53-55 sts. AT THE SAME TIME when piece measures 4-4-4-6-6-6 cm, finish A.3 and work with anthracite until finished measurements. Work until piece measures 39-39-39-39-39-37 cm (2 cm remain before finished measurements, try the jacket and work to desired length). Switch to double pointed needles size 3 mm. Work 4 ridges in GARTER ST - see explanation above, LOOSELY cast off. Sleeve measures approx. 41-41-41-41-41-39 cm (shorter measurements in the larger sizes because of wider shoulders). Work the other sleeve the same way. ASSEMBLY: Sew the openings under the sleeves. Sew the buttons on to the left band. ---------------------------------------------------------- HAT: PATTERN: See diagrams A.4 to A.6. Work entire pattern in stocking st. KNITTING TIP: If you want a shorter hat than measurements in pattern work until 4 cm remain before desired length and dec as explained in pattern. DECREASE TIP: Dec 1 st on each side of the middle 3 sts in A.5 as shown in diagram. Beg 1 st before A.5, K 2 tog with light pearl grey, work 1 st anthracite, 1 st light pearl grey, 1 st anthracite (= the 3 middle sts in A.5), slip 1 st as if to K, K 1 with light pearl grey, psso (= 2 sts dec). -------------------------------------------------------- HAT: Worked in the round on circular needle, switch to double pointed needles when needed. Cast on 104 sts on circular needle size 3 mm with anthracite. K 1 round, then work rib = K 1/P 1 for 6 rounds. Switch to circular needle size 3.5 mm and work pattern in the round according to diagram A.4. When A.4 has been worked, piece measures approx. 4½ cm. Then work pattern in the round as follows: * Work A.5 (= 5 sts), A.6 (= 21 sts) *, repeat from *-* 4 times in total. Continue pattern like this. REMEMBER KNITTING TENSION AND READ KNITTING TIP. When round marked with arrow in diagram A.6 has been worked, beg dec at the top of hat. Dec 1 st on each side of the middle 3 sts in A.5 - READ DECREASE TIP and see diagram (= 8 sts dec). Repeat dec every other round a total of 3 times and then every round 7 times in total = 24 sts remain on needle. K 1 round with anthracite while K all sts tog 2 by 2 = 12 sts. Cut the yarn and pull it through the remaining sts, tighten tog and fasten. Hat measures approx. 24 cm. |
|||||||||||||||||||
Diagram explanations |
|||||||||||||||||||
|
|||||||||||||||||||
 |
|||||||||||||||||||
 |
|||||||||||||||||||
 |
|||||||||||||||||||
Have you finished this pattern?Tag your pictures with #dropspattern #starrynightcardigan or submit them to the #dropsfan gallery. Do you need help with this pattern?You'll find 29 tutorial videos, a Comments/Questions area and more by visiting the pattern on garnstudio.com. © 1982-2026 DROPS Design A/S. We reserve all rights. This document, including all its sub-sections, has copyrights. Read more about what you can do with our patterns at the bottom of each pattern on our site. |
|||||||||||||||||||


With over 40 years in knitting and crochet design, DROPS Design offers one of the most extensive collections of free patterns on the internet - translated to 17 languages. As of today we count 324 catalogues and 12285 patterns translated into English (UK/cm). 12285
We work hard to bring you the best knitting and crochet have to offer, inspiration and advice as well as great quality yarns at incredible prices! Would you like to use our patterns for other than personal use? You can read what you are allowed to do in the Copyright text at the bottom of all our patterns. Happy crafting!
Post a comment to pattern DROPS 166-24
We would love to hear what you have to say about this pattern!
If you want to leave a question, please make sure you select the correct category in the form below, to speed up the answering process. Required fields are marked *.