
Popular categories
Looking for a yarn?


Comments / Questions (120)
![]() Mareike wrote:
Mareike wrote:
Ich schätze, ich brauche für die nächste Reihe eine Step by Step Anleitung! Vielen vielen Dank!!!
30.12.2015 - 11:11DROPS Design answered:
Antwort siehe unten! :-)
25.01.2016 - 11:33
![]() Mareike Meyer wrote:
Mareike Meyer wrote:
Hallo, Ich habe jetzt schon hin und her überlegt und ausprobiert, aber ich bekomme den Teil des Rückenteils nicht hin, wo es um die Verschiebung geht. Ich stricke noch nicht so lange und verstehe es nicht... Ich bin nun bei 23 cm und habe nun die erste Verschiebung gestrickt, wie stricke ich nun in der nächsten Reihe (eine Rückreihe oder?) weiter? Ich habe das mit A4 im Zunahmetipp gelesen, das sagt mir aber nicht... Vielen Dank!!!
30.12.2015 - 11:10DROPS Design answered:
Es gibt mittlerweile ein Video zur Verschiebung, das finden Sie im Kopf neben dem Foto unter "Videos". Vielleicht hilft Ihnen das weiter.
25.01.2016 - 11:32
![]() Angela wrote:
Angela wrote:
Gli aumenti fatti accanto alla maglia di vivagno come devo lavorare sempre a legaccio o maglia rasata ,non ho capito se devo allungare il motivo A3 ho mantenerlo a 9 maglie,guardando la foto ai lati si vede dopo motivo A9 e non legaccio ,forse non capisco qualcosa
06.12.2015 - 14:46DROPS Design answered:
Buongiorno Angela. Le m aumentate devono essere lavorate ritorte (quindi nel filo dietro, per evitare che si formi un buco), ma seguendo il diagramma A.4. Il diagramma A.3 resta sempre di 9 m. Buon lavoro!
07.12.2015 - 14:06
![]() Kerstin Sheldrake wrote:
Kerstin Sheldrake wrote:
Ich habe dieses Modell gerade in Alpaka (A+A) beendet, und es sieht toll aus! Wieviel Gramm brauche ich um es in Brushed Alpaka Silk zu arbeiten? Danke!
03.12.2015 - 13:13DROPS Design answered:
Da Sie Ihre Größe nicht genannt haben, müssen Sie selbst ein wenig rechnen ;-): Nehmen Sie die Garnmenge von Air und rechnen Sie die Grammzahl auf die Lauflänge um, also z.B. für die kleinste Größe 400 g Air = 8 x 50 g = 8 x 150 m, das ergibt 1200 m. Wenn Sie das nun auf Brushed Alpaca Silk umrechnen, teilen Sie 1200 m durch die Lauflänge von Brushed Alpaca Silk: 25 g = 140 m, also 1200 m durch 140 m = 8,5, d.h. Sie benötigen für die kleinste Größe 9 Knäuel. (Die Lauflänge ist also etwa doppelt so lang wie die von Air, aber das Garn ist ein Flauschgarn und soll luftig wirken, daher können Sie es trotz dieses Lauflängenunterschieds verwenden.)
05.12.2015 - 19:04
![]() Trienke Van Der Velde wrote:
Trienke Van Der Velde wrote:
Hoe doe je dat met het verschuiven van A3 middenachter? Je moet meerderen aan begin (voor A3) en minderen na A3. Brei je dan de gemeerderde steken aan het begin ook in A3 patroon? Dus kantsteek, 2 av, etc. Of?
26.11.2015 - 17:18DROPS Design answered:
Hoi Trienke. Je verschuift door meerderen en minderen aan de zijkanten van A.3: Brei 1 kant st in ribbelst, meerder 1 st - LEES TIP VOOR HET MEERDEREN, A.3, minder 1 st - LEES TIP VOOR HET MINDEREN, tricotst tot er 2 st over zijn voor de volgende A.3, minder 1 st, A.3, meerder 1 st, 1 kant st in ribbelst. Je breit niet de nieuwe st in A.3 maar in tricotst. Op deze manier verplaatst het patroon zich richting middenachter.
30.11.2015 - 16:49
![]() M J Dorsman wrote:
M J Dorsman wrote:
Welke maat is XXXL??? Ik wil maat 54/56 breien.....maar uw maatr geeft breedte trui 60 cm terwijl in andere modellen ca. 72 of 75 cm breed wordt gemeten..... Klopt dus de maat in dit patroon en de hoeveelheid wol?????
12.11.2015 - 23:58DROPS Design answered:
Hoi. Meestal is maat XXXL een 46+, maar volg de afmetingen volgens de maattekening onderaan. De afmetingen en hoeveelheid wol zou moeten kloppen.
13.11.2015 - 15:29
![]() Elsa wrote:
Elsa wrote:
Je viens de monter les deux mailles pour les fentes dans le dos et je ne comprend pas comment faire A3 au dessus de A1 et A2, le motif du point fantaisie ne va pas suivre avec 2 mailles envers au dessus d'1 maille envers? Merci d'avance pour votre éclaircissement.
07.11.2015 - 15:14DROPS Design answered:
Bonjour Elsa, on monte 2 m et on tricote 1 m lis point mousse + les 9 m de A.3 au-dessus des 2 m montées + les 8 m de A.1/A.2, vous aurez ainsi: 1 m point mousse, les 9 m de A.3 (= la 1ère m de A.3 = la 2ème montée + les 8 m de A.1) et en fin de rang: 9 m de A.3 (= les 8 premières m de A.3 = les 8 m de A.2, la dernière m de A.3 = la 1ère m montée et on termine par 1 m point mousse). Bon tricot!
09.11.2015 - 09:52
![]() Anja wrote:
Anja wrote:
Ok, dann ist alles richtig und ich kann ganz entspannt weiterstricken :) Vielen Dank für die Hilfe!
14.10.2015 - 15:36
![]() Anja wrote:
Anja wrote:
Ich habe nun am Rückenteil mit der Verschiebung des Musters A3 zur Mitte hin begonnen und habe, wie in der Anleitung beschrieben, nach der Randmasche eine Masche zugenommen, dann das Muster A3 gestrickt und dann durch zusammenstricken 2 rechter Maschen wieder eine Masche abgenommen. Das ganze habe ich jetzt bereits 5x in jeder vierten Reihe wiederholt. Mein Strickstick läuft jetzt aber am Rand nicht mehr gerade hoch, sondern nach außen, also so V-ähnlich. Ist das so richtig?
12.10.2015 - 08:29DROPS Design answered:
Es klingt zumindest alles richtig. Eine leichter Schrägverlauf ergibt sich durch die Zu- und Abnahmen, da sie ja nicht ganz direkt nebeneinander liegen und die Zunahme beidseitig immer direkt neben der Rand-M erfolgt.
14.10.2015 - 12:29
![]() Madiloo wrote:
Madiloo wrote:
Thank you for your answer, I think I am almost there. However, you seem to be saying the sides are in stocking stitch, but looking at the photo, it looks like they have the A3 pattern. Please advise.
08.10.2015 - 15:40DROPS Design answered:
Dear Madiloo, see answer below, the new inc sts on each side should be worked in A.4 (see Increase tips). Happy knitting!
08.10.2015 - 17:30
|
|||||||
Sigrid#sigridsweater |
|||||||
|
|
|||||||
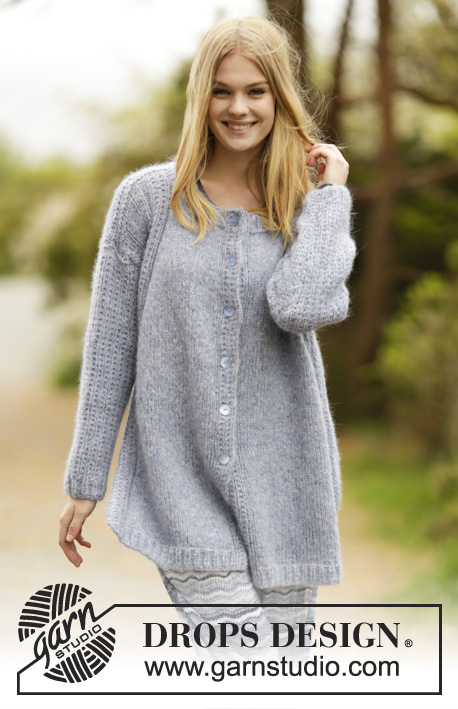
Knitted DROPS jumper with false raglan, vent and textured pattern on shoulders and sleeves in ”Air”. Size: S - XXXL.
DROPS 166-18 |
|||||||
|
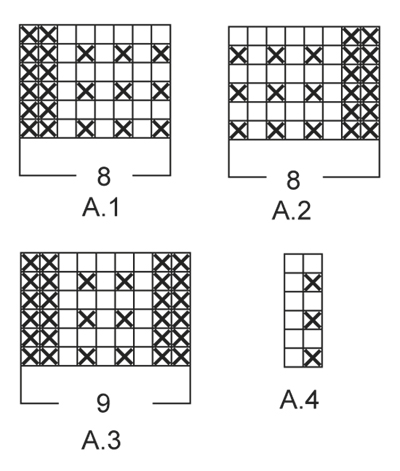
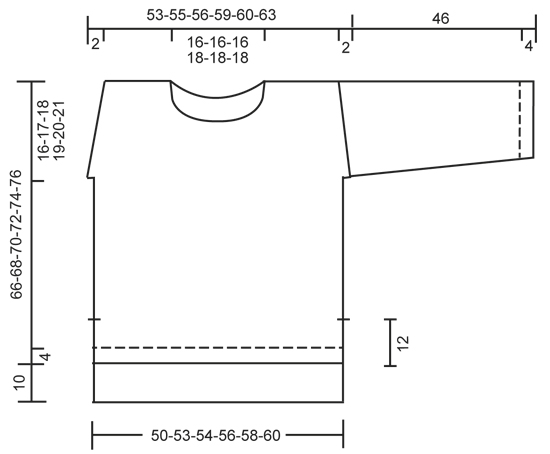
GARTER ST (back and forth): K all rows. 1 ridge = 2 rows K. PATTERN: See diagrams A.1 to A.4. The diagrams show all rows in pattern seen from RS. INCREASE TIP: Inc 1 st by making 1 YO. On next row work YOs twisted, i.e. work in the back loop of st instead of front to avoid holes. NOTE: Work the inc sts gradually in diagram A.4. DECREASE TIP: Dec 1 sts as follows: All dec are done from RS! Dec as follows after A.3: K 2 tog. Dec as follows before A.3: Work until 2 sts before A.3, slip 1 st as if to K, K 1, psso. ---------------------------------------------------------- JUMPER: Worked back and forth on circular needle and sewn tog when finished. Front piece is shorter than back piece. BACK PIECE: Cast on 95-98-101-107-113-116 sts on circular needle size 5 mm with Air. Work rib as follows: A.1 (= 8 sts), K 1, * P 2, K 1 *, repeat from *-* until 8 sts remain on row, A.2 (= 8 sts). Continue like this back and forth until piece measures 4 cm. On next row from RS switch to circular needle size 5.5 mm and work as follows: A.1, stocking st over the next 79-82-85-91-97-100 sts, AT THE SAME TIME dec 15-14-15-17-21-20 sts evenly, A.2 = 80-84-86-90-92-96 sts on needle in total. Continue in stocking st, work A.1 and A.2 in each side as before until piece measures 22 cm in all sizes. REMEMBER THE KNITTING TENSION At the end of the next 2 rows cast on 2 new sts (marks vent) = 84-88-90-94-96-100 sts. Now work A.3 (= 9 sts) over A.1 and A.2. i.e. inside 1 edge st in GARTER ST - see explanation above - in each side. When piece measures 26-24-24-23-23-23 cm, beg displacement of A.3 towards mid back. Work 1 edge st in garter st, inc 1 st - READ INCREASE TIP, A.3, dec 1 st - READ DECREASE TIP, stocking st until 2 sts remain before next A.3, dec 1 st, A.3, inc 1 st, 1 edge st in garter st. Repeat displacement of A.3 every 4th row 17-19-20-21-22-24 more times. NOTE: Inc is always inside 1 edge st in garter st in each side. AT THE SAME TIME when piece measures 60-61-62-63-64-65 cm, cast on 1 new st at the end of the next 2 rows for armholes = 86-90-92-96-98-102 sts. Continue pattern as before inside 1 edge st in garter st and 1 st in stocking st in each side. When piece measures 74-76-78-80-82-84 cm, cast off the middle 24-24-24-26-26-26 sts for neck and finish each shoulder separately. On next row from the neck, cast off 1 st = 30-32-33-34-35-37 sts remain on each shoulder. When piece measures 76-78-80-82-84-86 cm, work 1 ridge over all sts. Cast off. Work the other shoulder the same way. FRONT PIECE: Cast on and work as back piece. When piece measures 12 cm, work as follows: At the end of the next 2 rows cast on 2 new sts (marks vent) = 84-88-90-94-96-100 sts. Now work A.3 (= 9 sts) over A.1 and A.2. and work 1 edge st in garter st - see explanation above - in each side. When piece measures 16-14-14-13-13-13 cm, beg displacement of A.3 towards mid front as on back piece. AT THE SAME TIME when piece measures 50-51-52-53-54-55 cm, cast on 1 new st at the end of the next 2 rows for armholes = 86-90-92-96-98-102 sts. Continue pattern inside 1 edge st in garter st and 1 st in stocking st in each side. When piece measures 54-56-58-59-61-63 cm, slip the middle 14-14-14-16-16-16 sts on a stitch holder and finish each shoulder separately. Then cast off sts on every row from neck as follows: 3 sts 1 time, 2 sts 1 time and 1 st 1 time = 30-32-33-34-35-37 sts remain for shoulder. Work edge st towards neck in garter st. When piece measures 66-68-70-72-74-76 cm, work 1 ridge over all sts. Cast off. Work the other shoulder the same way. SLEEVE: Worked back and forth on circular needle. Cast on 39-41-43-43-43-45 sts on circular needle size 5 mm with Air. Work rib as follows: 1 edge st in garter st, K 1, * P 1, K 1 *, repeat from *-* until 1 st remains, 1 edge st in garter st. When rib measures 4 cm, switch to circular needle size 5.5 mm and continue pattern as follows: 1 edge st in garter st, work last st in A.4, repeat A.4 until 1 st remains, 1 edge st in garter st. When piece measures 10 cm, inc 1 st inside 1 edge st in garter st in each side. Work the inc sts in the pattern A.4. Repeat inc every 5½-4½-4½-3½-3-3 cm 6-7-7-9-11-11 more times = 53-57-59-63-67-69 sts. When sleeve measures 46 cm in all sizes, work a sleeve cap with short rows as follows from RS: Work until 8-9-9-10-11-12 sts remain, turn and work until 8-9-9-10-11-12 sts remain, turn and work until 17-19-19-21-22-23 sts remain, turn and work until 17-19-19-21-22-23 sts remain. Turn and work all sts on needle, turn and work over all sts. Cast off with K from RS. Knit another sleeve. ASSEMBLY: Sew the shoulder seams tog. Sew sleeves to body inside 1 edge st in garter st. Sew underarm seams and side seams in one inside 1 edge st in garter st but leave 12 cm for vent at the bottom of body (i.e. 22 cm on back piece and 12 cm on front piece). NECK EDGE: Beg from mid back and pick up approx. 120-130 sts (incl sts on stitch holder) on circular needle size 5 mm. K 1 round while adjusting the no of sts to 75-75-75-84-84-84. Then work rib (= K 1/P 2) for 3 cm. Cast off with K over K and P over P. |
|||||||
Diagram explanations |
|||||||
|
|||||||
 |
|||||||
 |
|||||||
Have you finished this pattern?Tag your pictures with #dropspattern #sigridsweater or submit them to the #dropsfan gallery. Do you need help with this pattern?You'll find 31 tutorial videos, a Comments/Questions area and more by visiting the pattern on garnstudio.com. © 1982-2026 DROPS Design A/S. We reserve all rights. This document, including all its sub-sections, has copyrights. Read more about what you can do with our patterns at the bottom of each pattern on our site. |
|||||||


With over 40 years in knitting and crochet design, DROPS Design offers one of the most extensive collections of free patterns on the internet - translated to 17 languages. As of today we count 324 catalogues and 12290 patterns translated into English (UK/cm). 12290
We work hard to bring you the best knitting and crochet have to offer, inspiration and advice as well as great quality yarns at incredible prices! Would you like to use our patterns for other than personal use? You can read what you are allowed to do in the Copyright text at the bottom of all our patterns. Happy crafting!
Post a comment to pattern DROPS 166-18
We would love to hear what you have to say about this pattern!
If you want to leave a question, please make sure you select the correct category in the form below, to speed up the answering process. Required fields are marked *.