
Popular categories
Looking for a yarn?


Comments / Questions (120)
![]() Claudia wrote:
Claudia wrote:
Hi, den Umschlag den ich in der Vorderseite mache, wird der auf der Rückseite dann links oder rechts abgestrickt. Danke☺
01.02.2016 - 17:07DROPS Design answered:
Liebe Claudia, die Frage zum Umschlag scheint geklärt zu sein.
09.03.2016 - 12:45
![]() Claudia wrote:
Claudia wrote:
Hallo! Ich habe mit der Verschiebung von A3 begonnen. Ich fange mit einer rechten Seite an. Wenn ich aber in jeder 4. Reihe eine Verschiebung arbeite, ist das doch eine linke, also die Rückseite?
01.02.2016 - 17:05DROPS Design answered:
Antwort siehe oben! :-)
03.02.2016 - 19:55Maria Monica Urbani wrote:
Buonasera. Vorrei capire bene come iniziare. Il primo ferro dopo l avvio delle maglie è considerato il rovescio del Lavoro? Come devo impostare il primo ferro? Scusate ma non mi trovo con i diagrammi. Grazie mille Monica
29.01.2016 - 21:28DROPS Design answered:
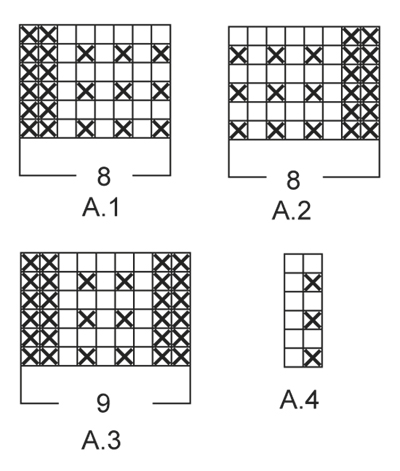
Buongiorno Maria Monica. Il primo ferro è sul diritto del lavoro. Quindi legge il diag. A.1 come segue (da destra verso sinistra): 1 m rov, 1 m dir, 1 m rov, 1 m dir, 1 m rov, 1 m dir, 2 m rov. Per il diag. A2: 2 m rov, 1 m dir, 1 m rov, 1 m dir, 1 m rov, 1 m dir, 1 m rov. Ci riscriva se ancora in difficoltà. Buon lavoro!
01.02.2016 - 08:56Maria Monica Urbani wrote:
Buonasera. Vorrei capire bene come iniziare. Il primo ferro dopo l avvio delle maglie è considerato il rovescio del Lavoro? Come devo impostare il primo ferro? Scusate ma non mi trovo con i diagrammi. Grazie mille Monica
29.01.2016 - 21:28DROPS Design answered:
Buongiorno Maria Monica. Il primo ferro è sul diritto del lavoro. Quindi legge il diag. A.1 come segue (da destra verso sinistra): 1 m rov, 1 m dir, 1 m rov, 1 m dir, 1 m rov, 1 m dir, 2 m rov. Per il diag. A2: 2 m rov, 1 m dir, 1 m rov, 1 m dir, 1 m rov, 1 m dir, 1 m rov. Ci riscriva se ancora in difficoltà. Buon lavoro!
01.02.2016 - 08:56
![]() Cristina Marchetti wrote:
Cristina Marchetti wrote:
Per fare un maglione da donna taglia 44 quanta lana drops air occorre ?
29.01.2016 - 19:06DROPS Design answered:
Buonasera Cristina, in basso alla fine delle spiegazioni può trovare il diagramma con le misure del capo finito, le confronti con un capo che le vada bene per scegliere la taglia corretta; le quantità di filato necessarie le trova in alto di fianco alla foto. Buon lavoro!
29.01.2016 - 19:20
![]() Martine Bart wrote:
Martine Bart wrote:
Un grand merci pour votre réponse j'ai enfin compris je pense !!! Mais il y avait un manque certain dans les explications. Bien cordialement. MB
21.01.2016 - 13:45
![]() Nardy wrote:
Nardy wrote:
Dank je wel. Dan doe ik het gelukkig toch goed.
06.01.2016 - 17:42
![]() Giulia wrote:
Giulia wrote:
Per il dietro non trovo corrispondenza tra lo schema A1 e A2 e la dicitura "lavorare a coste come segue: 1m a diritto *2m rov, 1m dir* e ripetere fino ai 4 cm". quando nello schema mi a me sembra che siano 2 m rovesce *1m dir, 1m rov* e ripetere e il ferro successivo 2 m a diritto e poi tutto rovescio fino alle ultime otto maglie con A2. Non capisco proprio cosa devo seguire..! Aiuto!
04.01.2016 - 12:43DROPS Design answered:
Buongiorno Giulia. Deve lavorare come segue: diag. A1 (1 rov, 1 dir, 1 rov, 1 dir, 1 rov, 1 dir, 2 rov), 1 dir , ripete * 2 rov, 1 dir * finché non rimangono 8 m che lavora come indicato nel diag.A2 (2 rov, 1 dir, 1 rov, 1 dir, 1 rov, 1 dir, 1 rov). Sul ferro di ritorno: A2 (6 rov, 2 dir), lavora a coste come si presentano le m, lavora le ultime 8 m seguendo il diag. A1 (2 dir, 6 rov). Buon lavoro!
05.01.2016 - 13:51
![]() Nardy Wegman wrote:
Nardy Wegman wrote:
Wat een worsteling met dit , naar wat ik dacht, simpele patroon. Het verschuiven moet je NIET MEEBREIEN? Op de foto zie ik dat patroon toch duidlijk breder wordt. Het blijft een patroon van 9 steken? Ik heb alles al een keer uitgehaald. Brei heel veel van jullie patronen zonder probleem en met veel succes, maar hier geloof ik toch echt dat er iets niet klopt. HELP
01.01.2016 - 17:37DROPS Design answered:
Hoi Nardy. Door het minderen en meerderen aan elke kant van A.3 verschuift je het patroon. Je blijft de steken breien volgens A.3 maar je krijgt meer steken voor A.3 en minder na. Ik hoop dat het wat duidelijker is zo, en ik heb gevraagd voor een instructievideo van deze techniek. Ik kan helaas niet zeggen hoelang het duurt op dit moment, maar reken op 1-2 weken.
05.01.2016 - 15:44
![]() Mareike wrote:
Mareike wrote:
Ich schätze, ich brauche für die nächste Reihe eine Step by Step Anleitung! Vielen vielen Dank!!!
30.12.2015 - 11:21DROPS Design answered:
Antwort siehe unten! :-)
25.01.2016 - 11:33
|
|||||||
Sigrid#sigridsweater |
|||||||
|
|
|||||||
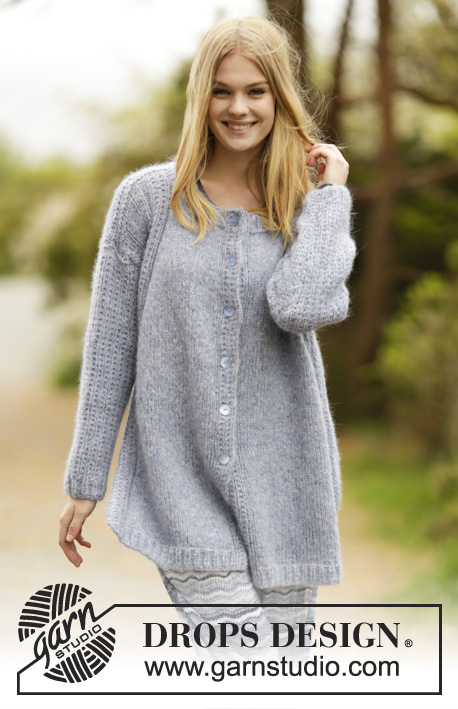
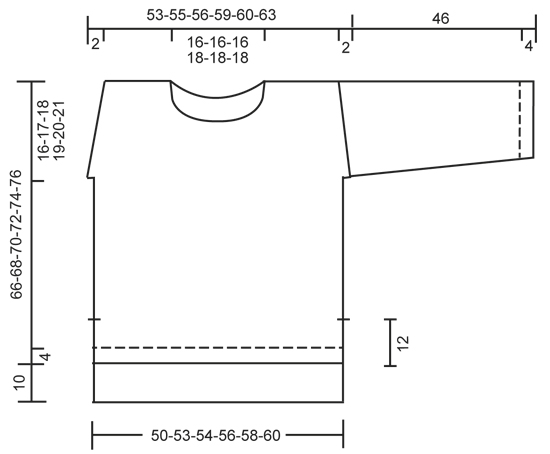
Knitted DROPS jumper with false raglan, vent and textured pattern on shoulders and sleeves in ”Air”. Size: S - XXXL.
DROPS 166-18 |
|||||||
|
GARTER ST (back and forth): K all rows. 1 ridge = 2 rows K. PATTERN: See diagrams A.1 to A.4. The diagrams show all rows in pattern seen from RS. INCREASE TIP: Inc 1 st by making 1 YO. On next row work YOs twisted, i.e. work in the back loop of st instead of front to avoid holes. NOTE: Work the inc sts gradually in diagram A.4. DECREASE TIP: Dec 1 sts as follows: All dec are done from RS! Dec as follows after A.3: K 2 tog. Dec as follows before A.3: Work until 2 sts before A.3, slip 1 st as if to K, K 1, psso. ---------------------------------------------------------- JUMPER: Worked back and forth on circular needle and sewn tog when finished. Front piece is shorter than back piece. BACK PIECE: Cast on 95-98-101-107-113-116 sts on circular needle size 5 mm with Air. Work rib as follows: A.1 (= 8 sts), K 1, * P 2, K 1 *, repeat from *-* until 8 sts remain on row, A.2 (= 8 sts). Continue like this back and forth until piece measures 4 cm. On next row from RS switch to circular needle size 5.5 mm and work as follows: A.1, stocking st over the next 79-82-85-91-97-100 sts, AT THE SAME TIME dec 15-14-15-17-21-20 sts evenly, A.2 = 80-84-86-90-92-96 sts on needle in total. Continue in stocking st, work A.1 and A.2 in each side as before until piece measures 22 cm in all sizes. REMEMBER THE KNITTING TENSION At the end of the next 2 rows cast on 2 new sts (marks vent) = 84-88-90-94-96-100 sts. Now work A.3 (= 9 sts) over A.1 and A.2. i.e. inside 1 edge st in GARTER ST - see explanation above - in each side. When piece measures 26-24-24-23-23-23 cm, beg displacement of A.3 towards mid back. Work 1 edge st in garter st, inc 1 st - READ INCREASE TIP, A.3, dec 1 st - READ DECREASE TIP, stocking st until 2 sts remain before next A.3, dec 1 st, A.3, inc 1 st, 1 edge st in garter st. Repeat displacement of A.3 every 4th row 17-19-20-21-22-24 more times. NOTE: Inc is always inside 1 edge st in garter st in each side. AT THE SAME TIME when piece measures 60-61-62-63-64-65 cm, cast on 1 new st at the end of the next 2 rows for armholes = 86-90-92-96-98-102 sts. Continue pattern as before inside 1 edge st in garter st and 1 st in stocking st in each side. When piece measures 74-76-78-80-82-84 cm, cast off the middle 24-24-24-26-26-26 sts for neck and finish each shoulder separately. On next row from the neck, cast off 1 st = 30-32-33-34-35-37 sts remain on each shoulder. When piece measures 76-78-80-82-84-86 cm, work 1 ridge over all sts. Cast off. Work the other shoulder the same way. FRONT PIECE: Cast on and work as back piece. When piece measures 12 cm, work as follows: At the end of the next 2 rows cast on 2 new sts (marks vent) = 84-88-90-94-96-100 sts. Now work A.3 (= 9 sts) over A.1 and A.2. and work 1 edge st in garter st - see explanation above - in each side. When piece measures 16-14-14-13-13-13 cm, beg displacement of A.3 towards mid front as on back piece. AT THE SAME TIME when piece measures 50-51-52-53-54-55 cm, cast on 1 new st at the end of the next 2 rows for armholes = 86-90-92-96-98-102 sts. Continue pattern inside 1 edge st in garter st and 1 st in stocking st in each side. When piece measures 54-56-58-59-61-63 cm, slip the middle 14-14-14-16-16-16 sts on a stitch holder and finish each shoulder separately. Then cast off sts on every row from neck as follows: 3 sts 1 time, 2 sts 1 time and 1 st 1 time = 30-32-33-34-35-37 sts remain for shoulder. Work edge st towards neck in garter st. When piece measures 66-68-70-72-74-76 cm, work 1 ridge over all sts. Cast off. Work the other shoulder the same way. SLEEVE: Worked back and forth on circular needle. Cast on 39-41-43-43-43-45 sts on circular needle size 5 mm with Air. Work rib as follows: 1 edge st in garter st, K 1, * P 1, K 1 *, repeat from *-* until 1 st remains, 1 edge st in garter st. When rib measures 4 cm, switch to circular needle size 5.5 mm and continue pattern as follows: 1 edge st in garter st, work last st in A.4, repeat A.4 until 1 st remains, 1 edge st in garter st. When piece measures 10 cm, inc 1 st inside 1 edge st in garter st in each side. Work the inc sts in the pattern A.4. Repeat inc every 5½-4½-4½-3½-3-3 cm 6-7-7-9-11-11 more times = 53-57-59-63-67-69 sts. When sleeve measures 46 cm in all sizes, work a sleeve cap with short rows as follows from RS: Work until 8-9-9-10-11-12 sts remain, turn and work until 8-9-9-10-11-12 sts remain, turn and work until 17-19-19-21-22-23 sts remain, turn and work until 17-19-19-21-22-23 sts remain. Turn and work all sts on needle, turn and work over all sts. Cast off with K from RS. Knit another sleeve. ASSEMBLY: Sew the shoulder seams tog. Sew sleeves to body inside 1 edge st in garter st. Sew underarm seams and side seams in one inside 1 edge st in garter st but leave 12 cm for vent at the bottom of body (i.e. 22 cm on back piece and 12 cm on front piece). NECK EDGE: Beg from mid back and pick up approx. 120-130 sts (incl sts on stitch holder) on circular needle size 5 mm. K 1 round while adjusting the no of sts to 75-75-75-84-84-84. Then work rib (= K 1/P 2) for 3 cm. Cast off with K over K and P over P. |
|||||||
Diagram explanations |
|||||||
|
|||||||
 |
|||||||
 |
|||||||
Have you finished this pattern?Tag your pictures with #dropspattern #sigridsweater or submit them to the #dropsfan gallery. Do you need help with this pattern?You'll find 31 tutorial videos, a Comments/Questions area and more by visiting the pattern on garnstudio.com. © 1982-2026 DROPS Design A/S. We reserve all rights. This document, including all its sub-sections, has copyrights. Read more about what you can do with our patterns at the bottom of each pattern on our site. |
|||||||


With over 40 years in knitting and crochet design, DROPS Design offers one of the most extensive collections of free patterns on the internet - translated to 17 languages. As of today we count 324 catalogues and 12290 patterns translated into English (UK/cm). 12290
We work hard to bring you the best knitting and crochet have to offer, inspiration and advice as well as great quality yarns at incredible prices! Would you like to use our patterns for other than personal use? You can read what you are allowed to do in the Copyright text at the bottom of all our patterns. Happy crafting!
Post a comment to pattern DROPS 166-18
We would love to hear what you have to say about this pattern!
If you want to leave a question, please make sure you select the correct category in the form below, to speed up the answering process. Required fields are marked *.