
Popular categories
Looking for a yarn?


Comments / Questions (120)
![]() Gillian wrote:
Gillian wrote:
When reading the charts, is it right to left for the RS and left to right for the Ws? Also, when working the WS at the beginning of the back piece, should it be knitting in 2x1 rib, so p1, k2? Thanks!
13.05.2016 - 19:16DROPS Design answered:
Dear Gillian, you are correct about how to read diagram. The rib a the beg of back piece are worked P2,K1 from RS and P1, K2 from WS. Happy knitting!
17.05.2016 - 08:38
![]() VALENTINA R wrote:
VALENTINA R wrote:
Un' altra domanda quando inizio gli aumenti a 26cm,come si fa a lavorarli con il diagramma A4 che è formato da 2 maglie rov e dir,se faccio un solo aumento per lato?mi ritrovo a dover aumentare gradualmente una maglia seguendo lo schema che ne comprende 2,è compresa in A4 la prima maglia di vivagno che inizio lavorandola a rovescio?
13.05.2016 - 13:41DROPS Design answered:
Buongiorno Valentina. Lavora il diag A4 sul numero di m aumentate. Quindi: m vivagno, aumenta 1 m ( che lavora come il quadratino più a sinistra di A4), A3. Secondo aumento: 1 m vivagno, aumento (che lavora come la m più a destra di A4), seconda m di A4, A3. Terzo aumento: m vivagno, aumento (che lavora come la m più a sinistra di A4), prima m di A4, seconda m di A4, A3 e così via. Uguale alla fine del ferro, dopo il diag.A3. Buon lavoro!
13.05.2016 - 17:56
![]() VALENTINA R wrote:
VALENTINA R wrote:
Salve,sto lavorando al modello,sto lavorando la parte dietro e non capisco come devo lavorare le 2 nuove maglie avviate per lo spacco,le ho avviate a diritto, ora col ferro di ritorno come vanno lavorate?se seguo il diagramma A4 non vado a modificare il diagramma A3 trovandomi un nemero di maglie del motivo diverse?
12.05.2016 - 14:58DROPS Design answered:
Buonasera Valentina. Deve lavorare la prima e l'ultima m a legaccio e il diagramma A3 al posto dei diag.A1/A2. Quindi all'inizio del ferro avrà: 1 m vivagno a legaccio (prima m aumentata), diag. A3 sulle 9 m successive (2a m avviata + le 8 m di A.1) e alla fine del ferro: diag A3 sulle 8 m del diag A2 + la prima m avviata, 1 m vivagno a legaccio (seconda m avviata). Lavora il diag A4 dopo, quando sposta il diag.A3. Buon lavoro!
12.05.2016 - 18:57
![]() Linda wrote:
Linda wrote:
Er kommet til ermet og får ikke oppskrift til å stemme: det står vrangbord lages ved 1vr og 1 rett men ut fra bildet ser det ut som om dere har gjort samme som på bak/forstykket: 2 vr og 1 rett -men dersom jeg gjør det på ermet i str.m passer det ikke med antall masker. Så hva er korrekt ?
08.05.2016 - 19:06DROPS Design answered:
Hej Linda. Jeg ville strikke som der staar i mönstret, for det passer med antal af masker. Vil du gerne strikke som paa for/bakstykket, saa kan du tilpasse antallet af masker saa det passer.
11.05.2016 - 17:15
![]() Jette wrote:
Jette wrote:
Den ser lækker ud, men det er nok den mest uforståelige opskrift, jeg nogen sinde har set
01.05.2016 - 20:05
![]() Marguerite wrote:
Marguerite wrote:
What is the bust size for each of the following: S M L XL XXL and etc. Thanks.
25.03.2016 - 22:05DROPS Design answered:
Dear Marguerite. You can see the measurements in the diagram behind the pattern.
26.03.2016 - 13:11
![]() Anna Larsson wrote:
Anna Larsson wrote:
När jag förflyttar mönster 3, hurdana maskor (vilket mönster) stickar jag i början och slutet av varven? Slätstickning eller mer av mönster 3??
17.03.2016 - 22:23DROPS Design answered:
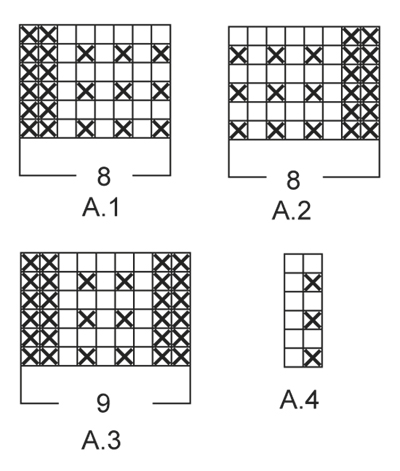
Hej Anna, Det står under ÖKNINGSTIPS: Det ökas 1 m genom att göra 1 omslag. På nästa v stickas omslaget vridet (dvs sticka i bakre maskbågen i stället för i främre) så att det inte blir hål. OBS: De nya m stickas fortlöpande in i diag A.4! Lycka till!
30.03.2016 - 14:44
![]() Ellen wrote:
Ellen wrote:
Ik zie in de uitleg en op de video dat je de steken naast de verschoven steken van het patroon in tricotsteek breit. Zo heb ik het dus gebreid en kom dan na bijvoorbeeld 57 toeren uit op: 19 steken tricotsteek, 9 steken A3, 28 steken tricotsteek, 9 steken A3 en 19 steken tricotsteek. Maar als ik op de foto kijk, zie ik aan de zijkanten geen tricotsteek maar boordsteek. Heb ik het juist begrepen?
28.02.2016 - 20:57DROPS Design answered:
Hoi Ellen. De video toont hoe je het patroon moet laten verschuiven, maar je moet de steken breien zoals er staat in het patroon.
08.03.2016 - 16:31
![]() Joke wrote:
Joke wrote:
Ik heb 18 x elke 4e naald het patroon van 9 steken verschoven. Stop ik hier nu na de 18e keer mee?
26.02.2016 - 07:29DROPS Design answered:
Hoi Joke. Als je in totaal 18 keer moet verschuiven, dan stop je
26.02.2016 - 14:42
![]() Amiet wrote:
Amiet wrote:
Bonjour, je suis en train de tricoter le dos du modèle, jai fait 19 fois les diminutions et augmentations prevues, toutes les 4 mailles. Or mon ouvrage mesure désormais environ 50 cm. Je suis donc loin des 76 cm des hauteur totale. Je ne comprends pas comment continuer maintenant que j'ai fait toutes les augmentations et diminutions. Pouvez vous m'aider? Est ce normal?
25.02.2016 - 17:35DROPS Design answered:
Bonjour Mme Amiet, en taille M, on décale A.3 20 fois au total tous les 4 rangs, soit 80 rangs au total et sur la base de l'échantillon de 20 rangs = 10 cm, vous devez avoir 64 cm au total depuis le début après le décalage. Tricotez ensuite les mailles comme avant, sans décaler. Bon tricot!
26.02.2016 - 10:44
|
|||||||
Sigrid#sigridsweater |
|||||||
|
|
|||||||
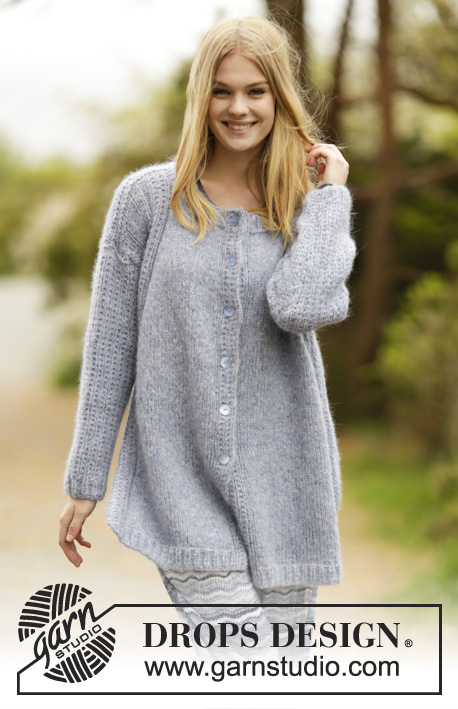
Knitted DROPS jumper with false raglan, vent and textured pattern on shoulders and sleeves in ”Air”. Size: S - XXXL.
DROPS 166-18 |
|||||||
|
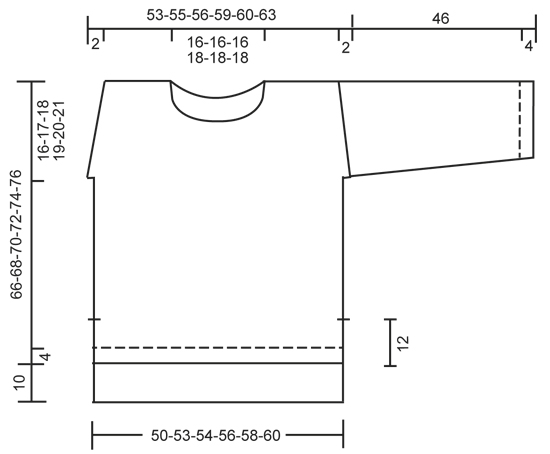
GARTER ST (back and forth): K all rows. 1 ridge = 2 rows K. PATTERN: See diagrams A.1 to A.4. The diagrams show all rows in pattern seen from RS. INCREASE TIP: Inc 1 st by making 1 YO. On next row work YOs twisted, i.e. work in the back loop of st instead of front to avoid holes. NOTE: Work the inc sts gradually in diagram A.4. DECREASE TIP: Dec 1 sts as follows: All dec are done from RS! Dec as follows after A.3: K 2 tog. Dec as follows before A.3: Work until 2 sts before A.3, slip 1 st as if to K, K 1, psso. ---------------------------------------------------------- JUMPER: Worked back and forth on circular needle and sewn tog when finished. Front piece is shorter than back piece. BACK PIECE: Cast on 95-98-101-107-113-116 sts on circular needle size 5 mm with Air. Work rib as follows: A.1 (= 8 sts), K 1, * P 2, K 1 *, repeat from *-* until 8 sts remain on row, A.2 (= 8 sts). Continue like this back and forth until piece measures 4 cm. On next row from RS switch to circular needle size 5.5 mm and work as follows: A.1, stocking st over the next 79-82-85-91-97-100 sts, AT THE SAME TIME dec 15-14-15-17-21-20 sts evenly, A.2 = 80-84-86-90-92-96 sts on needle in total. Continue in stocking st, work A.1 and A.2 in each side as before until piece measures 22 cm in all sizes. REMEMBER THE KNITTING TENSION At the end of the next 2 rows cast on 2 new sts (marks vent) = 84-88-90-94-96-100 sts. Now work A.3 (= 9 sts) over A.1 and A.2. i.e. inside 1 edge st in GARTER ST - see explanation above - in each side. When piece measures 26-24-24-23-23-23 cm, beg displacement of A.3 towards mid back. Work 1 edge st in garter st, inc 1 st - READ INCREASE TIP, A.3, dec 1 st - READ DECREASE TIP, stocking st until 2 sts remain before next A.3, dec 1 st, A.3, inc 1 st, 1 edge st in garter st. Repeat displacement of A.3 every 4th row 17-19-20-21-22-24 more times. NOTE: Inc is always inside 1 edge st in garter st in each side. AT THE SAME TIME when piece measures 60-61-62-63-64-65 cm, cast on 1 new st at the end of the next 2 rows for armholes = 86-90-92-96-98-102 sts. Continue pattern as before inside 1 edge st in garter st and 1 st in stocking st in each side. When piece measures 74-76-78-80-82-84 cm, cast off the middle 24-24-24-26-26-26 sts for neck and finish each shoulder separately. On next row from the neck, cast off 1 st = 30-32-33-34-35-37 sts remain on each shoulder. When piece measures 76-78-80-82-84-86 cm, work 1 ridge over all sts. Cast off. Work the other shoulder the same way. FRONT PIECE: Cast on and work as back piece. When piece measures 12 cm, work as follows: At the end of the next 2 rows cast on 2 new sts (marks vent) = 84-88-90-94-96-100 sts. Now work A.3 (= 9 sts) over A.1 and A.2. and work 1 edge st in garter st - see explanation above - in each side. When piece measures 16-14-14-13-13-13 cm, beg displacement of A.3 towards mid front as on back piece. AT THE SAME TIME when piece measures 50-51-52-53-54-55 cm, cast on 1 new st at the end of the next 2 rows for armholes = 86-90-92-96-98-102 sts. Continue pattern inside 1 edge st in garter st and 1 st in stocking st in each side. When piece measures 54-56-58-59-61-63 cm, slip the middle 14-14-14-16-16-16 sts on a stitch holder and finish each shoulder separately. Then cast off sts on every row from neck as follows: 3 sts 1 time, 2 sts 1 time and 1 st 1 time = 30-32-33-34-35-37 sts remain for shoulder. Work edge st towards neck in garter st. When piece measures 66-68-70-72-74-76 cm, work 1 ridge over all sts. Cast off. Work the other shoulder the same way. SLEEVE: Worked back and forth on circular needle. Cast on 39-41-43-43-43-45 sts on circular needle size 5 mm with Air. Work rib as follows: 1 edge st in garter st, K 1, * P 1, K 1 *, repeat from *-* until 1 st remains, 1 edge st in garter st. When rib measures 4 cm, switch to circular needle size 5.5 mm and continue pattern as follows: 1 edge st in garter st, work last st in A.4, repeat A.4 until 1 st remains, 1 edge st in garter st. When piece measures 10 cm, inc 1 st inside 1 edge st in garter st in each side. Work the inc sts in the pattern A.4. Repeat inc every 5½-4½-4½-3½-3-3 cm 6-7-7-9-11-11 more times = 53-57-59-63-67-69 sts. When sleeve measures 46 cm in all sizes, work a sleeve cap with short rows as follows from RS: Work until 8-9-9-10-11-12 sts remain, turn and work until 8-9-9-10-11-12 sts remain, turn and work until 17-19-19-21-22-23 sts remain, turn and work until 17-19-19-21-22-23 sts remain. Turn and work all sts on needle, turn and work over all sts. Cast off with K from RS. Knit another sleeve. ASSEMBLY: Sew the shoulder seams tog. Sew sleeves to body inside 1 edge st in garter st. Sew underarm seams and side seams in one inside 1 edge st in garter st but leave 12 cm for vent at the bottom of body (i.e. 22 cm on back piece and 12 cm on front piece). NECK EDGE: Beg from mid back and pick up approx. 120-130 sts (incl sts on stitch holder) on circular needle size 5 mm. K 1 round while adjusting the no of sts to 75-75-75-84-84-84. Then work rib (= K 1/P 2) for 3 cm. Cast off with K over K and P over P. |
|||||||
Diagram explanations |
|||||||
|
|||||||
 |
|||||||
 |
|||||||
Have you finished this pattern?Tag your pictures with #dropspattern #sigridsweater or submit them to the #dropsfan gallery. Do you need help with this pattern?You'll find 31 tutorial videos, a Comments/Questions area and more by visiting the pattern on garnstudio.com. © 1982-2026 DROPS Design A/S. We reserve all rights. This document, including all its sub-sections, has copyrights. Read more about what you can do with our patterns at the bottom of each pattern on our site. |
|||||||


With over 40 years in knitting and crochet design, DROPS Design offers one of the most extensive collections of free patterns on the internet - translated to 17 languages. As of today we count 324 catalogues and 12290 patterns translated into English (UK/cm). 12290
We work hard to bring you the best knitting and crochet have to offer, inspiration and advice as well as great quality yarns at incredible prices! Would you like to use our patterns for other than personal use? You can read what you are allowed to do in the Copyright text at the bottom of all our patterns. Happy crafting!
Post a comment to pattern DROPS 166-18
We would love to hear what you have to say about this pattern!
If you want to leave a question, please make sure you select the correct category in the form below, to speed up the answering process. Required fields are marked *.