
Popular categories
Looking for a yarn?


Comments / Questions (120)
Dorina Burkhardt wrote:
Hallo liebes Drops Team! Ich habe eine Frage bezüglich den verkürzten Reihen - fange ich mit 9 Ma an und arbeite immer 1 Ma mehr, bis 19 übrig sind ?
21.12.2016 - 22:11DROPS Design answered:
Liebe Frau Burkhardt, bein den Ärmel stricken Sie eine Reihe bis noch 9 M übrig sind, dann zurückstricken bis 9 M an der anderen Seite übrig sind, dann eine Hinreihe bis 19 M übrig sind (inkl. the 9 M), dann zurückstricken bis 19 M an der anderen Seite übrig sind = 4 Reihe insgesamt. Viel Spaß beim stricken!
22.12.2016 - 09:47
![]() Els wrote:
Els wrote:
Ik vraag me af hoe dat verschuivend patroon er op de rug uitziet
15.12.2016 - 13:48DROPS Design answered:
Hoi Els. Je ziet het patroon aan de zijkant - die schuift richting het midden - net zoals op het voorpand. Dus het achterpand komt net zo uit te zien als het voorpand - alleen langer...
15.12.2016 - 14:10
![]() Els wrote:
Els wrote:
Ik ben benieuwd hoe deze trui er achteraan uitziet. Is er geen foto van? De video geeft maar een gedeeltelijke indruk...
15.12.2016 - 12:43DROPS Design answered:
Hoi Els. Hij ziet er net uit als de voorkant - alleen langer.
15.12.2016 - 12:55
![]() Els wrote:
Els wrote:
Ik krijg een foutmelding
15.12.2016 - 12:29
![]() Fiona wrote:
Fiona wrote:
I would like to make this so that it is more fitted, if I make the size small but use smaller needles also, would that work? I would normally wear a UK size 8-10. Thank you
21.11.2016 - 22:02DROPS Design answered:
Dear Fiona, you should make a swatch with smaller needle to check if the new texture is okay to you and not too tight, and you may have to adjust following your own swatch. Your DROPS store can provide you any further personnal assistance if requested, even per mail or telephone. Happy knitting!
22.11.2016 - 09:06
![]() L. wrote:
L. wrote:
Hi, ich bin jetzt bei den Ärmeln angekommen und habe Schwierigkeiten, das Muster zu verstehen. Das Bündchen wird einfach rechts links im Wechsel gestrickt, richtig? Das darauf folgende Muster bereitet mir Schwierigkeiten, ich verstehe nicht wie ich vorgehen muss. Über Hilfe würde ich mich freuen :)
17.11.2016 - 11:32DROPS Design answered:
Liebe L, ja genau, am Anfang der Ärmel stricken Sie 1 M re, 1 M li im Wechsel, dann stricken Sie Diagram A.4, dh: Hin-R= 1 Masche li/1 Masche re - Rück-Reihe = Alle Maschen links von der Rückseite stricken. Viel Spaß beim stricken!
17.11.2016 - 12:53
![]() Benedicte Olsen wrote:
Benedicte Olsen wrote:
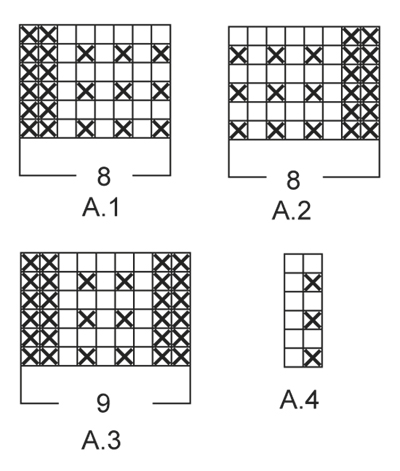
Hei ! Jeg har startet på bakstykke, men skjønner ikke hvordan det etter 22 cm skal stemme mellom A1 og A2 og A3 over. Det går ikke opp med vrange og rette. Dere skriver at A3 skal over A1 og A2, men A1 har 8 m og det går ikke opp med de rette rillene.Kan dere illustrere hvilke masker som skal over hverandre og hvor mange kantmasker det skal være ? Mønsteret: Nå strikkes A.3 (= 9 m) over A.1 og A.2, dvs innenfor 1 kant-m RILLE - se forkl over, i hver side. Mvh Benedicte
18.09.2016 - 00:16DROPS Design answered:
Hej. Du har nu lagt upp 2 nya m i varje sida. Sticka sedan 1 kantm i rille och sedan A.3. Då kommer det bli riktigt mot diagram A.1 och A.2. Lycka till!
30.09.2016 - 11:27
![]() Karin wrote:
Karin wrote:
Habe ich das richtig verstanden, dass in Muster A1 und A2 jeweils die Randmasche inbegriffen ist und links gestrickt wird? Warum wird kein Knötchenrand in rechts gestrickt?
15.09.2016 - 10:22DROPS Design answered:
Liebe Karin, die erste M. in A.1 (= Randmasche) ist im Perlmuster gestrickt, wie die letzte M. in A.2 (= Randmasche), so dass ein Knötchenrand sollte entstehen.
30.09.2016 - 11:47
![]() Michela wrote:
Michela wrote:
Buongiorno. Sto finendo il dietro e le istruzioni dicono "quando il lavoro misura 76 cm, lavorare 1 costa su tutte le m. Cosa si intende per lavorare una costa su tutte le maglie? Grazie
05.07.2016 - 07:36DROPS Design answered:
Buongiorno. E' una costa a legaccio, quindi due ferri lavorando tutte le m a dir. Buon lavoro!
05.07.2016 - 08:45
![]() Veronika Huse Larsen wrote:
Veronika Huse Larsen wrote:
Hvordan størrelse er det hun på bildet har på seg? vil gjerne strikke en som sitter likt sånn som på hun på bildet
25.05.2016 - 21:38DROPS Design answered:
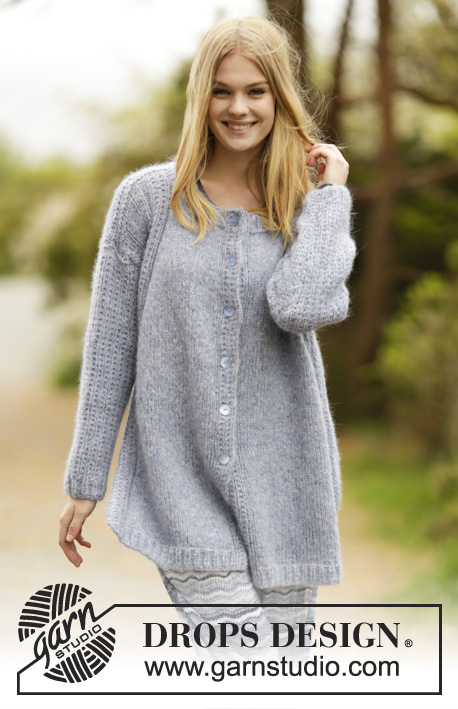
Hei Veronika. Som regel har modellen den mindste störrelse paa. Men husk at bruge maalskitsen nederst saa du kan vaelge störrelse - sammenlign eventuelt maalene hvis du har en lignende tröje hjemme som du er glad for.
26.05.2016 - 16:12
|
|||||||
Sigrid#sigridsweater |
|||||||
|
|
|||||||
Knitted DROPS jumper with false raglan, vent and textured pattern on shoulders and sleeves in ”Air”. Size: S - XXXL.
DROPS 166-18 |
|||||||
|
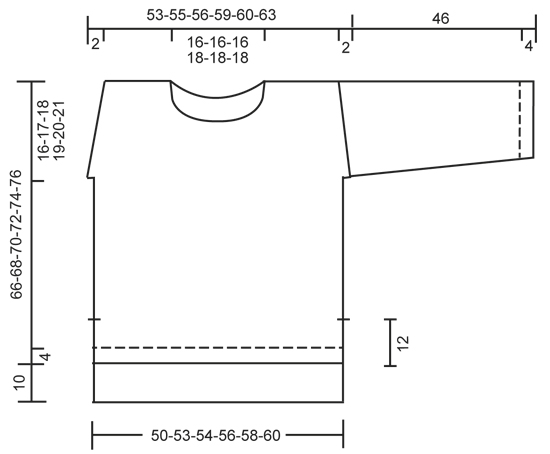
GARTER ST (back and forth): K all rows. 1 ridge = 2 rows K. PATTERN: See diagrams A.1 to A.4. The diagrams show all rows in pattern seen from RS. INCREASE TIP: Inc 1 st by making 1 YO. On next row work YOs twisted, i.e. work in the back loop of st instead of front to avoid holes. NOTE: Work the inc sts gradually in diagram A.4. DECREASE TIP: Dec 1 sts as follows: All dec are done from RS! Dec as follows after A.3: K 2 tog. Dec as follows before A.3: Work until 2 sts before A.3, slip 1 st as if to K, K 1, psso. ---------------------------------------------------------- JUMPER: Worked back and forth on circular needle and sewn tog when finished. Front piece is shorter than back piece. BACK PIECE: Cast on 95-98-101-107-113-116 sts on circular needle size 5 mm with Air. Work rib as follows: A.1 (= 8 sts), K 1, * P 2, K 1 *, repeat from *-* until 8 sts remain on row, A.2 (= 8 sts). Continue like this back and forth until piece measures 4 cm. On next row from RS switch to circular needle size 5.5 mm and work as follows: A.1, stocking st over the next 79-82-85-91-97-100 sts, AT THE SAME TIME dec 15-14-15-17-21-20 sts evenly, A.2 = 80-84-86-90-92-96 sts on needle in total. Continue in stocking st, work A.1 and A.2 in each side as before until piece measures 22 cm in all sizes. REMEMBER THE KNITTING TENSION At the end of the next 2 rows cast on 2 new sts (marks vent) = 84-88-90-94-96-100 sts. Now work A.3 (= 9 sts) over A.1 and A.2. i.e. inside 1 edge st in GARTER ST - see explanation above - in each side. When piece measures 26-24-24-23-23-23 cm, beg displacement of A.3 towards mid back. Work 1 edge st in garter st, inc 1 st - READ INCREASE TIP, A.3, dec 1 st - READ DECREASE TIP, stocking st until 2 sts remain before next A.3, dec 1 st, A.3, inc 1 st, 1 edge st in garter st. Repeat displacement of A.3 every 4th row 17-19-20-21-22-24 more times. NOTE: Inc is always inside 1 edge st in garter st in each side. AT THE SAME TIME when piece measures 60-61-62-63-64-65 cm, cast on 1 new st at the end of the next 2 rows for armholes = 86-90-92-96-98-102 sts. Continue pattern as before inside 1 edge st in garter st and 1 st in stocking st in each side. When piece measures 74-76-78-80-82-84 cm, cast off the middle 24-24-24-26-26-26 sts for neck and finish each shoulder separately. On next row from the neck, cast off 1 st = 30-32-33-34-35-37 sts remain on each shoulder. When piece measures 76-78-80-82-84-86 cm, work 1 ridge over all sts. Cast off. Work the other shoulder the same way. FRONT PIECE: Cast on and work as back piece. When piece measures 12 cm, work as follows: At the end of the next 2 rows cast on 2 new sts (marks vent) = 84-88-90-94-96-100 sts. Now work A.3 (= 9 sts) over A.1 and A.2. and work 1 edge st in garter st - see explanation above - in each side. When piece measures 16-14-14-13-13-13 cm, beg displacement of A.3 towards mid front as on back piece. AT THE SAME TIME when piece measures 50-51-52-53-54-55 cm, cast on 1 new st at the end of the next 2 rows for armholes = 86-90-92-96-98-102 sts. Continue pattern inside 1 edge st in garter st and 1 st in stocking st in each side. When piece measures 54-56-58-59-61-63 cm, slip the middle 14-14-14-16-16-16 sts on a stitch holder and finish each shoulder separately. Then cast off sts on every row from neck as follows: 3 sts 1 time, 2 sts 1 time and 1 st 1 time = 30-32-33-34-35-37 sts remain for shoulder. Work edge st towards neck in garter st. When piece measures 66-68-70-72-74-76 cm, work 1 ridge over all sts. Cast off. Work the other shoulder the same way. SLEEVE: Worked back and forth on circular needle. Cast on 39-41-43-43-43-45 sts on circular needle size 5 mm with Air. Work rib as follows: 1 edge st in garter st, K 1, * P 1, K 1 *, repeat from *-* until 1 st remains, 1 edge st in garter st. When rib measures 4 cm, switch to circular needle size 5.5 mm and continue pattern as follows: 1 edge st in garter st, work last st in A.4, repeat A.4 until 1 st remains, 1 edge st in garter st. When piece measures 10 cm, inc 1 st inside 1 edge st in garter st in each side. Work the inc sts in the pattern A.4. Repeat inc every 5½-4½-4½-3½-3-3 cm 6-7-7-9-11-11 more times = 53-57-59-63-67-69 sts. When sleeve measures 46 cm in all sizes, work a sleeve cap with short rows as follows from RS: Work until 8-9-9-10-11-12 sts remain, turn and work until 8-9-9-10-11-12 sts remain, turn and work until 17-19-19-21-22-23 sts remain, turn and work until 17-19-19-21-22-23 sts remain. Turn and work all sts on needle, turn and work over all sts. Cast off with K from RS. Knit another sleeve. ASSEMBLY: Sew the shoulder seams tog. Sew sleeves to body inside 1 edge st in garter st. Sew underarm seams and side seams in one inside 1 edge st in garter st but leave 12 cm for vent at the bottom of body (i.e. 22 cm on back piece and 12 cm on front piece). NECK EDGE: Beg from mid back and pick up approx. 120-130 sts (incl sts on stitch holder) on circular needle size 5 mm. K 1 round while adjusting the no of sts to 75-75-75-84-84-84. Then work rib (= K 1/P 2) for 3 cm. Cast off with K over K and P over P. |
|||||||
Diagram explanations |
|||||||
|
|||||||
 |
|||||||
 |
|||||||
Have you finished this pattern?Tag your pictures with #dropspattern #sigridsweater or submit them to the #dropsfan gallery. Do you need help with this pattern?You'll find 31 tutorial videos, a Comments/Questions area and more by visiting the pattern on garnstudio.com. © 1982-2026 DROPS Design A/S. We reserve all rights. This document, including all its sub-sections, has copyrights. Read more about what you can do with our patterns at the bottom of each pattern on our site. |
|||||||


With over 40 years in knitting and crochet design, DROPS Design offers one of the most extensive collections of free patterns on the internet - translated to 17 languages. As of today we count 324 catalogues and 12290 patterns translated into English (UK/cm). 12290
We work hard to bring you the best knitting and crochet have to offer, inspiration and advice as well as great quality yarns at incredible prices! Would you like to use our patterns for other than personal use? You can read what you are allowed to do in the Copyright text at the bottom of all our patterns. Happy crafting!
Post a comment to pattern DROPS 166-18
We would love to hear what you have to say about this pattern!
If you want to leave a question, please make sure you select the correct category in the form below, to speed up the answering process. Required fields are marked *.