DROPS Super Sale - SAVE 30% on 5 wonderful yarns!
Product image DROPS BabyAlpaca Silk yarn
DROPS BabyAlpaca Silk
70% Alpaca, 30% Silk
Discontinued
find alternatives
DROPS Super Sale
DROPS Baby 21-33

#viggovest

DROPS design: Pattern no BS-001-by
Yarn group A
--------------------------------------------------------
Size: 1/3 - 6/9 - 12/18 months (2 - 3/4) years
Size in cm: 56/62 - 68/74 - 80/86 (92 - 98/104)

Materials: DROPS BABY ALPACA SILK from Garnstudio
50-50-100 (100-100) g colour no 7402, light sea green
50-50-50 (50-100) colour no 7219, pistachio

DROPS CIRCULAR NEEDLE SIZE 2.5 mm (40 or 60 cm) - or size needed to get 26 sts x 34 rows in stocking st = 10 x 10 cm.
DROPS CIRCULAR NEEDLE SIZE 2 mm (40 or 60 cm) - for rib.

DROPS WOODEN BUTTONS LIGHT, NO 503: 4 pieces

-------------------------------------------------------

Alternative Yarn – See how to change yarns here
Yarn Groups A to F – Use the same pattern and change the yarn here
Yarn usage using an alternative yarn – Use our yarn converter here

-------------------------------------------------------

You might also like...

Product image DROPS BabyAlpaca Silk
DROPS BabyAlpaca Silk
70% Alpaca, 30% Silk
Discontinued
find alternatives

Pattern instructions

NOTE: This pattern is written in British English. All measurements in charts are in cm. Convert from cm to inches here. There are different terms for crocheting in British and American English. If this pattern includes crochet, convert "crochet terms" here. See this pattern in American English here..
RIB: * K 2, P 2 *, repeat from *-*.

STRIPES: * 2 rounds/rows pistachio, 2 rounds/rows light sea green *, repeat from *-*.
--------------------------------------------------------
--------------------------------------------------------

BODY:
Cast on 152-172-192 (212-232) sts on circular needle size 2 mm with light sea green Baby Alpaca Silk. Work in RIB - see explanation above - for 3-3-3 (4-4) cm.
Switch to circular needle size 2.5 mm and work in stocking st and STRIPES - see explanation above - while AT THE SAME TIME dec 38-42-46 (50-56) sts evenly on 1st round = 114-130-146 (162-176) sts. Insert a marker at beg of round and a marker after 57-65-73 (81-88) sts = mid of each side. REMEMBER THE KNITTING TENSION! When piece measures 15-16-17 (18-19) cm, cast off 8-8-8 (10-12) sts in each side for armholes (i.e. 4-4-4 (5-6) sts on each side of both markers). Then finish front and back piece separately.

BACK PIECE:
= 49-57-65 (71-76) sts. Continue to cast off for armholes in each side as follows: 2 sts 3 times and 1 st 2-3-3 (5-4) times = 33-39-47 (49-56) sts. When piece measures 23-25-27 (29-31) cm, cast off the middle 19-21-25 (27-30) sts for neck and finish each shoulder separately. Continue to cast off 2 sts on next row from neck = 5-7-9 (9-11) sts remain on shoulder. Cast off when piece measures 24-26-28 (29½-31½) cm.

FRONT PIECE:
= 49-57-65 (71-76) sts. Continue to cast off for armholes in each side as on back piece. AT THE SAME TIME when piece measures 20-22-23 (25-26) cm, slip the middle 9-11-15 (17-20) sts on a stitch holder for neck and finish each shoulder separately. Continue to cast off for neck at beg of every row from neck: 2 sts 2 times and 1 st 3 times. After all cast offs and dec are done, 5-7-9 (9-11) sts remain on shoulder. Cast off when piece measures 24-26-28 (29½-31½) cm.

FRONT NECK EDGE:
Knit up from RS approx. 48-60-68 (72-80) sts incl sts on stitch holder at the front (divisible by 4) along the neck line at the front on circular needle size 2 mm with light sea green. Work rib back and forth on needle with 1 edge st in garter st and 2 K sts in each side (seen from RS). When neck edge measures 2-2-2 (3-3) cm, loosely cast off with K over K and P over P.

BACK NECK EDGE:
Knit up from RS approx. 36-40-44 (48-52) sts (divisible by 4) along the neck line at the back and work rib as on front piece.

SLEEVE EDGE:
Knit up from RS approx. 76-84-88 (96-104) sts (divisible by 4) along one armhole on circular needle size 2 mm with light sea green. Work rib back and forth as on neck edge. Repeat along the other armhole.

FRONT SHOULDER EDGE:
Knit up from RS along the front of one shoulder (also over sleeve and neck edge) approx. 20-24-28 (32-36) sts (divisible by 4) on circular needle size 2 mm with light sea green. Work rib back and forth with 1 edge st in garter st and 2 K sts in each side (seen from RS). When edge measures approx. 1-1.5 cm, cast off for 2 button holes. 1 button hole = cast off 2 sts and cast on 2 new sts on next row over these sts. Each button hole should be at least 3 sts from the edge in each side. When edge measures 2-2-2 (3-3) cm, cast off with K over K and P over P. Repeat at the front on the other shoulder.

BACK SHOULDER EDGE:
Knit up along the back of one shoulder as on front piece and work rib as on front piece but do not cast off for button holes. Repeat at the back on the other shoulder. Sew on buttons.

Diagram

Diagram measurements for DROPS Baby 21-33
Do you have a question? See a list of frequently asked questions (FAQ)

Knitting tension is what determines the final measurements of your work, and is usually measured per 10 x 10 cm. It is provided like so: number of stitches in width x number of rows in height - eg: 19 stitches x 26 rows = 10 x 10 cm.

The knitting tension is very individual; some people knit/crochet loosely while others work tightly. You adjust the knitting tension with the needle size, which is why the suggested needle size is only meant as a guide! You need to adjust this (up or down) to ensure that YOUR knitting tension matches the knitting tension provided in the pattern. If you work with a different knitting tension than provided you will have a different yarn consumption, and your work will have different measurements than what the pattern suggests.

The knitting tension also determines which yarns can replace each other. As long as you achieve the same knitting tension you can replace one yarn with another.

See DROPS lesson: How to measure your tension/gauge

See DROPS video: How to make a gauge tension swatch

The required amount of yarn is provided in grams, eg: 450 g. To calculate how many balls you’ll need you first need to know how many grams are in 1 ball (25g, 50g or 100g). This information is available if you click on the individual yarn quality on our pages. Divide the amount required with the amount of each ball. For example, if each ball is 50g (the most common amount), the calculation will be as follows: 450 / 50 = 9 balls.

The important thing when changing from one yarn to another is that the knitting/crochet tension remains the same. This is so that the measurements of the finished piece will be the same as on the sketch provided. It is easier to achieve the same knitting tension using yarns from the same yarn group. It is also possible to work with multiple strands of a thinner yarn to achieve the knitting tension of a thicker one. Please try our yarn converter. We recommend you to always work a test swatch.

Please NOTE: when changing yarn the garment might have a different look and feel to the garment in the photo, due to individual properties and qualities of each yarn.

See DROPS lesson: Can I use a different yarn than the one mentioned in the pattern?

All our yarns are categorised into yarn groups (from A to F) according to thickness and knitting tension – group A contains the thinnest yarns and group F the thickest. This makes it easier for you to find alternative yarns to our patterns, should you wish to switch yarn. All yarns within the same group have a similar knitting tension and can easily replace each other. However, different yarn qualities have different structures and properties which will give the finished work a unique look and feel.

Click here for an overview of the yarns in each yarn group

At the top of all our patterns you’ll find a link to our yarn calculator, which is a helpful tool should you wish to use a different yarn than suggested. By filling in the yarn quality you wish to replace, the amount (in your size) and number of strands, the calculator will present good alternative yarns with the same knitting tension. Additionally it will tell you how much you’ll require in the new qualities and whether you’ll need to work with multiple strands. Most skeins are 50g (some are 25g or 100g).

If the pattern is worked with multiple colours, every colour will have to be calculated separately. Similarly, if the pattern is worked with several strands of different yarns (for example 1 strand Alpaca and 1 strand Kid-Silk) you will have to find alternatives for each, individually.

Click here to see our yarn calculator

Since different yarns have different qualities and textures we have chosen to keep the original yarn in our patterns. However, you can easily find options among our available qualities by using our yarn calculator, or simply pick a yarn from the same yarn group.

It is possible that some retailers still have discontinued yarns in stock, or that someone has a few skeins at home that they would like to find patterns for.

The yarn calculator will provide both alternative yarn as well as required amount in the new quality.

If you think it's hard to decide what size to make, it can be a good idea to measure a garment you own already and like the size of. Then you can pick the size by comparing those measures with the ones available in the pattern's size chart.

You'll find the size chart at the bottom of the pattern.

See DROPS lesson: How to read size chart

The needle size provided in the pattern serves only as a guide, the important thing is to follow the knitting tension. And since knitting tension is very individual, you will have to adjust the needle size to ensure that YOUR tension is the same as in the pattern – maybe you’ll have to adjust 1, or even 2 needle sizes, up or down to achieve the correct tension. For this, we recommend that you work test swatches.

Should you work with a different knitting tension than the one provided, the measurements of the finished garment might deviate from the measurement sketch.

See DROPS lesson: How to measure your tension/gauge

See DROPS video: How to make a tension/gauge swatch

Working a garment top-down provides more flexibility and room for personal adjustment. For example it is easier to try the garment on while working, as well as making adjustments to length of yoke and shoulder caps.

The instructions are carefully explaining every step, in the correct order. Diagrams are adjusted to the knitting direction and are worked as usual.

The diagram depicts all rows/rounds, and every stitch seen from the right side. It is read from bottom to top, from right to left. 1 square = 1 stitch.

When working back and forth, every other row is worked from the right side and every other row is worked from the wrong side. When working from the wrong side, the diagram will have to be worked reversed: from left to right, knit stitches are purled, purl stitches are knit etc.

When working in the round every round is worked from the right side and the diagram are worked from right to left on all rounds.

See DROPS lesson: How to read knitting diagrams

The diagram depicts all rows/rounds, and every stitch seen from the right side. It is worked from bottom to top, from right to left.

When working back and forth every other row is worked from the right side: from right to left and every other row is worked from the wrong side: from left to right.

When working in the round, every row in the diagram are worked from the right side, from right to left.

When working a circular diagram you start in the middle and work your way outwards, counter clockwise, row by row.

The rows usually start with a given number of chain stitches (equivalent to the height of the following stitch), this will either be depicted in the diagram or explained in the pattern.

See DROPS lesson: How to read crochet diagrams

Instructions for working several diagrams after each other on the same row/round, will often be written like so: “work A.1, A.2, A.3 a total of 0-0-2-3-4 times". This means you work A.1 once, then A.2 is worked once, and A.3 is repeated (in width) the number of times provided for your size – in this case like so: S = 0 times, M = 0 times, L=2 times, XL= 3 times and XXL = 4 times.

The diagrams are worked as usual: begin with the first row in A.1, then work the first row in A.2 etc.

See DROPS lesson: How to read knitting diagrams

See DROPS lesson: How to read crochet diagrams

The total width of the garment (from wrist-to-wrist) will be larger in the larger sizes, despite the actual sleeves being shorter. The larger sizes have longer sleeve caps and wider shoulders, so there will be a good fit in all sizes.

The measurement sketch/schematic drawing provides information regarding the full length of the garment. If it’s a jumper or a jacket the length is measured from the highest point on the shoulder closest to the neckline, and straight down to the bottom of the garment. It is NOT measured from the tip of shoulder. Similarly, the length of yoke is measured from the highest point on the shoulder and down to where yoke is split into body and sleeves.

On a jacket measures are never taken along bands, unless specifically stated. Always measure inside band stitches when measuring the length.

See DROPS lesson: How to read a schematic drawing

Diagrams are often repeated on the round or in height. 1 repeat is the diagram the way it appears in the pattern. If it says to work 5 repeats of A.1 in the round, then you work A.1 a total of 5 times after/next to each other in the round. If it says to work 2 repeats of A.1 vertically/in height you work the entire diagram once, then begin again at the start and work the entire diagram one more time.

Chain stitches are slightly narrower than other stitches and to avoid working the cast-on edge too tight, we simply chain more stitches to begin with. The stitch count will be adjusted on the following row to fit the pattern and measurement sketch.

The rib edge is more elastic and will contract slightly compared to, for example, stocking stitch. By increasing before the rib edge, you avoid a visible difference in width between the rib edge and the rest of the body.

It’s very easy to cast off too tightly, and by making yarn overs while casting off (and simultaneously casting these off) you avoid a too tight cast off edge.

See DROPS video: How to bind off with yarn overs (yo)

To achieve an even increase (or decrease) you can increase on, for example: every 3rd and 4th row alternately, like so: work 2 rows and increase on the 3rd row, work 3 rows and increase on the 4th. Repeat this until the increase is complete.

See DROPS lesson: Increase or decrease 1 st on every 3rd and 4th row alternately

Should you prefer to work in the round instead of back and forth, you may of course adjust the pattern. You’ll need to add steeks mid-front (usually 5 stitches), and follow the instructions. When you would normally turn and work from the wrong side, simply work across the steek and continue in the round. At the end you’ll cut the piece open, pick up stitches to work bands, and cover the cut edges.

See DROPS video: How to knit steeks and cut open

Should you prefer to work back and forth instead of in the round, you may of course adjust the pattern so you work the pieces separately and then assemble them at the end. Divide the stitches for the body in 2, add 1 edge stitch in each side (for sewing) and work the front and back pieces separately.

See DROPS lesson: Can I adapt a pattern for circular needles into straight needles?

Pattern repeats can vary slightly in the different sizes, in order to get the correct proportions. If you’re not working the exact same size as the garment in the photo, yours might deviate slightly. This has been carefully developed and adjusted so that the complete impression of the garment is the same in all sizes.

Make sure to follow instructions and diagrams for your size!

If you have found a pattern you like which is available in women’s size it’s not very difficult to convert it to men’s size. The biggest difference will be the length of sleeves and body. Start working on the women size that you think would fit across the chest. The additional length will be worked right before you cast off for the armhole/sleeve cap. If the pattern is worked top-down you can add the length right after the armhole or before the first decrease on sleeve.

Regarding additional yarn amount, this will depend on how much length you add, but it is better with a skein too many than too few.

All yarns will have excess fibres (from production) that might come off as lint or shedding. Brushed yarns (ie hairier yarns) have more of these loose, excess fibres, causing more shedding.

Shedding also depends on what is worn under or over the garment, and whether this pulls at the yarn fibres. It’s therefore not possible to guarantee that there will be no shedding

Below are some tips on how to get the best result when working with hairier yarns:

1. When the garment is finished (before you wash it) shake it vigorously so the looser hairs come off. NOTE: do NOT use a lint roller, brush or any method that pulls at the yarn.

2. Place the garment in a plastic bag and put it in your freezer - the temperature will cause the fibres to become less attached to each other, and excess fibres will come off easier.

3. Leave in the freezer for a few hours before taking it out and shaking it again.

4. Wash the garment according to the instructions on the yarn label.

Pilling is a natural process that happens to even the most exclusive of fibers. It's a natural sign of wear and tear that is hard to avoid, and that is most visible in high friction areas of your garment like a sweater's arms and cuffs.

You can make your garment look as new by removing the pilling, using a fabric comb or a pill/lint remover.

Still can't find the answer you need? Then scroll down and leave your question so one of our experts can try to help you. This will be done normally within 5 to 10 working days.
In the meantime, you can read the questions and answers that others have left to this pattern or join the DROPS Workshop on Facebook to get help from fellow knitters/crocheters!

Post a comment to pattern DROPS Baby 21-33

We would love to hear what you have to say about this pattern!

If you want to leave a question, please make sure you select the correct category in the form below, to speed up the answering process. Required fields are marked *.

Comments / Questions (78)

country flag Viktoria wrote:

Hallo liebes Drops-Team. ich bin Anfängerin und habe mich trotzdem mal an die Weste gewagt. Nun die erste Hürde. Wenn in der Anleitung steht die Teile (vorder- und Rückenteil ) für sich fertig stricken. Was ist damit genau gemeint? Die Teile auf anderen Nadeln fertig stricken? Danke schonmal. Gruß Viktoria

18.12.2013 - 17:41

DROPS Design answered:

Liebe Viktoria, das bedeutet einzeln fertig stricken. Sie können nacheinander die gleiche Nadel benutzen.

19.12.2013 - 07:37

country flag Marilyne wrote:

Bonjour, je tricote ce modèle et j'ai un souci pour les diminutions des emmanchures. Je fais la taille 6/9 mois. J'ai donc 57m pour le dos. Je dois faire 3 fois 2m puis 3 fois une maille, cela fait 9 mailles en moins mais au lieu d'arriver au chiffre de 48m (57m de départ -8) je dois avoir 39m soit 18 mailles en moins. Merci de m'expliquer cette différence et ce qu'il faut faire pour y remédier. Dans l'attente de votre aide. M.

07.12.2013 - 19:12

Marilyne answered:

Oups !!! J'ai trouvé moi même la solution !!! En fait j'ai oublié qu'il y avait deux côtés... donc 9m (et non 8 comme noté dans ma question précédente)x 2, cela fait bien 18m pour les diminutions et j'arrive donc à 39m... Merci pour votre site.

07.12.2013 - 20:23

MARIA wrote:

Hello Drops! What do you mean by "Work rib back and forth on needle with 1 edge st in garter st and 2 K sts in each side" in the front neck edge? Isn't the rib knitted K2,P2? Do you mean that the first 3 stitches in the rib are 1 garter,K2 and then until the end K2,P2 knitted? Thank you!

03.12.2013 - 15:32

DROPS Design answered:

Dear Maria, you are correct, it means to work in rib K2/P2 starting with 1 st in garter st, and K2, then P2, *K2,P2*, repeat from *-* and finish the row with K2 and 1 st in garter st. Happy knitting!

03.12.2013 - 15:56

country flag Christiane wrote:

Hallo liebes DropsTeam, wenn ich die angegebenen Masse rechne um zu kontrollieren, wie hoch der ausschnitt sein muss, habe ich keine cm-Angaben im Diagramm. was übersehe ich? Danke

23.11.2013 - 16:05

DROPS Design answered:

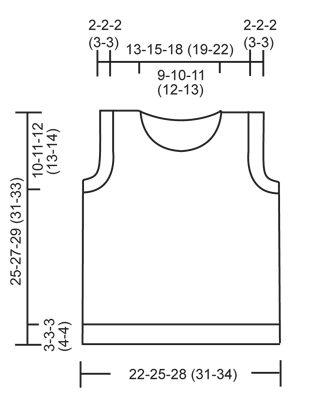
Liebe Christiane, das wird durch den Text in der Anleitung klar. Für die kleinste Grösse z.B. wird nach 15 cm für das Armloch abgekettet und nach 20 cm für den vorderen Halsausschnitt - bei einer Gesamthöhe von 25 cm. Also ist der vordere Halsausschnitt 5 cm. Wenn Sie der Anleitung folgen, wird dies automatisch richtig. Wir dürfen das Diagramm jeweils nicht mit nicht unbedingt nötigen cm-Angaben überladen.

25.11.2013 - 07:55

country flag Mette wrote:

Jeg skal samle masker op langs kanten - inkl. de masker jeg har på tråd i midten, men hvordan gør jeg lige det? Jeg tænkte at starte ved den ene skulder (retsiden), men hvad så når jeg kommer til midten? Skal jeg så strikke dem ret og fortsætte opsamlingen efter dem op til den anden skulderspids?

21.11.2013 - 17:07

DROPS Design answered:

Hej Mette. Ja, det bedste er at starte ved den ene skulder, tag op, strik over m paa traaden, og tag op til den anden skulder. Strik rib som beskrevet.

22.11.2013 - 11:29

country flag Ursula wrote:

Vielen Dank. Jetzt sehe ich Licht am Ende des Tunnels.

09.10.2013 - 21:11

country flag Ursula wrote:

Werden Vorder- und Rückenteil rund zusammengestrickt und ab Armausschnitt getrennt beendet? Bin etwas irritiert von den 192 angeschlagenen Maschen für das Bündchen. Danke.

08.10.2013 - 12:45

DROPS Design answered:

Liebe Ursula, ja der Pullunder wird bis zum Armloch in Runden gestrickt. Nach dem Bündchen wird die Maschenzahl zudem etwas reduziert.

09.10.2013 - 08:17

country flag Karen wrote:

Vedr. halskant foran: Der står: "Strik rib frem og tilbage på p med 1 kantm retstrik og 2 ret i hver side (set fra retten)". Jeg har netop strikket masker op fra retsiden og skal således i gang med at strikke fra vrangsiden - hvordan begynder jeg? Med ret eller vrang? Gælder det med 1 kantm retstrik og 2 ret i hver side hver pind, eller hver pind fra retten? Er det muligt at få en mere udførlig beskrivelse? Tak.

18.09.2013 - 11:30

DROPS Design answered:

Fra vrangen: 1 kantm retstrik, 2 vrang og rib ifølge opskriften. Fra retsiden: 1 kantm retstrik, 2 ret og rib ifølge opskriften. God fornøjelse!

18.09.2013 - 14:01

country flag PAM wrote:

Ich habe eine Frage zum Abketten an den Vorder- bzw. Rückenteilen: Hallo, ich habe noch eine Frage: Muss ich bei den Vorder- bzw. Rückenteilen in jeder zweiten Reihe abketten oder kette ich am Anfang der Reihe ab und am Ende stricke ich Maschen zusammen? Danke!

16.09.2013 - 22:50

DROPS Design answered:

Liebe Pam, man kettet immer am Anfang der R ab. Wir haben es in der Anleitung nun deutlicher formuliert, vielen Dank für den Hinweis.

17.09.2013 - 08:14

country flag Marie wrote:

Når man er nået til for/bagstykket, skal de to så strikkes rundt på rundpinden?

03.08.2013 - 16:13

DROPS Design answered:

Hej Marie. Du starter med at strikke baade for/bagstykket rundt paa rundpinden. Naar du har lukket af til aermegabene strikker du for- og bagstykket hver for sig, frem og tilbage. Det kan du sagtens göre paa rundpind, eller skift til en lige pind, hvis du synes det er nemmere.

22.08.2013 - 14:47