
Popular categories
Looking for a yarn?


Comments / Questions (78)
![]() Triin wrote:
Triin wrote:
Tere Kui ma hakkan seljaosa eraldi kuduma, siis on vaja silmuseid mõlemal küljel korduvalt maha kududa. Aga kas see tähendab, et iga rea lõpus ma katkestan lõnga ja alustan uut rida uue lõngaga?
07.02.2018 - 10:31DROPS Design answered:
Tere Triin! Silmused kootakse tavaliselt käeaugu jaoks maha rea alguses, nii ei pea lõnga katkestama. St. kui on vaja kududa maha rea lõpus, siis tegelt kootakse need silmused maha hoopis järgmise rea alguses.
15.05.2018 - 12:31
![]() Witz wrote:
Witz wrote:
Sorry, ich muss noch mal nachfragen, wenn ich die 3er Nadeln nach dem Bündchen nehme (gemäss meiner Maschenprobe), kann ich dann die normal erwähnten Maschenangaben der Anleitung für Abnahmen usw. übernehmen..... Danke im Voraus für Ihre Hilfe
25.01.2017 - 15:36DROPS Design answered:
Liebe Frau Witz, stricken Sie dann einfach die Maschenanzahl für die Größe. Viel Spaß beim stricken!
25.01.2017 - 16:43
![]() Witz wrote:
Witz wrote:
Hallo, vielen Dank für Ihre rasche Info. Habe noch ein Frage, meine Maschenprobe stimmt erst mit 3er Nadeln, anstatt 2.5er, bedeudet das, dass ich das Bündchen mit 2.5 Nadeln und Vorder-und Rückenteil mit 3er Nadeln stricken muss? und kann ich die vorgeschriebene Maschenanzahl auch verwenden, oder nicht !
25.01.2017 - 11:57DROPS Design answered:
Liebe Frau Witz, wenn Sie die Maschenprobe mit Nadeln 3 anstatt 2,5 (= 26 M x 34 R = 10 x 10 cm) haben, dann sollen Sie mit diesen Nadeln die richtige Grösse stricken. Das Bündchen stricken Sie dann mit kleineren Nadeln, dh 2,5 dann. Viel Spaß beim stricken!
25.01.2017 - 13:49Witz wrote:
Hallo, habe eine Frage zur Kinder-Weste Viggo. Warum werden nach den 3 cm Bündchen Maschen abgenommen, müsste das Bündchen nicht kleiner sein, als das Vorder-und Rückenteil, mache ich da einen Denkfehler? Vielen Dank für Ihre Information
25.01.2017 - 10:06DROPS Design answered:
Liebe Frau Witz, das Bündchen wird mit kleineren Nadeln gestrickt, wenn man mit den grösseren Nadeln strickt, muss man abnehmen damit die Breite stimmt. Viel Spaß beim stricken!
25.01.2017 - 11:33
![]() Annamaria wrote:
Annamaria wrote:
Essendo che si lavora in tondo quello del video lo so fare ma dopo il segna punto grazie
14.09.2016 - 12:04DROPS Design answered:
Buongiorno Annamaria. Dopo il segnapunto, continua ad intrecciare come prima. Se preferisce, può lavorare come segue: finisce il giro precedente 4m prima del segnapunti che individua l’inizio del giro, intreccia 4 m, passa il segnapunti, intreccia altre 4m, lavora finchè non rimangono 4 m prima del segnapunti successivo, intreccia 4m, passa il segnapunti, intreccia 4m e lavora le ultime m sui ferri. Buon lavoro!
14.09.2016 - 12:34
![]() Anna wrote:
Anna wrote:
Hallo! Ich erhalte die Maschenprobe statt Nadelstärke 2,5 nur mit 3,5 wie auch auf dem Etikett empfohlen. Wo liegt mein Fehler und kann ich auch einfach die größere Nadeln nehmen oder stimmt dann das Muster bzw Maschenangaben nicht mehr!? Vielen Dank!
01.05.2016 - 23:15DROPS Design answered:
Hallo Anna, nehmen Sie die Nadel, mit der Sie die angegebene Maschenprobe erhalten. Nicht die Nadelstärke ist relevant, sonder die Maschenprobe.
02.05.2016 - 09:52
![]() Andrea wrote:
Andrea wrote:
Hallo, ich habe eine Frage zum Bündchen am Rückenteil. Werden die Maschen dort auch wie beim Vorderteil nur aus dem Halsauschnitt aufgenommen? Oder wird das Bündchen komplett über das Rückenteil, also auch über die abgeketteten Schultermaschen gestrickt?
06.02.2016 - 10:17DROPS Design answered:
Für den Halsausschnitt fassen Sie die Maschen nur aus dem Halsausschnitt auf. Die Schulterbündchen werden separat gestrickt, wie unter "Schulter am Vorderteil" bzw. "Schulter am Rückenteil" beschrieben.
06.02.2016 - 20:29
![]() Andrea Braun wrote:
Andrea Braun wrote:
Frage von grade eben hat sich erledigt. Ich habe mich verlesen. Entschuldigen Sie.
26.12.2015 - 22:14
![]() Braun Andrea wrote:
Braun Andrea wrote:
Ist es richtig, dass der Halsausschnitt im Rückenteil tiefer ist, als im Vorderteil. Es heißt beim Rückteil nach 19 cm und beim Vorderteil nach 20 cm die mittleren Maschen abketten.
26.12.2015 - 22:11DROPS Design answered:
Beim Rückenteil steht 23 cm, es sind 19 M, die Sie bei der kleinsten Größe abketten: "Nach 23-25-27 (29-31) cm die mittleren 19-21-25 (27-30) M. für den Hals abk."
29.12.2015 - 16:14
![]() Maria Elena wrote:
Maria Elena wrote:
Buongiorno, vorrei fare questo splendido modello ma le diminuzioni degli scalfi (sia per il dietro che per il davanti) vanno fatte all'inizio e alla fine del ferro? E questo per ogni ferro o a ferri alterni? Grazie mille
07.09.2015 - 09:56DROPS Design answered:
Buongiorno Maria Elena, le diminuzioni per gli scalfi vengono fatte sul davanti e dietro a entrambi i lati su ogni ferro come indicato. Ci riscriva se qualcosa non è chiaro. Buon lavoro!
07.09.2015 - 11:52
|
|
Viggo#viggovest |
|
|
|
|
Knitted vest / slipover with stripes for baby and children in DROPS BabyAlpaca Silk
DROPS Baby 21-33 |
|
|
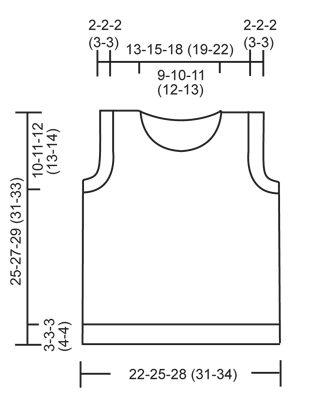
RIB: * K 2, P 2 *, repeat from *-*. STRIPES: * 2 rounds/rows pistachio, 2 rounds/rows light sea green *, repeat from *-*. -------------------------------------------------------- -------------------------------------------------------- BODY: Cast on 152-172-192 (212-232) sts on circular needle size 2 mm with light sea green Baby Alpaca Silk. Work in RIB - see explanation above - for 3-3-3 (4-4) cm. Switch to circular needle size 2.5 mm and work in stocking st and STRIPES - see explanation above - while AT THE SAME TIME dec 38-42-46 (50-56) sts evenly on 1st round = 114-130-146 (162-176) sts. Insert a marker at beg of round and a marker after 57-65-73 (81-88) sts = mid of each side. REMEMBER THE KNITTING TENSION! When piece measures 15-16-17 (18-19) cm, cast off 8-8-8 (10-12) sts in each side for armholes (i.e. 4-4-4 (5-6) sts on each side of both markers). Then finish front and back piece separately. BACK PIECE: = 49-57-65 (71-76) sts. Continue to cast off for armholes in each side as follows: 2 sts 3 times and 1 st 2-3-3 (5-4) times = 33-39-47 (49-56) sts. When piece measures 23-25-27 (29-31) cm, cast off the middle 19-21-25 (27-30) sts for neck and finish each shoulder separately. Continue to cast off 2 sts on next row from neck = 5-7-9 (9-11) sts remain on shoulder. Cast off when piece measures 24-26-28 (29½-31½) cm. FRONT PIECE: = 49-57-65 (71-76) sts. Continue to cast off for armholes in each side as on back piece. AT THE SAME TIME when piece measures 20-22-23 (25-26) cm, slip the middle 9-11-15 (17-20) sts on a stitch holder for neck and finish each shoulder separately. Continue to cast off for neck at beg of every row from neck: 2 sts 2 times and 1 st 3 times. After all cast offs and dec are done, 5-7-9 (9-11) sts remain on shoulder. Cast off when piece measures 24-26-28 (29½-31½) cm. FRONT NECK EDGE: Knit up from RS approx. 48-60-68 (72-80) sts incl sts on stitch holder at the front (divisible by 4) along the neck line at the front on circular needle size 2 mm with light sea green. Work rib back and forth on needle with 1 edge st in garter st and 2 K sts in each side (seen from RS). When neck edge measures 2-2-2 (3-3) cm, loosely cast off with K over K and P over P. BACK NECK EDGE: Knit up from RS approx. 36-40-44 (48-52) sts (divisible by 4) along the neck line at the back and work rib as on front piece. SLEEVE EDGE: Knit up from RS approx. 76-84-88 (96-104) sts (divisible by 4) along one armhole on circular needle size 2 mm with light sea green. Work rib back and forth as on neck edge. Repeat along the other armhole. FRONT SHOULDER EDGE: Knit up from RS along the front of one shoulder (also over sleeve and neck edge) approx. 20-24-28 (32-36) sts (divisible by 4) on circular needle size 2 mm with light sea green. Work rib back and forth with 1 edge st in garter st and 2 K sts in each side (seen from RS). When edge measures approx. 1-1.5 cm, cast off for 2 button holes. 1 button hole = cast off 2 sts and cast on 2 new sts on next row over these sts. Each button hole should be at least 3 sts from the edge in each side. When edge measures 2-2-2 (3-3) cm, cast off with K over K and P over P. Repeat at the front on the other shoulder. BACK SHOULDER EDGE: Knit up along the back of one shoulder as on front piece and work rib as on front piece but do not cast off for button holes. Repeat at the back on the other shoulder. Sew on buttons. |
|
 |
|
Have you finished this pattern?Tag your pictures with #dropspattern #viggovest or submit them to the #dropsfan gallery. Do you need help with this pattern?You'll find 10 tutorial videos, a Comments/Questions area and more by visiting the pattern on garnstudio.com. © 1982-2026 DROPS Design A/S. We reserve all rights. This document, including all its sub-sections, has copyrights. Read more about what you can do with our patterns at the bottom of each pattern on our site. |


With over 40 years in knitting and crochet design, DROPS Design offers one of the most extensive collections of free patterns on the internet - translated to 17 languages. As of today we count 324 catalogues and 12290 patterns translated into English (UK/cm). 12290
We work hard to bring you the best knitting and crochet have to offer, inspiration and advice as well as great quality yarns at incredible prices! Would you like to use our patterns for other than personal use? You can read what you are allowed to do in the Copyright text at the bottom of all our patterns. Happy crafting!
Post a comment to pattern DROPS Baby 21-33
We would love to hear what you have to say about this pattern!
If you want to leave a question, please make sure you select the correct category in the form below, to speed up the answering process. Required fields are marked *.