
Popular categories
Looking for a yarn?


Comments / Questions (428)
![]() Marion Eitel wrote:
Marion Eitel wrote:
Ich komme mit der 4.Runde nicht zurecht es heißt 5 LM dann 1 Dreifach Stäbchen um dieselbe LM. Bitte welche LM ist da gemeint? Um die 5???? Dann 7 Lm 4 3fach Stäbchen wo hinein denn bitte. Dann 2 3fach in das vorige ich bin verwirrt. Hilfe
04.06.2023 - 17:13DROPS Design answered:
Liebe Frau Eitel, es ist in die 1. Luftmasche, die gleiche, wo Sie die 2. Kettmasche gehäkelt haben - schauen Sie ab ca 03:30 in diesem Video. Viel Spaß beim häkeln!
05.06.2023 - 10:18
![]() WYBRECHT Denise wrote:
WYBRECHT Denise wrote:
Je suis désolée finalement j’ai assez de laine il m’en reste même un peu j’ ai paniqué hihi .., Je tiens à dire que j’ ai aimé réaliser ce modèle, les explications sont très claires, merci !
03.12.2022 - 14:31
![]() Wybrecht Denise wrote:
Wybrecht Denise wrote:
Bonjour, j'ai acheté 600 g de laine pour la taille S/M, l'échantillon correspond, tout est Ok, j'arrive à la fin et je me rends compte que je n'aurai pas assez de fil pour faire les bordures finales !!!
02.12.2022 - 09:57DROPS Design answered:
Bonjour Mme Wybrecht, crochetez-vous en DROPS Nepal? Avez-vous bien le bon nombre de mailles en largeur mais aussi en hauteur (soit 14 double-brides x 5,5 rangs = 10 x10 cm)? Merci!
02.12.2022 - 15:15
![]() Lena wrote:
Lena wrote:
Eine wunderschöne Jacke! Gibt es eine Anleitung für ein möglichst ähnliches Modell zum Stricken? Es geht weniger um das Muster als um die Form des Jäckchens.
13.10.2022 - 20:48DROPS Design answered:
Liebe Lena, hier finden Sie alle unsere gestrickten Kreisjacken. Viel Spaß beim stricken!
14.10.2022 - 08:26
![]() Mojca wrote:
Mojca wrote:
Buongiorno, non riesco a capire da dove calcolare le 81 magli laterali per lavorare il davanti sininstro come sotto spiegato. Grazie . Continuare a lavorare solo sulle 81 m.a.d. per ogni lato – cioè non lavorare sulle 39 m.a.d. in alto sul collo o sulle 39 m.a.d. in basso dietro. Continuare con la spiegazione sotto del DAVANTI.
04.10.2022 - 14:03DROPS Design answered:
Buonasera Mojca, è a cerchio, deve lasciar perdere le maglie vicino al collo e alla fine del dietro a ogni lato e lavorare solo sulle maglie centrali. Buon lavoro!
04.10.2022 - 19:45
![]() Debbie Little wrote:
Debbie Little wrote:
Hi, I'm on the 16th row with the right amount of trebles but my circle is curving in, is this normal? I am crocheting the L/XL SIZE.
23.07.2022 - 15:19
![]() Myssed wrote:
Myssed wrote:
Bonjour, je le remet en question car je ne sais pas si vous répondez aux commentaires. Pour le premier rang des devants je commence les diminutions à la fin du premier rang ou j'en fait dès le départ, si oui comment je procède ?
17.06.2020 - 20:22DROPS Design answered:
Bonjour Mme Myssed, vous commencez à diminuer dès la fin du 1er rang - cf DIMINUTIONS-1. puis au début et à la fin de chaque rang. Bon crochet!
18.06.2020 - 09:40
![]() Myssed wrote:
Myssed wrote:
Bonjour, pour les devants, au premier rang au début je dois faire des diminutions ou je commence les diminutions qu'à partir de la fin du premier rang ? merci =)
17.06.2020 - 20:20
![]() Laure wrote:
Laure wrote:
Bonjour, je suis au niveau des manches ou emmanchures. J ai finit ma manche et je dois la raccorder à la veste mais je suis coincé. En effet... J ai 2 fois 30 mailles sur la veste (trou pour le bras) et seulement 25 mailles de la manches pour raccorder. Comment se fait le raccord ? Je vous remercie pour l aide et ce très beau patron. Laure
28.05.2020 - 08:50DROPS Design answered:
Bonjour Laure, placez votre manche avec le bas de la manche au niveau de l'emmanchure, épinglez ou faufilez si besoin, la manche va s'intégrer parfaitement à l'emmanchure (en S/M vous devez avoir sauté 27 mailles et non 25) . Bon crochet!
28.05.2020 - 09:13
![]() Laura wrote:
Laura wrote:
Hi, I need help with the increases in the front panels. Do I alternate increasing before and after the markers from row to row (eg., increase before both markers on row 1 and after both markers on row 2)? Or do I alternate within the same row (eg., before the first marker but after the second marker?) Also, am I increasing in the stitch before /after the marker or using the first / second stitch of the increase in the row below?
17.04.2020 - 04:53DROPS Design answered:
Dear Laura, you will increase alternately on each row, ie first increase before both markers, then on next row increase after both markers and so on. Happy crocheting!
17.04.2020 - 09:19
|
|
Wild Flower#wildflowercardigan |
|
 |
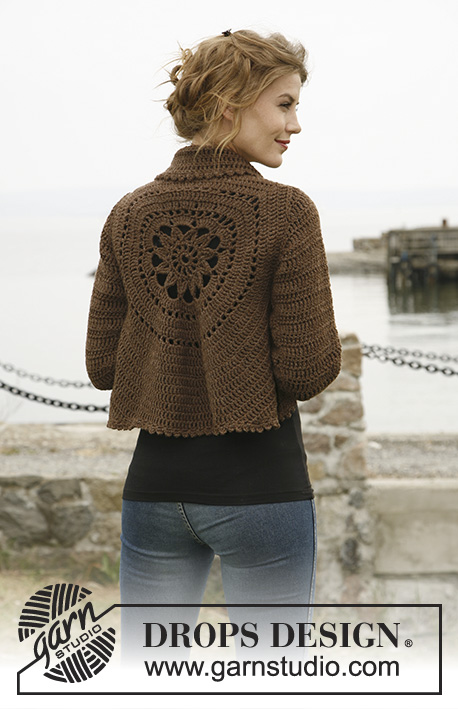 |
Crochet DROPS jacket worked in a circle in ”Nepal”. Size: S to XXXL
DROPS 132-2 |
|
|
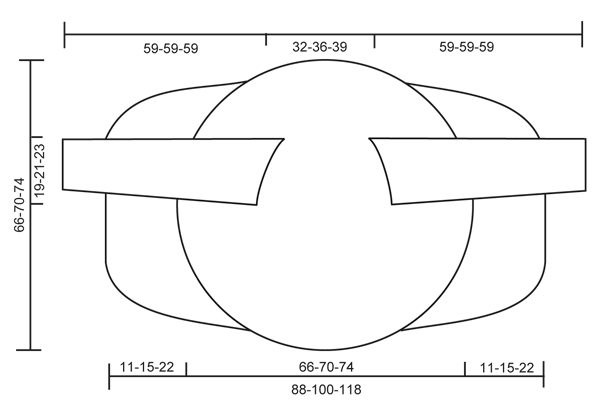
CROCHET TIP: Replace first dtr on every round/row with 4 ch. DECREASE TIP 1 (applies to the body): Dec as follows: Work dtr until 3 dtr remain, * in the first of these work 1 tr, in the next 1 htr and in the last 1 dc, turn with 1 ch, skip dc, work 1 sl st in htr and 1 sl st in tr, then 1 dc in first dtr, 1 htr in next dtr and 1 tr in next dtr, work dtr until 3 dtr remain at end of row *, repeat from *-* until a total of 6-8-12 rows have been worked. DECREASE TIP 2 (applies to sleeve cap): Dec at beg of row by working sl st over the no of dtr to be dec. Dec at end of row by working until same no of sts to be dec remains, turn piece. -------------------------------------------------------- -------------------------------------------------------- BODY: Worked in the round in a circle from mid back. Crochet 8 ch on hook size 5 mm with Nepal and form a ring with 1 sl st in first ch. ROUND 1: Work 12 dc in ch-ring, finish with 1 sl st in first dc. ROUND 2: 5 ch (= 1 tr + 2 ch), * 1 tr in next dc, 2 ch *, repeat from *-* the entire round and finish with 1 sl st in 3rd ch from beg of round = 12 tr with 2 ch between each. ROUND 3: 1 ch, continue to crochet as follows in every ch-loop the entire round: 1 dc + 1 ch + 1 dc + 1 ch, finish round with 1 sl st in first ch = 24 dc with 1 ch between each. ROUND 4: 1 sl st in first dc, 1 sl st in first ch, 5 ch, 1 triple tr in same ch, * 7 ch, then work 4 triple tr tog as follows: Work 2 triple tr in same ch as last triple tr but wait with last YO and pull through on both triple tr, skip 1 dc + 1 ch + 1 dc, work 1 triple tr in next ch but wait with last YO and pull through, then work last triple tr in same ch and pull last YO through all 5 sts on hook *, repeat from *-* a total of 11 times, 7 ch, work 2 triple tr tog in same ch (but wait with last YO and pull through on both), work 1 sl st in 5th ch from beg of round and pull thread through all 3 sts on hook. ROUND 5: 1 sl st in first ch-loop, 4 ch (= 1 dtr), 7 dtr in same ch-loop, then work 8 dtr in every ch-loop, finish with 1 sl st in 4th ch from beg of round = a total of 96 dtr. ROUND 6: 5 ch (= 1 tr + 2 ch), * skip 1 dtr, 1 tr in next dtr, 2 ch *, repeat from *-* the entire round and finish with 1 sl st in 3rd ch from beg of round = 48 ch-loops. ROUND 7 – READ CROCHET TIP: Work 1 dtr in every tr and work 1 and 2 dtr alternately in every ch-loop the entire round = 120 dtr. ROUND 8: Work 1 dtr in every dtr but work 2 dtr in every 10th dtr = 132 dtr. ROUND 9: 5 ch (= 1 tr + 2 ch), * skip 1 dtr, 1 tr in next dtr, 2 ch *, repeat from *-* the entire round and finish with 1 sl st in 3rd ch from beg of round = 66 ch-loops. ROUND 10: Work 1 dtr in every tr and work 1 and 2 dtr alternately in every ch-loop the entire round = 165 dtr. ROUND 11: Work 1 dtr in every dtr but work 2 dtr in every 15th dtr = 176 dtr. ROUND 12: Work 1 dtr in every dtr but work 2 dtr in every 16th dtr = 187 dtr. Piece measures approx. 20 cm from centre and outwards. SIZE S/M: ROUND 13: 1 ch, then work 1 dc in each of the first 45 dtr (= up towards neck), work 30 loose ch, skip the next 27 dtr (= armhole), then work 1 dc in each of the next 88 dtr (= down towards back), work 30 loose ch, skip the next 27 dtr (= armhole) and fasten with 1 sl st in first dc on round. ROUND 14: Work 1 dtr in every dc - but inc 2 dtr evenly over the first 45 dc (= 47 dtr), then work 30 dtr in ch-row over armhole, work 1 dtr in every dc – but inc 3 dtr evenly over the bottom 88 dc (= 91 dtr), and work 30 dtr in ch-row over armhole = 198 dtr. ROUND 15 to 19: Continue with dtr – while at the same time inc 6 dtr evenly on every round. After 19th round there are 228 dtr on the round and piece measures approx. 33 cm from centre and outwards. Continue working only over 79 dtr in each side – i.e. do not work over 35 dtr at top by neck or 35 dtr at bottom of back. Continue with explanation under FRONT PIECE. SIZE L/XL: ROUND 13: Work 1 dtr in every dtr but work 2 dtr in every 17th dtr = 198 dtr. ROUND 14: 1 ch, then work 1 dc in each of the first 50 dtr (= up towards neck), work 32 loose ch, skip the next 29 dtr (= armhole), then work 1 dc in each of the next 90 dtr (= down towards back), work 32 loose ch, skip the next 29 dtr (= armhole) and fasten with 1 sl st in first dc on round. ROUND 15: Work 1 dtr in every dc - but inc 3 dtr evenly over the first 50 dc (= 53 dtr), then work 32 dtr in ch-row over armhole, work 1 dtr in every dc – but inc 3 dtr evenly over the bottom 90 dc (= 93 dtr), and work 32 dtr in ch-row over armhole = 210 dtr. ROUND 16 to 20: Continue with dtr – while at the same time inc 6 dtr evenly on every round. After 20th round there are 240 dtr on the round and piece measures approx. 35 cm from centre and outwards. Continue working only over 81 dtr in each side – i.e. do not work over 39 dtr at top by neck or 39 dtr at bottom of back. Continue with explanation under FRONT PIECE. SIZE XXL and XXXL: ROUND 13: Work 1 dtr in every dtr but work 2 dtr in every 17th dtr = 198 dtr. ROUND 14: Work 1 dtr in every dtr but work 2 dtr in every 18th dtr = 209 dtr. ROUND 15: 1 ch, then work 1 dc in each of the first 54 dtr (= up towards neck), work 36 loose ch, skip the next 32 dtr (= armhole), then work 1 dc in each of the next 91 dtr (= down towards back), work 36 loose ch, skip the next 32 dtr (= armhole) and fasten with 1 sl st in first dc on round. ROUND 16: Work 1 dtr in every dc - but inc 2 dtr evenly over the first 54 dc (= 56 dtr), then work 36 dtr in ch-row over armhole, work 1 dtr in every dc – but inc 3 dtr evenly over the bottom 91 dc (= 94 dtr), and work 36 dtr in ch-row over armhole = 222 dtr. ROUND 17 to 22: Continue with dtr – while at the same time inc 6 dtr evenly on every round. After 22nd round there are 258 dtr on the round and piece measures approx. 37 cm from centre and outwards. Continue working only over 89 dtr in each side – i.e. do not work over 40 dtr at top by neck or 40 dtr at bottom of back. Continue with explanation under FRONT PIECE. LEFT FRONT PIECE - ALL SIZES: = 79-81-89 dtr. Insert a marker after 23-24-27 sts in from each side (= 33-33-35 sts between markers). Then work dtr back and forth over these sts while at the same time inc 1 st at every marker on every row (i.e. inc 2 sts on row, inc alternately before and after marker) and dec 3 sts at beg and end of every row in each side – SEE DECREASE TIP 1 until a total of 6-8-12 rows back and forth have been worked. RIGHT FRONT PIECE: Work same way as on left piece over 79-81-89 dtr in right side. SLEEVE (worked sleeve back and forth): Work 46-48-53 loose ch (incl 4 ch to turn with) on hook size 5 mm with Nepal. ROW 1: 1 dtr in 5th ch from hook, 1 dtr in each of the next 2-4-2 ch, * skip 1 ch, 1 dtr in each of the next 6 ch *, repeat from *-* until 4 ch remain, skip 1 ch and work 1 dtr in each of the last 3 ch = 37-39-43 dtr. ROW 2: 1 dtr in every dtr – READ CROCHET TIP! ROW 3: 6 ch (= 1 dtr + 2 ch), skip 1 dtr, 1 dtr in next dtr, * 2 ch, skip 1 dtr, 1 dtr in next dtr *, repeat from *-* the entire row = 18-19-21 ch-loops. ROW 4: Work 1 dtr in every dtr and 1 dtr in every ch-loop = 37-39-43 dtr. Repeat row 2-4 a total of 3 times. Piece measures approx. 18 cm. Then work dtr on all rows until finished measurements, while at the same time inc as follows: SIZE S/M: * Inc 1 dtr in one side by working 2 dtr in next to last dtr. On next row inc 1 dtr in the other side the same way. Inc 1 more time the same way in each side, then work 1 row without inc *, repeat from *-* a total of 3 times = 12 inc = 49 dtr. SIZE L/XL + XXL/XXXL: * Inc 1 dtr in one side by working 2 dtr in next to last dtr. On next row inc 1 dtr in the other side the same way *, repeat from *-* a total of 8 times = 16 inc = 55-59 dtr. ALL SIZES: Continue to work until piece measures 49 cm in all sizes. Now dec on every row in each side for sleeve cap – SEE DECREASE TIP 2: 3 dtr 1 time, 2 dtr 3 times and 3 dtr 1 time = 25-31-35 dtr remain at the top. Cut the thread. ASSEMBLY: Sew sleeve seams tog edge to edge to avoid a chunky seam. Work 1 round around the entire body and at bottom of sleeves as follows: * 5 ch, 1 tr in first ch, skip 1 st, fasten with 1 dc in next st *, repeat from *-* the entire round and finish with 1 sl st in first ch. Sew in the sleeves. If desired, close the jacket with a pin or sew on a button on to left front piece (try the jacket on to see where button should be) and button it in crochet border. |
|
 |
|
Have you finished this pattern?Tag your pictures with #dropspattern #wildflowercardigan or submit them to the #dropsfan gallery. Do you need help with this pattern?You'll find 9 tutorial videos, a Comments/Questions area and more by visiting the pattern on garnstudio.com. © 1982-2026 DROPS Design A/S. We reserve all rights. This document, including all its sub-sections, has copyrights. Read more about what you can do with our patterns at the bottom of each pattern on our site. |
|


With over 40 years in knitting and crochet design, DROPS Design offers one of the most extensive collections of free patterns on the internet - translated to 17 languages. As of today we count 325 catalogues and 12298 patterns translated into English (UK/cm). 12298
We work hard to bring you the best knitting and crochet have to offer, inspiration and advice as well as great quality yarns at incredible prices! Would you like to use our patterns for other than personal use? You can read what you are allowed to do in the Copyright text at the bottom of all our patterns. Happy crafting!
Post a comment to pattern DROPS 132-2
We would love to hear what you have to say about this pattern!
If you want to leave a question, please make sure you select the correct category in the form below, to speed up the answering process. Required fields are marked *.