
Popular categories
Looking for a yarn?


Comments / Questions (49)
![]() Asma wrote:
Asma wrote:
Bonjour, j'ai un problème avec le point fantaisie après les diminutions du dos , vous dites commencer et terminer le point fantaisie avec 1 m env (vu sur l'envers) à une m lisière de chaque côté, faut il aussi 1 m env après chaque diminution? merci.
26.02.2018 - 12:27DROPS Design answered:
Bonjour Asma, je ne vous suis pas très bien, quand on tricote M.1 (= 1 m lis, M.1 en commençant par 1 m env = la 3ème ou la dernière m du diagramme, puis on le répète en largeur, 1 m lis), on ne diminue pas, on continue ainsi jusqu'à la fin et on rabat les mailles pour l'emmanchure sur le côté comme indiqué (plus de m lis le temps des emmanchures). Bon tricot!
26.02.2018 - 12:49
![]() Teresa Mas wrote:
Teresa Mas wrote:
Cómo se lee M1 ? De derecha a izquierda siempre? Primera fila, lado revés: 2revés, 1 derecho, 2 revés, 1 derecho? Fila segunda, lado derecho: 1 derecho, 2 revés, 1 derecho, 2 revés? Gracias.
12.12.2017 - 23:55DROPS Design answered:
Hola Teresa, en el diagrama se muestran todos los puntos vistos por el lado derecho. Las filas por el lado derecho se leen de derecha a izquierda y las filas por el lado revés de derecha a izquierda. En este patrón, como la primera vuelta es por el lado revés, se trabaja 1 derecho, 2 reveses y 1 derecho 2 reveses.
17.12.2017 - 18:25
![]() Teresa Mas wrote:
Teresa Mas wrote:
Estoy tejiendo la espalda. Tengo 96 puntos. Voy a empezar M1. Empiezo fila con prenda lado revés. 1 punto de orillo, 1 revés y M1 (2 revés, 1 derecho, 2 revés, 1derecho) 15 veces. Acabo fila con un revés y 1 orillo. Me sobran 2 puntos
12.12.2017 - 23:51DROPS Design answered:
Hola Teresa, el patrón está bien, M1 son 3 puntos. M1 debe repetirse tantas veces como haga falta según el número de puntos y los reveses después del primer punto orillo y antes del último forman parte de M1.
17.12.2017 - 18:20
![]() Kathy wrote:
Kathy wrote:
I am a seasoned knitter and teacher of knitting. I wrote before about M.1 pattern clarification and I think it would be helpful to actually write out the first row of pattern to get knitters on the right foot. Also, I would suggest that under the section "Right Front Piece" you add a reminder to place the buttonholes.
05.02.2017 - 17:35
![]() Kathy wrote:
Kathy wrote:
I am on the back piece just past the increase after the garter stitch rows. Have 102 sts. on needle. For pattern M.1, does it read 1st row on the bottom from left to right (K1, P2, K1, P2), therefore making the second row from the bottom as a RS row reading from right to left? (not understanding the "NOTE:" comment that follows "Now continue in M.1 with 1 edge stitch ..."
27.12.2016 - 17:34DROPS Design answered:
Dear Kathy, 1st row in M.1 on back piece is worked from WS, ie work 1 edge st, P1, K1, P2 and then repeat diagram reading from the left towards the right from Ws and from the right towards the right from RS. Happy knitting!
29.12.2016 - 14:50
![]() Anna wrote:
Anna wrote:
Hej, kan du forklare mig hvordan strikker man de 2 første række i M1? Jeg strikker størrelse S og jeg har 87m, tak!
01.04.2016 - 13:13DROPS Design answered:
Hej Anna, M1 strikker du således når du har 87 m. Retsiden (=diagrammet nederst fra højre mod venstre): 1kantm, (2r,1v,2r,1vr)x14, 1r, 1kantm. Vrangen (= diagrammet fra 2.p nederst fra venstre mod højre): 1kantm, 1vr, (2r,1vr,2r,1vr)x14 1kantm. God fornøjelse!
05.04.2016 - 12:18
![]() Anna wrote:
Anna wrote:
Bonjour, vous ne m'avez pas répondu, je tricote le dos, je commence M1, et j'ai 87 m, est-ce que je tricote le premier rang de M1 de gauche à droite soit,"1m end, et 2m envers"
31.03.2016 - 13:34DROPS Design answered:
Bonjour Anna - voir réponse ci-dessous, elle doit être plus complète cette fois. Bonne continuation!
31.03.2016 - 13:48Anna wrote:
Bonjour, est-ce ainsi que se tricote le premier rang de M1 ; 1m lis, 14 fois; 1 m end, 2 m envers? Et qu'en est-il du deuxième rang à l'endroit? Merci d'avance.
31.03.2016 - 09:22DROPS Design answered:
Bonjour Anna, le 1er rang de M.1 se fait sur l'envers, commencez par 1 m lis, 1 m env, *1 m end, 2 m env, 1 m end, 2 m env*, répétez de *-* 14 fois au total (= sur les 84 m suivantes) et terminez par 1 m lis (= 2ème rang de gauche à droite). Au rang suivant sur l'endroit, on lit de droite à gauche: (1 m end, 2 m env, 1 m end, 2 m env) et terminez par 1 m end avant la m lis. Bon tricot!
31.03.2016 - 13:47
![]() Anna wrote:
Anna wrote:
Bonjour, je tricote le dos en taille S, et je commence M1, le diagramme compte 6maskes et j'ai 87m. Le premier rang se tricote par l'envers, pouvez-vous me dire comment tricoter le premier rang deM1? Ainsi que le deuxième. Merci!
31.03.2016 - 07:21DROPS Design answered:
Bonjour Anna, tricotez les 87 m ainsi: 1 m lis au point mousse, répétez 14 fois les 6 m de M.1 (= 84 m) et terminez par la 1ère m de M.1 (= 1 m jersey end) et 1 m lis au point mousse. Bon tricot!
31.03.2016 - 08:54
![]() Durand wrote:
Durand wrote:
Je l'ai fait, fini, et lorsque je l'ai mouillé pour le bloquer il a triplé de longueur,manches dos et devant, il n'est plus mettable, pourtant j'ai acheté la laine proposée par le modèle. je suis trés déçu car le gilet était vraiment magnifique, je pense avoir tricoté trop large je ne sais pas. je vais le détricoter pour ne pas gâcher la laine
19.06.2015 - 16:41DROPS Design answered:
Bonjour Mme Durand, suivez toujours bien les indications de l'étiquette et les généralités sur l'entretien des lainages. N'hésitez pas à demander conseil auprès de votre magasin DROPS, il pourra vous aider et vous renseigner. Bon tricot!
19.06.2015 - 18:30
|
||||||||||
Mandy#mandyjacket |
||||||||||
|
|
||||||||||
Knitted DROPS jacket with textured pattern and pockets in ”Nepal”. Sizes S to XXXL
DROPS 124-4 |
||||||||||
|
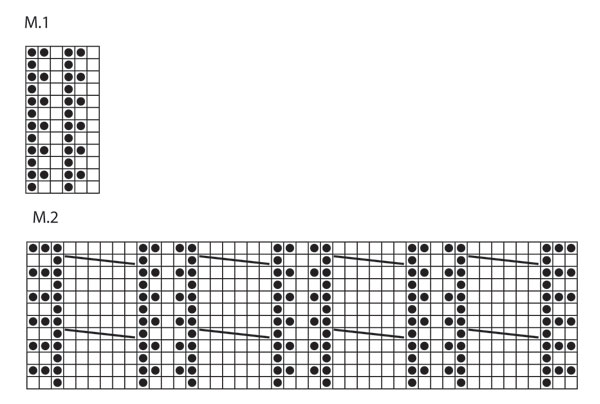
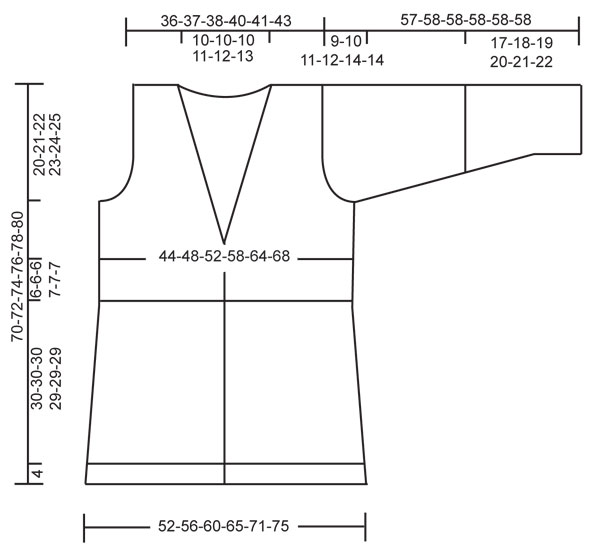
PATTERN: See diagram M.1 and M.2. Diagram shows the pattern from RS. GARTER ST (back and forth on needle): K all rows. MEASUREMENT TIP: Due to the weight of the yarn all measurements should be made whilst the garment is hanging, otherwise it will be too long when worn. BUTTONHOLES: Make buttonholes on right front band. 1 buttonhole = K tog 3rd and 4th st from the edge and make 1 YO. Make buttonholes when piece measures: SIZE S: 12, 20, 28, 36 and 44 cm SIZE M: 13, 21, 29, 37 and 45 cm SIZE L: 14, 22, 30, 38 and 46 cm SIZE XL: 12, 19, 26, 33, 40 and 47 cm SIZE XXL: 13, 20, 27, 34, 41 and 48 cm SIZE XXXL: 14, 21, 28, 35, 42 and 49 cm -------------------------------------------------------- JACKET: Worked in parts back and forth on circular needle. BACK PIECE: See MEASUREMENT TIP! Cast on 107-119-125-137-149-155 sts (includes 1 edge st each side) on circular needle size 4.5 mm with Nepal. P 1 row from WS and continue in rib as follows from RS: 1 edge st, * K3, P3 *, repeat from *-* until 4 sts remain and finish with K3 and 1 edge st. When rib measures 4 cm change to circular needle size 5 mm. K 1 row from RS, AT THE SAME TIME dec 17-21-21-25-27-25 sts evenly = 90-98-104-112-122-130 sts. P 1 row from WS and continue in stocking st. When piece measures 9 cm dec 1 st each side, repeat the dec each side on every 4-4-4-4.5-4.5-4.5 cm a total of 7-7-7-6-6-6 times = 76-84-90-100-110-118 sts. When piece measures 34-34-34-33-33-33 cm change back to circular needle size 4.5 mm. Now continue in GARTER ST - see above - on all sts. When garter st section measures approx 6-6-6-7-7-7 cm (piece measures a total of approx 40 cm for all sizes – REMEMBER MEASUREMENT TIP) change back to circular needle size 5 mm. K 1 row from RS, AT THE SAME TIME inc 11-12-12-14-16-17 sts evenly = 87-96-102-114-126-135 sts. Now continue in M.1 with 1 edge st each side (first row = from WS) – NOTE: Beg and finish pattern with P1 (as seen from WS) inside edge st each side. Continue in M.1 until piece measures 50-51-52-53-54-55 cm. Now cast off for armhole at the beg of every row each side as follows: 3 sts 1-1-1-2-3-3 times, 2 sts 1-3-4-4-5-6 times and 1 st 3-3-3-4-4-5 times = 71-72-74-78-80-83 sts. Continue in pattern as before until piece measures 68-70-72-74-76-78 cm – REMEMBER MEASUREMENT TIP. Now cast off the middle 17-18-18-20-22-23 sts for neck and complete each shoulder separately. Cast off 1 st on neckline on next row = 26-26-27-28-28-29 sts left on shoulder. Cast off when piece measures 70-72-74-76-78-80 cm. RIGHT FRONT PIECE: Worked back and forth on circular needle. Cast on 55-61-67-73-79-85 sts (includes 1 edge st at the side and 6 front band sts towards front edge) on circular needle size 4.5 mm with Nepal. P 1 row from WS with 6 front band sts towards front edge in garter st (front band worked in garter st until finished measurements). Now continue in rib as follows from RS: 6 front band sts, * K3, P3 *, repeat from *-* and finish with 1 edge st. When rib measures 4 cm change to circular needle size 5 mm. K 1 row from RS, AT THE SAME TIME dec 4-6-9-11-12-14 sts evenly (do not dec on front band) = 51-55-58-62-67-71 sts. P 1 row from WS (front band in garter st) and continue in stocking st with 6 front band sts towards front edge. When piece measures 9 cm dec at the side as described for back piece = 44-48-51-56-61-65 sts. When piece measures 34-34-34-33-33-33 cm change back to circular needle size 4.5 mm. Now work garter st on all sts. When garter st section measures approx 6-6-6-7-7-7 cm (adjust to back piece) change back to circular needle size 5 mm. K 1 row from RS, AT THE SAME TIME inc 6-5-5-6-7-9 sts evenly = 50-53-56-62-68-74 sts. Now work M.1 with 1 edge st at the side and 6 front band sts towards front edge (first row = from WS) – NOTE: Beg and finish pattern with P1 (as seen from WS) inside edge st and front band. Continue in M.1 until piece measures 45-46-47-48-49-50 cm. Now beg incorporating more sts in in the garter st on front band for collar as follows: work 1 st from front piece into the garter st on front band on every 4th row a total of 10-9-9-10-11-13 times. AT THE SAME TIME inc 1 st inside the outermost st on front band (inc by making 1 YO, on next row K YO into back of loop to avoid a hole). Repeat the inc on every 8-8-6-6-6-6 row a total of 6-7-9-8-9-7 times. AT THE SAME TIME when piece measures 50-51-52-53-54-55 cm cast off for armhole at the beg of every row from the side as described for back piece. After all dec for armhole and inc for collar are complete there are 48-48-51-52-54-55 sts on needle. Continue in garter st and pattern until piece measures 70-72-74-76-78-80 cm – REMEMBER MEASUREMENT TIP. On next row from the side (= from WS) cast off 26-26-27-28-28-29 sts for shoulder = 22-22-24-24-26-26 front band sts left on needle. Work remaining sts on row. Continue for collar as follows (row 1 = RS): * work back and forth on all sts, work back and forth on the first 10-10-12-12-14-14 sts only *, repeat from *-* until collar measures approx 7-7-7-8-8-9 cm from shoulder (measured where shortest). Cast off. LEFT FRONT PIECE: Like right front piece, but mirrored. SLEEVE: Worked back and forth on circular needle. Cast on 50-50-50-56-56-56 sts (includes 1 edge st each side) on circular needle size 4.5 mm with Nepal. P 1 row from WS and continue in rib as follows from RS: 1 edge st, * K3, P3 *, repeat from *-* and finish with 1 edge st. When rib measures 6 cm change to circular needle size 5 mm. K 1 row from RS, AT THE SAME TIME dec 8-8-6-12-10-10 sts evenly = 42-42-44-44-46-46 sts. P 1 row from WS and continue in stocking st. When piece measures 9-7-9-8-6-8 cm inc 1 st each side (inc by making 1 YO inside edge st, on next row K YO into back of loop to avoid a hole). Repeat the inc on every 3.5-3-2.5-2-2-1.5 cm a total of 11-14-15-18-19-22 times. AT THE SAME TIME when piece measures 17-18-19-20-21-22 cm inc 6 sts evenly on row (this inc is in addition to the inc each side). On next row from RS continue in M.1 with 1 edge st each side. Incorporate inc sts at the sides in pattern as you go along. After all inc are complete there are 70-76-80-86-90-96 sts on needle. When piece measures 48-48-47-46-44-44 cm - NOTE! Less for the larger sizes because of longer sleeve cap and wider shoulder - cast off for sleeve cap at the beg of every row each side as follows: 4 sts 1 time, then 2 sts at the beg of every row until piece measures approx 56-57-57-57-57-57 cm. Cast off 4 sts at beg of the next 2 rows, and then cast off remaining sts. Piece measures approx 57-58-58-58-58-58 cm. ASSEMBLY: Sew shoulder seams. Set in sleeves. Sew sleeve and side seams inside 1 edge st. Sew collar tog mid back – sew in outer loops of sts to avoid a chunky seam. Sew collar to neckline on back piece with neat sts. Sew on buttons. POCKETS: Cast on 31 sts on circular needle size 5 mm with Nepal and work back and forth on needle as follows: K 1 row from RS and K 1 row from WS. Now K 1 row from RS, AT THE SAME TIME inc 14 sts evenly (do not inc on the outermost 2 sts each side) = 45 sts. P 1 row from WS. Continue in M.2 until pocket measures approx 18-18-20-20-22-22 cm – finish after 1 or 3 rows after a cable. K 1 row from RS, AT THE SAME TIME dec 14 sts evenly (not on the 2 sts each side) = 31 sts. K 1 row from WS and K 1 row from RS. Now cast off with K sts from WS. Make 2. Place the pockets on front piece approx 7-9 cm from mid front with the bottom of pocket just covering the rib. Sew the pockets on with neat sts. |
||||||||||
Diagram explanations |
||||||||||
|
||||||||||
 |
||||||||||
 |
||||||||||
Have you finished this pattern?Tag your pictures with #dropspattern #mandyjacket or submit them to the #dropsfan gallery. Do you need help with this pattern?You'll find 20 tutorial videos, a Comments/Questions area and more by visiting the pattern on garnstudio.com. © 1982-2026 DROPS Design A/S. We reserve all rights. This document, including all its sub-sections, has copyrights. Read more about what you can do with our patterns at the bottom of each pattern on our site. |
||||||||||


With over 40 years in knitting and crochet design, DROPS Design offers one of the most extensive collections of free patterns on the internet - translated to 17 languages. As of today we count 325 catalogues and 12298 patterns translated into English (UK/cm). 12298
We work hard to bring you the best knitting and crochet have to offer, inspiration and advice as well as great quality yarns at incredible prices! Would you like to use our patterns for other than personal use? You can read what you are allowed to do in the Copyright text at the bottom of all our patterns. Happy crafting!
Post a comment to pattern DROPS 124-4
We would love to hear what you have to say about this pattern!
If you want to leave a question, please make sure you select the correct category in the form below, to speed up the answering process. Required fields are marked *.