
Popular categories
Looking for a yarn?


Comments / Questions (51)
![]() Krissy wrote:
Krissy wrote:
Ich hab das mit der Knopfblende auch nicht verstanden. Ich hab diesen "Schlitz" einfach weggestrickt und dann ein das Halsbündchen dran. Passt!
28.07.2013 - 16:30
![]() Nicole wrote:
Nicole wrote:
Hallo, Ich habe das gleiche Problem wie Theresia... Wird die Knopfblende extra gestrickt und am Schluss angenäht, oder werden die 12 Maschen aus dem Rand aufgenommen?
31.05.2013 - 18:51DROPS Design answered:
Liebe Nicole, diese Stelle war etwas ungenau übersetzt, wir werden es gleich korrigieren. Die Maschen werden aus dem Rand aufgenommen. Danke für die Rückmeldung!
03.06.2013 - 09:46
![]() Theresia wrote:
Theresia wrote:
Hallo, ich verstehe nicht so richtig, wo ich die Knopfblende anbringen soll. Wird die gleich angestrickt oder später angenäht? Und werden die Hals- und Armkanten rundgestrickt oder hin und her?
10.02.2013 - 09:06
![]() Tatjana wrote:
Tatjana wrote:
Liebes Drops-Team, mir ist der Schlitz im Rückenteil nicht klar. Der hintere Halsausschnitt ist dadurch stufenförmig, das kann doch nicht richtig sein!? Wofür ist der Schlitz gedacht? Vielen Dank für eine Rückmeldung Tatjana
12.12.2012 - 12:46DROPS Design answered:
Hallo Tatjana, der Schlitz dient dazu, dass der Pullunder gut angezogen werden kann. Es gibt den hinteren Halsausschnitt und zusätzlich den Schlitz.
13.12.2012 - 08:30
![]() Vaike wrote:
Vaike wrote:
Kuidas saab õla- ja kaelaaugu laius jääda 11 ja 19,kui käeauk on maha lastud
02.07.2012 - 07:39
![]() DROPS Deutsch wrote:
DROPS Deutsch wrote:
Einmal für das Rückenteil und einmal für das Vorderteile.
18.11.2011 - 08:54
![]() Marion Jagusch wrote:
Marion Jagusch wrote:
Sehr geehrtes Team, bei dem Modell BabyDROPS 19-20 (Weste im Strukturmuster) ist mir etwas unklar. Die Anleitung für die rechte und linke Schulter ist zweimal aufgeführt. Mit freundlichen Grüßen Marion Jagusch --
18.11.2011 - 07:18
![]() Drops Design wrote:
Drops Design wrote:
Rettelserne er lagt ind i opskriften. Så opskriften på nettet stemmer!
17.05.2011 - 10:26
![]() Mille wrote:
Mille wrote:
Der står, at der er en del rettelser til den mindste størrelse, når jeg klikker på "se rettelse" - men rettelserne står der ikke??
16.05.2011 - 18:24
![]() Drops Design wrote:
Drops Design wrote:
Jo når du deler arbejdet bagpå så får du en slids. For at denne slids skal nå sammen så du kan knappe vesten midt bagpå, så strikker du en knapkant langs med slidsens kant. God fornøjelse!
04.02.2011 - 14:20
|
|||||||
Petit Lord#petitlordslipover |
|||||||
|
|
|||||||
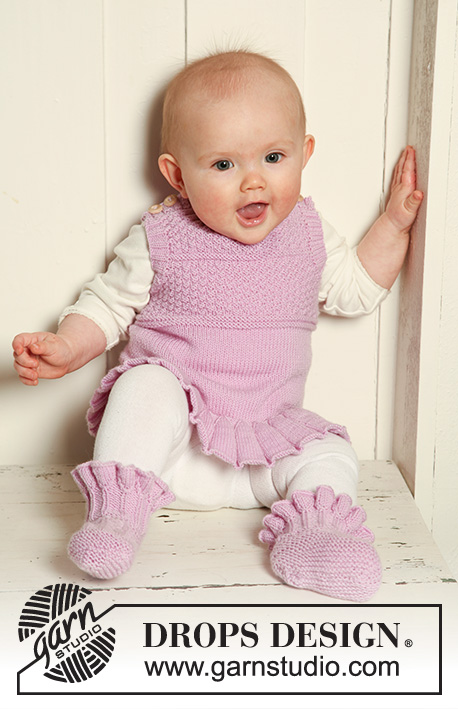
Knitted vest / slipover with textured pattern for baby and children in DROPS BabyMerino
DROPS Baby 19-20 |
|||||||
|
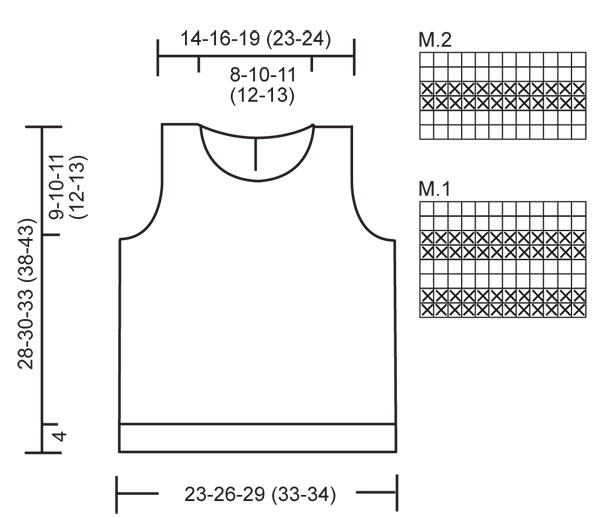
SLEEVELESS TOP: PATTERN: See diagram M.1 and M.2. Diagrams show the pattern from RS. DOUBLE MOSS ST: Row 1: * K2, P2 *, repeat from *-*. Row 2: K over K and P over P. Row 3: P over K and K over P. Row 4: Like row 2. Repeat row 1-4. GARTER ST (back and forth on needle): K all rows. -------------------------------------------------------- -------------------------------------------------------- SLEEVELESS TOP: Worked in the round on circular needle. Cast on 136-148-164 (188-196) sts on circular needle size 2.5 mm with Baby Merino. K 1 round and continue in rib K2/P2. When rib measures 4 cm dec 24-24-24 (32-32) sts evenly = 112-124-140 (156-164) sts. Insert a marker each side. Change to circular needle size 3 mm and continue in stocking st. REMEMBER THE KNITTING TENSION! When piece measures 13-14-15 (18-20) cm work M.1 on all sts. After 1 vertical repeat of M.1 continue in DOUBLE MOSS ST – see above - on all sts. When piece measures 19-20-22 (26-30) cm cast off 6 sts each side (i.e. 3 sts each side of marker) for armhole and complete front and back pieces separately. BACK PIECE: = 50-56-64 (72-76) sts. Continue back and forth on needle in double moss st. AT THE SAME TIME cast off for armhole each side on every other row: 2 sts 4 times and 1 st 1 time = 32-38-46 (54-58) sts. After dec for armhole are complete continue in M.2 on all sts. After 1 vertical repeat of M.2 continue in double moss st. AT THE SAME TIME 4 rows after M.2, cast off the middle 6-6-6 (6-6) sts for split and complete each shoulder separately. RIGHT SHOULDER: = 13-16-20 (24-26) sts. Continue back and forth on needle in double moss st until piece measures 26-28-31 (36-41) cm. Now cast off 6-8-9 (10-12) sts towards neck and cast off 1 st on neckline on next row = 6-7-10 (13-13) sts left on shoulder. Cast off when piece measures 28-30-33 (38-43) cm. LEFT SHOULDER: Like right shoulder but mirrored. FRONT PIECE: = 50-56-64 (72-76) sts. Continue back and forth on needle in double moss st. AT THE SAME TIME cast off for armhole each side as described for back piece = 32-38-46 (54-58) sts. After dec for armhole continue in M.2 on all sts. After 1 vertical repeat of M.2 continue in double moss st. When piece measures approx 24-25-28 (32-37) cm cast off the middle 10-14-16 (18-22) sts for neck and complete each shoulder separately. RIGHT SHOULDER: = 11-12-15 (18-18) sts. Continue back and forth on needle in double moss st, AT THE SAME TIME cast off to shape the neckline at the beg of every row from mid front: 2 sts 2 times and 1 st 1 time = 6-7-10 (13-13) sts left on shoulder. Cast off when piece measures 28-30-33 (38-43) cm. LEFT SHOULDER: Like right shoulder but mirrored. ASSEMBLY: Sew shoulder seams. BUTTON EDGE BACK PIECE: Pick up 12-16-16 (20-20) sts from RS on needle size 2.5 mm along right side of split on back piece. K 1 row from WS and work next row as follows from RS: 1 GARTER ST – see above - * K2/P2 *, repeat from *-* 2-3-3 (4-4) times and finish with K2 and 1 GARTER ST. Continue like this until edge measures approx 1 cm. Now make 1-1-1 (2-2) buttonholes as follows (from RS): SIZE 1/3 months: 1 garter st, K2, P2, cast off 2 sts, P2, K2 and 1 garter st. SIZE 6/9 + 12/18 months: 1 garter st, K2, P2, K2, cast off 2 sts, K2, P2, K2 and 1 garter st. SIZE 2 + 3/4 years: 1 garter st, K2, P2, cast off 2 sts, P2, K2, P2, cast off 2 sts, P2, K2 and 1 garter st. Cast on 2 new sts over cast off sts on return row. Cast off with K over k and P over P when edge measures approx 2 cm. Repeat along left side of split, but do not make buttonholes. NECKLINE: Pick up 88 to 128 sts (divisible by 4) from RS round neck (also pick up on button edges on back piece) on circular needle size 2.5 mm. K 1 row from WS and continue as follows from RS: 1 garter st, * K2/P2 *, repeat from *-* and finish with K2 and 1 garter st. When rib measures approx 1 cm make 1 buttonhole in line with the others on button edge on back piece. Cast off with K over K and P over P when rib measures approx 2-2-2 (3-3) cm. BORDER ROUND ARMHOLES: Beg mid under sleeve. Pick up 52 to 84 sts (divisible by 4) from RS round armhole on double pointed needles size 2.5 mm. P 1 round and continue in rib K2/P2 until border measures approx 2-2-2 (3-3) cm. Cast off with K over K and P over P. Repeat round the other armhole. ASSEMBLY: Sew on buttons on left side of split on back piece. Sew button edges to bottom of split. |
|||||||
Diagram explanations |
|||||||
|
|||||||
 |
|||||||
Have you finished this pattern?Tag your pictures with #dropspattern #petitlordslipover or submit them to the #dropsfan gallery. Do you need help with this pattern?You'll find 18 tutorial videos, a Comments/Questions area and more by visiting the pattern on garnstudio.com. © 1982-2026 DROPS Design A/S. We reserve all rights. This document, including all its sub-sections, has copyrights. Read more about what you can do with our patterns at the bottom of each pattern on our site. |
|||||||


With over 40 years in knitting and crochet design, DROPS Design offers one of the most extensive collections of free patterns on the internet - translated to 17 languages. As of today we count 324 catalogues and 12267 patterns translated into English (UK/cm). 12267
We work hard to bring you the best knitting and crochet have to offer, inspiration and advice as well as great quality yarns at incredible prices! Would you like to use our patterns for other than personal use? You can read what you are allowed to do in the Copyright text at the bottom of all our patterns. Happy crafting!
Post a comment to pattern DROPS Baby 19-20
We would love to hear what you have to say about this pattern!
If you want to leave a question, please make sure you select the correct category in the form below, to speed up the answering process. Required fields are marked *.