
Popular categories
Looking for a yarn?


Comments / Questions (51)
![]() Anne wrote:
Anne wrote:
Da må jeg ha gjort en feil. Min splitt er bare 3 cm i høyden. Det er ikke plass til å ta opp 16 masker der. Hvor høy skal slippen være?
19.11.2025 - 11:39DROPS Design answered:
Hei Anne, For 16 masker splitten skal være ca. 4-5 cm. Hvis du mener splitten er stor nok til at babyen kan få hodet gjennom, kan du strikke opp færre masker og ha en kortere splitt. Eller ta opp begge skuldrene på bakstykket og strikke dem litt lenger. Hilsen Dops Team.
20.11.2025 - 06:49
![]() Anne wrote:
Anne wrote:
Jeg forstår ikke hvor jeg ta opp masker til knappekanten bak. Begynner jeg midt på splitten og frem til den ene skulderen? Hadde vært fint med en bilde.
19.11.2025 - 03:31DROPS Design answered:
Hei Anne, Du tar hver side av splitten for seg, først høyre siden med knapphull, deretter venstre siden. Du begynner på bunn/top fra retten og strikker opp masker til andre enden av splitten. Vi har dessverre ikke noe bilde av dette. Hilsen Drops Team.
19.11.2025 - 06:45
![]() Sabine wrote:
Sabine wrote:
Gibt es zu dieser Knopfblende ein Video? Ich komme damit nicht klar
06.02.2025 - 11:30DROPS Design answered:
Liebe Sabine, die Anleitung wurde bei der Knopfblende umformuliert, sodass sie nun hoffentlich verständlicher ist. Sie fassen die Maschen nur aus dem senkrechten Rand des rückwärtigen Schlitzes auf, nicht aus dem Rand des Halsausschnitts. Gutes Gelingen!
10.02.2025 - 09:49
![]() Sabine wrote:
Sabine wrote:
Hallo! Ich komme mit der Knopfblende am Rückenteil nicht klar. Der Ausschnitt am Rücken ist halbrund. Davon soll ich 16 Maschen auffassen. Von wo fasse ich diese auf? Nur von der Seite? Was ist dann mit dem unteren Teil? LG
03.02.2025 - 13:53DROPS Design answered:
Liebe Sabine, die 16 Maschen werden längs dem Schlitz aufgeffasen, für rechtes Rückenteil fassen Sie bei einer Hinreihe von Halsauschnitt bis die 2 Maschen die für den Schlitz abgekettet wurden, und für linkes Vorderteil von unten (bei den abgekettenen Maschen bis Hals. Die Knoplöcher sind nur beim rechten Vorderteil bearbeitet. Viel Spaß beim Stricken!
03.02.2025 - 14:32
![]() Eila Nikitin wrote:
Eila Nikitin wrote:
Garnmängden till storlek 86/92står 100 g, det går åt 150 g. Har stickat med rätt garn enl mönster.
30.01.2023 - 21:55
![]() Ruth wrote:
Ruth wrote:
Liebes Drops-Team, ich verstehe nicht, wo ich bei der Knopfblende Maschen seitlich aufnehmen soll, denn es ist eigentlich ein runder Halsausschnitt und ich müsste bis zur Schulter hoch aufnehmen. Ein Foto von der Rückseite der Weste wäre wirklich hilfreich. Ich habe 6 Maschen im Rückenteil abgekettet und fast gleich anschließend für die Schulter jeweils die nötigen Maschen. Das ergibt eine „Rundung“, wo ich nirgends seitlich Maschen aufnehmen kann. Wie muss ich das stricken? Lg
07.10.2021 - 16:23
![]() Kathryn wrote:
Kathryn wrote:
The shoulder casting off seems confusing. Cast off six towards neckline then cast off one on the neckline on the next row. This would create a loop since one stitch is left on the other side of gap created by cast off. I see others are confused by this too. Please find another way to write this instruction to make it clearer? Thank you
20.09.2021 - 08:42DROPS Design answered:
Dear Kathry, after you have cast off stitches for neck you continue each shoulder separately, let's say you cast off for neck on a RS row, you then work the right shoulder first casting off at the beg of next row from WS (back piece) = the row starting from neck. When you will work the left shoulder (back piece), you then cast off at the beg of row from WS. Hope this will help, happy knitting!
20.09.2021 - 11:25
![]() Karin Meier wrote:
Karin Meier wrote:
Hallo, ich habe die Anleitung durchgelesen und bin überrascht, dass man am Anfang Maschen abnehmen muss. Normalerweise nimmt man doch Maschen auf nach dem Bund. Ist das richtig so oder ein Druckfehler?
22.07.2021 - 23:24DROPS Design answered:
Liebe Frau Meier, für die gleiche Breite braucht man mehr Maschen, um Bündchen mit Nadeln Nr 2,5 als glattrechts mit Nadeln Nr3 zu stricken, deshalb muss man nach dem Bündchen abnehmen, damit die Bündchen nicht fester ziehen, und so hat man die richtige Breite. Viel Spaß beim stricken!
23.07.2021 - 08:30
![]() Heidi wrote:
Heidi wrote:
Jeg strikker str. 12/18 mdr. Ved halskant står der “strik 88 op til 128 masker (delbart med 4)” - hvad betyder det ? Jeg har prøvet med 116 masker og det kan jeg se er for stort... Jeg forstår simpelthen ikke hvad det betyder, håber i kan hjælpe mig. Hilsen Heidi
12.01.2021 - 17:42DROPS Design answered:
Hei Heidi. Du skal strikke opp et maskeantall mellom 88 og 128 masker. Har du strikket den minste størrelsen har nok 88 masker vært passe, men i den største størrelsen passer 128 masker bedre. Men maskeantallet må være delelig med 4 for av vrangborden skal gå opp. Ettersom du syns 116 masker ble for stort, kan du prøve 104 eller 108? mvh DROPS design
18.01.2021 - 14:09
![]() Monica Gyllborg wrote:
Monica Gyllborg wrote:
Hur stickar man ett sprund vid halskanten mitt bak ska det bara vara på själva halskanten?
10.08.2020 - 19:20DROPS Design answered:
Hej Monica. Om du ser under BAKST så ser du där hur du ska maska av de mittersta 6 m till sprund när du har stickat 4 v efter M.2. Efter det stickas höger och vänster axel färdig för sig och det är här du senare stickar kant/knappkant. Mvh DROPS Design
14.08.2020 - 09:34
|
|||||||
Petit Lord#petitlordslipover |
|||||||
|
|
|||||||
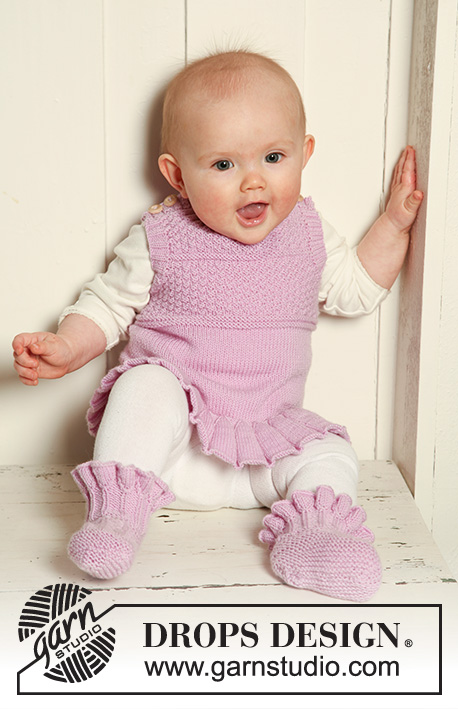
Knitted vest / slipover with textured pattern for baby and children in DROPS BabyMerino
DROPS Baby 19-20 |
|||||||
|
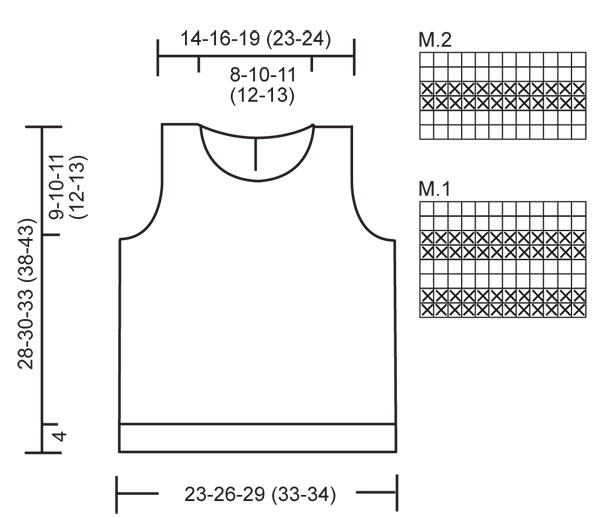
SLEEVELESS TOP: PATTERN: See diagram M.1 and M.2. Diagrams show the pattern from RS. DOUBLE MOSS ST: Row 1: * K2, P2 *, repeat from *-*. Row 2: K over K and P over P. Row 3: P over K and K over P. Row 4: Like row 2. Repeat row 1-4. GARTER ST (back and forth on needle): K all rows. -------------------------------------------------------- -------------------------------------------------------- SLEEVELESS TOP: Worked in the round on circular needle. Cast on 136-148-164 (188-196) sts on circular needle size 2.5 mm with Baby Merino. K 1 round and continue in rib K2/P2. When rib measures 4 cm dec 24-24-24 (32-32) sts evenly = 112-124-140 (156-164) sts. Insert a marker each side. Change to circular needle size 3 mm and continue in stocking st. REMEMBER THE KNITTING TENSION! When piece measures 13-14-15 (18-20) cm work M.1 on all sts. After 1 vertical repeat of M.1 continue in DOUBLE MOSS ST – see above - on all sts. When piece measures 19-20-22 (26-30) cm cast off 6 sts each side (i.e. 3 sts each side of marker) for armhole and complete front and back pieces separately. BACK PIECE: = 50-56-64 (72-76) sts. Continue back and forth on needle in double moss st. AT THE SAME TIME cast off for armhole each side on every other row: 2 sts 4 times and 1 st 1 time = 32-38-46 (54-58) sts. After dec for armhole are complete continue in M.2 on all sts. After 1 vertical repeat of M.2 continue in double moss st. AT THE SAME TIME 4 rows after M.2, cast off the middle 6-6-6 (6-6) sts for split and complete each shoulder separately. RIGHT SHOULDER: = 13-16-20 (24-26) sts. Continue back and forth on needle in double moss st until piece measures 26-28-31 (36-41) cm. Now cast off 6-8-9 (10-12) sts towards neck and cast off 1 st on neckline on next row = 6-7-10 (13-13) sts left on shoulder. Cast off when piece measures 28-30-33 (38-43) cm. LEFT SHOULDER: Like right shoulder but mirrored. FRONT PIECE: = 50-56-64 (72-76) sts. Continue back and forth on needle in double moss st. AT THE SAME TIME cast off for armhole each side as described for back piece = 32-38-46 (54-58) sts. After dec for armhole continue in M.2 on all sts. After 1 vertical repeat of M.2 continue in double moss st. When piece measures approx 24-25-28 (32-37) cm cast off the middle 10-14-16 (18-22) sts for neck and complete each shoulder separately. RIGHT SHOULDER: = 11-12-15 (18-18) sts. Continue back and forth on needle in double moss st, AT THE SAME TIME cast off to shape the neckline at the beg of every row from mid front: 2 sts 2 times and 1 st 1 time = 6-7-10 (13-13) sts left on shoulder. Cast off when piece measures 28-30-33 (38-43) cm. LEFT SHOULDER: Like right shoulder but mirrored. ASSEMBLY: Sew shoulder seams. BUTTON EDGE BACK PIECE: Pick up 12-16-16 (20-20) sts from RS on needle size 2.5 mm along right side of split on back piece. K 1 row from WS and work next row as follows from RS: 1 GARTER ST – see above - * K2/P2 *, repeat from *-* 2-3-3 (4-4) times and finish with K2 and 1 GARTER ST. Continue like this until edge measures approx 1 cm. Now make 1-1-1 (2-2) buttonholes as follows (from RS): SIZE 1/3 months: 1 garter st, K2, P2, cast off 2 sts, P2, K2 and 1 garter st. SIZE 6/9 + 12/18 months: 1 garter st, K2, P2, K2, cast off 2 sts, K2, P2, K2 and 1 garter st. SIZE 2 + 3/4 years: 1 garter st, K2, P2, cast off 2 sts, P2, K2, P2, cast off 2 sts, P2, K2 and 1 garter st. Cast on 2 new sts over cast off sts on return row. Cast off with K over k and P over P when edge measures approx 2 cm. Repeat along left side of split, but do not make buttonholes. NECKLINE: Pick up 88 to 128 sts (divisible by 4) from RS round neck (also pick up on button edges on back piece) on circular needle size 2.5 mm. K 1 row from WS and continue as follows from RS: 1 garter st, * K2/P2 *, repeat from *-* and finish with K2 and 1 garter st. When rib measures approx 1 cm make 1 buttonhole in line with the others on button edge on back piece. Cast off with K over K and P over P when rib measures approx 2-2-2 (3-3) cm. BORDER ROUND ARMHOLES: Beg mid under sleeve. Pick up 52 to 84 sts (divisible by 4) from RS round armhole on double pointed needles size 2.5 mm. P 1 round and continue in rib K2/P2 until border measures approx 2-2-2 (3-3) cm. Cast off with K over K and P over P. Repeat round the other armhole. ASSEMBLY: Sew on buttons on left side of split on back piece. Sew button edges to bottom of split. |
|||||||
Diagram explanations |
|||||||
|
|||||||
 |
|||||||
Have you finished this pattern?Tag your pictures with #dropspattern #petitlordslipover or submit them to the #dropsfan gallery. Do you need help with this pattern?You'll find 18 tutorial videos, a Comments/Questions area and more by visiting the pattern on garnstudio.com. © 1982-2026 DROPS Design A/S. We reserve all rights. This document, including all its sub-sections, has copyrights. Read more about what you can do with our patterns at the bottom of each pattern on our site. |
|||||||


With over 40 years in knitting and crochet design, DROPS Design offers one of the most extensive collections of free patterns on the internet - translated to 17 languages. As of today we count 324 catalogues and 12267 patterns translated into English (UK/cm). 12267
We work hard to bring you the best knitting and crochet have to offer, inspiration and advice as well as great quality yarns at incredible prices! Would you like to use our patterns for other than personal use? You can read what you are allowed to do in the Copyright text at the bottom of all our patterns. Happy crafting!
Post a comment to pattern DROPS Baby 19-20
We would love to hear what you have to say about this pattern!
If you want to leave a question, please make sure you select the correct category in the form below, to speed up the answering process. Required fields are marked *.