
Popular categories
Looking for a yarn?


Comments / Questions (145)
![]() Fie W. Davidsen wrote:
Fie W. Davidsen wrote:
Hej.. Jeg vil meget gerne i gang med at lave dette lækre sæt.. Men i har glemt at skrive hvad str. pind man skal bruge. Så hvad str. pind skal man bruge?
25.06.2009 - 14:24
![]() Christina wrote:
Christina wrote:
Zuckersüß diese Mütze. Die Wolle ist gekauft und ich bin schon am stricken.
11.02.2009 - 20:27
![]() Drops Design wrote:
Drops Design wrote:
1 kast = YO (you can find most of our designs in english).
09.02.2009 - 09:26
![]() Kristjana wrote:
Kristjana wrote:
What does "1 kast." mean? (...ved å lage 1 kast. for å unngå hull strikkes kastet....) I understand the rest.. :) Thank you in advance! :)
07.02.2009 - 14:07
![]() Ragna E. Weaver wrote:
Ragna E. Weaver wrote:
Would you have a conversion list of: cm to inches, mm to inches. I am trying to pick a pattern I want, then order your yarn. Thank you this would be very helpful. Ragna Pettersen Weaver
17.01.2009 - 16:21
![]() Chris wrote:
Chris wrote:
I har glemt at angive strikkefasthed og pindestørrelse. I bogen er strikkefastheden forkert!
10.01.2009 - 23:46
![]() Tanja wrote:
Tanja wrote:
Super süss, werde ich auf jedenfall für meinen Kleinsten machen!!!
01.12.2008 - 20:36
![]() Ina wrote:
Ina wrote:
Extrem süüüß! Es ist gerade zum Strickenhinsetzen! Ich wüßte schon für wen!
28.11.2008 - 19:43Isabelle Lauzon wrote:
Merci énormément d'avoir traduit ce modèle ; il est trop mignon... Aussi merci pour tous les modèles disponibles sur votre site.
28.11.2008 - 19:38
![]() Lebigre wrote:
Lebigre wrote:
Trop mignon, merci de nous faire profiter de vos oeuvres , j'ai repris le plaisir de tricoter
27.11.2008 - 23:08
|
|||||||||||||
Little Acorn#littleacornset |
|||||||||||||
|
|
|||||||||||||
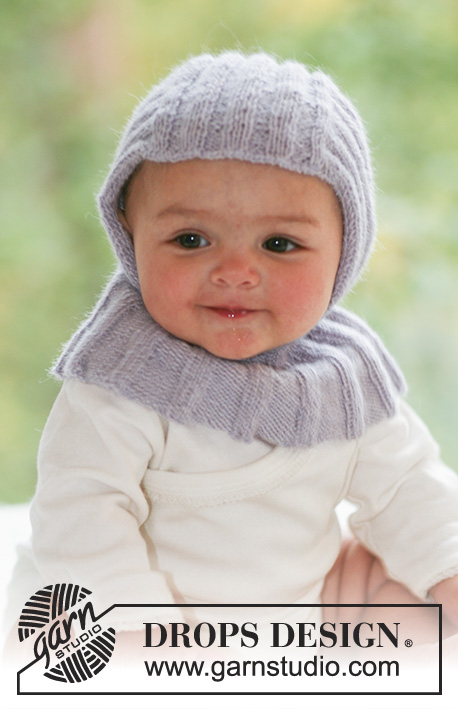
Knitted helmet hat and scarf in garter st with crochet edges, for baby and children in DROPS Merino Extra Fine
DROPS Baby 18-1 |
|||||||||||||
|
BONNET GARTER ST (back and forth on needle): K all rows. INCREASING TIP: Make all inc from RS. Inc 1 st by making 1 YO. Work YO into back of loop on return row to avoid a hole. DECREASING TIP: Make all dec from RS. Dec 1 st on each side of st with marker. Beg 1 st before st with marker, slip 1 st on cable needle behind piece, slip next st as if to K (st with marker), K tog next st and st from cable needle, psso. ------------------------------------------------------------ BONNET: Worked back and forth on needle in garter st – SEE ABOVE. Cast on 97-105-109 (113-121) sts on needle size 4 mm with light beige. K 1 row from WS and now insert 7 markers in piece from RS as follows: M-1 in first st on row M-2 in st 18-20-21 (22-24) M-3 in st 35-39-41 (43-47) M-4 in st 49-53-55 (57-61) M-5 in st 63-67-69 (71-75) M-6 in st 80-86-89 (92-98) M-7 in last st on row Continue in garter st, AT THE SAME TIME on row 1 begin inc and dec as follows – SEE INCREASING AND DECREASING TIP: INC 1 st after M-1 on every other row DEC 1 st on each side of M-2 on every other row INC 1 st before M-3 on every other row INC 1 st after M-3 on every 4th row DEC 1 st on each side of M-4 on every 4th row 5-7-8 (10-11) times and then on every other row to finished measurements (i.e. when dec on every other row no of sts will dec) INC 1 st before M-5 on every 4th row INC 1 st after M-5 on every other row DEC 1 st on each side of M-6 on every other row INC 1 st before M-7 on every other row. Continue like this. When piece measures 13-15-16 (18-19) cm (measured from lowest point by M-2 or M-6) work next row as follows from RS: * K1, K2 tog *, repeat from *-*, AT THE SAME TIME as casting off. ASSEMBLY: Back of hat = cast off row, i.e. 2 whole points and 2 half points. The middle of the 3 whole points on the opposite side of piece = cast on row, sits at middle of forehead. Sew hat tog, edge to edge along cast off row as follows: Sew first half point to one side of the first whole point. Sew the other side of first whole point to one side of second whole point. Then the other side of second whole point to the last half point. Now sew hat tog mid back – make sure to sew edge to edge to avoid a chunky seam. CROCHET BORDER: Beg at bottom of point on one side. Crochet with crochet hook size 4 mm and off-white as follows: 1 dc in point, a string of ch measuring 20-22-24 (26-28) cm, turn piece and work 1 sl st in each ch on return row, finish with 1 sl st in dc in point (= tie string). Continue round the bonnet as follows: * 3 ch, 1 tr in the first of these 3 ch, skip approx 1 cm, 1 dc in next st *, repeat from *-* to point at the other side. Work a tie string as described above and continue round the bonnet as follows: * 3 ch 1 tr in the first of these 3 ch, skip approx 1 cm, 1 dc in next st *, repeat from *-* to the first point and finish with 1 sl st in first dc from beg of round. ------------------------------------------------------------ SCARF: Worked in garter st back and forth on needle. Cast on 18-20-22 (24-26) sts on needle size 4 mm with light beige and work garter st back and forth on needle until piece measures approx 8-9-10 (11-12) cm. Now divide the piece in the middle and slip half the sts on a stitch holder = 9-10-11 (12-13) sts left on needle. Continue on these sts for 4-5-5 (6-6) cm (piece measures 12-14-15 (17-18) cm in total). Slip sts on a stitch holder and slip sts from the first stitch holder back on needle. Work garter st back and forth on needle for 4-5-5 (6-6) cm. Now slip all sts back on needle and continue in garter st until piece measures approx 44-47-51 (55-60) cm. Cast off. CROCHET BORDER: Crochet a border round scarf with crochet hook size 4 mm and off-white as follows: * 1 dc, 3 ch, 1 tr in the first of these 3 ch, skip approx 1 cm *, repeat from *-* and finish with 1 sl st in first dc from beg of round. |
|||||||||||||
Diagram explanations |
|||||||||||||
|
|||||||||||||
 |
|||||||||||||
Have you finished this pattern?Tag your pictures with #dropspattern #littleacornset or submit them to the #dropsfan gallery. Do you need help with this pattern?You'll find 11 tutorial videos, a Comments/Questions area and more by visiting the pattern on garnstudio.com. © 1982-2026 DROPS Design A/S. We reserve all rights. This document, including all its sub-sections, has copyrights. Read more about what you can do with our patterns at the bottom of each pattern on our site. |
|||||||||||||


With over 40 years in knitting and crochet design, DROPS Design offers one of the most extensive collections of free patterns on the internet - translated to 17 languages. As of today we count 325 catalogues and 12298 patterns translated into English (UK/cm). 12298
We work hard to bring you the best knitting and crochet have to offer, inspiration and advice as well as great quality yarns at incredible prices! Would you like to use our patterns for other than personal use? You can read what you are allowed to do in the Copyright text at the bottom of all our patterns. Happy crafting!
Post a comment to pattern DROPS Baby 18-1
We would love to hear what you have to say about this pattern!
If you want to leave a question, please make sure you select the correct category in the form below, to speed up the answering process. Required fields are marked *.