
Popular categories
Looking for a yarn?


Comments / Questions (201)
![]() Nicole Hampe wrote:
Nicole Hampe wrote:
Was für ein hübsches Muster! Ich stricke die Jacke und bin bis zum Kragen gut mit der Anleitung zurecht gekommen. Was ist beim Kragen gemeint mit:" 1R. re. auf links stricken..."? Die linke Seite der Arbeit zeigt zu mir und ich stricke alle Maschen rechts ab oder anders herum?Schon mal vielen Dank fürs Helfen!
07.12.2015 - 14:52DROPS Design answered:
Das soll bedeuten, dass Sie 1 Rück-R re stricken. ("auf links" = Rück-R). Die Übersetzung ist etwas älter, daher noch diese ältere Begrifflichkeit.
09.12.2015 - 21:46Lana Torgerson wrote:
I'm having trouble with decreasing on the yolk. Do I decrease on each side of every cable?
02.11.2015 - 02:50DROPS Design answered:
Dear Mrs Togerson, decrease are done from RS to the left and to the right alternately of all cables by P2 tog, i.e. on the first dec row, decrease to the left (= after cable) and on next dec row, dec to the right (= before) of all cables and repeat these both dec row (3rd dec row = to the left, 4th dec row = to the right, etc). Happy knitting!
02.11.2015 - 09:50
![]() Kathleen wrote:
Kathleen wrote:
Working on yoke. 2nd paragraph= Continue in pattern like this, AT THE SAME TIME on next row from RS dec for raglan- SEE DECREASING TIP. Could not find decreasing tip. Is it either side of armhole where we newly added in sleeves? Please help.... So darling to this point.
01.11.2015 - 18:39DROPS Design answered:
Dear Kathleen, you will find "decreasing tip" at the beg of the pattern (before "Jacket"). The dec on yoke are done alternately on the left and the right of all cables on row (on 1st dec row dec 1 st after each cable, on the next dec row dec 1 st before each cable). Happy knitting!
02.11.2015 - 09:29Karin wrote:
Viel kleiner als 1/3 Monate gibt es wohl kaum!
12.07.2015 - 17:36
![]() Ute Hessing wrote:
Ute Hessing wrote:
Liebes Garnstudio. Ich bewundere Ihre Arbeit! Danke für Ihre Mühe! Ich habe ein Problem mit den Mützen. Dafür wäre auch eine Schemazeichnung sehr, sehr hilfreich. Außerdem kann ich mit den Zahlenangaben überhaupt nichts anfangen. Wenn ich eine Größe ändern will, muss ich selbst rechnen. Aber wie errechne ich den Maschenanschlag für ein Neugeborenes für die oben abgebildete Mütze? Welche Maße? Danke! Viele Grüße Ute
12.07.2015 - 11:32DROPS Design answered:
Vielen lieben Dank für Ihr Lob! Was die Angaben betrifft, ist es grundsätzlich nicht ratsam, selbst umzurechnen, da sich dann die Proportionen verschieben oder auch Muster nicht mehr passen. Unsere Anleitungen sind extra meistens für sehr viele Größen beschrieben, damit man nicht selbst ändern muss. Die kleinste Größe bei dieser Mütze ist ja bereits ab 1 Monat, das ist schon recht klein. Ich würde an Ihrer Stelle einfach die kleinste Größe stricken, so haben Sie auch etwas länger Freude an der Mütze. Sie können den Rand der Mütze ja auch umschlagen, wenn sie etwas zu groß sein sollte. Dieses Modell ist zudem durch das Muster leicht elastisch.
13.07.2015 - 09:27
![]() Simon Francoise wrote:
Simon Francoise wrote:
Merci beaucoup,je vais commencer dés demain.
23.02.2015 - 19:16
![]() ANN DE KERPEL wrote:
ANN DE KERPEL wrote:
Hallo, ik vind dit een prachtig vestje . Ik kan echter niet aan het kraagje beginnen. Al enkele keren een poging maar nooit niet zoals op de foto. De pas heeft 8cm. tegelijk 8 st aan iedere kant op hulpdraad.Dan begint het :( waar moet men die 2 keer 1st afzetten ?Dan voor kraag; neem 10 st op (inclusief 8 st op hulpdraad),brei 1 nld r aan verkeerde kant. Is dat juist voor die 10 st ???? het vervolg kan ik echt niet meer volgend. Hulp hulp aub. Bedankt alvast. Grtjs
04.11.2014 - 21:18DROPS Design answered:
Hoi Ann. Je kant af tussen de 8 st op de draad en de st op de nld, dus je hebt de 8 st op de draad gezet, kant st af, brei de nld uit tot de 8 st op de draad aan de andere kant, keer, kant af. Als je kraag gaat breien, zet je de 8 st terug op de nld, neem 2 st op in de overgang tussen de 8 st en de resterende st op de nld (in totaal 10 st). Je hebt dan in totaal 10+43+10 st op de nld, brei 1 nld r aan de verkeerde kant en pas het aantal st aan tot 50 st (dwz, minder gelijkmatig 13 st).
05.11.2014 - 16:42
![]() Titi wrote:
Titi wrote:
Hi, thanks for your guidance. I have problem in this section" Pick up 10 sts on each side of neckline mid front (incl sts on stitch holders. I think that must pick up all sts on needle and holders, is it correct?
02.10.2014 - 08:23DROPS Design answered:
Dear Titi, for collar you have to pick up 10 sts on each side on neckline, it means the 8 sts in each st holder + pick up 2 sts in the bound off sts for neckline = 10 sts each side (+ remaining sts from yoke to work the collar). Happy knitting!
02.10.2014 - 10:02
![]() Titi wrote:
Titi wrote:
Hi, where the text says"hen yoke measures 10-11-12 (13-14) cm dec all P2 between cables to P1 and K tog the 4 sts on each cable 2 by 2 = approx 43-49-55 (61-67) sts left on row". I have P3 . how can I understand where is wrong?
30.09.2014 - 10:56DROPS Design answered:
Dear Titi, check the number of dec you have made for yoke, you should have started with a first dec, then on every 8th row: 0-0-1 (2-3) times, on every 6th row: 1-2-2 (1-1) times and then on every 4th row: 4-3-2 (2-1) times - so that you have P2 in each P section. Happy knitting!
30.09.2014 - 13:48
![]() Sabine wrote:
Sabine wrote:
Hallo, ich stricke gerade die Haube,verstehe aber nicht wie ich das Mittelteil stricken soll. Wieviel Maschen usw
29.08.2014 - 22:30DROPS Design answered:
Wenn Sie die M bei den Zöpfen zusammengestrickt haben, haben Sie ja 64-70-76 (82-88) M auf der Nadel. Dann ketten Sie zuerst an der einen Seite der Arbeit 23-25-27 (29-31) M ab, dann ketten Sie am Anfang der nächsten R 23-25-27 (29-31) M an der anderen Seite der Arbeit ab. Es bleiben 18-20-22 (24-26) M in der Mitte der Arbeit übrig. Diese M stricken Sie nun kraus re, und zwar 11-12-13 (14-15) cm lang. Das ist dann das Mittelstück.
30.08.2014 - 15:40
|
|||||||
Cable Princess#cableprincessjacket |
|||||||
 |
 |
||||||
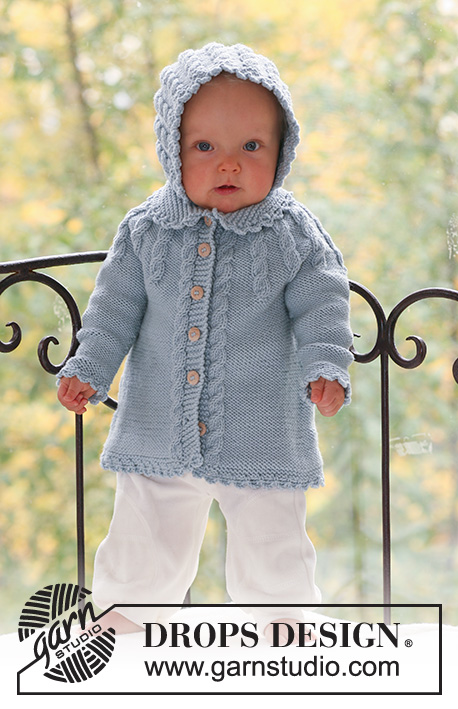
Set of knitted jacket and bonnet with cables for baby and children in DROPS Merino Extra Fine
DROPS Baby 17-1 |
|||||||
|
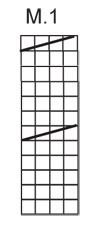
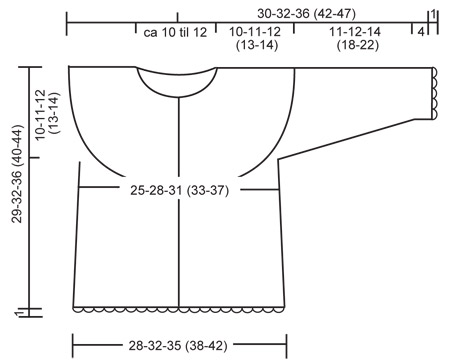
PATTERN: See diagram M.1 – the diagram shows pattern from the RS. GARTER ST (back and forth on needle): K all rows. GARTER ST (in the round): K 1 round, P 1 round. BUTTONHOLES: Make buttonholes on right front band. 1 buttonhole = K tog 2nd and 3rd st from mid front and make 1 YO. Make buttonholes when piece measures: SIZE 1/3 months: 4, 8, 13, 17, 22 and 26 cm SIZE 6/9 months: 4, 9, 14, 19, 24 and 29 cm SIZE 12/18 months: 4, 10, 16, 22, 28 and 33 cm SIZE 2 years: 5, 11, 18, 24, 31 and 37 cm SIZE 3/4 years: 5, 12, 19, 26, 33 and 40 cm DECREASING TIP (applies to jacket): Make all dec from RS. Dec 1 st to the left and to the right alternately of all cables by P2 tog, i.e. the first dec is made to the left and the next dec is made to the right of all cables, etc. Decrease only on the inside of the outermost cable towards the band in each side. CROCHET PICOT BORDER: With crochet hook size 4 mm: 1 dc in first st, * 4 ch, 1 tr in the first of these ch (= 1 picot), skip 1 cm, 1 dc in next st *, repeat from *-*. ---------------------------------------------------------- JACKET BODY PIECE: Worked back and forth on circular needle from mid front. Cast on 128-144-158 (170-186) sts (includes 5 front band sts each side towards mid front) on circular needle size 4 mm with Merino Extra Fine. Work 4 rows garter st (first row = RS) – SEE ABOVE. Work next row as follows from RS: 5 front band sts in garter st, P1, K2 in each of the next 2 sts (i.e. 2 sts inc to 4), P across the row until 8 sts remain, K2 in each of the next 2 sts, P1 and 5 front band sts in garter st = 132-148-162 (174-190) sts. Insert 1 marker 36-40-44 (47-51) sts in from each side (= 60-68-74 (80-88) sts between markers on back piece). Work next row as follows from WS: 5 garter sts, K1, M.1, K across the row until 10 sts remain, M.1, K1, 5 garter sts. Work next row as follows from RS: 5 garter sts, P1, M.1, P across the row until 10 sts remain, M.1, P1, 5 garter sts. Continue in pattern like this (i.e. front band sts in garter st, 1 st in reverse stocking st inside front bands, 1 cable (= M.1) each side and remaining sts in reverse stocking st). REMEMBER THE KNITTING TENSION! AT THE SAME TIME when piece measures 4 cm dec 1 st on each side of both markers by P2 tog. Repeat the dec on every 4 cm a total of 4-4-4 (5-5) times = 116-132-146 (154-170) sts. AT THE SAME TIME when piece measures 4-4-4 (5-5) cm make buttonhole on right front band – SEE ABOVE. When piece measures approx 19-21-24 (27-30) cm – adjust so that next row is from WS – cast off 6 sts each side for armhole (= 3 sts on each side of both markers) = 104-120-134 (142-158) sts left on row. Put piece aside and knit the sleeves. SLEEVE: Worked in the round on double pointed needles. Cast on 28-30-32 (34-38) sts on double pointed needles size 4 mm with Merino Extra Fine. Work 4 rounds garter st – SEE ABOVE. Continue in reverse stocking st, and insert a marker at beg of round = mid under arm. When piece measures 4 cm inc 1 st on each side of marker and repeat the inc on every 6-5-6 (6-8) round a total of 5-6-7 (8-8) times = 38-42-46 (50-54) sts. When piece measures 14-15-18 (22-26) cm cast off 6 sts mid under arm = 32-36-40 (44-48) sts. Put piece aside and knit the other sleeve. YOKE: Slip sleeves on the same circular needle as body piece where cast off for armhole = 168-192-214 (230-254) sts. Work 1 row from RS with front bands and cables as before and remaining sts in reverse stocking st, AT THE SAME TIME dec 0-4-6 (2-6) sts evenly (do not dec on front bands and cables) = 168-188-208 (228-248) sts. Work next row as follows from WS: 5 garter sts, K1, M.1, * K8, P2 in each of the next 2 sts (i.e. 2 sts inc to 4) *, repeat from *-* until 18 sts remain, K8, M.1, K1 and 5 garter sts = 196-220-244 (268-292) sts. Work next row as follows from RS: 5 garter sts, P1, M.1, * P8, M.1 *, repeat from *-* 15-17-19 (21-23) times, P1 and 5 garter sts. Continue in pattern like this, AT THE SAME TIME on next row from RS start dec to shape the round yoke – SEE DECREASING TIP. Continue to dec on every 8th row: 0-0-1 (2-3) more times, on every 6th row: 1-2-2 (1-1) times in total and then on every 4th row: 4-3-2 (2-1) times in total (there are now 2 purled stitches between every cable). AT THE SAME TIME when yoke measures 8-9-10 (11-12) cm slip 8 sts each side towards mid front on stitch holders for neck. Cast off to shape the neckline each side at the beg of every row from mid front: 1 st 2 times. When yoke measures 10-11-12 (13-14) cm dec all P2 between cables to P1 and K tog the 4 sts on each cable 2 by 2 = approx 43-49-55 (61-67) sts left on row. COLLAR: Pick up 10 sts on each side of neckline mid front (incl sts on stitch holders). K 1 row from WS, AT THE SAME TIME adjust no of sts evenly to 50-54-58 (62-66). Work garter st back and forth on needle until collar measures 3-3-4 (4-5) cm. Now cast off 1 st each side a total of 4 times and then cast off remaining sts. Collar measures approx 5-5-6 (6-7) cm. ASSEMBLY: Sew openings under arms. Crochet a picot border – SEE ABOVE – round collar, round sleeve edges and along bottom edge of jacket. Sew on buttons. ---------------------------------------------------------- BONNET: Worked back and forth on circular needle. LOOSELY cast on 64-70-76 (82-88) sts on circular needle size 4 mm with Merino extra fine. Work 4 rows garter st – SEE ABOVE. Work next row as follows from RS: 1 garter st, * K2 in each of the next 2 sts, P4 *, repeat from *-* until 3 sts remain, K2 in each of the next 2 sts, 1 garter st = 86-94-102 (110-118) sts. Continue as follows from WS: 1 garter st, * M.1, K 4 *, repeat from *-* until 5 sts remain, M.1 (= 4 sts) and 1 garter st. Work next row as follows from RS: 1 garter st, * M.1, P 4 *, repeat from *-* until 5 sts remain, M.1 (= 4 sts), 1 garter st. Continue in pattern like this until piece measures approx 10-11-12 (13-14) cm – adjust so that next row is from RS – and now K tog the 4 sts on each cable 2 by 2 = 64-70-76 (82-88) sts. On next row from WS cast off the first 23-25-27 (29-31) sts, work remaining sts on row. On next row from RS cast off the first 23-25-27 (29-31) sts = 18-20-22 (24-26) sts left on row (= back piece). Work garter st back and forth on these sts for 11-12-13 (14-15) cm, cast off. ASSEMBLY: Sew the sides on the piece mid back to side pieces, sew edge to edge to avoid a chunky seam. Pick up approx 60 to 84 sts (divisible by 4) along bottom edge of bonnet on circular needle size 4 mm, K 1 row from WS and K 1 row from RS. Work next row as follows from WS: K2, * P2 tog, 1 YO *, repeat from *-* and K2 (= eyelet row). K 2 rows on all sts and cast off. Crochet a ch-string measuring approx 70 cm with crochet hook size 4 mm and thread string through eyelet row. Crochet a picot border – SEE ABOVE – round the front opening of bonnet. |
|||||||
Diagram explanations |
|||||||
|
|||||||
 |
|||||||
 |
|||||||
Have you finished this pattern?Tag your pictures with #dropspattern #cableprincessjacket or submit them to the #dropsfan gallery. Do you need help with this pattern?You'll find 17 tutorial videos, a Comments/Questions area and more by visiting the pattern on garnstudio.com. © 1982-2026 DROPS Design A/S. We reserve all rights. This document, including all its sub-sections, has copyrights. Read more about what you can do with our patterns at the bottom of each pattern on our site. |
|||||||


With over 40 years in knitting and crochet design, DROPS Design offers one of the most extensive collections of free patterns on the internet - translated to 17 languages. As of today we count 324 catalogues and 12285 patterns translated into English (UK/cm). 12285
We work hard to bring you the best knitting and crochet have to offer, inspiration and advice as well as great quality yarns at incredible prices! Would you like to use our patterns for other than personal use? You can read what you are allowed to do in the Copyright text at the bottom of all our patterns. Happy crafting!
Post a comment to pattern DROPS Baby 17-1
We would love to hear what you have to say about this pattern!
If you want to leave a question, please make sure you select the correct category in the form below, to speed up the answering process. Required fields are marked *.