
Popular categories
Looking for a yarn?


Comments / Questions (201)
Adela wrote:
Hola! en la pieza del CUERPO ¿disminuyo de ambos lados y en la misma vuelta? o en forma alternada?..Gracias.Me confundo con indicación de Tips para dism saco.Por favor aclárame Abrazo
15.09.2016 - 17:06DROPS Design answered:
Hola Adela, Las dism se trabajan de la sig manera: en una fila con dism trabajamos 2 pjd antes de cada trenza y en la sig fila con las dism trabajamos 2 pjd después de cada trenza
17.09.2016 - 19:10
![]() Janne Berg wrote:
Janne Berg wrote:
Ser ut til at mønsteret er riktig og jeg har glømt to fellinger😊😊
19.07.2016 - 21:22
![]() Janne Berg wrote:
Janne Berg wrote:
Etter å ha felt inn de 4 m på flettene til 2 m (på luen) og 25 m i hver side, så skal en ha 20 m igjen. Men her blir det 22 m. Regner med at det er de 2 kantmaskene som ikke er tatt med her. Så derfor har jeg felt 26 med i hver side. Har strikket jakken og den er helt nyyydelig. Små hjerteknapper i tre passet perfekt til den flott grønnfargen😀
19.07.2016 - 15:30
![]() Isnard Christine wrote:
Isnard Christine wrote:
Pour l'empiècement lorsque j'ai 214 mailles et que je répartis deux diminutions j'obtiens 212 et non 208 (taille 3) Y a t il une erreur ou bien ai-je mal interprété le nombre de diminutions?
01.07.2016 - 15:36DROPS Design answered:
Bonjour Mme Isnard, il faut en fait diminuer 6 m et non 2 - correction faite, merci. Bon tricot!
01.07.2016 - 18:00
![]() Isnard Christine wrote:
Isnard Christine wrote:
Pour l'empiècement dois-je diminuer une maille avant chaque torsade et ensuite une maille après chaque torsade au rang suivant ou bien 8 rangs après? Merci pour votre réponse.
01.07.2016 - 15:30DROPS Design answered:
Bonjour Mme Isnard, on diminue entre les torsades, la 1ère fois avant les torsades (= à gauche de chaque torsade) et la fois suivante après les torsades (= à droite de chaque torsade). On diminue ainsi alternativement 1 m à la fin et au début des sections en m env. On répète ces diminutions en fonction de chaque taille tous les 8 rangs, puis tous les 6 rangs et tous les 4 rangs. Bon tricot!
01.07.2016 - 17:57
![]() Jane wrote:
Jane wrote:
Don't understand the cable instructions, at what row do you make the first cable? How many rows do you knit before making the second one? Very confusing, I have never seen cable instructions like this before.
09.04.2016 - 20:36DROPS Design answered:
Dear Jane, diagrams should be read from bottom to top and from right to left. The first cable is on the 6th row (RS) and the second one is on the 12th row (RS) and so on. Happy knitting!
10.04.2016 - 00:18
![]() Cluchi wrote:
Cluchi wrote:
In the yoke section it has 8 stitches between cables. The decreases only total 5 leaving 3 stitches between. It then says later "when yoke measures ... dec all P2 between cables to P1"
14.03.2016 - 10:45DROPS Design answered:
Dear Cluchi, check the number of dec you have made for yoke, you should have started with a first dec, then continue dec: on every 8th row: 0-0-1 (2-3) times, on every 6th row: 1-2-2 (1-1) times and then on every 4th row: 4-3-2 (2-1) times - so that you have P2 in each P section. Happy knitting!
14.03.2016 - 11:44Coddie wrote:
Re: Q2 I should have said raglan decreases. But question remains, in row 1 of raglan decreases do I decrease each side of each cable? Thank you for your responses. Very much appreciated.
19.02.2016 - 17:33DROPS Design answered:
Dear Coddie, you dec alternately on each side of all cable, ie on 1st dec row you will dec to the left of each cable, on next dec row you will dec to the right of each cable and repeat this, ie you dec only 1 st between cables, alternately after and before all cables. Happy knitting!
20.02.2016 - 12:32Coddie wrote:
Regarding the decreases of the yoke...Would it be possible to get final stitch counts after all decreases for each size? Q 2: on row 1 of the raglan increases, do I decrease one stitch BOTH sides of each cable? Or decrease L on row 1 and decrease R on row 3? Q 3: Since I'm confused about the above, I have no clue how to calculate "eighth row" or "sixth row".
19.02.2016 - 15:50DROPS Design answered:
Dear Coddie, number of sts dec is different depending on the size you are working on, each number refers to the size, ie when you dec 0-4-2 (2-6) sts evenly on 1st row from RS on yoke, you will dec no sts in 1st size, 4 stss in 2nd size, and so on. When dec every 8th/6th row, work 1 row with dec, 7/5 rows without dec and repeat these 8/6 rows how many times stated for your size. Happy knitting!
19.02.2016 - 16:34
![]() Nicole Hampe wrote:
Nicole Hampe wrote:
Danke für die Hilfe! Die Jacke ist inzwischen fertig und sieht an meiner Tochter hinreißend aus!!
11.12.2015 - 09:39
|
|||||||
Cable Princess#cableprincessjacket |
|||||||
 |
 |
||||||
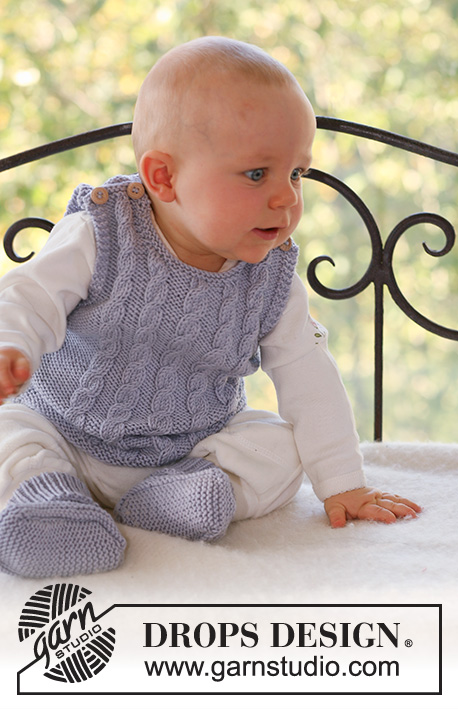
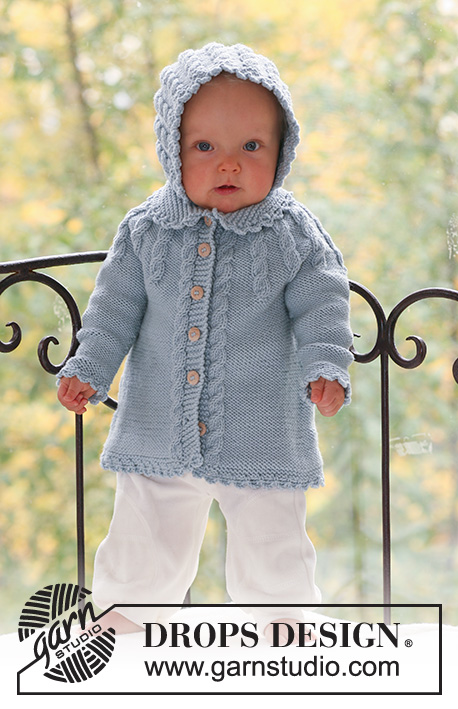
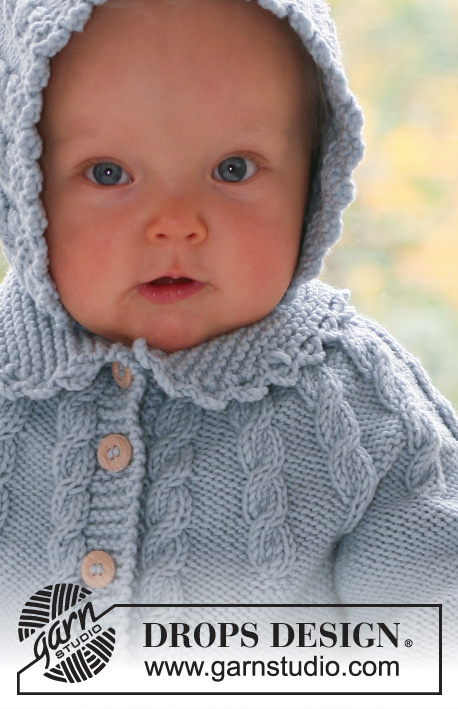
Set of knitted jacket and bonnet with cables for baby and children in DROPS Merino Extra Fine
DROPS Baby 17-1 |
|||||||
|
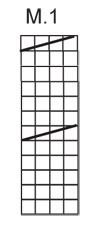
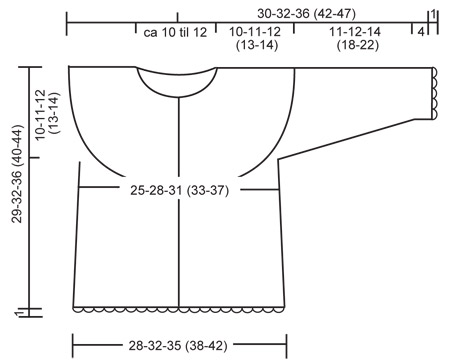
PATTERN: See diagram M.1 – the diagram shows pattern from the RS. GARTER ST (back and forth on needle): K all rows. GARTER ST (in the round): K 1 round, P 1 round. BUTTONHOLES: Make buttonholes on right front band. 1 buttonhole = K tog 2nd and 3rd st from mid front and make 1 YO. Make buttonholes when piece measures: SIZE 1/3 months: 4, 8, 13, 17, 22 and 26 cm SIZE 6/9 months: 4, 9, 14, 19, 24 and 29 cm SIZE 12/18 months: 4, 10, 16, 22, 28 and 33 cm SIZE 2 years: 5, 11, 18, 24, 31 and 37 cm SIZE 3/4 years: 5, 12, 19, 26, 33 and 40 cm DECREASING TIP (applies to jacket): Make all dec from RS. Dec 1 st to the left and to the right alternately of all cables by P2 tog, i.e. the first dec is made to the left and the next dec is made to the right of all cables, etc. Decrease only on the inside of the outermost cable towards the band in each side. CROCHET PICOT BORDER: With crochet hook size 4 mm: 1 dc in first st, * 4 ch, 1 tr in the first of these ch (= 1 picot), skip 1 cm, 1 dc in next st *, repeat from *-*. ---------------------------------------------------------- JACKET BODY PIECE: Worked back and forth on circular needle from mid front. Cast on 128-144-158 (170-186) sts (includes 5 front band sts each side towards mid front) on circular needle size 4 mm with Merino Extra Fine. Work 4 rows garter st (first row = RS) – SEE ABOVE. Work next row as follows from RS: 5 front band sts in garter st, P1, K2 in each of the next 2 sts (i.e. 2 sts inc to 4), P across the row until 8 sts remain, K2 in each of the next 2 sts, P1 and 5 front band sts in garter st = 132-148-162 (174-190) sts. Insert 1 marker 36-40-44 (47-51) sts in from each side (= 60-68-74 (80-88) sts between markers on back piece). Work next row as follows from WS: 5 garter sts, K1, M.1, K across the row until 10 sts remain, M.1, K1, 5 garter sts. Work next row as follows from RS: 5 garter sts, P1, M.1, P across the row until 10 sts remain, M.1, P1, 5 garter sts. Continue in pattern like this (i.e. front band sts in garter st, 1 st in reverse stocking st inside front bands, 1 cable (= M.1) each side and remaining sts in reverse stocking st). REMEMBER THE KNITTING TENSION! AT THE SAME TIME when piece measures 4 cm dec 1 st on each side of both markers by P2 tog. Repeat the dec on every 4 cm a total of 4-4-4 (5-5) times = 116-132-146 (154-170) sts. AT THE SAME TIME when piece measures 4-4-4 (5-5) cm make buttonhole on right front band – SEE ABOVE. When piece measures approx 19-21-24 (27-30) cm – adjust so that next row is from WS – cast off 6 sts each side for armhole (= 3 sts on each side of both markers) = 104-120-134 (142-158) sts left on row. Put piece aside and knit the sleeves. SLEEVE: Worked in the round on double pointed needles. Cast on 28-30-32 (34-38) sts on double pointed needles size 4 mm with Merino Extra Fine. Work 4 rounds garter st – SEE ABOVE. Continue in reverse stocking st, and insert a marker at beg of round = mid under arm. When piece measures 4 cm inc 1 st on each side of marker and repeat the inc on every 6-5-6 (6-8) round a total of 5-6-7 (8-8) times = 38-42-46 (50-54) sts. When piece measures 14-15-18 (22-26) cm cast off 6 sts mid under arm = 32-36-40 (44-48) sts. Put piece aside and knit the other sleeve. YOKE: Slip sleeves on the same circular needle as body piece where cast off for armhole = 168-192-214 (230-254) sts. Work 1 row from RS with front bands and cables as before and remaining sts in reverse stocking st, AT THE SAME TIME dec 0-4-6 (2-6) sts evenly (do not dec on front bands and cables) = 168-188-208 (228-248) sts. Work next row as follows from WS: 5 garter sts, K1, M.1, * K8, P2 in each of the next 2 sts (i.e. 2 sts inc to 4) *, repeat from *-* until 18 sts remain, K8, M.1, K1 and 5 garter sts = 196-220-244 (268-292) sts. Work next row as follows from RS: 5 garter sts, P1, M.1, * P8, M.1 *, repeat from *-* 15-17-19 (21-23) times, P1 and 5 garter sts. Continue in pattern like this, AT THE SAME TIME on next row from RS start dec to shape the round yoke – SEE DECREASING TIP. Continue to dec on every 8th row: 0-0-1 (2-3) more times, on every 6th row: 1-2-2 (1-1) times in total and then on every 4th row: 4-3-2 (2-1) times in total (there are now 2 purled stitches between every cable). AT THE SAME TIME when yoke measures 8-9-10 (11-12) cm slip 8 sts each side towards mid front on stitch holders for neck. Cast off to shape the neckline each side at the beg of every row from mid front: 1 st 2 times. When yoke measures 10-11-12 (13-14) cm dec all P2 between cables to P1 and K tog the 4 sts on each cable 2 by 2 = approx 43-49-55 (61-67) sts left on row. COLLAR: Pick up 10 sts on each side of neckline mid front (incl sts on stitch holders). K 1 row from WS, AT THE SAME TIME adjust no of sts evenly to 50-54-58 (62-66). Work garter st back and forth on needle until collar measures 3-3-4 (4-5) cm. Now cast off 1 st each side a total of 4 times and then cast off remaining sts. Collar measures approx 5-5-6 (6-7) cm. ASSEMBLY: Sew openings under arms. Crochet a picot border – SEE ABOVE – round collar, round sleeve edges and along bottom edge of jacket. Sew on buttons. ---------------------------------------------------------- BONNET: Worked back and forth on circular needle. LOOSELY cast on 64-70-76 (82-88) sts on circular needle size 4 mm with Merino extra fine. Work 4 rows garter st – SEE ABOVE. Work next row as follows from RS: 1 garter st, * K2 in each of the next 2 sts, P4 *, repeat from *-* until 3 sts remain, K2 in each of the next 2 sts, 1 garter st = 86-94-102 (110-118) sts. Continue as follows from WS: 1 garter st, * M.1, K 4 *, repeat from *-* until 5 sts remain, M.1 (= 4 sts) and 1 garter st. Work next row as follows from RS: 1 garter st, * M.1, P 4 *, repeat from *-* until 5 sts remain, M.1 (= 4 sts), 1 garter st. Continue in pattern like this until piece measures approx 10-11-12 (13-14) cm – adjust so that next row is from RS – and now K tog the 4 sts on each cable 2 by 2 = 64-70-76 (82-88) sts. On next row from WS cast off the first 23-25-27 (29-31) sts, work remaining sts on row. On next row from RS cast off the first 23-25-27 (29-31) sts = 18-20-22 (24-26) sts left on row (= back piece). Work garter st back and forth on these sts for 11-12-13 (14-15) cm, cast off. ASSEMBLY: Sew the sides on the piece mid back to side pieces, sew edge to edge to avoid a chunky seam. Pick up approx 60 to 84 sts (divisible by 4) along bottom edge of bonnet on circular needle size 4 mm, K 1 row from WS and K 1 row from RS. Work next row as follows from WS: K2, * P2 tog, 1 YO *, repeat from *-* and K2 (= eyelet row). K 2 rows on all sts and cast off. Crochet a ch-string measuring approx 70 cm with crochet hook size 4 mm and thread string through eyelet row. Crochet a picot border – SEE ABOVE – round the front opening of bonnet. |
|||||||
Diagram explanations |
|||||||
|
|||||||
 |
|||||||
 |
|||||||
Have you finished this pattern?Tag your pictures with #dropspattern #cableprincessjacket or submit them to the #dropsfan gallery. Do you need help with this pattern?You'll find 17 tutorial videos, a Comments/Questions area and more by visiting the pattern on garnstudio.com. © 1982-2026 DROPS Design A/S. We reserve all rights. This document, including all its sub-sections, has copyrights. Read more about what you can do with our patterns at the bottom of each pattern on our site. |
|||||||


With over 40 years in knitting and crochet design, DROPS Design offers one of the most extensive collections of free patterns on the internet - translated to 17 languages. As of today we count 324 catalogues and 12285 patterns translated into English (UK/cm). 12285
We work hard to bring you the best knitting and crochet have to offer, inspiration and advice as well as great quality yarns at incredible prices! Would you like to use our patterns for other than personal use? You can read what you are allowed to do in the Copyright text at the bottom of all our patterns. Happy crafting!
Post a comment to pattern DROPS Baby 17-1
We would love to hear what you have to say about this pattern!
If you want to leave a question, please make sure you select the correct category in the form below, to speed up the answering process. Required fields are marked *.