
Popular categories
Looking for a yarn?


Comments / Questions (201)
![]() Ines Kutzner wrote:
Ines Kutzner wrote:
Hallo, Meine Frage zur PASSE: wo setze ich denn die Ärmel an? In der Anleitung steht ja nur alle Maschen auf eine Rundstricknadel legen. LG Ines
05.10.2019 - 12:29DROPS Design answered:
Liebe Frau Kutzner, die Ärmel legen Sie über die 6 abgekettene Maschen am Rumpfteil, dh wie in diesem Video gezeigt. Viel Spaß beim stricken!
07.10.2019 - 08:58
![]() Gisele wrote:
Gisele wrote:
Just wanted to note that 5 balls of this yarn as stated in the pattern for size 2 years was not enough. I have to order one more. I followed all the instructions in the pattern.
01.09.2019 - 04:57
![]() Grethe wrote:
Grethe wrote:
Når der skal tages ind på bærestykket på venstre side af snoningen, gælder det også snoningen i kanten?
14.04.2019 - 16:59DROPS Design answered:
Hei Grethe. Du feller på innsiden av flettene i hver side, men feller ikke på siden mot knappestolpene. God fornøyelse
23.04.2019 - 13:31
![]() Jutta wrote:
Jutta wrote:
Hallo, am Hals soll man immer aus 3 linksmaschen 2 machen. Es sind immer 8 Links Maschen zwischen den Zöpfen. Wenn ich aus drei linksmasvhen 2 machen soll, gehtvdas bei 8 m ja nur 2x. D. H. Ich habe dann statt 8 nur noch 6 linke Maschen. Am Ende habe ich aber viel mehr als 61 m auf der Nadel. Oder wie ist es richtig. ?
10.09.2018 - 22:40DROPS Design answered:
Liebe Jutta, nach der 1. Abnahmen haben Sie 247 M, dann nehmen Sie in jeder 8. Reihe x 2, in jeder 6. Reihe x 1 und in jeder 4. Reihe x 2 = 142 M sind dann übrig - dann werden 16 M + 2 Maschen für die Hals stillgelegt = 122 M dann werden die Maschen von A.1 zs gestrickt + die linke Maschen zs gestrikt = es bleiben ca 61 M. Viel Spaß beim stricken!
17.09.2018 - 17:31
![]() Jutta wrote:
Jutta wrote:
Ab wo wird gemessen,(gleichzeitig nach 8-9-10-11-12cm) um die 8m für den Kragen stillzulegen?
05.09.2018 - 14:28DROPS Design answered:
Liebe Juttta, diese 8-9-10-11-12 cm werden vom Anfang der Passe gemessen. Viel Spaß beim stricken!
05.09.2018 - 14:40
![]() Jutta wrote:
Jutta wrote:
Hallo, ich möchte den Kragen weglassen. Muss ich dann trotzdem 8m stilllegen oder kann ich einfach einfach in der Mitte für den Hals abketten , wie beschrieben und dann am Ende alles abketten?möchte nur diese pikotkante direkt an den Halsausschnitt dran häkeln. Würde mich freuen, wenn Soe mir da weiter helfen könnten.
05.09.2018 - 14:20DROPS Design answered:
Liebe Jutta, wenn Sie diese 8 M nicht auf beiden Seiten stilllegen wird der Halsauschnitt die gleiche hinten und vorne sein. Die Abnahmen für den Halsausschnitt können Sie wie in der Anleitung arbeiten, und dann nur den Kragen anders stricken. Viel Spaß beim stricken!
05.09.2018 - 14:39
![]() Mary wrote:
Mary wrote:
Is there another version of the instructions for the yoke? maybe some diagrams? i have read and reread the instruction and have knitted to the point of binding off for the neckline. I am so confused, and reading the comments and questions of other readers i am not alone. Please help. i think i may be ripping my garment apart.
15.05.2018 - 00:27DROPS Design answered:
Dear Mary, you will slip the first 8 sts at the beg of next 2 rows on a st holder for neck (work these sts first and slip them on a st holder to avoid cutting the yarn), then continue binding off at the beg of every row on each side (= both from RS and WS): 1 st 2 times. Do not forget to continue the decrease as before. Happy knitting!
15.05.2018 - 08:48
![]() Rt wrote:
Rt wrote:
Strikker jakka og er kommet til fellinga på slutten der en setter masker på tråd. Står en skal strikke de to vrange mellom flettene sammen til en vrang. Men jeg har tre masker igjen. Var jo i utgangspunktet 8 masker mellom flettene og når en feller 5 ganger er det 3 masker igjen?
04.02.2018 - 20:25DROPS Design answered:
Hei Rt. Det er nå lagt til en rettelse under bærestykket, (oppdatert 26.02.2018). mvh Drops design
02.03.2018 - 07:31
![]() Britta wrote:
Britta wrote:
Die angegebenen 200g Wolle für Größe 62/68 haben bei mir nicht ausgereicht. Ich habe 250g benötigt.
05.11.2017 - 12:54
![]() Britta wrote:
Britta wrote:
Beim Kragen soll man 10M. Inkl. Maschen auf dem Hilfsfaden aufnehmen. Steht der Kragen dann 2Maschen über der Blende über?
05.11.2017 - 12:49DROPS Design answered:
Liebe Britta, diese 10 M sind die 8 stillgelten Maschen + 2 M (diese werden am Halsausschnitt aufgefassen, wo Sie 1 M 2 x abgekettet haben). Viel Spaß beim stricken!
06.11.2017 - 09:44
|
|||||||
Cable Princess#cableprincessjacket |
|||||||
 |
 |
||||||
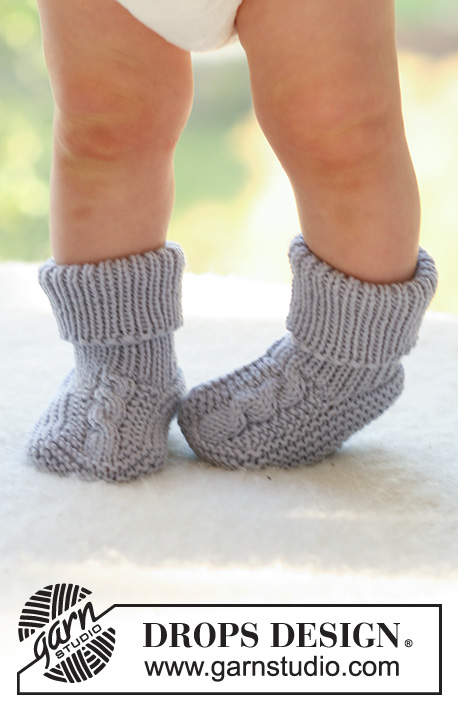
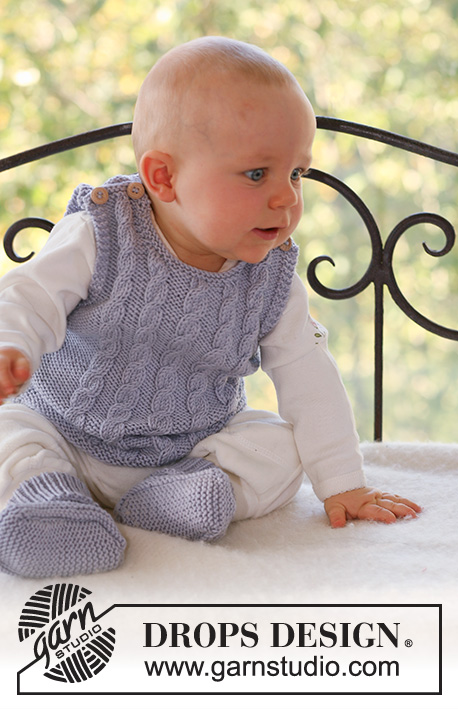
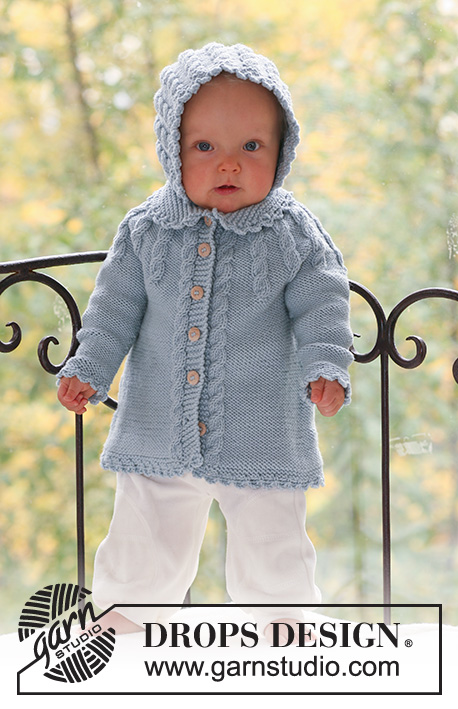
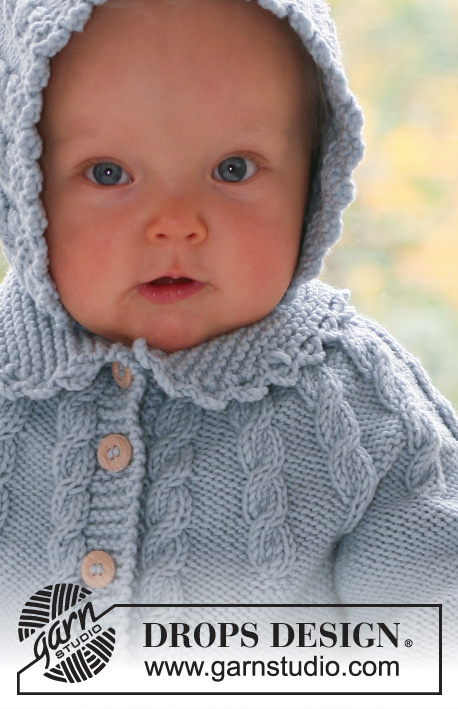
Set of knitted jacket and bonnet with cables for baby and children in DROPS Merino Extra Fine
DROPS Baby 17-1 |
|||||||
|
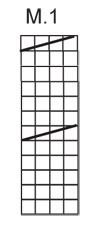
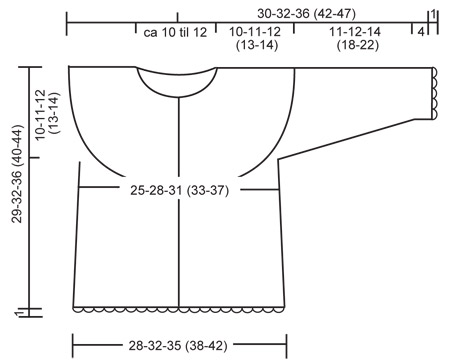
PATTERN: See diagram M.1 – the diagram shows pattern from the RS. GARTER ST (back and forth on needle): K all rows. GARTER ST (in the round): K 1 round, P 1 round. BUTTONHOLES: Make buttonholes on right front band. 1 buttonhole = K tog 2nd and 3rd st from mid front and make 1 YO. Make buttonholes when piece measures: SIZE 1/3 months: 4, 8, 13, 17, 22 and 26 cm SIZE 6/9 months: 4, 9, 14, 19, 24 and 29 cm SIZE 12/18 months: 4, 10, 16, 22, 28 and 33 cm SIZE 2 years: 5, 11, 18, 24, 31 and 37 cm SIZE 3/4 years: 5, 12, 19, 26, 33 and 40 cm DECREASING TIP (applies to jacket): Make all dec from RS. Dec 1 st to the left and to the right alternately of all cables by P2 tog, i.e. the first dec is made to the left and the next dec is made to the right of all cables, etc. Decrease only on the inside of the outermost cable towards the band in each side. CROCHET PICOT BORDER: With crochet hook size 4 mm: 1 dc in first st, * 4 ch, 1 tr in the first of these ch (= 1 picot), skip 1 cm, 1 dc in next st *, repeat from *-*. ---------------------------------------------------------- JACKET BODY PIECE: Worked back and forth on circular needle from mid front. Cast on 128-144-158 (170-186) sts (includes 5 front band sts each side towards mid front) on circular needle size 4 mm with Merino Extra Fine. Work 4 rows garter st (first row = RS) – SEE ABOVE. Work next row as follows from RS: 5 front band sts in garter st, P1, K2 in each of the next 2 sts (i.e. 2 sts inc to 4), P across the row until 8 sts remain, K2 in each of the next 2 sts, P1 and 5 front band sts in garter st = 132-148-162 (174-190) sts. Insert 1 marker 36-40-44 (47-51) sts in from each side (= 60-68-74 (80-88) sts between markers on back piece). Work next row as follows from WS: 5 garter sts, K1, M.1, K across the row until 10 sts remain, M.1, K1, 5 garter sts. Work next row as follows from RS: 5 garter sts, P1, M.1, P across the row until 10 sts remain, M.1, P1, 5 garter sts. Continue in pattern like this (i.e. front band sts in garter st, 1 st in reverse stocking st inside front bands, 1 cable (= M.1) each side and remaining sts in reverse stocking st). REMEMBER THE KNITTING TENSION! AT THE SAME TIME when piece measures 4 cm dec 1 st on each side of both markers by P2 tog. Repeat the dec on every 4 cm a total of 4-4-4 (5-5) times = 116-132-146 (154-170) sts. AT THE SAME TIME when piece measures 4-4-4 (5-5) cm make buttonhole on right front band – SEE ABOVE. When piece measures approx 19-21-24 (27-30) cm – adjust so that next row is from WS – cast off 6 sts each side for armhole (= 3 sts on each side of both markers) = 104-120-134 (142-158) sts left on row. Put piece aside and knit the sleeves. SLEEVE: Worked in the round on double pointed needles. Cast on 28-30-32 (34-38) sts on double pointed needles size 4 mm with Merino Extra Fine. Work 4 rounds garter st – SEE ABOVE. Continue in reverse stocking st, and insert a marker at beg of round = mid under arm. When piece measures 4 cm inc 1 st on each side of marker and repeat the inc on every 6-5-6 (6-8) round a total of 5-6-7 (8-8) times = 38-42-46 (50-54) sts. When piece measures 14-15-18 (22-26) cm cast off 6 sts mid under arm = 32-36-40 (44-48) sts. Put piece aside and knit the other sleeve. YOKE: Slip sleeves on the same circular needle as body piece where cast off for armhole = 168-192-214 (230-254) sts. Work 1 row from RS with front bands and cables as before and remaining sts in reverse stocking st, AT THE SAME TIME dec 0-4-6 (2-6) sts evenly (do not dec on front bands and cables) = 168-188-208 (228-248) sts. Work next row as follows from WS: 5 garter sts, K1, M.1, * K8, P2 in each of the next 2 sts (i.e. 2 sts inc to 4) *, repeat from *-* until 18 sts remain, K8, M.1, K1 and 5 garter sts = 196-220-244 (268-292) sts. Work next row as follows from RS: 5 garter sts, P1, M.1, * P8, M.1 *, repeat from *-* 15-17-19 (21-23) times, P1 and 5 garter sts. Continue in pattern like this, AT THE SAME TIME on next row from RS start dec to shape the round yoke – SEE DECREASING TIP. Continue to dec on every 8th row: 0-0-1 (2-3) more times, on every 6th row: 1-2-2 (1-1) times in total and then on every 4th row: 4-3-2 (2-1) times in total (there are now 2 purled stitches between every cable). AT THE SAME TIME when yoke measures 8-9-10 (11-12) cm slip 8 sts each side towards mid front on stitch holders for neck. Cast off to shape the neckline each side at the beg of every row from mid front: 1 st 2 times. When yoke measures 10-11-12 (13-14) cm dec all P2 between cables to P1 and K tog the 4 sts on each cable 2 by 2 = approx 43-49-55 (61-67) sts left on row. COLLAR: Pick up 10 sts on each side of neckline mid front (incl sts on stitch holders). K 1 row from WS, AT THE SAME TIME adjust no of sts evenly to 50-54-58 (62-66). Work garter st back and forth on needle until collar measures 3-3-4 (4-5) cm. Now cast off 1 st each side a total of 4 times and then cast off remaining sts. Collar measures approx 5-5-6 (6-7) cm. ASSEMBLY: Sew openings under arms. Crochet a picot border – SEE ABOVE – round collar, round sleeve edges and along bottom edge of jacket. Sew on buttons. ---------------------------------------------------------- BONNET: Worked back and forth on circular needle. LOOSELY cast on 64-70-76 (82-88) sts on circular needle size 4 mm with Merino extra fine. Work 4 rows garter st – SEE ABOVE. Work next row as follows from RS: 1 garter st, * K2 in each of the next 2 sts, P4 *, repeat from *-* until 3 sts remain, K2 in each of the next 2 sts, 1 garter st = 86-94-102 (110-118) sts. Continue as follows from WS: 1 garter st, * M.1, K 4 *, repeat from *-* until 5 sts remain, M.1 (= 4 sts) and 1 garter st. Work next row as follows from RS: 1 garter st, * M.1, P 4 *, repeat from *-* until 5 sts remain, M.1 (= 4 sts), 1 garter st. Continue in pattern like this until piece measures approx 10-11-12 (13-14) cm – adjust so that next row is from RS – and now K tog the 4 sts on each cable 2 by 2 = 64-70-76 (82-88) sts. On next row from WS cast off the first 23-25-27 (29-31) sts, work remaining sts on row. On next row from RS cast off the first 23-25-27 (29-31) sts = 18-20-22 (24-26) sts left on row (= back piece). Work garter st back and forth on these sts for 11-12-13 (14-15) cm, cast off. ASSEMBLY: Sew the sides on the piece mid back to side pieces, sew edge to edge to avoid a chunky seam. Pick up approx 60 to 84 sts (divisible by 4) along bottom edge of bonnet on circular needle size 4 mm, K 1 row from WS and K 1 row from RS. Work next row as follows from WS: K2, * P2 tog, 1 YO *, repeat from *-* and K2 (= eyelet row). K 2 rows on all sts and cast off. Crochet a ch-string measuring approx 70 cm with crochet hook size 4 mm and thread string through eyelet row. Crochet a picot border – SEE ABOVE – round the front opening of bonnet. |
|||||||
Diagram explanations |
|||||||
|
|||||||
 |
|||||||
 |
|||||||
Have you finished this pattern?Tag your pictures with #dropspattern #cableprincessjacket or submit them to the #dropsfan gallery. Do you need help with this pattern?You'll find 17 tutorial videos, a Comments/Questions area and more by visiting the pattern on garnstudio.com. © 1982-2026 DROPS Design A/S. We reserve all rights. This document, including all its sub-sections, has copyrights. Read more about what you can do with our patterns at the bottom of each pattern on our site. |
|||||||


With over 40 years in knitting and crochet design, DROPS Design offers one of the most extensive collections of free patterns on the internet - translated to 17 languages. As of today we count 324 catalogues and 12285 patterns translated into English (UK/cm). 12285
We work hard to bring you the best knitting and crochet have to offer, inspiration and advice as well as great quality yarns at incredible prices! Would you like to use our patterns for other than personal use? You can read what you are allowed to do in the Copyright text at the bottom of all our patterns. Happy crafting!
Post a comment to pattern DROPS Baby 17-1
We would love to hear what you have to say about this pattern!
If you want to leave a question, please make sure you select the correct category in the form below, to speed up the answering process. Required fields are marked *.