
Popular categories
Looking for a yarn?


Comments / Questions (201)
![]() Maria Vilar wrote:
Maria Vilar wrote:
Espelho diminuir, cada 4, 6, carreiras como escolher o sítio para ficar visualmente equilibrado Quando diz 1 vez é em todas as secções ou só numa? Estou confusa
12.02.2021 - 11:45DROPS Design answered:
Bom dia: Pode dividir o número total de malhas que tem na agulha pelo número de diminuições. Por exemplo, se tiver 100 malhas e 10 diminuições a fazer, se dividir 100 por 10 = 10. Faz cada diminuição na 9.ª e 10ªmalha. Desta forma, as diminuições ficam bem distribuídas. Se diz repetir 1 vez, volta a fazer as diminuições. Ou seja, diminui uma primeira vez e repete mais 1 vez = 2 vezes. Esperamos ter ajudado. Bom tricô!
16.02.2021 - 09:04
![]() Catalina wrote:
Catalina wrote:
Hola! Tengo una duda, estoy tejiendo “yoke” y no me queda claro cuando se hacen las disminuciones (dice cada 8, 6 y 4 rows) pero por ejemplo en mi talla sale que debo disminuir 0 veces cada 8, entonces debo tejer 8 (no disminuir) luego 6 (disminuir), luego 4 (disminuir) y luego nuevamente 8, etc? No entiendo, porque siento que me quedaría muy grande! Muchas gracias!
11.12.2020 - 18:02DROPS Design answered:
Hola Catalina. Entiendo que trabajas la talla pequeña ( no esta mencionada la talla en tu pregunta), entonces comienzas a disminuir directamente cada 6ª fila. ( para las tallas pequeñas no se trabaja las disminuciones cada 8ª fila al inicio), después continuar trabajando según el patrón.
13.12.2020 - 12:07
![]() Carola Lipaj wrote:
Carola Lipaj wrote:
Ich habe über Amazon pay wolle und Nadel bestellt. Wann kommt die Ware ich habe keine Bestätigung bekommen und auch über Amazon kann ich nichts finden
17.11.2020 - 18:11DROPS Design answered:
Liebe Frau Lipaj, am besten wenden Sie sich bitte direkt an den Verkaufer - oder Amazon direkt. Hier finden Sie die Liste von den DROPS Händlern in Deutschland. Viel Spaß beim stricken!
18.11.2020 - 07:41
![]() Michèle wrote:
Michèle wrote:
D accord mais du côté 8 mailles envers on diminue me semble t il d après la photo?
01.10.2020 - 13:56DROPS Design answered:
Bonjour Michèle, tout à fait, on va diminuer entre tous les M.1 , mais pas avant le M 1 en début de rang (juste après la bordure du devant et 1 m jersey) ni après le tout dernier M.1 du rang (juste avant 1 m jersey et la bordure devant). Bon tricot!
01.10.2020 - 14:03
![]() Michèle wrote:
Michèle wrote:
Bonjour Concernant le raglan, une diminution de chaque côté des torsages d accord. Egalement d'un côté de chaque torsade du bord? Merci à vous
01.10.2020 - 11:12DROPS Design answered:
Bonjour Michèle, on ne diminue pas après le 1er M1 du rang ni avant le dernier M.1 du rang (= il n'y a qu'une seule maille jersey). Bon tricot!
01.10.2020 - 12:44
![]() Adela wrote:
Adela wrote:
Deseo fervorosamente tejer una vez mas este modelo ,en Talles 6/7- 8/9- 10/11,es posible que publiquen en estos talles ?Me encantaría, de no ser posible ,mi pedido es me explique como llevarlo a talles mas grande.
15.08.2020 - 20:44DROPS Design answered:
Hola Adela. No hacemos, ni enviamos los patrones personalizados. Para las tallas más grandes necesita hacer cálculos adicionales, puede usar como ejemplo algún modelo de la colección de niños que contenga las tallas que quiere trabajar.
16.08.2020 - 13:16
![]() Victoria wrote:
Victoria wrote:
Hola, voy terminando la pechera y después de tejer los 11 cm ( talla 2) hay que poner 8 puntos en gancho auxiliar y después no entiendo como seguir. ¿los 8 puntos se toman a los 2 lados? ¿cuantos puntos se rematan? Para formar línea del escote ¿se teje con todas las doradas? Gracias!!
11.08.2020 - 23:18DROPS Design answered:
Hola Victoria, para hacer el escote, se pasan 8 pts desde el centro del delantero en cada delantero a un gancho auxiliar (es decir, 16 pts en total). Para dar forma al escote, cierras en cada fila desde el centro del delantero 1 pt 2 veces (1 pt en 1 fila y otro en la siguiente desde el centro del delantero), los puntos que cierras son los siguientes a los pts recogidos.
22.11.2020 - 13:14
![]() Francisca wrote:
Francisca wrote:
AL FINAL DE PECHERA.."AL MISMO TIEMPO cuando la pechera mida 8-9-10 (11-12) cm, desl 8 pts de cada lado del centro del frente.." SON LOS PUNTOS DE ADELANTE DONDE VAN LOS OJALES???, ESOS HAY QUE CERRARLOS SEGUN INDICACIONES A CONTINUACION. FAVOR ACLARAR ULTIMA PARTE DE LA PECHERA, GRACIAS
19.07.2020 - 23:59DROPS Design answered:
Hola Francisca. Los 8 puntos son los puntos en el centro del delantero (incluyendo 5 pts de la cenefa y 3 pts del delantero). Se pueden cerrar o pasar a un gancho auxiliar. Retomamos de nuevo estos puntos cuando vamos a trabajar el cuello. Si los pasamos a un gancho auxiliar el inicio del cuello queda mejor.
20.07.2020 - 20:36
![]() Aime wrote:
Aime wrote:
Palun seda lõiku selgitada! Tee kahandusi igal 8-ndal real 0-0-1 (2-3) korda, igal 6-ndal real 1-2-2 (1-1) korda ja siis igal 4-ndal real 4-3-2 (2-1) korda.
24.12.2019 - 11:28DROPS Design answered:
Tere Aime! Kahanduste kordade arv oleneb suurusest. Näiteks kahanda suurusel 3/4 aastane igal 8-ndal real 3 korda, siis igal 6-ndal real 1 kord jne. Head kudumist!
03.01.2020 - 23:45
![]() Ines Kutzner wrote:
Ines Kutzner wrote:
Hallo Drops Design, erstmal großen Dank für die Hilfe bei der Jacke. Nun habe ich aber erneut ein Problem und zwar komme ich bei Mütze nicht klar. Wie nähe ich die richtig zusammen? Danach soll ich ja 60 bis 84 Maschen aufnehmen, heißt das ich nehme die Maschen rund um die ganze Haube auf oder nur am unteren Teil? Gibt es manchmal ein Video zur Hilfe? Ganz lieben Dank im voraus. LG Ines
03.11.2019 - 10:45DROPS Design answered:
Liebe Frau Kutzner, die letze 11-15 cm über die 18-26 letzten Maschen sind hinter dem Kopf, die beidseitige abgekettene 23-31 Maschen nähen Sie an den 11-15 cm auf beiden Seiten. Dann fassen Sie die Maschen unten: in die ersten 10-14 cm, in die abgekettene Maschen und in die letzten 10-14 cm auf die andere Seite. Viel Spaß beim stricken!
04.11.2019 - 17:00
|
|||||||
Cable Princess#cableprincessjacket |
|||||||
 |
 |
||||||
Set of knitted jacket and bonnet with cables for baby and children in DROPS Merino Extra Fine
DROPS Baby 17-1 |
|||||||
|
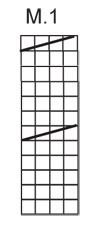
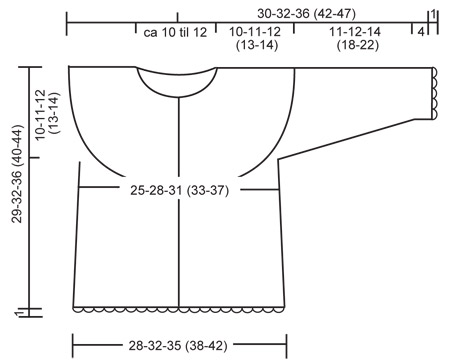
PATTERN: See diagram M.1 – the diagram shows pattern from the RS. GARTER ST (back and forth on needle): K all rows. GARTER ST (in the round): K 1 round, P 1 round. BUTTONHOLES: Make buttonholes on right front band. 1 buttonhole = K tog 2nd and 3rd st from mid front and make 1 YO. Make buttonholes when piece measures: SIZE 1/3 months: 4, 8, 13, 17, 22 and 26 cm SIZE 6/9 months: 4, 9, 14, 19, 24 and 29 cm SIZE 12/18 months: 4, 10, 16, 22, 28 and 33 cm SIZE 2 years: 5, 11, 18, 24, 31 and 37 cm SIZE 3/4 years: 5, 12, 19, 26, 33 and 40 cm DECREASING TIP (applies to jacket): Make all dec from RS. Dec 1 st to the left and to the right alternately of all cables by P2 tog, i.e. the first dec is made to the left and the next dec is made to the right of all cables, etc. Decrease only on the inside of the outermost cable towards the band in each side. CROCHET PICOT BORDER: With crochet hook size 4 mm: 1 dc in first st, * 4 ch, 1 tr in the first of these ch (= 1 picot), skip 1 cm, 1 dc in next st *, repeat from *-*. ---------------------------------------------------------- JACKET BODY PIECE: Worked back and forth on circular needle from mid front. Cast on 128-144-158 (170-186) sts (includes 5 front band sts each side towards mid front) on circular needle size 4 mm with Merino Extra Fine. Work 4 rows garter st (first row = RS) – SEE ABOVE. Work next row as follows from RS: 5 front band sts in garter st, P1, K2 in each of the next 2 sts (i.e. 2 sts inc to 4), P across the row until 8 sts remain, K2 in each of the next 2 sts, P1 and 5 front band sts in garter st = 132-148-162 (174-190) sts. Insert 1 marker 36-40-44 (47-51) sts in from each side (= 60-68-74 (80-88) sts between markers on back piece). Work next row as follows from WS: 5 garter sts, K1, M.1, K across the row until 10 sts remain, M.1, K1, 5 garter sts. Work next row as follows from RS: 5 garter sts, P1, M.1, P across the row until 10 sts remain, M.1, P1, 5 garter sts. Continue in pattern like this (i.e. front band sts in garter st, 1 st in reverse stocking st inside front bands, 1 cable (= M.1) each side and remaining sts in reverse stocking st). REMEMBER THE KNITTING TENSION! AT THE SAME TIME when piece measures 4 cm dec 1 st on each side of both markers by P2 tog. Repeat the dec on every 4 cm a total of 4-4-4 (5-5) times = 116-132-146 (154-170) sts. AT THE SAME TIME when piece measures 4-4-4 (5-5) cm make buttonhole on right front band – SEE ABOVE. When piece measures approx 19-21-24 (27-30) cm – adjust so that next row is from WS – cast off 6 sts each side for armhole (= 3 sts on each side of both markers) = 104-120-134 (142-158) sts left on row. Put piece aside and knit the sleeves. SLEEVE: Worked in the round on double pointed needles. Cast on 28-30-32 (34-38) sts on double pointed needles size 4 mm with Merino Extra Fine. Work 4 rounds garter st – SEE ABOVE. Continue in reverse stocking st, and insert a marker at beg of round = mid under arm. When piece measures 4 cm inc 1 st on each side of marker and repeat the inc on every 6-5-6 (6-8) round a total of 5-6-7 (8-8) times = 38-42-46 (50-54) sts. When piece measures 14-15-18 (22-26) cm cast off 6 sts mid under arm = 32-36-40 (44-48) sts. Put piece aside and knit the other sleeve. YOKE: Slip sleeves on the same circular needle as body piece where cast off for armhole = 168-192-214 (230-254) sts. Work 1 row from RS with front bands and cables as before and remaining sts in reverse stocking st, AT THE SAME TIME dec 0-4-6 (2-6) sts evenly (do not dec on front bands and cables) = 168-188-208 (228-248) sts. Work next row as follows from WS: 5 garter sts, K1, M.1, * K8, P2 in each of the next 2 sts (i.e. 2 sts inc to 4) *, repeat from *-* until 18 sts remain, K8, M.1, K1 and 5 garter sts = 196-220-244 (268-292) sts. Work next row as follows from RS: 5 garter sts, P1, M.1, * P8, M.1 *, repeat from *-* 15-17-19 (21-23) times, P1 and 5 garter sts. Continue in pattern like this, AT THE SAME TIME on next row from RS start dec to shape the round yoke – SEE DECREASING TIP. Continue to dec on every 8th row: 0-0-1 (2-3) more times, on every 6th row: 1-2-2 (1-1) times in total and then on every 4th row: 4-3-2 (2-1) times in total (there are now 2 purled stitches between every cable). AT THE SAME TIME when yoke measures 8-9-10 (11-12) cm slip 8 sts each side towards mid front on stitch holders for neck. Cast off to shape the neckline each side at the beg of every row from mid front: 1 st 2 times. When yoke measures 10-11-12 (13-14) cm dec all P2 between cables to P1 and K tog the 4 sts on each cable 2 by 2 = approx 43-49-55 (61-67) sts left on row. COLLAR: Pick up 10 sts on each side of neckline mid front (incl sts on stitch holders). K 1 row from WS, AT THE SAME TIME adjust no of sts evenly to 50-54-58 (62-66). Work garter st back and forth on needle until collar measures 3-3-4 (4-5) cm. Now cast off 1 st each side a total of 4 times and then cast off remaining sts. Collar measures approx 5-5-6 (6-7) cm. ASSEMBLY: Sew openings under arms. Crochet a picot border – SEE ABOVE – round collar, round sleeve edges and along bottom edge of jacket. Sew on buttons. ---------------------------------------------------------- BONNET: Worked back and forth on circular needle. LOOSELY cast on 64-70-76 (82-88) sts on circular needle size 4 mm with Merino extra fine. Work 4 rows garter st – SEE ABOVE. Work next row as follows from RS: 1 garter st, * K2 in each of the next 2 sts, P4 *, repeat from *-* until 3 sts remain, K2 in each of the next 2 sts, 1 garter st = 86-94-102 (110-118) sts. Continue as follows from WS: 1 garter st, * M.1, K 4 *, repeat from *-* until 5 sts remain, M.1 (= 4 sts) and 1 garter st. Work next row as follows from RS: 1 garter st, * M.1, P 4 *, repeat from *-* until 5 sts remain, M.1 (= 4 sts), 1 garter st. Continue in pattern like this until piece measures approx 10-11-12 (13-14) cm – adjust so that next row is from RS – and now K tog the 4 sts on each cable 2 by 2 = 64-70-76 (82-88) sts. On next row from WS cast off the first 23-25-27 (29-31) sts, work remaining sts on row. On next row from RS cast off the first 23-25-27 (29-31) sts = 18-20-22 (24-26) sts left on row (= back piece). Work garter st back and forth on these sts for 11-12-13 (14-15) cm, cast off. ASSEMBLY: Sew the sides on the piece mid back to side pieces, sew edge to edge to avoid a chunky seam. Pick up approx 60 to 84 sts (divisible by 4) along bottom edge of bonnet on circular needle size 4 mm, K 1 row from WS and K 1 row from RS. Work next row as follows from WS: K2, * P2 tog, 1 YO *, repeat from *-* and K2 (= eyelet row). K 2 rows on all sts and cast off. Crochet a ch-string measuring approx 70 cm with crochet hook size 4 mm and thread string through eyelet row. Crochet a picot border – SEE ABOVE – round the front opening of bonnet. |
|||||||
Diagram explanations |
|||||||
|
|||||||
 |
|||||||
 |
|||||||
Have you finished this pattern?Tag your pictures with #dropspattern #cableprincessjacket or submit them to the #dropsfan gallery. Do you need help with this pattern?You'll find 17 tutorial videos, a Comments/Questions area and more by visiting the pattern on garnstudio.com. © 1982-2026 DROPS Design A/S. We reserve all rights. This document, including all its sub-sections, has copyrights. Read more about what you can do with our patterns at the bottom of each pattern on our site. |
|||||||


With over 40 years in knitting and crochet design, DROPS Design offers one of the most extensive collections of free patterns on the internet - translated to 17 languages. As of today we count 324 catalogues and 12285 patterns translated into English (UK/cm). 12285
We work hard to bring you the best knitting and crochet have to offer, inspiration and advice as well as great quality yarns at incredible prices! Would you like to use our patterns for other than personal use? You can read what you are allowed to do in the Copyright text at the bottom of all our patterns. Happy crafting!
Post a comment to pattern DROPS Baby 17-1
We would love to hear what you have to say about this pattern!
If you want to leave a question, please make sure you select the correct category in the form below, to speed up the answering process. Required fields are marked *.