
Popular categories
Looking for a yarn?


Comments / Questions (38)
![]() Hochet Valérie wrote:
Hochet Valérie wrote:
Bonjour, en taille M, à 5 cm à partir du marqueur, il y a plusieurs choses à faire ; dont 2 m en moins pou l'encolure (180m-2m= 178 m) ok. Puis continuer avec M5 et mjusqu'à 7cm : puis rabattre 4m de chaque côté" pour emmanchure = 140m. je ne comprends pas comment on passe de 178 m à 140 m. Merci pour vos explications. Cordialement.
05.09.2019 - 22:07DROPS Design answered:
Bonjour Mme Hochet, en taille M, on a 158 m et on va rabattre 2 x 4 m pour les emmanchures, il va rester 150 m; il y avait quelques erreurs dans cette partie, elles ont été corrigées, merci pour votre retour. Bon tricot!
06.09.2019 - 08:03
![]() Franca wrote:
Franca wrote:
Salve, sono arrivata a lavorare il diagramma M4 ma il lavoro è diverso da quello in foto, i buchini sono più ravvicinati mentre in foto sono più distanti. inoltre facendo anche il diagramma M5 alcuni buchini sono così vicini da accavallarsi e l'effetto è bruttino. potreste darmi indicazioni? grazie
06.07.2018 - 18:46DROPS Design answered:
Buongiorno Franca. Il risultato finale si ottiene solo dopo aver lavato il capo. Se però le sembrano troppo vicini i buchi del diag. M4 e se non comporta disfare troppo lavoro può intervallare i buchi di un numero maggiore di maglie (sia sul davanti che sul dietro). Il diag.M5 viene lavorato solo sulle 3 m vicino alle maglie a punto legaccio dello scollo: non dovrebbe sovrapporsi con M4. Buon lavoro!
06.07.2018 - 21:17
![]() Christelle wrote:
Christelle wrote:
Bjr je reviens vers vous car je ne réussis vraiment pas à décaler pour M3 en tricotant en aller-retour Pourriez-vous m'indiquer la démarche à suivre J'ai acheté la laine sur ce site D'avance merci pour votre aide
13.05.2018 - 19:32DROPS Design answered:
Bonjour Christelle, quand M.2 a été tricoté 1 fois en hauteur, tricotez les 6 m suivantes à l'endroit et placez votre marqueur de début de tour ici (les tours commencent désormais ici), continuez en tricotant M.3. La première double diminution du 1er M.3 va s'aligner automatiquement au-dessus de celle de M.1, et ainsi de suite, la 1ère diminution du M.3 suivant va s'aligner au-dessus de celle du 2ème M.1 et ainsi de suite. Bon tricot!
14.05.2018 - 11:07
![]() Christelle wrote:
Christelle wrote:
Bjr je tricote ce modèle en aller-retour car je ne sais pas tricoter avec des aiguilles circulaires J'ai tricoté 6 m en jersey end puis j'ai tricoté M3 que je ne peux finir puisqu'il manque 6 m. Dois-je donc tricoter ... 1 jeté 1 end 1 jeté 3 end et finir par 1 m glissée ? Merci de votre réponse
10.05.2018 - 12:23DROPS Design answered:
Bonjour Christelle, pour tricoter chaque partie séparément, il vous faut répartir les mailles sur les 2 pièces, ici, après M.1 et M.2, on tricote 6 m end pour décaler le début du tour et pour aligner M.3 au-dessus de M.2/M.1. Il va vous falloir bien répartir les mailles pour tomber juste, voir aussi ici. Pour toute assistance individuelle complémentaire, contactez le magasin où vous avez acheté votre laine. Bon tricot!
11.05.2018 - 07:41
![]() Michelle B wrote:
Michelle B wrote:
After working M.2 is the instructions telling me to do an entire row in stockinette? Or am I supposed to do 6 stockinette stitches insert a marker then start with M.3 (within this place then second marker). Thanks!
22.05.2017 - 00:58DROPS Design answered:
Dear Michelle, when M.2 has been worked 1 time in height, just work the next 6 sts in stocking st, then place the marker at beg of round here (rounds now start there), add a second marker after half of the sts, then work M.3. Happy knitting!
22.05.2017 - 09:51
![]() Cathy wrote:
Cathy wrote:
Bonjour, J'ai fait ce modèle en Bomull-Lin 03 (catégorie C comme Paris ). Je suis très contente du résultat :-)
09.03.2017 - 09:14
![]() Vignau Bègue wrote:
Vignau Bègue wrote:
Bonjour, pouvez vous me préciser de quel marqueur on parle, car nous venons juste de commencer l'encolure devant : en même temps, à 4-5-4-4 cm de hauteur du marqueur, tricoter 12 m de chaque côté au point mousse (=6 m de chaque côté des marqueur merci beaucoup
25.04.2016 - 17:08DROPS Design answered:
Bonjour Mme Vignau, on mesure à partir du marqueur placé quand l'ouvrage mesure 27-31 cm - cf également réponse ci-dessous. Bon tricot!
25.04.2016 - 17:35
![]() Vignau Bègue wrote:
Vignau Bègue wrote:
Bonjour, pouvez vous me préciser de quel marqueur on parle, car nous venons juste de commencer l'encolure devant : en même temps, à 4-5-4-4 cm de hauteur du marqueur, tricoter 12 m de chaque côté au point mousse (=6 m de chaque côté des marqueur merci beaucoup
21.04.2016 - 14:11DROPS Design answered:
Bonjour Mme Vignau, on a placé auparavant 2 marqueurs (1 après 35-50 cm au milieu devant et 1 autre après 105-150 m au milieu dos), il est indiqué ensuite que les mesures suivantes sont faites à partir de ces marqueurs. Bon tricot!
21.04.2016 - 15:52
![]() Angela Kuhl wrote:
Angela Kuhl wrote:
Nach mehrmaligen auftrennen der Reihen habe ich jetzt keine Lust mehr .M3 klappt einfach nicht.Schade das Modell hätte mir gut gefallen! Vielen Dank für die Hilfe ich weiß auch nicht an was es liegt.
24.02.2016 - 19:49DROPS Design answered:
Das Muster M3 ist von der Konstruktion sehr ähnlich wie M1, wenn Sie M1 stricken konnten, schaffen Sie sicher auch M3!
10.03.2016 - 08:16
![]() Angela Kuhl wrote:
Angela Kuhl wrote:
Hallo ,vielleicht könnt Ihr mir ja helfen.Ich bin jetzt bei Muster M3 habe die erste Reihe hinter mir aber dann geht irgendwie gar nichts mehr.Ab der 2. Reihe verschiebt sich das Muster immer weiter nach hinten so das es unregelmäßig wird.Ich weiß nicht was ich falsch mache M1 Und M2 funktionierten prima aber jetzt komme ich nicht mehr klar.Habt Ihr vielleicht eine Lösung für mich? Vielen Dank Eure Angela
24.02.2016 - 15:02DROPS Design answered:
Haben Sie darauf geachtet, dass die Zunahmen (Umschläge) und Abnahmen sich ausgleichen? Es sind ja pro gemusterter Rd 4 Umschläge und 4 abgenommene M (2 x 2 M, die abgenommen werden). Sie können sich auch an den 3 zusammengestrickten M orientieren, diese müssen immer übereinander liegen. Vielleicht hilft es, wenn Sie sich diese M markieren.
24.02.2016 - 18:51
|
|||||||||||||||||||
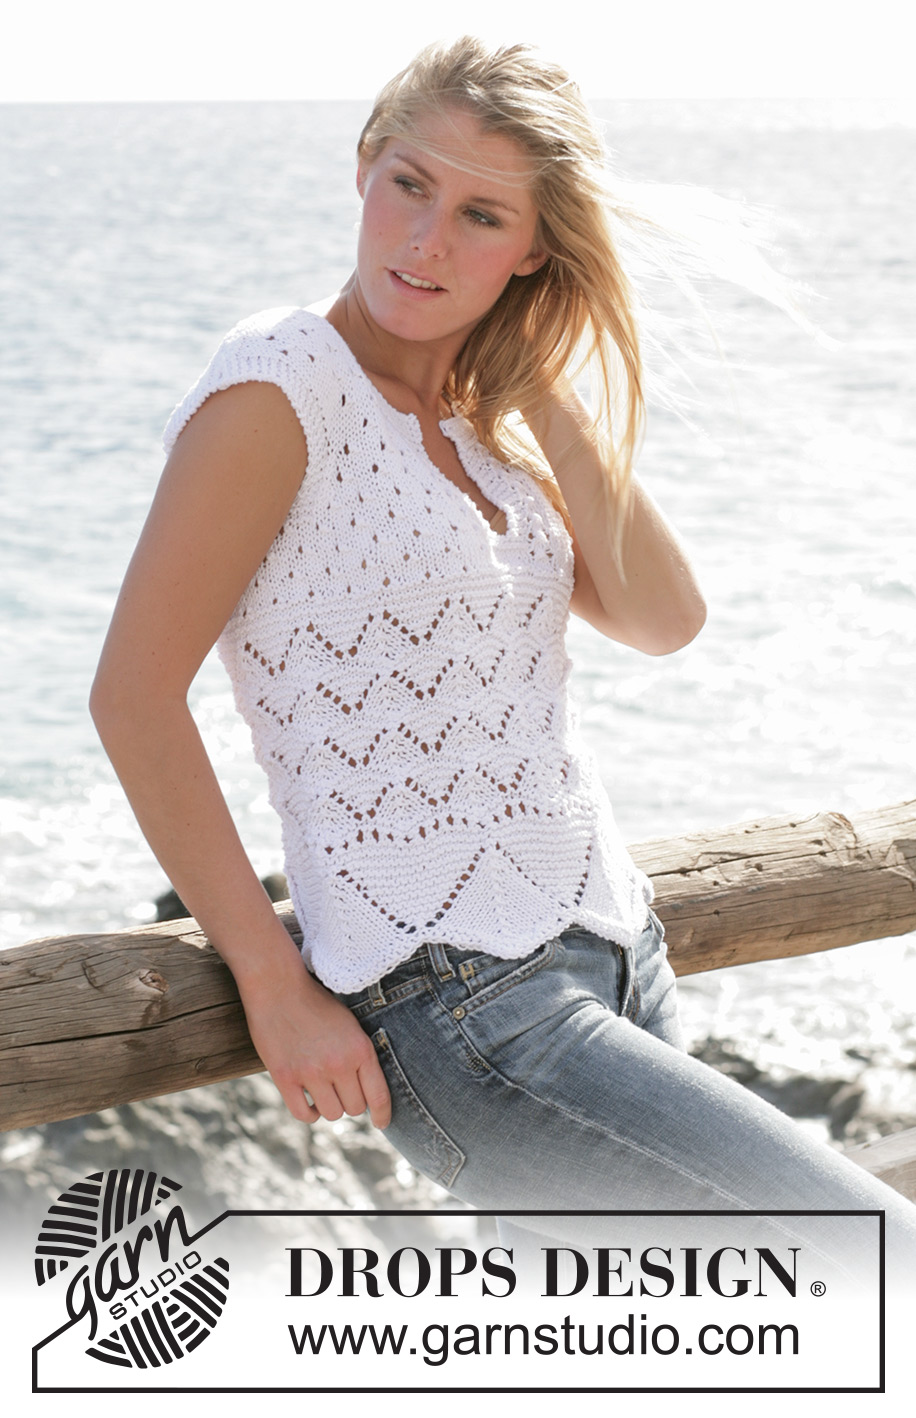
Seaside Bird#seasidebirdtop |
|||||||||||||||||||
|
|
|||||||||||||||||||
DROPS top with lace pattern in ”Paris”
DROPS 101-29 |
|||||||||||||||||||
|
Knitting tension: 17 sts x 22 rows on needles size 5 mm in stocking st = 10 x 10 cm. Lace pattern will stretch garment somewhat in width. Pattern: See diagram M.1 to M.5. Pattern is shown from RS. Garter st: (in the round on needle): 1st round: K and 2nd round: P Garter st (back and forth on row): Knit all rows. Decreasing tips (applies to armhole): All dec from RS. Dec for armhole within 4 sts garter st as follows: Before 4 sts garter st: K2 tog After 4 sts garter st: Slip 1 st as if to knit, K1, psso. Increasing tips (applies to wide shoulders): All inc from RS. Inc for wide shoulders within 4 garter sts on each side by yo on needle. On next row P yo into back of st to avoid hole. Incorporate new sts into pattern as you go. ____________________________________________________________ Back and front pieces: Knit piece in the round. Double circular needles size 5 mm (or use 2 circular needles) and cast on 140-160-180-200 sts on 2 needles with Paris (this is done to ensure elasticity of cast on edge). Pull out the one needle and insert 1 marking thread at start of round. Knit 2 rounds garter sts – see explanation above. Continuing knit M.1. When M.1 is knitted once in height continue with M.2. When M.2 is knitted once in height knit 6 sts stocking st on next round to shift round start. Insert 1 marking thread (= mid side). Also insert 1 marking thread after 70-80-90-100 sts (= mid opposite side). Now knit M.3. Patterns should now appear on top of each other as shown in diagram. Knit M.3 4-4-5-5 times in total in height. Continuing knit 2 rounds garter sts. Piece now measures approx 27-27-31-31 cm. Insert 2 new marking threads into piece, 1 marking thread after 35-40-45-50 sts (= mid front piece) and 1 marking thread after 105-120-135-150 sts (= mid back). Continuing, measure piece from here. Knit 1 round garter sts. Continuing knit M.4. When piece measures approx 2-3-3-3 cm from marking threads, continue with M.4, but knit 8 sts on each side of marking threads mid front as follows: M.5 (= 3 sts), 10 sts garter sts (marking threads placed between these sts), M.5 (= 3 sts). Read next section before knitting. At the same time when piece measures 4-5-4-4 cm from marking thread also knit 12 sts on each side in garter st (6 sts on each side of marking threads on sides). At the same time when piece measures 4-5-5-5 cm from marking threads cast off middle 2 sts from neck side = 138-158-178-198 sts (continuing, knit piece back and forth from mid front). Continue with M.5 and 4 sts garter sts on each side of cast off sts. Knit remaining sts as before. Continue like this until piece measures 6-7-6-6 cm. Now cast off 4 sts on each side of armhole = 130-150-170-190 sts. Continuing, knit front and back pieces separately. Back piece: = 66-76-86-96 sts. Continue in M.4. At the same time dec 1 sts for armhole on every other row – read Decreasing tips: 5-7-8-10 times = 56-62-70-76 sts. Then inc 1 sts for shoulder on each side on every other row – read Increasing tips – 6-6-4-3 times = 68-74-78-82 sts. When piece measures 22-25-25-26 cm from marking threads mid back cast off middle 32-36-36-38 sts off for neck. Continuing cast off 1 sts on next row at neckline = 17-18-20-21 sts left on each shoulder. Knit until piece measures approx 23-26-26-27 cm from marking thread mid back. Knit 4 rows garter sts before casting off loosely. Left front piece: = 32-37-42-47 sts. Continue with M.4 but 7 sts from mid front continue knitting like back and front pieces (M.5 and 4 sts garter st). At the same time dec for armhole and inc for wide shoulder like back piece. At the same time when piece measures 13-15-15-15 cm from marking thread mid front slip 6-8-8-9 m at mid front onto thread or stitch holder. Continuing, cast off on every other row 2 sts 2 times and 1 st 6 times = 17-18-20-21 m left on needle for shoulder. Knit until piece measreus approx 23-26-26-27 cm from marking thread or stitch holder mid front. Knit 4 rows garter st before casting off loosely. Right front piece: Knit like left front piece but reversed. Assembly: Sew shoulder seams. Neckline: Pick up approx 85 to 102 sts (incl sts from thread or stitch holder) round neckline on needle size 5 mm. Continue with 8 rows garter sts back and forth from mid front. Cast off loosely. |
|||||||||||||||||||
Diagram explanations |
|||||||||||||||||||
|
|||||||||||||||||||
 |
|||||||||||||||||||
Have you finished this pattern?Tag your pictures with #dropspattern #seasidebirdtop or submit them to the #dropsfan gallery. Do you need help with this pattern?You'll find 27 tutorial videos, a Comments/Questions area and more by visiting the pattern on garnstudio.com. © 1982-2026 DROPS Design A/S. We reserve all rights. This document, including all its sub-sections, has copyrights. Read more about what you can do with our patterns at the bottom of each pattern on our site. |
|||||||||||||||||||


With over 40 years in knitting and crochet design, DROPS Design offers one of the most extensive collections of free patterns on the internet - translated to 17 languages. As of today we count 324 catalogues and 12290 patterns translated into English (UK/cm). 12290
We work hard to bring you the best knitting and crochet have to offer, inspiration and advice as well as great quality yarns at incredible prices! Would you like to use our patterns for other than personal use? You can read what you are allowed to do in the Copyright text at the bottom of all our patterns. Happy crafting!
Post a comment to pattern DROPS 101-29
We would love to hear what you have to say about this pattern!
If you want to leave a question, please make sure you select the correct category in the form below, to speed up the answering process. Required fields are marked *.