
Popular categories
Looking for a yarn?


Comments / Questions (91)
![]() Lorraine Bruce wrote:
Lorraine Bruce wrote:
I am now struggling with the instructions for the raglan shaping. I have guessed that the instruction "towards the sleeves" refers to the body sections and likewise the "towards the body pieces" refers to the sleeves. Is this correct? Also there seems to be an error in the next paragraph - "After all inc for raglan sleeves and neck are complete" I think tha should be "decrease" not "increase". For such a simple pattern I am finding this very confusing. Your help would be great.
29.07.2019 - 02:22DROPS Design answered:
Hi Lorraine, Towards the sleeves means on the sleeve side of the marker threads and towards the body means the body side of the marker threads. You are right, you decrease to raglan as described in the text. Happy knitting!
29.07.2019 - 07:22
![]() Lorraine Bruce wrote:
Lorraine Bruce wrote:
I have finally worked out that on the WS rows I must start the pattern in the middle of the row because of the 3 extra stitches. This information could help other knitters. It is not just a matter of starting the WS row as per the pattern M1. Perhaps this could be included in the instructions for the pattern. I am now very pleased with the appearance of the pattern.
28.04.2019 - 01:51
![]() Lorraine Bruce wrote:
Lorraine Bruce wrote:
Hi, After trying several times to get the pattern to work - and pulling out about 7 cm of work each time - I am now reading all rows from right to left over the 231 stitches in size L. This seems to have the best result but I know I must be doing something wrong. Please help.
26.04.2019 - 05:59DROPS Design answered:
Hi Lorraine, When working from the right side, the pattern is read from bottom right to left. When working back from the wrong side, the pattern is read from left to right. I hope this helps and happy knitting!
26.04.2019 - 07:59
![]() Lorraine Bruce wrote:
Lorraine Bruce wrote:
In M1 should all rows be read right to left? I have been reading RS right to left and WS left to right but the pattern does not work. I think the extra 3 stitches are causing confusion.
25.04.2019 - 03:24DROPS Design answered:
Hi Lorraine, Yes the pattern M1 is read from bottom right to left on the right side and left to right on wrong side. Happy knitting!
25.04.2019 - 08:13
![]() Rosy wrote:
Rosy wrote:
Bonjour, pour les manches il semble qu'il y ait une erreur, il est écrit "Avec les aiguilles double pointes 4, monter 48-48-454-54-60 m ", ... le chiffre 454 doit il être interprété comme 54 au autrement ? Merci !
08.09.2018 - 17:14DROPS Design answered:
Bonjour Rosy, il y avait une faute de frappe (corrigée), il faut monter 48-48-54-54-60 m., merci, bon tricot!
10.09.2018 - 09:00
![]() Sheila Inger wrote:
Sheila Inger wrote:
Hi, The M1 pattern is over 6 stitches. However, on the medium size I am working over 207 stitches. Doing the 6 stitch pattern over the 207 stitches doesn't work out, I have 3 stitches left. What do I do with these 3 stitches. Any help would be much appreciated. Thank you.
17.09.2017 - 11:27DROPS Design answered:
Dear Mrs Inger, repeat the 6 sts in M.1 a total of 34 times (= over 204 sts) then finish with the first 3 sts in M.1 (so that pattern will be symetrical on each side) = 204+6=207 sts. Happy knitting!
18.09.2017 - 09:16
![]() Chantal wrote:
Chantal wrote:
Bonjour, Je pense qu'il y a une erreur dans l'explication des diminutions du raglan. Ne faut-i pas plutôt lire, par exemple pour la taille M: "vers les manches, 25 fois tous les 2 rangs puis 3 fois tous les rangs" ( au lieu de "tous les 2 rangs "indiqués ? ) Idem vers le dos/devant. Merci d'avance pour votre réponse, je l'attends avant de poursuivre mon tricot.
12.10.2016 - 14:58DROPS Design answered:
Bonjour Chantal, vous avez tout à fait raison, il faut ensuite augmenter tous les rangs, les explications ont été corrigées, merci. Bon tricot!
12.10.2016 - 15:26
![]() BESSIERES wrote:
BESSIERES wrote:
Je ne comprends pas : diagramme M1 (sur 6 mailles) vu sur l'endroit : je doit tricoter comme suit 1 rang : sur l'endroit : 3 mailles endroit - 3 mailles envers au retour 2 ème rang sur l'envers : 4 mailles endroit -1 maille envers-1 maille endroit 3 ème rang sur l'endroit : 3 mailles endroit - 3 mailles envers 4 ème rang sur l'envers :1 maille envers -1 maille endroit-4 mailles envers C'est ça ? Merci de votre aide Mary
27.02.2015 - 12:45DROPS Design answered:
Bonjour Mme Bessieres, c'est tout à fait exact, on commence en bas à droite sur l'endroit et on lit de droite à gauche sur l'endroit, de gauche à droite sur l'envers. Bon tricot!
27.02.2015 - 13:56
![]() Bettina Heusner wrote:
Bettina Heusner wrote:
Hallo, in der Anleitung für die Ärmel steht die mittleren 13 Maschen unter dem Ärmel abketten. Wie ist dies gemeint?
26.01.2015 - 22:03DROPS Design answered:
Sie ketten 13 M an der unteren Ärmelmitte ab. Sie haben ja an der unteren Ärmelmitte 3 Link-M, also ketten Sie rechts davon 5 M ab, dann diese 3 Links-M und links davon wieder 5 M, also 13 M insgesamt an der unteren Ärmelmitte.
27.01.2015 - 14:23
![]() Karina Ramsdahl wrote:
Karina Ramsdahl wrote:
Hej hvordan skal diagrammet læses. Fra højre på alle pinde og er v pinden også vist i diagrammet
09.07.2014 - 16:06DROPS Design answered:
Hej Karina. Du starter nederst til højre og ret pinde læses fra højre mod venstre og vrangpinde læses fra venstre mod højre. Vrangpindene vises i diagrammet. Du kan læse det her også
11.07.2014 - 19:38
|
|||||||
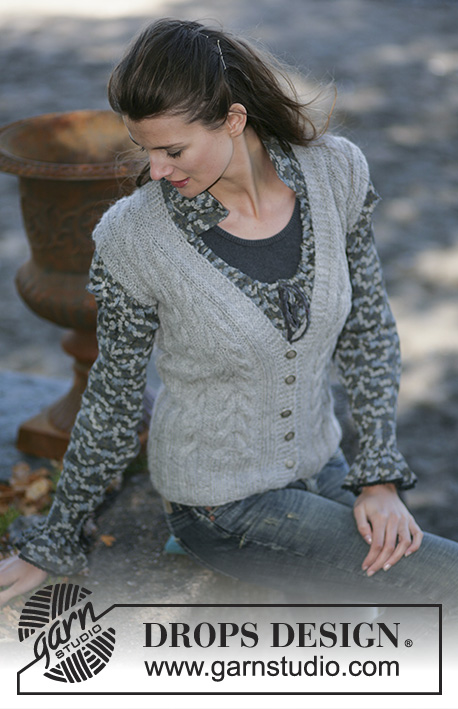
Night Fall Cardigan |
|||||||
|
|
|||||||
DROPS Jacket in pattern with raglan sleeve in Karisma
DROPS 96-7 |
|||||||
|
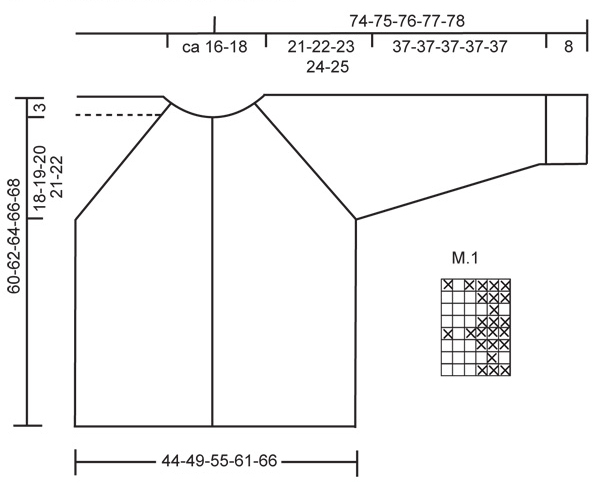
Knitting Tension: 21 stitches x 28 rows on needle size 4 mm in stocking sts = 10 x 10 cm Pattern: see diagram M.1 The diagram is seen from the right side. Decreasing tips (applies to raglan): purl the st on each side of the marking thread from the RS and knit it from the WS Dec as follows from the RS: 3 sts before the marking thread: slip 1 st as if to knit, K1, psso, P1 After the marking thread: P1, K2 tog Dec as follows from the WS: 3 sts before the marking thread: P2 tog, K1 After the marking thread: K1, P2 tog into back of st Buttonhole: Cast off for buttonholes on right front edge. 1 buttonhole = cast off the 3rd and 4th st from middle front and cast on 2 new sts in the same place on next row. Cast off for buttonholes when the piece measures: Size S: 5, 12, 19, 26, 33, 40, 47, 54 and 61 cm Size M: 5, 12, 20, 27, 34, 41, 49, 56 and 63 cm Size L: 5, 13, 20, 28, 35, 43, 50, 58 and 65 cm Size XL: 5, 13, 21, 28, 36, 44, 52, 59 and 67 cm Size XXL: 5, 13, 21, 29, 37, 45, 53, 60 and 68 cm Back and front piece: Knitted back and forth on circular needle from mid front. Cast on 197-221-245-269-293 sts (incl 7 front edge sts each side, knitted in garter sts throughout)) on circular needle size 4 mm. Continue as follows: (1st row = RS): 7 edge sts in garter sts, M.1 over 183-207-231-255-279 sts, 7 front edge sts in garter sts – remember buttonholes on right front edge – see above. When piece measures 39-40-41-42-43 cm knit next row as follows: 7 front edge sts, M.1 over 37-43-49-55-61 sts, cast off 13 sts for armhole, M.1 over 83-95-107-119-131 sts, cast off 13 sts for armhole, M.1 over 37-43-49-55-61 sts. Put all sts on a thread and knit the sleeves. Sleeves: The sleeves are knitted round on double pointed needles. Cast on 48-48-54-54-60 sts on double pointed needles size 4 mm and knit M.1 – make sure to have P3 mid under arm. When piece measures 8 cm inc 1 st on each side of the P3 mid under arm on every 2.5-2-2.5-2-2 cm a total of 15-18-15-18-18 times – incorporate new sts in M.1 as you go along = 78-84-84-90-96 sts. When piece measures 45 cm cast off 13 sts mid under arm = 65-71-71-77-83 sts. Yoke: Put sleeves in on the same circular needle as back and front pieces where you cast off for armholes = 301-337-361-397-433 sts. Insert a marking thread in all transitions between sleeves and body pieces = 4 marking threads. Continue in pattern, at the same time dec for raglan on every other row – see Decreasing tips – as follows: Towards the sleeves: on every other row 25-25-28-28-26 times and then on every row 0-3-0-3-8 times. Towards the body pieces: on every other row 24-26-26-22-19 times and then on every row 0-1-4-14-23 times. At the same time when piece measures 54-56-58-60-62 cm put the outermost 10-11-12-12-12 sts each side on a thread for neck. Dec to shape the neckline on every other row 2 sts 2 times and 1 st 2 times. After all inc for raglan and neck are complete = 73-83-93-93-93 sts left on needle and piece measures approx 60-62-64-66-68 cm. Neck: Pick up approx 18 to 20 sts on each neckline (incl sts on thread) = approx 109 to 133 sts. Knit 1 row whilst dec evenly to 95-95-101-101-107 sts (do not dec over the 13 sts each side towards mid front). Now knit 2 rows Rib *K1, P1* (knit front edge as before), 1 row stocking sts and continue in M.1 (continue to knit front edge as before). Cast off loosely when M.1 measures 6 cm. Assembly: Sew the openings under arms and sew on buttons. |
|||||||
Diagram explanations |
|||||||
|
|||||||
 |
|||||||
Have you finished this pattern?Tag your pictures with #dropspattern or submit them to the #dropsfan gallery. Do you need help with this pattern?You'll find 29 tutorial videos, a Comments/Questions area and more by visiting the pattern on garnstudio.com. © 1982-2026 DROPS Design A/S. We reserve all rights. This document, including all its sub-sections, has copyrights. Read more about what you can do with our patterns at the bottom of each pattern on our site. |
|||||||


With over 40 years in knitting and crochet design, DROPS Design offers one of the most extensive collections of free patterns on the internet - translated to 17 languages. As of today we count 324 catalogues and 12291 patterns translated into English (UK/cm). 12291
We work hard to bring you the best knitting and crochet have to offer, inspiration and advice as well as great quality yarns at incredible prices! Would you like to use our patterns for other than personal use? You can read what you are allowed to do in the Copyright text at the bottom of all our patterns. Happy crafting!
Post a comment to pattern DROPS 96-7
We would love to hear what you have to say about this pattern!
If you want to leave a question, please make sure you select the correct category in the form below, to speed up the answering process. Required fields are marked *.