
Popular categories
Looking for a yarn?


Comments / Questions (92)
![]() Beate wrote:
Beate wrote:
Als nur Sockenstrickerin hätte ich mich mal lieber nicht an die wunderschöne Jacke wagen sollen. \r\nNun will ich es beenden. Meine Maschenanzahl stimmt bei Größe XL 93 Maschen nach Raglan und Hals nicht. Wie ist die genaue Aufteilung; Blende, Arm und Rumpf? \r\nTausend Dank
22.05.2025 - 16:22DROPS Design answered:
Liebe Beate, es waren 397 auf der Nadel am Anfang Passe, dann wird man insgesamt 4 Maschen für die Ärmel (2 M pro Ärmel) 28+3=31 Mal abnehmen (=124 M) und gleichzeitig 4 M für Vorder-/Rückenteil (1 pro Vorderteil + 2 beim Rückenteil) 22+14=36 Mal abnehmen (=144 M), und dann auch für Halsausschnitt wird beide Seite 12 M stillgelegt + 2 Maschen 2 x + 1 Masche 2 x abgekettet (=(12+4+2)x2=36 M insgesamt. So sind es: 397-124-144-36=93 sind noch übrig wenn alle Abnahmen gestrickt wurden. Viel Spaß beim Stricken!
23.05.2025 - 08:40
![]() Beate wrote:
Beate wrote:
Nochmals eure Hilfe Ersten 12 Maschen für den Hals auf eine Hilfsnadel legen Bedeutet: die Blendmaschen stricken und danach 12 Maschen auf die Hilfsnadel legen?
08.05.2025 - 14:20DROPS Design answered:
Liebe Beate, die ersten 12 Maschen der nächsten Hinreihe stricken und diese Maschen stilllegen, die Reihe bis zum Ende wie zuvor stricken, wenden, die ersten 12 Maschen am Anfang der Rückreihe stricken und stilllegen, die Reihe bis zum Ende wie zuvor stricken. Dann am Anfang jeder Reihe ab Halsausschnitt (dh Hin- sowie Rückreihe) wird man Maschen abketten. Die 12 stillgelgten Maschen beidseitig strickt man später für die Halsblende. Viel Spaß beim Stricken!
08.05.2025 - 15:48
![]() Beate wrote:
Beate wrote:
Ärmel anstricken? Beginn an der Knopfleiste; Stricken bis zur Abkettung;dann alle vier Nadeln des Ärmels gegen den Uhrzeigersinn aufnehmen; weiter mit Rumpf. Ist das der richtige Weg?
25.04.2025 - 12:42DROPS Design answered:
Liebe Beate, bei Hinreihen stricken Sie zuerst Maschen vom rechten Vorderteil, dann Maschen vom rechten Ärmel (= soll eine Hinreihe sein), Maschen vom Rückenteil, vom linken Ärmel (= auch hier eine Hinreihe) und Maschen vom linken Vorderteil. Vielleicht kann Ihnen dieses Video helfen? Viel Spaß beim Stricken!
25.04.2025 - 14:00
![]() Anja Engel wrote:
Anja Engel wrote:
Hej kan i så ikke også skrive i opskriften at ærmet skal strikke rundt Med venlig hilsen Anja
10.04.2025 - 14:00
![]() Anja Engel wrote:
Anja Engel wrote:
Hej jeg er igang med denne Night fall cardigan. Skal til og strikke ærmer. Men skal men strikke rundt eller frem og tilbage Med venlig hilsen Anja
10.04.2025 - 10:22DROPS Design answered:
Hej Anja, vi har strikket ærmerne rundt, vi skal få fjernet den parentes med kantmasken - tak for info :)
10.04.2025 - 12:09
![]() Martine wrote:
Martine wrote:
Taille L, choix augmentat° des manches. J'ai consulté beaucoup de contenu vidéo de tuto, n'arrive pas à me décider entre augmentat° intercalaires droite/gauche, ou autres types d'augmentat°. Trouver aucunes vidéos de tuto tricot circulaire avec point fantaisie pour comprendre et respecter la symétrie de la continuité de M1. Avez-vous une vidéo augmentat° point fantaisie en circulaire permettant de reproduire la symétrie du motif ? Cela me serait bien utile
19.03.2025 - 19:52
![]() Beate wrote:
Beate wrote:
Ich bin bei den Ärmeln, 8cm gestrickt und den Mustersatz mit 2linken Maschen begonnen, so wie Sie es vorgeschlagen haben. Perfekt. BITTE so eine Anleitung für die erste Zuhnahmenrunde-also 1Zu 3linkeM 1Zu. Wie muss ich die beiden Zunahmen stricken? Bitte etwas ausführlich. Das Video habe ich bereits gesehen. Hilft mir aber nicht vollständig. Dankeschön Beate
12.02.2025 - 11:46DROPS Design answered:
Liebe Beate, jetzt sollen Sie die neuen Maschen im Muster zunehmen und gleichzeitig immer noch die 3 mittleren Maschen links stricken; so am Anfang der Runde stricken Sie die neuen Maschen wie für ein neues Rapport vom M.1 (lesen Sie das Diagram links nach rechts) und am Ende der Runde wie für ein neues Rapport vom M.1 (aber diesmal lesen Sie rechts nach links). Unter den Ärmel haben Sie dann manchmal mehr linken Maschen als im Muster aber es ist ok so, das Muster soll sich erbreitern und nicht verschoben werden. Viel Spaß beim Stricken!
12.02.2025 - 13:26
![]() Beate wrote:
Beate wrote:
Dankeschön Ich habe ihre Hilfe das erste Mal benötigt. Ich bin begeistert, dass ich so schnell eine Lösung erhalten habe. Alles Gute für das gesamte Team.
11.02.2025 - 22:42
![]() Beate wrote:
Beate wrote:
Dankeschön für die schnelle Antwort. Ich brauche noch eine Info. Ärmel erste Runde: Ist das so richtig? 1RM, *3rechteM-3linkeM* wiederholen 1RM. Dann habe ich aber nur 2linkeM zum Beenden! Oder stricke ich KEINE extra RM, sondern beginne gleich mit dem Mustersatz? Dankeschön schon für die Bearbeitung. Beate
10.02.2025 - 18:43DROPS Design answered:
Liebe Beate, man soll 3 linke Maschen unter den Ärmel haben, so können Sie z.B. mit 2 M links anfangen (= die 2 letzten Maschen vom Diagram), dann M.1 in der Breite wiederholen und mit die ersten 4 Maschen die Runde enden = so haben Sie 3 li unter den Ärmel, die Maschenanzahl ist teilbar durch 6 / 1 Rapport M.1 in der Breite. Es sind keine Randmasche da man in der Runde strickt. Viel Spaß beim Stricken!
11.02.2025 - 09:27
![]() Beate wrote:
Beate wrote:
Noch ergänzend zur Frage vorher. Entschuldigung, dass ich so unsicher bin. Aber die Jacke und Wolle sind wirklich perfekt. Ich möchte diese gerne vernünftig beenden. Den Ärmel auf dem Nadelspiel bedeutet doch - in Runden , als geschlossenen Ärmel zu stricken. Im Strickcafe konnte mir leider auch niemand helfen. Deshalb hoffe ich fest, dass ihr Team mich aufklären kann. Danke für die vielen guten Strickideen.
08.02.2025 - 23:15DROPS Design answered:
Liebe Beate, ja genau, die Ärmel werden in der Runde mit dem Nadelspiel gestrickt (siehe im Video wie man die Maschen so anschlägt und (glattrechts strickt)). Diagram lesen Sie dann hier immer rechts nach links da alle Rudnde Hinreihen sind. Viel Spaß beim Stricken!
10.02.2025 - 10:27
|
|||||||
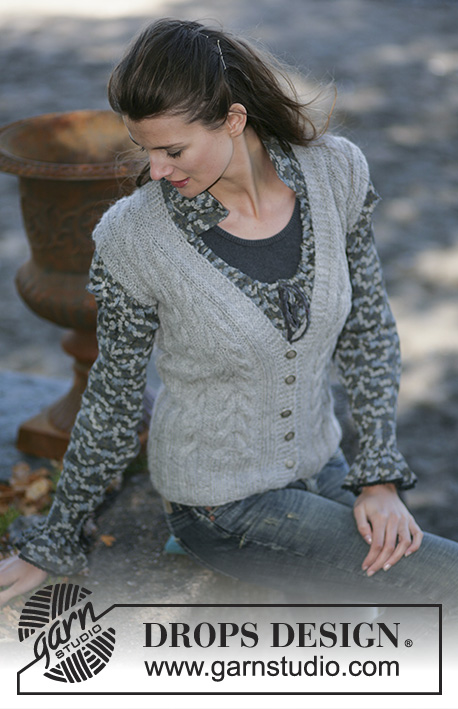
Night Fall Cardigan |
|||||||
|
|
|||||||
DROPS Jacket in pattern with raglan sleeve in Karisma
DROPS 96-7 |
|||||||
|
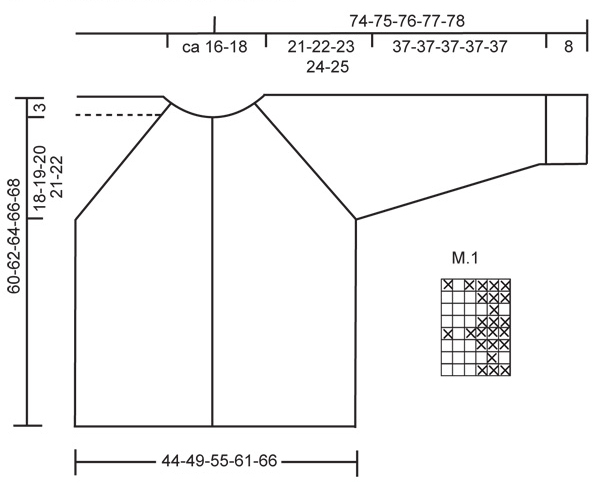
Knitting Tension: 21 stitches x 28 rows on needle size 4 mm in stocking sts = 10 x 10 cm Pattern: see diagram M.1 The diagram is seen from the right side. Decreasing tips (applies to raglan): purl the st on each side of the marking thread from the RS and knit it from the WS Dec as follows from the RS: 3 sts before the marking thread: slip 1 st as if to knit, K1, psso, P1 After the marking thread: P1, K2 tog Dec as follows from the WS: 3 sts before the marking thread: P2 tog, K1 After the marking thread: K1, P2 tog into back of st Buttonhole: Cast off for buttonholes on right front edge. 1 buttonhole = cast off the 3rd and 4th st from middle front and cast on 2 new sts in the same place on next row. Cast off for buttonholes when the piece measures: Size S: 5, 12, 19, 26, 33, 40, 47, 54 and 61 cm Size M: 5, 12, 20, 27, 34, 41, 49, 56 and 63 cm Size L: 5, 13, 20, 28, 35, 43, 50, 58 and 65 cm Size XL: 5, 13, 21, 28, 36, 44, 52, 59 and 67 cm Size XXL: 5, 13, 21, 29, 37, 45, 53, 60 and 68 cm Back and front piece: Knitted back and forth on circular needle from mid front. Cast on 197-221-245-269-293 sts (incl 7 front edge sts each side, knitted in garter sts throughout)) on circular needle size 4 mm. Continue as follows: (1st row = RS): 7 edge sts in garter sts, M.1 over 183-207-231-255-279 sts, 7 front edge sts in garter sts – remember buttonholes on right front edge – see above. When piece measures 39-40-41-42-43 cm knit next row as follows: 7 front edge sts, M.1 over 37-43-49-55-61 sts, cast off 13 sts for armhole, M.1 over 83-95-107-119-131 sts, cast off 13 sts for armhole, M.1 over 37-43-49-55-61 sts. Put all sts on a thread and knit the sleeves. Sleeves: The sleeves are knitted round on double pointed needles. Cast on 48-48-54-54-60 sts on double pointed needles size 4 mm and knit M.1 – make sure to have P3 mid under arm. When piece measures 8 cm inc 1 st on each side of the P3 mid under arm on every 2.5-2-2.5-2-2 cm a total of 15-18-15-18-18 times – incorporate new sts in M.1 as you go along = 78-84-84-90-96 sts. When piece measures 45 cm cast off 13 sts mid under arm = 65-71-71-77-83 sts. Yoke: Put sleeves in on the same circular needle as back and front pieces where you cast off for armholes = 301-337-361-397-433 sts. Insert a marking thread in all transitions between sleeves and body pieces = 4 marking threads. Continue in pattern, at the same time dec for raglan on every other row – see Decreasing tips – as follows: Towards the sleeves: on every other row 25-25-28-28-26 times and then on every row 0-3-0-3-8 times. Towards the body pieces: on every other row 24-26-26-22-19 times and then on every row 0-1-4-14-23 times. At the same time when piece measures 54-56-58-60-62 cm put the outermost 10-11-12-12-12 sts each side on a thread for neck. Dec to shape the neckline on every other row 2 sts 2 times and 1 st 2 times. After all inc for raglan and neck are complete = 73-83-93-93-93 sts left on needle and piece measures approx 60-62-64-66-68 cm. Neck: Pick up approx 18 to 20 sts on each neckline (incl sts on thread) = approx 109 to 133 sts. Knit 1 row whilst dec evenly to 95-95-101-101-107 sts (do not dec over the 13 sts each side towards mid front). Now knit 2 rows Rib *K1, P1* (knit front edge as before), 1 row stocking sts and continue in M.1 (continue to knit front edge as before). Cast off loosely when M.1 measures 6 cm. Assembly: Sew the openings under arms and sew on buttons. |
|||||||
Diagram explanations |
|||||||
|
|||||||
|
|||||||
Have you finished this pattern?Tag your pictures with #dropspattern or submit them to the #dropsfan gallery. Do you need help with this pattern?You'll find 28 tutorial videos, a Comments/Questions area and more by visiting the pattern on garnstudio.com. © 1982-2025 DROPS Design A/S. We reserve all rights. This document, including all its sub-sections, has copyrights. Read more about what you can do with our patterns at the bottom of each pattern on our site. |
|||||||


With over 40 years in knitting and crochet design, DROPS Design offers one of the most extensive collections of free patterns on the internet - translated to 17 languages. As of today we count 314 catalogues and 11822 patterns translated into English (UK/cm).
We work hard to bring you the best knitting and crochet have to offer, inspiration and advice as well as great quality yarns at incredible prices! Would you like to use our patterns for other than personal use? You can read what you are allowed to do in the Copyright text at the bottom of all our patterns. Happy crafting!
Post a comment to pattern DROPS 96-7
We would love to hear what you have to say about this pattern!
If you want to leave a question, please make sure you select the correct category in the form below, to speed up the answering process. Required fields are marked *.