
Popular categories
Looking for a yarn?


Comments / Questions (82)
![]() Anja wrote:
Anja wrote:
Die Variante, erst am Anfang, dann am Ende der Runde je vier Maschen abzuketten, hatte ich auch probiert, dann aber daran gezweifelt, dass dann ja am Ende eine Masche "übrig" bleibt, aber stimmt, durch diese zieht man dann den Faden, wie bei einem normalen Abschluss! Danach kommen ja eh alle Teile auf eine Nadel! Danke für die Denkstütze! Ist es eigentlich beim Zusammenstricken aller Teile egal, an welcher Stelle man beginnt? Können Sie eine empfehlen? Lieben Dank nochmal! Anja
01.07.2014 - 11:39DROPS Design answered:
Liebe Anja, genau, die letzte M wird quasi dadurch abgekettet, dass man den Faden durchzieht. An sich ist es egal, an welcher Stelle Sie mit der neuen Rd beginnen. Ich selbst bevorzuge eine der beiden hinteren Raglanlinien, da man hier den Faden unsichtbarer vernähen kann. Sie können auch den Faden, der noch am Rumpf hängt, weiterbenutzen und das als Rd-Beginn nehmen, dann müssen Sie 1x weniger vernähen. Hauptsache, Sie markieren sich zur Orientierung den Rd-Beginn.
01.07.2014 - 12:47
![]() Anja wrote:
Anja wrote:
Ich glaube, Sie haben mich nicht ganz richtig verstanden: Ich rede nicht vom Rumpfteil, sondern von den Ärmeln! Dann muss es also so sein, dass die Runde jeweils auf der oberen Mitte des Ärmels beginnt, nicht auf der unteren, wie es sonst ist, wenn man nicht rund strickt? Wenn das so ist, können Sie dieses wichtige Detail bitte in der Anleitung unterbringen? LG Anja
01.07.2014 - 08:44DROPS Design answered:
Liebe Anja, sorry, ich hatte "Ärmel" als "Armausschnitt" interpretiert. Der Rd-Beginn ist in dieser Anleitung nicht festgelegt, Sie können letztendlich selbst entscheiden, wo Sie die untere Ärmelmitte setzen. Wenn die letzten 4 M der 8 abzukettenden M am Rd-Beginn liegen, können Sie die Rd noch zu Ende stricken. Andere Möglichkeit: Die ersten 4 M abketten, die Rd stricken, die letzten 4 M abketten, der Endfaden liegt dann in der Mitte der 8 M.
01.07.2014 - 09:43
![]() Anja wrote:
Anja wrote:
Ich bin nun beim Ärmel an der Stelle, wo die 8 Maschen unten in der Mitte abgekettet werden sollen. Das ist bei mir zwischen den Runden 177 und 178 der Fall.Stricke ich dann die Runde 178 noch zu Ende oder lege ich die Maschen direkt nach dem Abketten still? Vielen Dank!
19.06.2014 - 08:17DROPS Design answered:
Liebe Anja, Sie haben ja dann wohl schon für beide Ärmel abgekettet? Dann können Sie gar keine Rd mehr komplett stricken, weil ja die Ärmelabnahme dazwischenliegt. Und wenn Sie nur bis zum nächsten Armausschnitt stricken, haben Sie ja am Vorder- oder Rückenteil 1 R mehr. Wenn Sie alle M (Rumpf + Ärmel) auf eine Nadel gelegt haben, können Sie die Rd neu ansetzen, markieren Sie sich dann den Rd-Beginn für die Raglanabnahmen.
29.06.2014 - 14:24Mina wrote:
Ingen tid alls, utan över 1 varv!
04.05.2014 - 08:58
![]() Lena Overgaard Andersen wrote:
Lena Overgaard Andersen wrote:
Hvad menes der med, at man skifter til rundpind nr 3½ og gradvis justerer maskeantallet til 212 (i mit tilfælde)? skal jeg tage ind, og over hvor lang tid?
03.05.2014 - 23:04DROPS Design answered:
Du tager ind jävnt fordelt på förste p du strikker med 3½. God fornöjelse!
07.05.2014 - 10:33
![]() Karen wrote:
Karen wrote:
Jeg forstår ikke beskrivelsen af raglanindtagningen: "På hver 4.omg: 2-0-0-0-0 gange, på hver 2.omg: 24-27-28-26-22 gange og derefter på hver omg: 0-4-5-12-23 gange. Tag ind i hver side på ærmerne: På hver 2.omg: 25-25-26-27-27 gange og derefter på hver omg: 5-8-9-10-13 gange." Hvordan kan jeg f.eks. tage ind 28 gange på hver 2. omg? Hvad menes der?
09.02.2014 - 10:36DROPS Design answered:
Hei Karen Du tar in på hver 2.omg gennom at strikke en omg der du tar ind, og så strikker du en omg uten å ta ind, så en omg der du tar ind, og så en omg uten å ta ind, osv. Hvis du ska ta ind 28 gange, så strikkes det i alt 56 omg.
11.02.2014 - 22:04
![]() Anja wrote:
Anja wrote:
Lieben Dank, ich hab gleich noch eine Frage: Kurz vor Ende der Anleitung für den Körper steht: "Wenn die Arbeit 33-34-35-36-37 cm misst, 8 M für das Armloch auf beiden Seiten alle abketten (d.h. 4 M auf jeder Seite der Markierungsfäden)" Fehlt hier zwischen "alle" und "abketten" eine Angabe? Ansonsten verstehe ich den Satz nicht. Vielen Dank nochmal für die Hilfe!
16.12.2013 - 08:37DROPS Design answered:
Liebe Anja, das Wort "alle" war zu viel und wir haben es nun gelöscht.
17.12.2013 - 08:16
![]() Anja wrote:
Anja wrote:
Wenn ich es richtig verstehe, werden sowohl Ärmel als auch der Körper des Pullis jeweils rundgestrickt. Am Ende der Anleitung steht, man soll die Öffnungen unter den Ärmeln zusammennähen. Welche Öffnungen denn? Vielen Dank!
13.12.2013 - 10:43DROPS Design answered:
Liebe Anja, es ist nicht die Unterarmnaht gemeinst, sondern wirklich nur die kleine Öffnung unter der Achsel, die entsteht, wenn Sie die rund gestrickten Teile für die Passe auf eine Nadel legen (dort, wo für das "Armloch" abgekettet wurde).
16.12.2013 - 08:11
![]() Lisbeth Karlsen wrote:
Lisbeth Karlsen wrote:
Vedr. model 91-5 : Der skal i str. xl slås 78 m op til ærmer. Er det rigtigt ? På billedet virker det som om ærmerne slutter tæt ved håndleddet. Med 78 m bliver de MEGET løse. Mvh Lisbeth
04.07.2010 - 15:48
![]() Drops Design wrote:
Drops Design wrote:
Jo, selve raglan-indtagningerne er forskellige på ærmerne og på ryg-&forstk. Du har jo 2 indtagninger på hvert ærme som du tager ud ifølge opskriften (og din tekst) og så har du 2 indtagninger på rygstk og 2 indt på forstk hvor du tager ind lidt anderledes ifølge den beskrivelse...God fornøjelse!
23.03.2009 - 15:13
|
|
DROPS 91-5 |
|
|
|
|
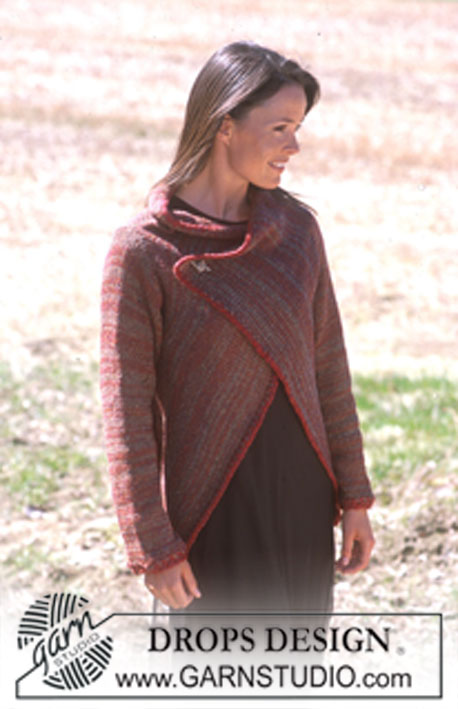
DROPS Raglan Sweater in Alpaca.
DROPS 91-5 |
|
|
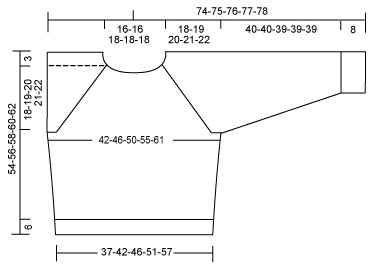
Gauge: 23 sts x 30 rows st st with larger ndls = 10 x 10 cm Rib: *K 2, p 4*, repeat *to* [= right side rows]. Work k above k and p above p. Raglan decreases: Before the marker thread work k 2 tog, k 1. After the marker thread work k 1, slip 1 k-wise, k 1, pass the slipped st over the k st. Garment information: If the gauge is not correct in the height and the knitting is too tight, the raglan shape will be too short and the armhole too small. To remedy this work 1 extra row without dec at regular intervals as often as necessary. The sweater is worked entirely in a circular manner to the neckline = no seaming. Back and front: With circular 3 mm ndls and Alpaca cast on 180-204-228-252-276 sts. Work Rib around for 6 cm. Change to 3.5 mm circular ndls. Work st st around and on the first row adjust sts to 172-192-212-236-264 sts. Insert a thread marker at each side with 86-96-106-118-132 sts between markers. When the garment meas 11 cm inc 1 st at each side of both thread markers. 1 inc = k into the back and into the front of the same st. Inc in this manner every 4.5-4.5-5-7-7 cm a total of 5-5-5-4-4 times = 192-212-232-252-280 sts. When the garment meas 33-34-35-36-37 cm bind off for armholes 4 sts at each side of both thread markers [= 8 sts total at each side] = 88-98-108-118-132 sts rem on each the back and the front. Put the garment aside while working the sleeves. Sleeves: With double pointed 3 mm ndls and Alpaca cast on 66-72-72-78-78 sts. Work Rib around for 8 cm. Change to double pointed 3.5 mm ndls. Work st st around and on the first row adjust sts to 60-64-64-70-70 sts. Place a thread marker around the first st on the row [= underarm st]. When the sleeve meas 14-11-11-13-13 cm inc 1 st at each side of the marked st and inc in this manner every 3-3-2.5-2.5-2 cm a total of 11-12-14-13-16 times = 82-88-92-96-102 sts. When the sleeve meas 48-48-47-47-47 cm bind off 8 middle underarm sts. Put the sleeve aside. Cast on and work the other sleeve the same. Raglan: Transfer sleeve sts to the circular ndl, placing one sleeve in each armhole space between back and front. There are now 324-356-384-412-452 sts on the round. Insert 1 thread marker in each of the 4 junctions between sleeves and back/front. Read rem text before continuing! Raglan dec: See description above. Dec are worked at each side of all marker threads. Raglan dec on back and front: For size S only: Work 1 row without dec. Then dec 1 st at each side every 4 rows twice. All sizes: Dec 1 st at each side every 2 rows 24-27-28-26-22 times and on every row 0-4-5-12-23 times. Raglan dec on sleeves: All sizes: Dec 1 st at each side every 2 rows 25-25-26-27-27 times and on every row 5-8-9-10-13 times. Neckline shaping: At the same time, when the garment mid front meas 47-49-51-53-55 cm transfer the middle 20-20-26-26-26 sts to a holder or thread. Work back and forth from here and bind off at each side of the neckline sts on alt rows further 2 sts twice and 1 st 3 times. When all raglan dec have been worked there are 66-66-72-72-72 sts rem on the ndl and the garment should meas approx. 54-56-58-60-62 cm to the shoulder. Neckband: Pick up and knit with the yarn and 3 mm double pointed ndls approx. 34 - 40 sts along the front's neck shaping [incl. sts on the holder]. P 1 row around while adjusting sts to 90-90-102-102-102 sts. K the next row around. Thereafter work Rib for 3 cm. Bind off evenly rib-wise. Finishing: Sew armhole openings. |
|
 |
|
Have you finished this pattern?Tag your pictures with #dropspattern or submit them to the #dropsfan gallery. Do you need help with this pattern?You'll find 24 tutorial videos, a Comments/Questions area and more by visiting the pattern on garnstudio.com. © 1982-2026 DROPS Design A/S. We reserve all rights. This document, including all its sub-sections, has copyrights. Read more about what you can do with our patterns at the bottom of each pattern on our site. |


With over 40 years in knitting and crochet design, DROPS Design offers one of the most extensive collections of free patterns on the internet - translated to 17 languages. As of today we count 324 catalogues and 12290 patterns translated into English (UK/cm). 12290
We work hard to bring you the best knitting and crochet have to offer, inspiration and advice as well as great quality yarns at incredible prices! Would you like to use our patterns for other than personal use? You can read what you are allowed to do in the Copyright text at the bottom of all our patterns. Happy crafting!
Post a comment to pattern DROPS 91-5
We would love to hear what you have to say about this pattern!
If you want to leave a question, please make sure you select the correct category in the form below, to speed up the answering process. Required fields are marked *.