
Popular categories
Looking for a yarn?


Comments / Questions (12)
![]() Wanda wrote:
Wanda wrote:
It seems I am allergic to Alpaca.. Can you recommend a substitute ? Thank You
14.12.2025 - 19:44DROPS Design answered:
Dear Wanda, you can use DROPS Karisma, which is indicated in the pattern as an alternative, with the amounts of yarn already calculated. DROPS Karisma is 100% Wool, so no Alpaca there. Happy knitting!
14.12.2025 - 20:22
![]() Bille wrote:
Bille wrote:
Liebes Drops Design Team, Welche Größe in mm haben die Knöpfe, die hier empfohlen wurden? Olivenholzknopf No 511 ist nicht zu finden, bzw. ich habe sie nicht gefunden. Vielen Dank.
15.07.2025 - 17:55DROPS Design answered:
Hallo Bille, die Knöpfe haben einen Durchmesser von 20 mm und Sie finden sie unter folgendem Link. Viele Grüße und viel Freude beim Stricken!
15.07.2025 - 19:20
![]() Creations wrote:
Creations wrote:
It looks like there is a wording error at the end of right front, "fasten off", should this be, "cut yarn and place aside"?
11.06.2025 - 19:03DROPS Design answered:
Hi, in fact you will cut the yarn and you can already fasten it / weave the ends as you put it aside and you work now left front piece then all pieces together. Hope it can help. Happy knitting!
12.06.2025 - 09:15
![]() Bärbel Haak wrote:
Bärbel Haak wrote:
Moin Nach langem Hin und her habe ich festgestellt, dass in der Erklärung zum Diagramm die Farbbestellung verwechselt wurde. Kann das sein? Lieben Gruß, Bärbel Haak
21.04.2025 - 11:12DROPS Design answered:
Liebe Frau Haak, Sie sind ja recht, das Muster soll mit rot gestrickt werden un die Hauptfarbe (hinten) soll mit natur gestrickt werden. Danke für den Hinweis. Viel Spaß beim Stricken!
22.04.2025 - 15:39
![]() Dd wrote:
Dd wrote:
Hello, what if I want to knit this without the color work (just in one colour) how would I cast on for the back piece?
22.01.2025 - 20:55DROPS Design answered:
Dear Dd, you can work the pattern with the same number of stitches with your desired color and simply knit in stocking stitch when A.1 to A.6 are mentioned, instead of working the colourwork charts. So the number of stitches can be the same. Happy knitting!
25.01.2025 - 18:14
![]() Kerstin wrote:
Kerstin wrote:
Hallo ein zweites Mal ☺️wenn die Randmasche nicht zum Rapport gehört, in welcher Farbe sollte ich sie dann Stricken, in der Hauptfarbe? Liebe Grüße
13.01.2025 - 07:10
![]() Kerstin wrote:
Kerstin wrote:
Hallo, sind die Randmaschen an beiden Seiten im Muster integriert oder werden sie unabhängig davon gestrickt?
12.01.2025 - 22:42DROPS Design answered:
Liebe Kerstin, man brauche keine extra Masche anzuschlagen, die Randmaschen sind in die Maschenanzahl inbegriffen, die werden aber nicht im Muster gestrickt. Viel Spaß beim Stricken!
13.01.2025 - 10:18
![]() Ilysa N Koltonow wrote:
Ilysa N Koltonow wrote:
This is the strangest pattern I have ever read. I won't be able to work it because it feels so wrong. Row 3 A-1 is red . So , I must carry the white along with me to come back with the white AND carry the red so I will be ready to work that? And why are the chart rows not numbered? It is a badly written pattern. It really has soured me off drop patterns altogether.
08.01.2025 - 16:08
![]() Marioli wrote:
Marioli wrote:
Chaqueta muy alegre y juvenil.
10.08.2024 - 23:29
![]() Carlota Viglizzo wrote:
Carlota Viglizzo wrote:
Sunday tale
10.08.2024 - 16:47
|
|||||||
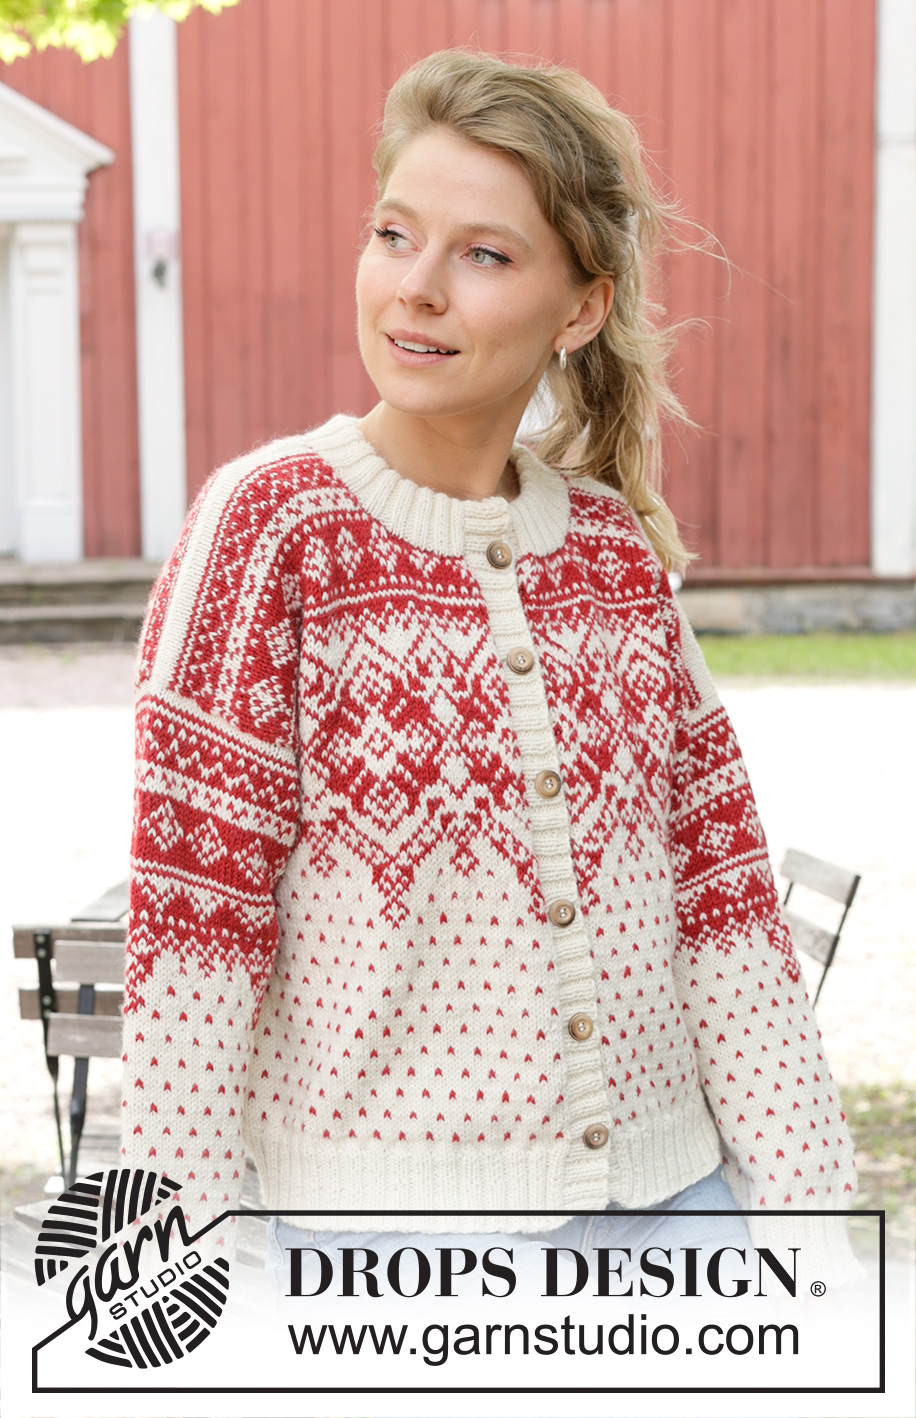
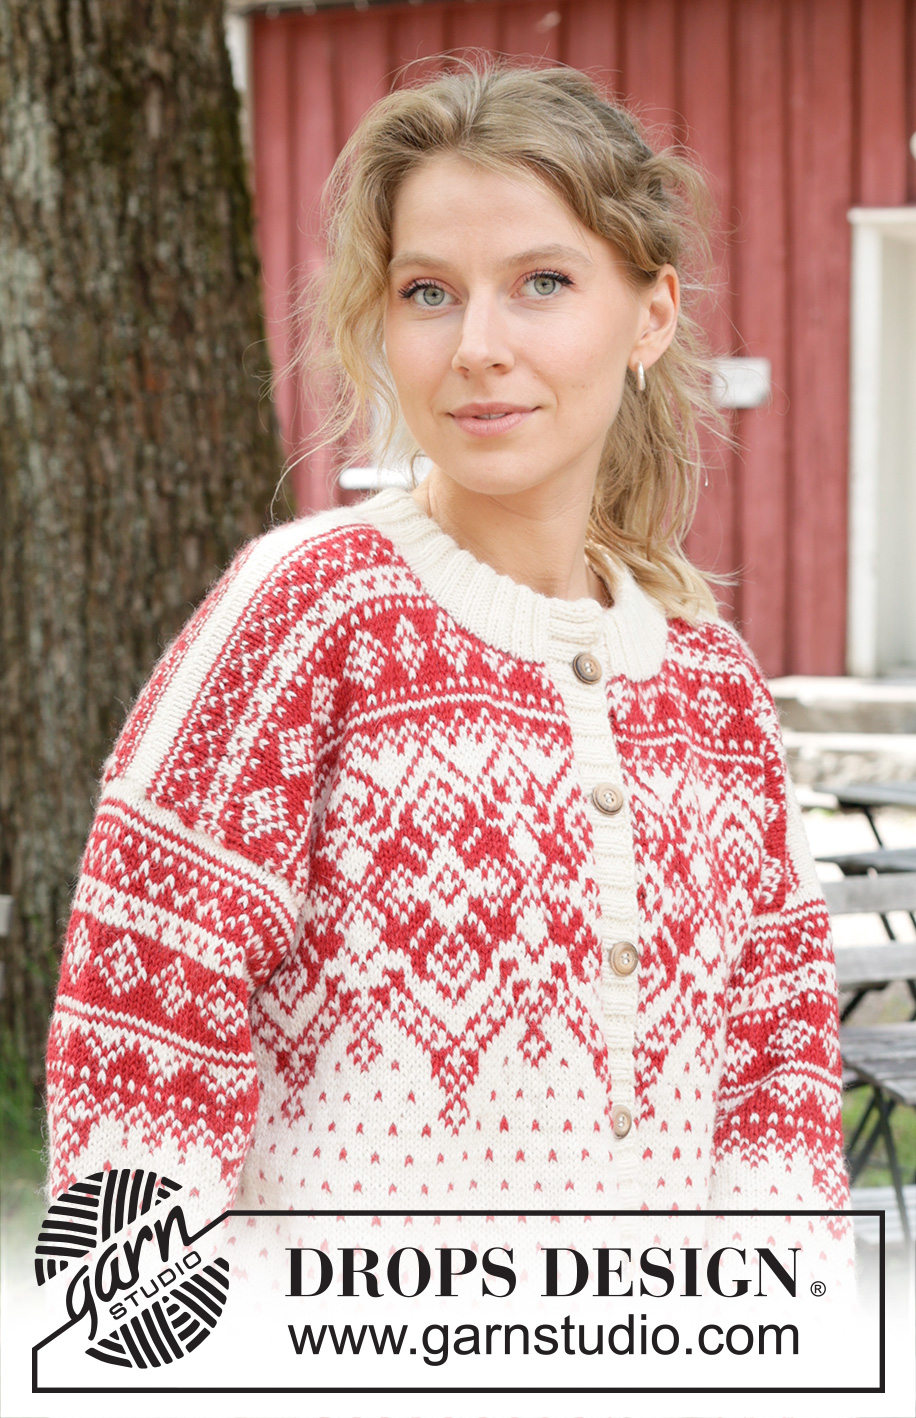
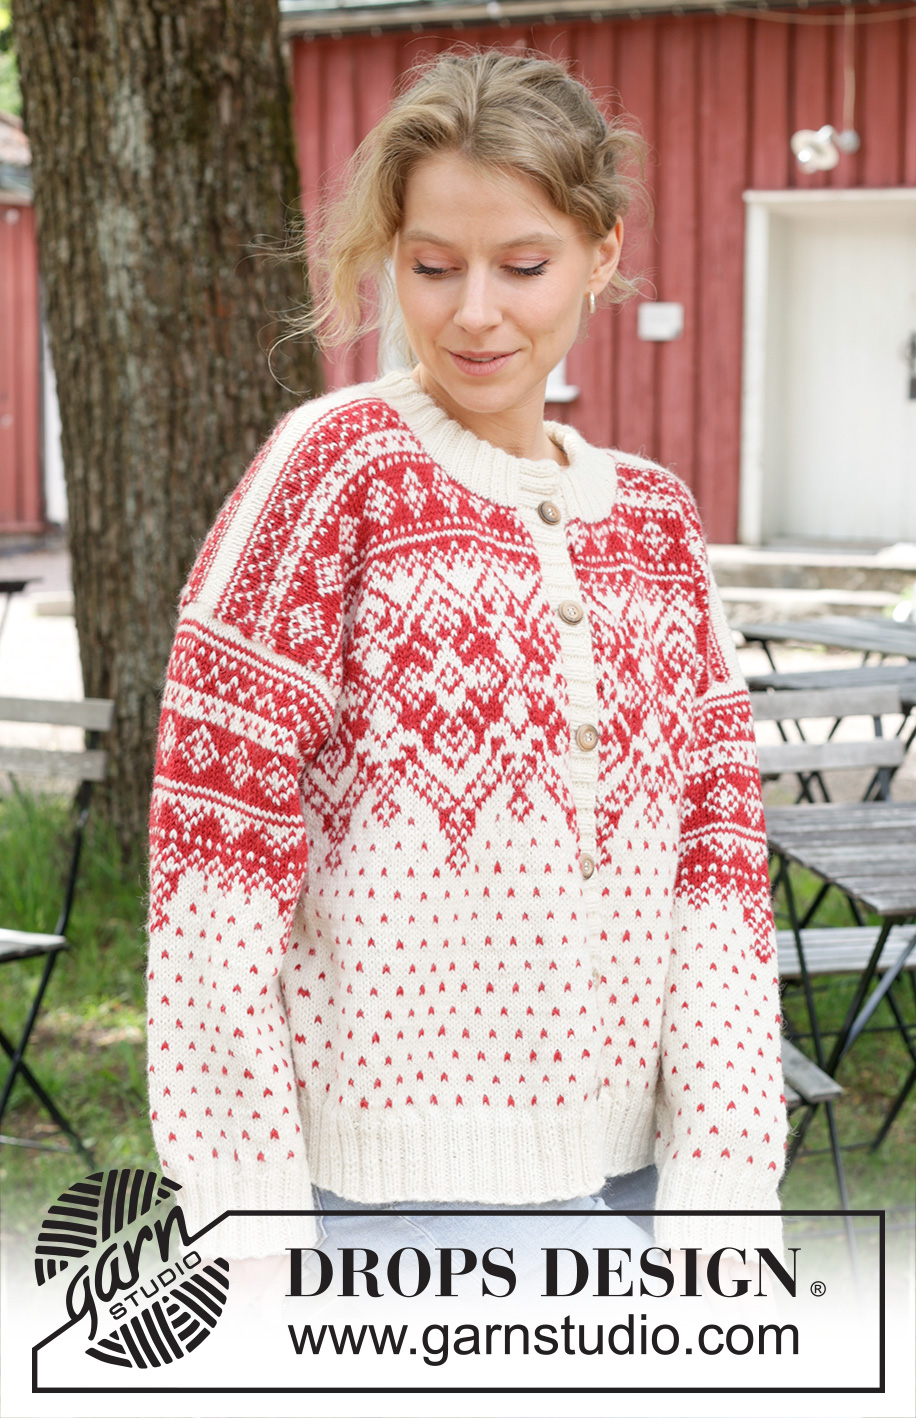
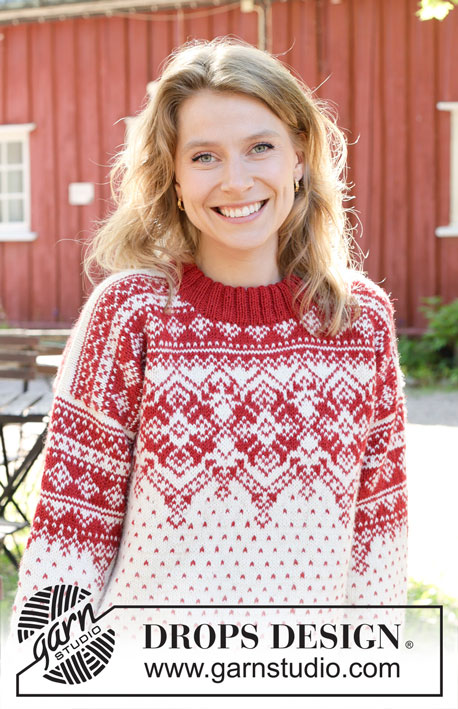
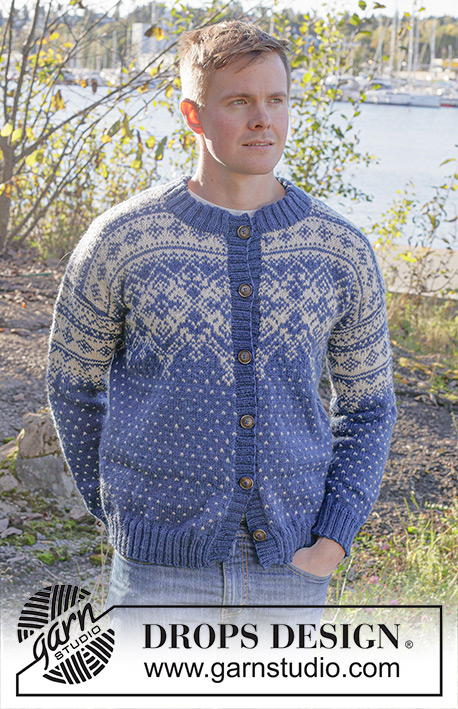
Nordic Flower Cardigan#nordicflowercardigan |
|||||||
 |
 |
||||||
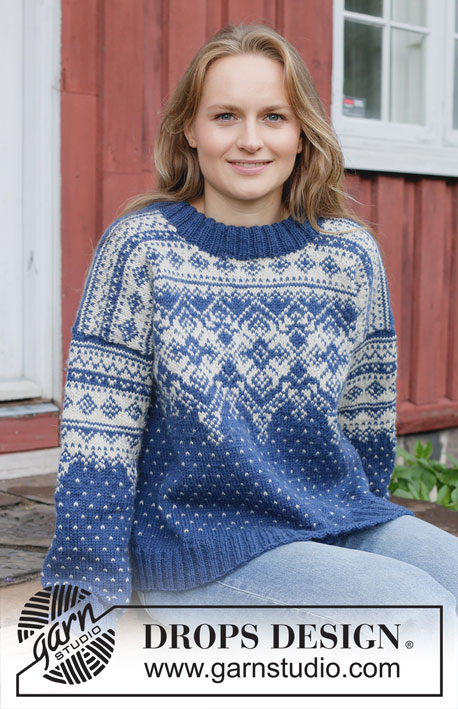
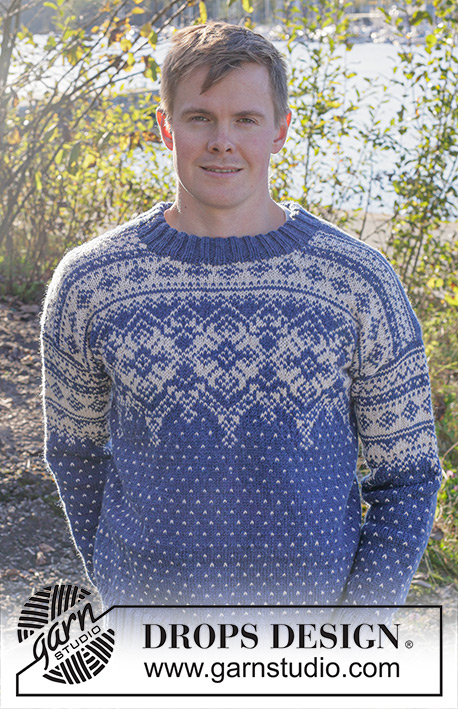
Knitted jacket in DROPS Lima or DROPS Karisma. Piece is knitted top down with Nordic pattern and double neck edge. Size: S - XXXL
DROPS 255-18 |
|||||||
|
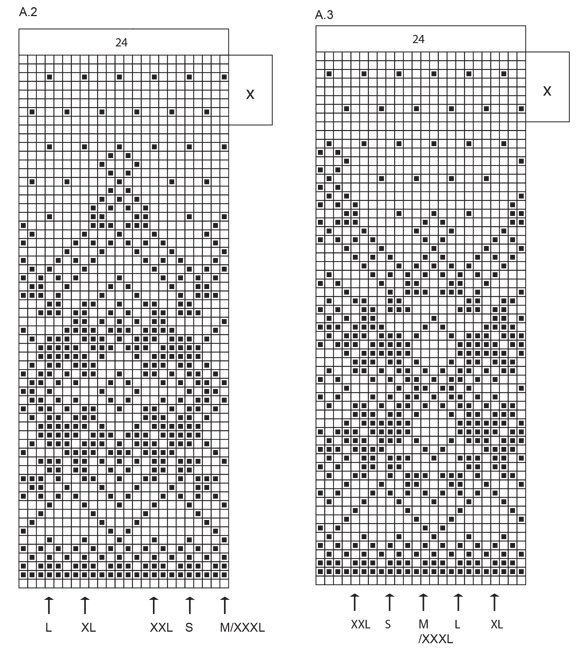
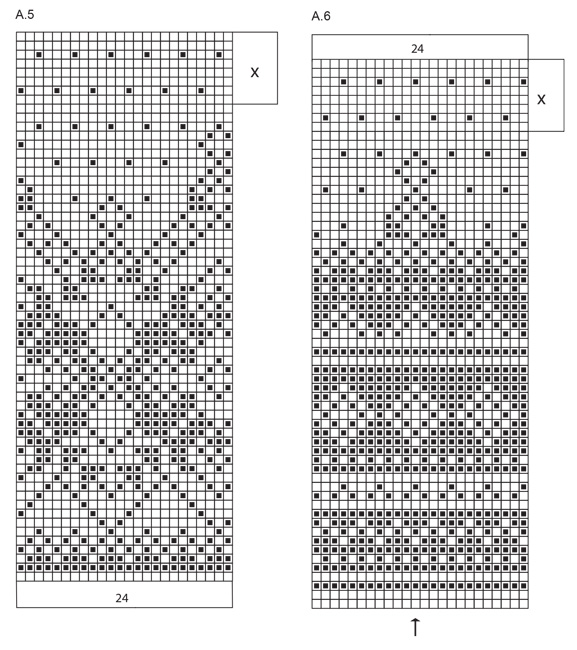
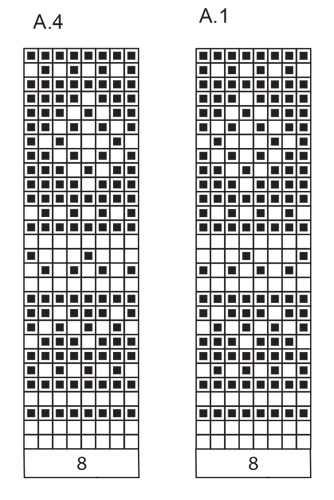
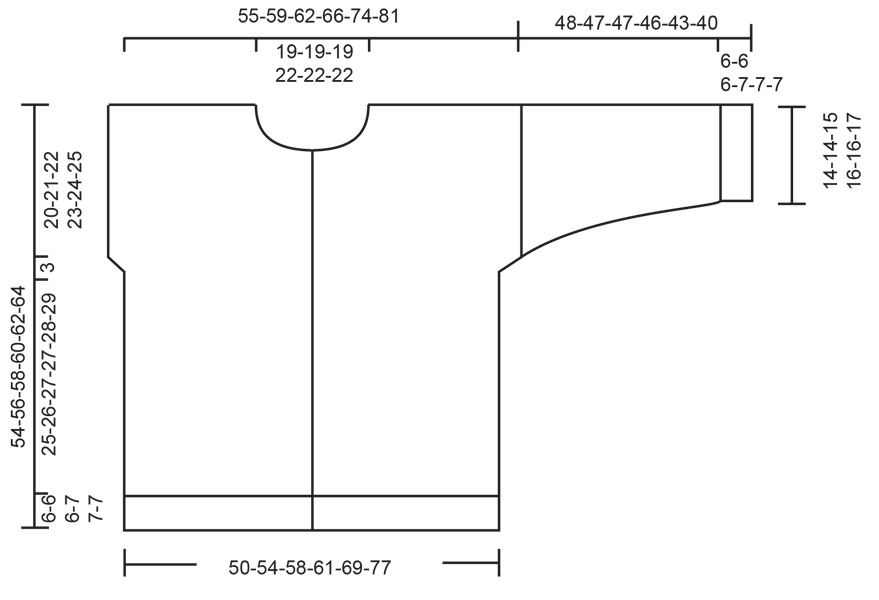
---------------------------------------------------------- EXPLANATION FOR THE PATTERN: ---------------------------------------------------------- GARTER STITCH (when working back and forth): Knit on all rows, i.e. knit from right side and knit from wrong side. 1 ridge vertically = knit 2 rows. PATTERN: See diagrams A.1 to A.6. Diagrams show all rows in pattern seen from the right side. Work pattern in stocking stitch. INCREASE TIP: Increase 1 stitch by making 1 yarn over, on next row/round work yarn over knit/purl yarn over twisted to avoid holes. Then work the new stitches in stocking stitch. DECREASE TIP: Decrease 1 stitch on each side of marker thread as follows: Work until 3 stitches remain before marker thread and knit 2 together, knit 2 (marker thread is in the middle of these 2 stitches), slip 1 stitch knitwise, knit 1, pass slipped stitch over stitch worked (= 2 stitches decreased). KNITTING TIP: To avoid the knitting tension to tighten when working pattern, it is important not to tighten the strands on back side of piece. Use a larger needle size when working pattern try needed. When there are large gaps in the pattern, twine the yarn on the back of piece. BUTTONHOLES: Decrease for 6-6-6-7-7-7 button holes on right front band. 1 buttonhole = work 2 stitches together, and make 1 yarn over – NOTE: Decrease for buttonholes will look better by purling 2 together in a section with 2 purl stitches (seen from right side). On next row knit yarn over to make holes. Place top buttonhole in the transition between neck edge and yoke, bottom buttonhole approx. in the transition between front piece and rib. Place the remaining 4-4-4-5-5-5 buttonholes evenly approx. 8-8½-9-7½-7½-8 cm apart. ---------------------------------------------------------- START THE PIECE HERE: ---------------------------------------------------------- JACKET - SHORT OVERVIEW OF THE PIECE: In this pattern needles of different length have been used, begin with fitting length for number of stitches and switch as needed. Work piece back and forth on needle. Work front pieces and back piece separately. Work top down, down to armholes, slip parts together and work back and forth from mid front. Pick up stitches for sleeves around the armholes. Then work sleeves downwards in the round on needle. Pick up stitches around the neck and work a neck edge, then pick up stitches along front piece and work bands. BACK PIECE: RIGHT SHOULDER: Work back and forth on circular needle. Cast on 38-42-46-46-54-62 stitches on circular needle size 4 mm with DROPS Lima in colour off white or DROPS Karisma in colour off white. Purl 1 row from wrong side, then work 4 rows pattern as shown in A.1 with 1 edge stitch in GARTER STITCH in each side - read explanation above. Put piece aside, and work the left shoulder. LEFT SHOULDER: Cast on 38-42-46-46-54-62 stitches on circular needle size 4 mm with DROPS Lima in colour off white or DROPS Karisma in colour off white. Purl 1 row from wrong side, then work 4 rows pattern as shown in A.1 with 1 edge stitch in GARTER STITCH in each side - read explanation above. On next row slip shoulders together for back piece as explained below. Work next row as follows from right side: Work 5th row in A.1 over stitches from left shoulder, cast on 39-39-39-47-47-47 new stitches on row with colour red/wine red, work 5th row in A.1 over stitches on right shoulder = 115-123-131-139-155-171 stitches. Read KNITTING TIP! Work 1 edge stitch, work A.1 until 2 stitches remain, work first stitch in A.1 (so that pattern begins and ends the same), 1 edge stitch in garter stitch. When A.1 has been worked, continue as follows: 1 edge stitch, see start arrow in A.2 for your size and work A.2 until 1 stitch remains, work 1 edge stitch. Pattern will not fit one whole repetition in the sides but there is one whole repetition of A.2 in the middle of row. When piece measures 20-21-22-23-24-25 cm from cast-on edge, insert 1 marker in each side of piece. Note which row in pattern this is. Continue A.2 and cast off at the beginning of every row in each side: 2 stitches 1 time, and 1 stitch 3 times = 105-113-121-129-145-161 stitches. Finish with 1 row from wrong side, cut the yarn and put piece aside, and work front pieces as explained below. RIGHT FRONT PIECE: Cast on 38-42-46-46-54-62 stitches on circular needle size 4 mm with DROPS Lima in colour off white or DROPS Karisma in colour off white. Purl 1 row from wrong side, then work as follows from right side: 1 edge stitch, A.1 over the next 32-40-40-40-48-56 stitches, work the first 4 stitches in A.1 1-0-1-1-1-1 time in total, finish with 1 edge stitch. On 13th-13th-15th-15th-17th-17th row in diagram begin increase for neck, cast on new stitches at the end of every row from right side as follows: 1 stitch 1 time, 2 stitches 2 times and 3 stitches 1 time = 46-50-54-54-62-70 stitches, work the increased stitches in the pattern. At the end of next row from right side cast on 13-13-13-17-17-17 new stitches = 59-63-67-71-79-87 stitches. Work A.1 with 1 edge stitch in garter stitch in each side. Make sure that the pattern fits the established pattern, the pattern will not fit one whole repetition towards mid front, but will fit towards the side. When A.1 has been worked 1 time vertically, continue as follows: 1 edge stitch, work the last 9-13-17-21-5-13 stitches in A.3 - see start arrow for size, work A.3 over the next 48-48-48-48-72-72 stitches, finish with 1 edge stitch. When piece measures 20-21-22-23-24-25 cm, insert 1 marker at the end of row from right side, make sure that this is the same row as on back piece. Continue A.3 and cast off at the beginning of every row from right side as follows: 2 stitches 1 time, and 1 stitch 3 times = 54-58-62-66-74-82 stitches. Finish with a row from wrong side. Fasten off. LEFT FRONT PIECE: Cast on 38-42-46-46-54-62 stitches on circular needle size 4 mm with DROPS Lima in colour off white or DROPS Karisma in colour off white. Purl 1 row from wrong side, then work as follows from right side: 1 edge stitch, work the 4 last stitches in A.4 1-0-1-1-1-1 time in total, work A.4 over the next 32-40-40-40-48-56 stitches and finish with 1 edge stitch. On 14th-14th-16th-16th-18th-18th row in diagram begin increase for neck, cast on new stitches at the end of every row from wrong side as follows: 1 stitch 1 time, 2 stitches 2 times and 3 stitches 1 time = 46-50-54-54-62-70 stitches, work the increased stitches in the pattern. At the end of next row from wrong side cast on 13-13-13-17-17-17 new stitches = 59-63-67-71-79-87 stitches. Work A.4 with 1 edge stitch in garter stitch in each side. Make sure that the pattern fits the established pattern, the pattern will not fit one whole repetition towards mid front, but will fit towards the side. When A.4 has been worked 1 time vertically, continue as follows: 1 edge stitch, work A.5 over the next 48-48-48-48-72-72 stitches, work the first 9-13-17-21-5-13 stitches in A.5 and finish with 1 edge stitch. When piece measures 20-21-22-23-24-25 cm, insert 1 marker at the end of row from right side, make sure that this is the same row as on back piece. Continue A.5 and cast off at the beginning of every row from wrong side as follows: 2 stitches 1 time, and 1 stitch 3 times = 54-58-62-66-74-82 stitches. Finish with a row from wrong side, do not cut the yarn, now work the parts together. BODY: On next row from right side work the parts together: Work as follows: Work over the 54-58-62-66-74-82 stitches from left front piece (continue A.5 as before as far as the pattern), work the next 105-113-121-129-145-161 stitches from back piece (continue pattern as shown in A.2, make sure that the pattern fits the established pattern), work over the 54-58-62-66-74-82 stitches from right front piece (continue A.5 the same way as before). There are now 213-229-245-261-293-325 stitches on needle. Continue back and forth with pattern and 1 edge stitch in each side as before until A.2, A.3 and A.5 have been worked. NOTE! The pattern will not fit in each side under sleeve but work pattern as far as possible towards each side, make sure that there is at least 1 stitch with colour off white in each side when working dots. When the pattern is done, repeat the last 8 rows in pattern (marked with x). Work as before until piece measures 25-26-27-27-28-29 cm from where the parts were put together, adjust so that a few rows without dots have been worked before rib. Now finish the piece with colour off white/off white. On next row from right side begin rib while AT THE SAME TIME increasing 39-43-47-47-59-63 stitches evenly on needle = 252-272-292-308-352-388 stitches. Switch to circular needle size 3 mm and work 1 edge stitch, work rib (= knit 2/purl 2 - remember increase) until 3 stitches remain, knit 2 and 1 edge stitch. Cast off when rib measures 6-6-6-7-7-7 cm. Jacket measures 54-56-58-60-62-64 cm. ASSEMBLY: Sew the shoulder seams. SLEEVES: Work sleeves in the round from armhole and downwards on circular needle size 4 mm. Pick up from right side 84-88-92-96-100-106 stitches along armhole – use colour off white, begin at the marker at the bottom of armhole and pick up stitches until marker in the other side. Stitches cast off in each side of body are sewn together when finish. Insert 1 marker thread at beginning of row. Insert in addition 1 marker in one of the 2 middle stitches on round (= approx. mid on top of sleeve). Marker thread mid under sleeve is used when decreasing under sleeve and marker mid on top of sleeve should be used to count where to begin pattern under sleeve. Work 1 round in stocking stitch with colour off white. Then work pattern, i.e. work A.6 around the sleeve - stitch with arrow in A.6 should fit stitch with marker mid on top of sleeve - count out towards marker thread where pattern should begin mid under sleeve (the pattern will not fit mid under sleeve). When sleeve measures 3 cm from marker on the shoulder, decrease mid under sleeve – read DECREASE TIP and decrease as follows: Decrease 2 stitches every 3-2½-2½-2-2-1½ cm 13-14-14-15-16-18 times in total = 58-60-64-66-68-70 stitches. When A.6 has been worked one time vertically, repeat the last 8 rounds (marked with x in diagram) Work until sleeve measures 42-41-41-39-36-33 cm from marker, adjust to work a few rows without dots before rib. Now finish with colour off white. Switch to double pointed needles size 3 mm and work rib (= knit 2/purl 2) while AT THE SAME TIME increasing 10-12-12-10-12-14 stitches evenly on 1st round = 68-72-76-76-80-84 stitches. When rib measures 6-6-6-7-7-7 cm cast off. DOUBLE NECK EDGE: Use circular needle size 3 mm and colour red/wine red. Begin from right side mid front and pick up approx. 120 to 136 stitches around the neck), number of stitches must be divisible by 4. Switch to colour off white. Work first row as follows from wrong side: 1 edge stitch, work rib (= purl 2, knit 2) until 3 stitches remain, purl 2 and 1 edge stitch. Continue rib back and forth like this for 9 cm. Switch to circular needle size 4 mm and cast off. RIGHT BAND: Use circular needle size 3 mm and colour off white. Begin at the bottom along opening on jacket and pick up approx. 120 to 140 stitches inside 1 edge stitch until 5 cm remain at the top on neck edge (the last 5 cm are folded in later) - number of stitches must be divisible by 4. Work rib back and forth as follows (first row is from wrong side): Work 1 edge stitch, * purl 2, knit 2 *, work from *-* until 3 stitches remain, purl 2 and 1 edge stitch. Continue rib until band measures 1½ cm. Now decrease for 6-6-6-7-7-7 BUTTONHOLES evenly – read explanation above. Cast off when band measures 3 cm. LEFT BAND: Use circular needle size 3 mm and colour off white. Begin at the top along opening on jacket, 4 cm down from cast-on edge on neck edge (the top 5 cm of neck edge are folded in later) and pick up approx. 120 to 140 stitches inside 1 edge stitch down to the end of body - number of stitches must be divisible by 4. Work the same way as right band but do not decrease for buttonholes ASSEMBLY: Sew the buttons on to the left band. Fold the rib down on inside of garment. Fasten rib to get a double neck edge. To avoid a tight neck edge that sticks out it is important to keep the seam elastic. Sew opening towards mid front together on bands with neat little stitches. Sew the opening under each sleeve. |
|||||||
Diagram explanations |
|||||||
|
|||||||
 |
|||||||
 |
|||||||
 |
|||||||
 |
|||||||
Have you finished this pattern?Tag your pictures with #dropspattern #nordicflowercardigan or submit them to the #dropsfan gallery. Do you need help with this pattern?You'll find 31 tutorial videos, a Comments/Questions area and more by visiting the pattern on garnstudio.com. © 1982-2026 DROPS Design A/S. We reserve all rights. This document, including all its sub-sections, has copyrights. Read more about what you can do with our patterns at the bottom of each pattern on our site. |
|||||||


With over 40 years in knitting and crochet design, DROPS Design offers one of the most extensive collections of free patterns on the internet - translated to 17 languages. As of today we count 325 catalogues and 12298 patterns translated into English (UK/cm). 12298
We work hard to bring you the best knitting and crochet have to offer, inspiration and advice as well as great quality yarns at incredible prices! Would you like to use our patterns for other than personal use? You can read what you are allowed to do in the Copyright text at the bottom of all our patterns. Happy crafting!
Post a comment to pattern DROPS 255-18
We would love to hear what you have to say about this pattern!
If you want to leave a question, please make sure you select the correct category in the form below, to speed up the answering process. Required fields are marked *.