
Popular categories
Looking for a yarn?


Comments / Questions (61)
![]() Lotta wrote:
Lotta wrote:
Rörigt mönster, jag gav upp och valde ett annat.
25.07.2024 - 23:10
![]() Coralie wrote:
Coralie wrote:
Correction des erreurs de calcul taille S après encolure: 12 m end en augmentant 1 maille (demi-dos) , AM 1 21 m end (manche), AM 2 21 m end en augmentant 2 m à intervalles réguliers (devant), AM 3 21 m end (manche), AM 4 13 dernières mailles en augmentant 1 maille (demi-dos) = 92 mailles.
09.07.2024 - 19:45
![]() Silvia wrote:
Silvia wrote:
Buongiorno, non riesco a capire come iniziare lo sprone con la taglia xxxl. Non capisco dove fare gli aumenti sul corpo 6 volte, mentre per le maniche un aumento a destra e uno a sinistra per 3 volte? Grazie Silvia
12.06.2024 - 17:01DROPS Design answered:
Buonasera Silvia, per gli aumenti sullo sprone deve seguire quanto riportato sotto "RAGLAN". Buon lavoro!
13.06.2024 - 22:33
![]() Lone Greve Kristensen wrote:
Lone Greve Kristensen wrote:
Når der under ‘bærestykke’ står, at der laves striber efter 13 cm fra halskant, er det så incl. halskant eller under halskanten?
08.06.2024 - 21:46DROPS Design answered:
Hei Lone. Når du har strikket den doble halskanten ferdig står det i oppskriften at arbidet skal måles herfra = arbeidet skal måles under halskanten. mvh DROPS Design
10.06.2024 - 14:00
![]() Lenny wrote:
Lenny wrote:
Can you please explain how to increase the six stitches after you divide the work for the sleeves?
27.05.2024 - 00:11DROPS Design answered:
Dear Lenny, do you mean how to cast on 6 stitches under each sleeve? Then, you can watch the following video: https://www.garnstudio.com/video.php?id=592&lang=en At the 7.04 mark you can see how they move the sleeve stitches and cast on the stitches under the sleeve. Happy knitting!
27.05.2024 - 00:51
![]() Carlotta wrote:
Carlotta wrote:
Buongiorno, sono bloccata sulla realizzazione dello sprone per la taglia M. Sono riuscita ad avere 192 maglie ma non riesco a capire le spiegazioni successive per ottenere le 280 maglie. Se aumento 15 volte ogni 2 giri solo sul corpo e 7 volte ogni 4 giri sulle maniche ottengo un raglan molto più lungo di 23 cm (ho realizzato all'avvio del lavoro il campione 10x10 cm= 17 m per 22 ferri). Bisogna aumentare in modo alternato 4 m (dietro, davanti) e 8 m (dietro, davanti e maniche)? Grazie
18.04.2024 - 09:01DROPS Design answered:
Buonasera Carlotta, deve lavorare gli aumenti in modo alternato: ogni 2 giri solo sul corpo e ogni 4 giri anche sulle maniche. Buon lavoro!
21.04.2024 - 23:13
![]() Roberta Bissonnette wrote:
Roberta Bissonnette wrote:
Instructions are terrible after you do the neck,
06.04.2024 - 04:07
![]() Carlotta wrote:
Carlotta wrote:
Salve, ho un problema per la lavorazione del raglan che mi ha portato a rifare il lavoro più volte. Quando si lavora al rovescio/diritto,oltre a lavorare i gettati del giro precedente, si devono fare ulteriori gettati ad ogni lato del marcapunto? Ho seguito il video ma questo non viene fatto, perciò alla fine ho ottenuto 112 maglie invece che 128 per taglia M. Grazie per l'aiuto!
04.04.2024 - 12:41DROPS Design answered:
Buongiorno Carlotta, gli aumenti sono dal diritto e dal rovescio del lavoro come descritto nel paragrafo della scollatura. Buon lavoro!
06.04.2024 - 09:37
![]() Dea wrote:
Dea wrote:
Per la signora Carlotta. Io per capire bene e sincerarmi del procedimento ho guardato il video che si trova nell'elenco di quelli previsti per questo modello "Come cucire un bordo del collo doppio " e anche se l'esempio è un collo a coste 1/1 il procedimento è uguale e si forma la taschina come dice lei. Buon lavoro :)
28.03.2024 - 20:51
![]() Dea wrote:
Dea wrote:
C'è un errore dove spiega come lavorare i gettati del raglan dal diritto del lavoro, prima del segnapunti. Invece di rovescio bisogna lavorarlo a diritto.
27.03.2024 - 15:34DROPS Design answered:
Buongiormo Dea, grazie per la segnalazione. Abbiamo corretto il testo. Buon lavoro!
27.03.2024 - 16:20
|
|
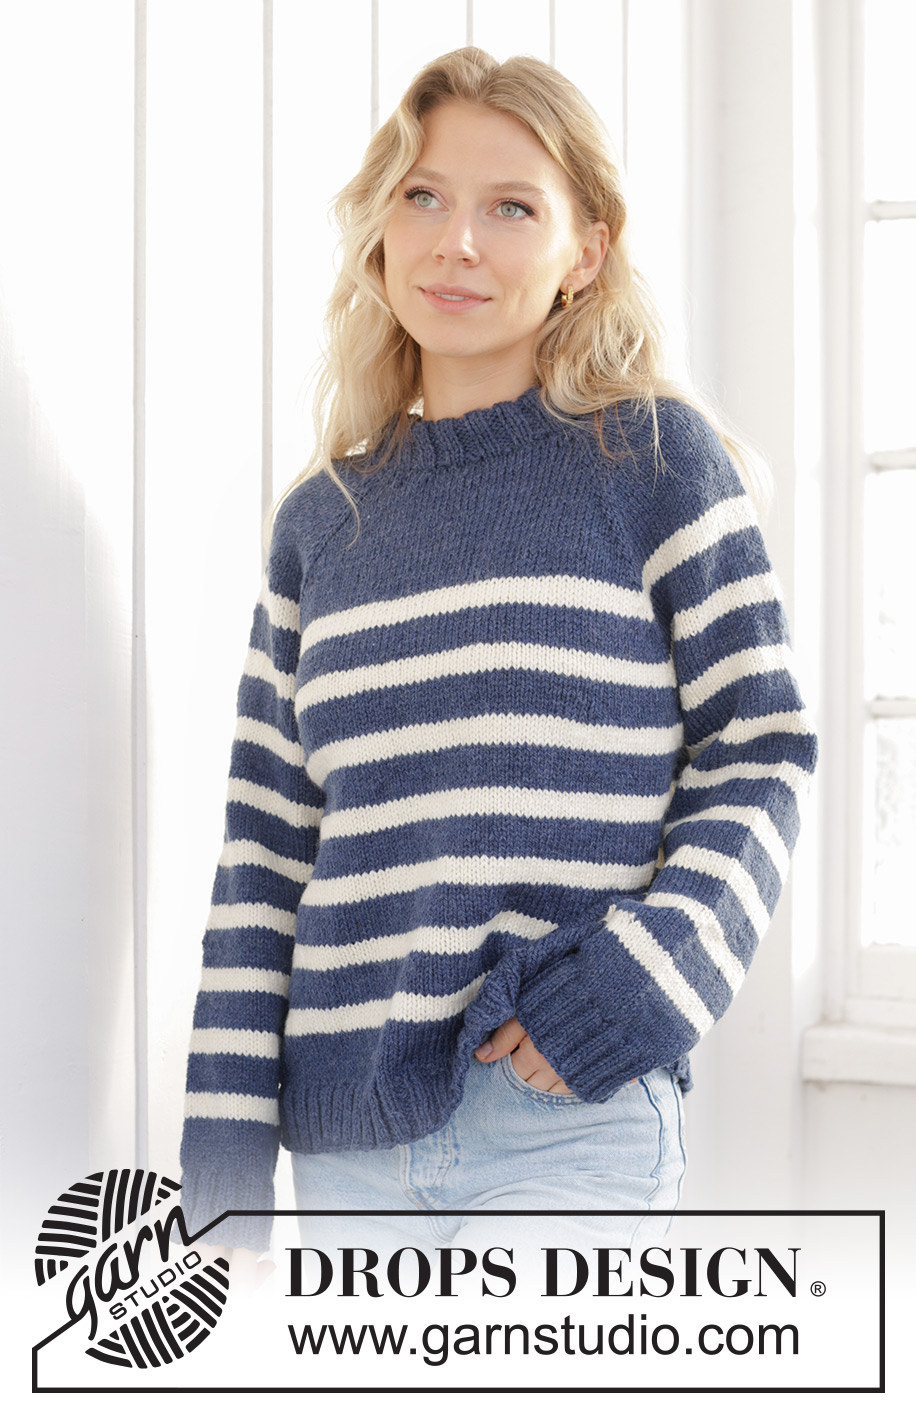
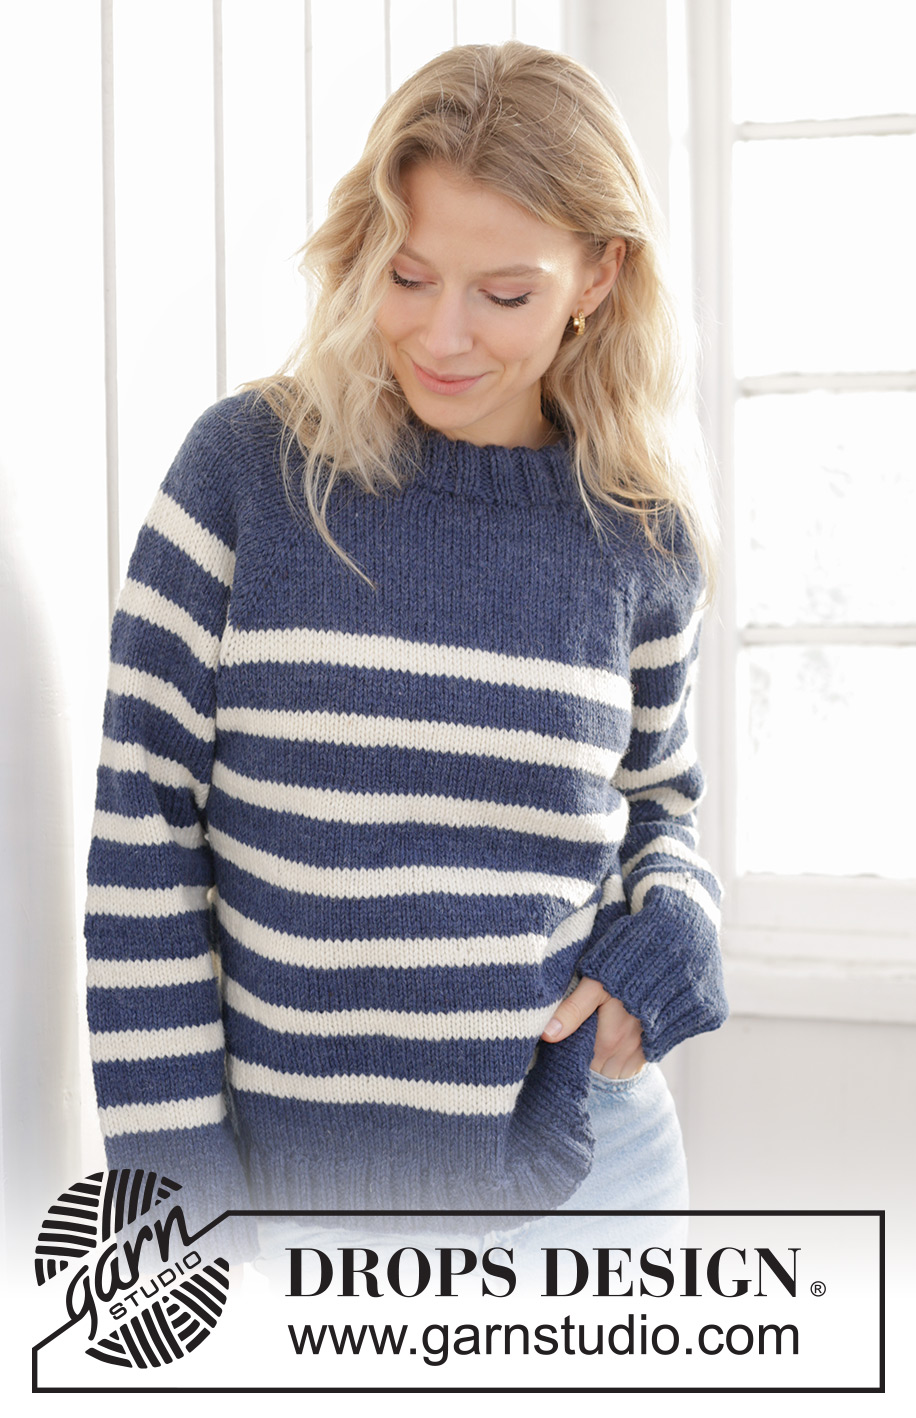
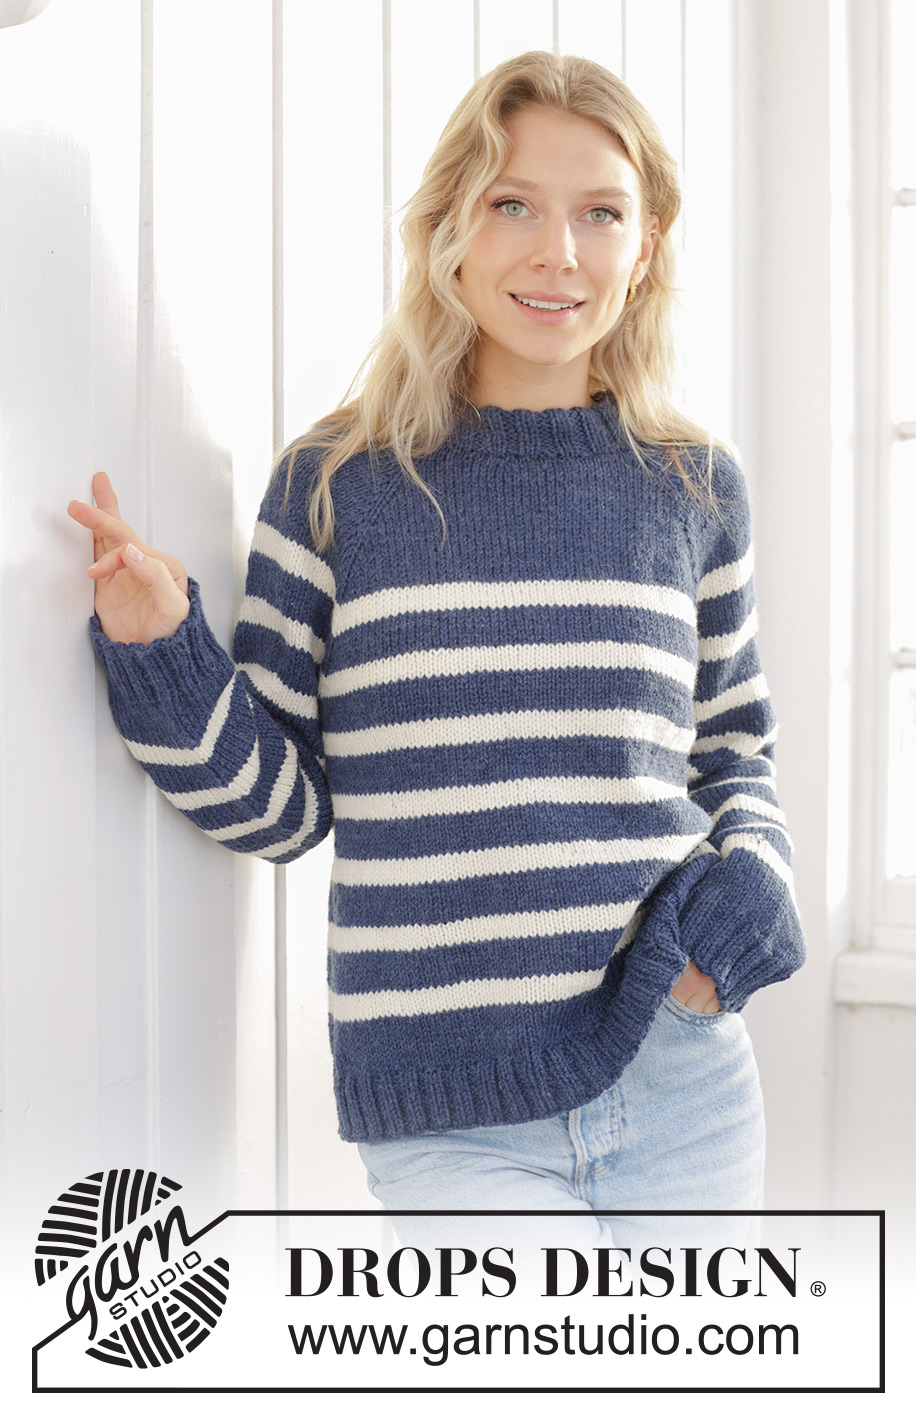
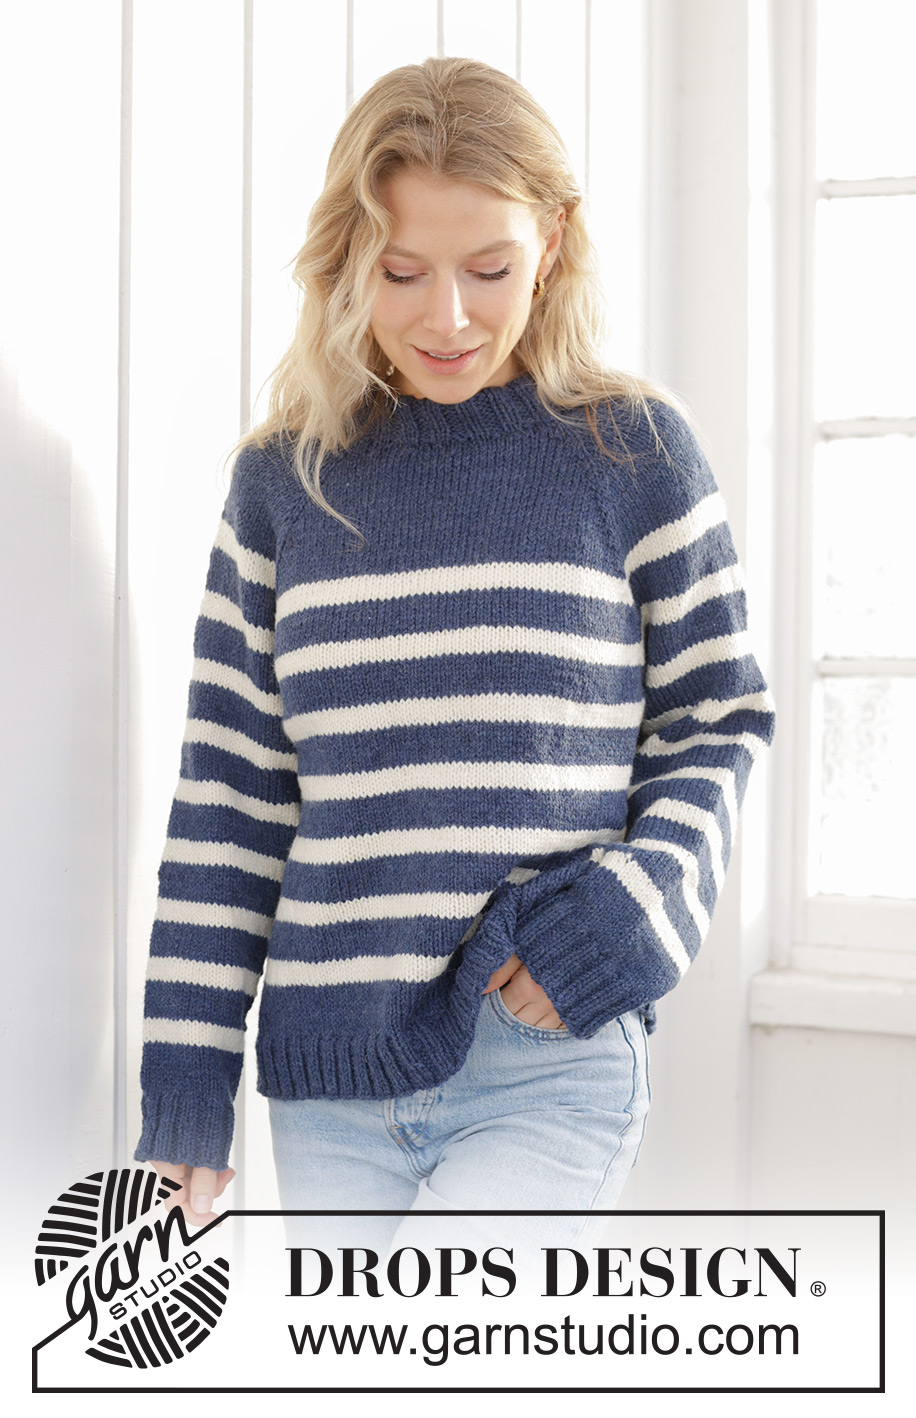
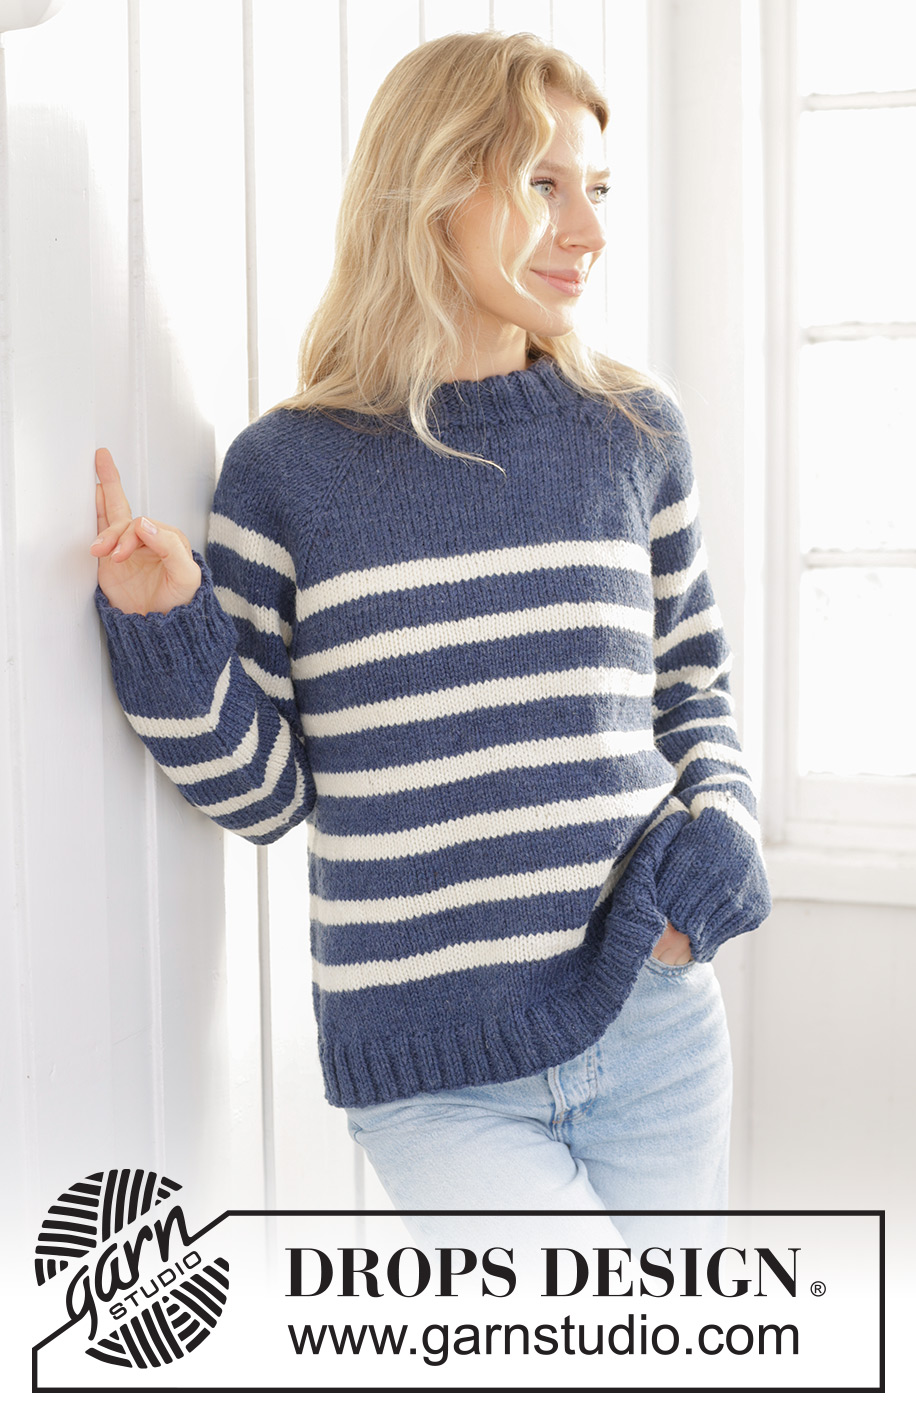
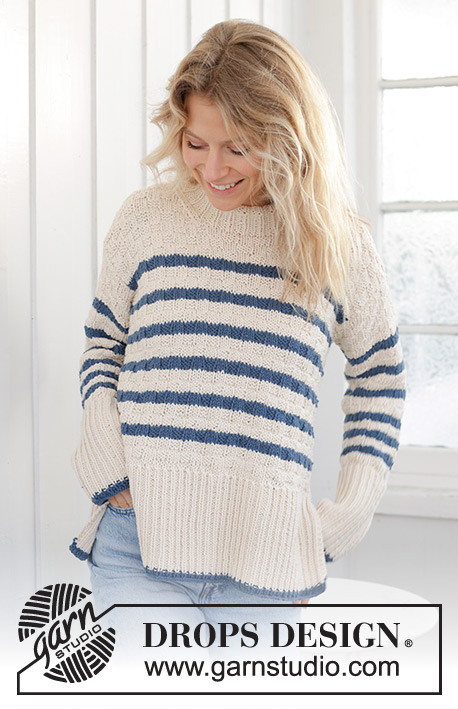
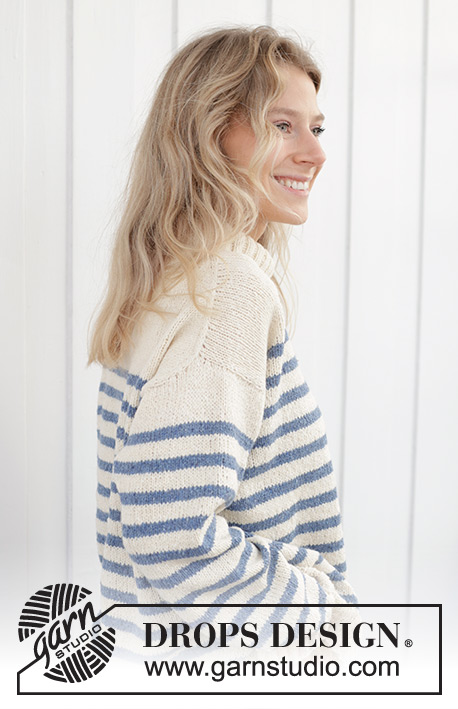
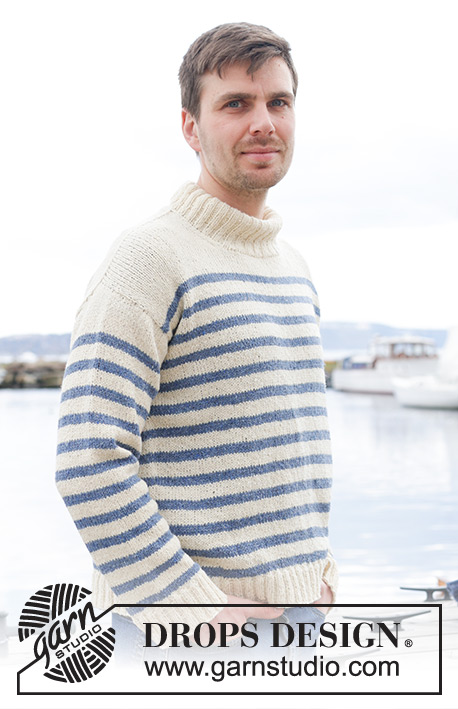
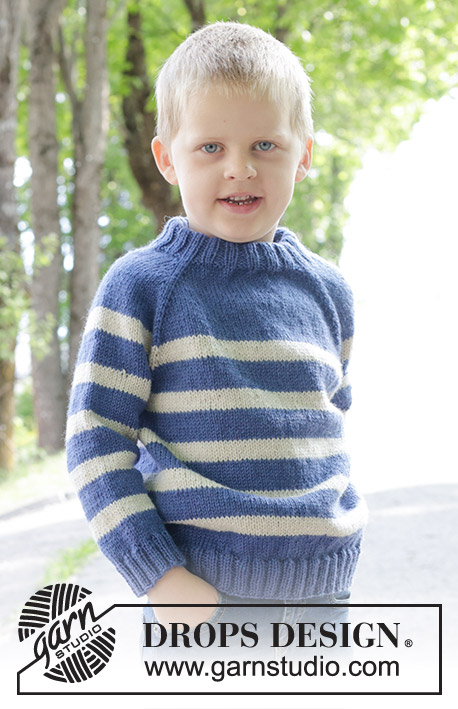
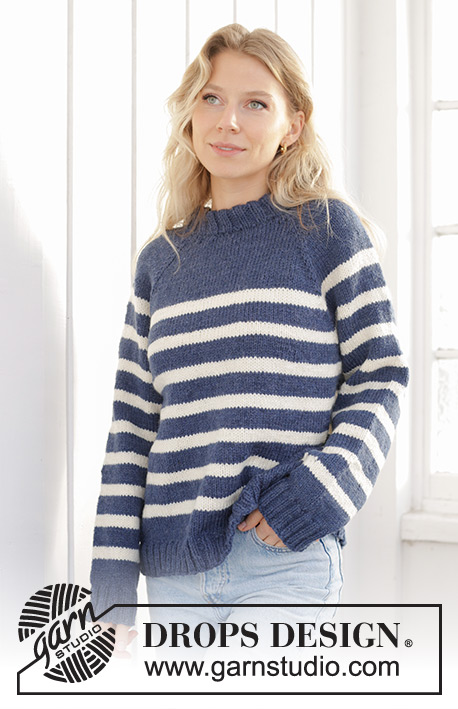
Meet the Captain#meetthecaptainsweater |
|
 |
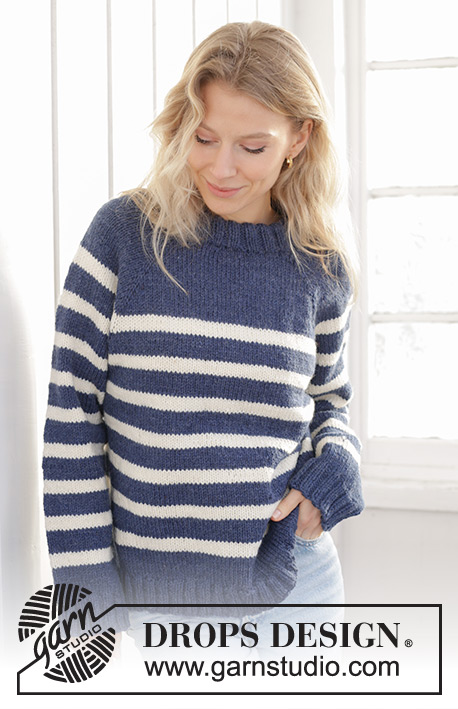 |
Knitted jumper in DROPS Alaska. The piece is worked top down with stocking stitch, stripes, double neck and raglan. Sizes S - XXXL.
DROPS 239-38 |
|
|
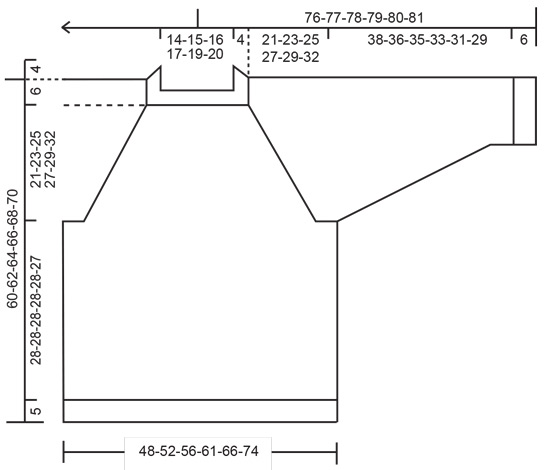
------------------------------------------------------- EXPLANATIONS FOR THE PATTERN: ------------------------------------------------------- RAGLAN: All increases are worked before/after 1 stocking stitch (marker-stitch). Increase for the body before markers 1 and 3 and after markers 2 and 4 when working from the right side; after markers 1 and 3 and before markers 2 and 4 when working from the wrong side. Increase for the sleeves after markers 1 and 3 and before markers 2 and 4 when working from the right side / after markers 2 and 4 and before markers 1 and 3 when working from wrong side Increase 1 stitch by making 1 yarn over. Yarn overs are worked as follows from the wrong side: BEFORE MARKER: Purl in back loop avoiding a hole. AFTER MARKER: Slip yarn over off the left needle and place it back the other way round (insert the left needle from the back when replacing it). Purl in front loop avoiding a hole. Yarn overs are worked as follows from the right side: BEFORE MARKER: Slip yarn over off the left needle and place it back the other way round (insert the left needle from the back when replacing it). Knit in front loop avoiding a hole (stitch leans to the right). AFTER MARKER: Knit in back loop (stitch leans to the left) to avoid a hole. STRIPES: Start at marker-1 (so the change of colours is not visible on the back piece) and work as follows: * 5 rounds of colour off white (approx. 2 cm), 8 rounds of colour dark blue (approx. 3.5 cm) *, repeat from *-*. DECREASE TIP (for sleeves): Start 3 stitches before the marker-thread, knit 2 together, knit 2 (marker-thread sits between these 2 stitches), slip 1 stitch as if to knit, knit 1 and pass the slipped stitch over the knitted stitch. ------------------------------------------------------- START THE PIECE HERE: ------------------------------------------------------- JUMPER – SHORT OVERVIEW OF THE PIECE: The neck and yoke are worked in the round with circular needle, from mid back and top down. The yoke is divided for body and sleeves and the body is continued in the round with circular needle. The sleeves are worked with short circular needle/double pointed needles. DOUBLE NECK: Cast on 88-92-96-100-104-108 stitches with colour dark blue DROPS Alaska, using short circular needles size 5 and 4 mm held together. Remove the needle size 5 mm (this gives you an elastic cast-on edge) keeping stitches on needle size 4 mm. Work rib in the round (knit 2, purl 2) for 8 cm. Fold the neck double to the inside and work 1 more round of rib, working every 4th stitch together with its corresponding stitch on the cast-on edge. You now have a double neck. The yoke is measured from here. Insert 4 markers at the same time as you increase 4 stitches on the next round as follows: Knit 10-12-12-14-14-16 and increase 1 stitch (half back piece), insert marker-1 in the next stitch, knit 21 (sleeve), insert marker-2 in the next stitch, knit 21-23-25-27-29-31 and increase 2 stitches evenly spaced (front piece), insert marker-3 in the next stitch, knit 21 (sleeve), insert marker-4 in the next stitch, knit the last 11-11-13-13-15-15 stitches and increase 1 stitch (half back piece) = 92-96-100-104-108-112 stitches. NECKLINE: Change to circular needle size 5 mm and work short rows at the back of the neck, starting mid-back: ROW 1 (right side): Knit and increase for RAGLAN – read description above, on each side of the first 2 markers (4 stitches increased), turn when you have knitted 3 stitches past marker-2. ROW 2 (wrong side): Purl and increase to raglan on each side of all markers (8 stitches increased), turn when you have purled 3 stitches past the last marker. ROW 3: Knit and increase to raglan on each side of all markers (8 stitches increased), turn when you have knitted 2 stitches after the previous turn. ROW 4: Purl and increase to raglan on each side of all markers (8 stitches increased), turn when you have purled 2 stitches after the previous turn. ROW 5: Knit and increase for raglan on each side of the first 2 markers (4 stitches increased), work to mid-back. The short rows are finished and you have increased 4 times for raglan at each marker = 124-128-132-136-140-144 stitches. YOKE: Work now yoke in the round over all stitches as explained below. SIZES S, M, L and XL: Start mid-back, work stocking stitch and increase for raglan on the body and sleeves (i.e. on each side of all 4 marker-stitches) every 2nd round 2-8-10-11 times = 140-192-212-224 stitches. AT THE SAME TIME when the yoke measures 13 cm from the neck, work STRIPES - read description above. Continue working and increasing for raglan but every 2nd increase is only on the body (4 stitches increased; i.e. increase for the body every 2nd round, for the sleeves every 4th round). Increase 18-15-14-16 times on the body (9-7-7-8 times on the sleeves). A total of 24-27-28-31 times on the body and 15-19-21-23 times on the sleeves. There are 248-280-296-320 stitches. Go to ALL SIZES. SIZES XXL and XXXL: Start mid-back, work stocking stitch and increase for raglan every round on the body 2-6 times and every 2nd round on the sleeves 1-3 times = 152-180 stitches. AT THE SAME TIME when the yoke measures 13 cm from the neck, work STRIPES - read description above. Now increase for the body and sleeves (on each side of all 4 marker-stitches) every 2nd round 10-7 times = 232-236 stitches. Continue working and increasing for raglan, but every 2nd increase is only on the body (4 stitches increased; i.e. increase for the body every 2nd round, for the sleeves every 4th round). Increase 18-22 times on the body (9-11 times on the sleeves). A total of 34-39 times on the body and 24-25 times on the sleeves. There are 340-368 stitches. Go to ALL SIZES. ALL SIZES: = 248-280-296-320-340-368 stitches. Continue with stocking stitch and stripes but without further increases until the yoke measures 21-23-25-27-29-32 cm measured from the neck mid-front. On the next round divide for the body and sleeves as follows: Work the first 37-42-43-48-51-58 stitches (half back piece), place the next 49-57-61-65-67-69 stitches on a thread for the sleeve, cast on 6-6-8-8-10-10 stitches (in side under sleeve), work 75-83-87-95-103-115 stitches (front piece), place the next 49-57-61-65-67-69 stitches on a thread for the sleeve, cast on 6-6-8-8-10-10 stitches (in side under sleeve), work the last 38-41-44-47-52-57 stitches (half back piece). BODY: = 162-178-190-206-226-250 stitches. Continue in the round with stocking stitch and stripes for a further 28-28-28-28-28-27 cm, finishing after a round of colour dark blue (there is 5 cm left to finished length and finish with colour dark blue). Knit 1 round and increase 18-22-22-26-26-34 stitches evenly spaced = 180-200-212-232-252-284 stitches. Change to circular needle size 4 mm. Work rib (knit 2, purl 2) for 5 cm. Cast off a little loosely with knit over knit and purl over purl. The jumper measures approx. 60-62-64-66-68-70 cm from the shoulder. SLEEVES: Place the 49-57-61-65-67-69 stitches from the thread on the one side of the piece on short circular needle/double pointed needles size 5 mm and knit up 1 stitch in each of the new stitches cast on under the sleeve = 55-63-69-73-77-79 stitches. Insert a marker-thread in the middle of the new stitches under the sleeve; allow it to follow your work onwards, it is used when decreasing under the sleeve. Continue in the round with stocking stitch and stripes. When the sleeve measures 4 cm decrease 2 stitches on each side of the marker-thread – read DECREASE TIP. Decrease like this every 8-4½-3-2½-2-2 cm a total of 5-8-10-11-12-12 times = 45-47-49-51-53-55 stitches. Continue working until the sleeve measures 38-36-35-33-31-29 cm from the division, finishing after a round of colour dark blue (there is approx. 6 cm left and the rest of the sleeve is worked with colour dark blue). Change to double pointed needles size 4 mm. Knit 1 round and increase 7-5-7-5-7-5 stitches evenly spaced = 52-52-56-56-60-60 stitches. Work rib (knit 2, purl 2) for 6 cm. Loosely cast off with knit over knit and purl over purl. The sleeve measures approx. 44-42-41-39-37-35 cm from the division. Work the other sleeve in the same way. |
|
 |
|
Have you finished this pattern?Tag your pictures with #dropspattern #meetthecaptainsweater or submit them to the #dropsfan gallery. Do you need help with this pattern?You'll find 32 tutorial videos, a Comments/Questions area and more by visiting the pattern on garnstudio.com. © 1982-2026 DROPS Design A/S. We reserve all rights. This document, including all its sub-sections, has copyrights. Read more about what you can do with our patterns at the bottom of each pattern on our site. |
|


With over 40 years in knitting and crochet design, DROPS Design offers one of the most extensive collections of free patterns on the internet - translated to 17 languages. As of today we count 325 catalogues and 12298 patterns translated into English (UK/cm). 12298
We work hard to bring you the best knitting and crochet have to offer, inspiration and advice as well as great quality yarns at incredible prices! Would you like to use our patterns for other than personal use? You can read what you are allowed to do in the Copyright text at the bottom of all our patterns. Happy crafting!
Post a comment to pattern DROPS 239-38
We would love to hear what you have to say about this pattern!
If you want to leave a question, please make sure you select the correct category in the form below, to speed up the answering process. Required fields are marked *.