
Popular categories
Looking for a yarn?


Comments / Questions (21)
![]() Baukje Knoet wrote:
Baukje Knoet wrote:
Ik zou hem een trui willen breien van beneden naar boven kan dat?
12.02.2025 - 17:01DROPS Design answered:
Dag Baukje,
Helaas is dit patroon alleen van boven naar beneden beschikbaar. In deze link vind je wat informatie over van boven naar beneden breien, misschien dat je hier wat aan hebt, zodat je eventueel toch dit patroon kunt gebruiken.
15.02.2025 - 10:56
![]() Alice wrote:
Alice wrote:
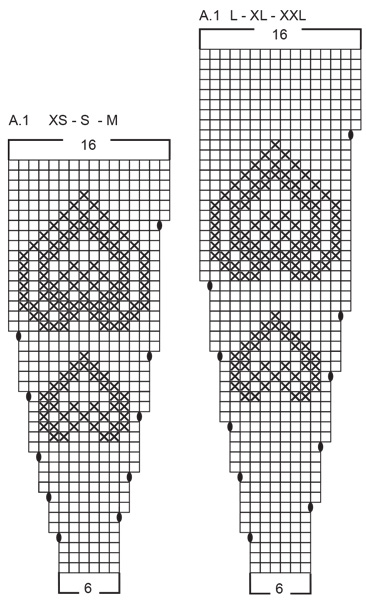
On the diagram do I start at the top or the bottom???
05.11.2024 - 00:28DROPS Design answered:
Hi Alice, you should start the diagram from the bottom and work from right to left side. Happy knitting!
05.11.2024 - 08:41
![]() Anne wrote:
Anne wrote:
På 15:e raden i diagrammet A1, i storlek L-XL ska man enligt diagrammet sticka 10 maskor, sedan en ökning, och därefter 1 maska. Om man gör så går inte diagrammet ut, dvs, den sista ökningen blir i nästa varv. I diagrammet ser det ut som att det finns 11 maskor per rapport, men i verkligheten är det bara 10. Hur gör man för att få till ökningen på 20 maskor inom rapporten?
03.04.2024 - 10:20DROPS Design answered:
Hei Anne. Ser ut som om den siste ruten i rad 15 ikke skulle ha vært der. Oppskriften er oversendt til design avd. slik at de kan ta en dobbeltsjekk/evnt komme med en rettelse. mvh DROPS Design
08.04.2024 - 12:54
![]() Sophie wrote:
Sophie wrote:
Pour la taille m au niveau du diagramme a la 12 ème ligne on fait 10 M 1 jeté et 1M. Mais a la fin cela ne tombe pas juste. Y aurait il une erreur?
30.10.2023 - 16:47DROPS Design answered:
Bonjour Sophie, au 12ème rang de A.1, taille M, vous avez 10 mailles dans chaque A.1 (les 6 mailles du départ + les 4 augmentations précédentes) et vous tricotez (9 mailles endroit, 1 jeté, 1 m endroit) et vous répétez de (à) tout le tour, vous avez désormais 11 mailles dans chaque A.1. Bon tricot!
30.10.2023 - 18:17
![]() Barbara wrote:
Barbara wrote:
Jak dodać oczka w żakardzie na okrągło, żeby nie było widoczne zwiększenie?
30.08.2023 - 10:10DROPS Design answered:
Witaj Basiu, w tym wzorze dodawanie oczek jest wykonywane w rzędach kolorem malinowym. Dodawanie oczek w schemacie żakardowym jest także wykonywane kolorem malinowym - aby dodać oczko należy wykonać 1 narzut między 2 oczkami, a w następnym okrążeniu przerobić oczko przekręcone w miejscu narzutu na prawo, aby uniknąć dziur. Pozdrawiam!
30.08.2023 - 15:04
![]() Barbara wrote:
Barbara wrote:
Jak obliczyć oczka w wykończeniu dekoltu? Musi być przejście z 88 oczek na 114 (rozm. L). Co ile zrobić zwiększenie?
06.03.2023 - 10:25DROPS Design answered:
Witaj Basiu, 88:26 = 3,3, tzn. będziesz dodawać 1 oczko na przemian co 3 i 4 oczka (mniej więcej oczywiście). Zawsze patrz w opisie DODAWANIE OCZEK (w regularnych odstępach/równomiernie) - trzeba to tylko zawsze zastosować do swojego rozmiaru. Pozdrawiamy!
06.03.2023 - 12:55
![]() Chacha wrote:
Chacha wrote:
Bonjour, il y a une erreur sur le diagramme A1 taille L.XL.XXL au rang 15 vous indiquez qu’il faut tricoter à l’endroit 10mailles, faire une augmentation, tricoter 1maille de plus à l’endroit. Puis répéter ce motif 19 fois. Ceci n’est pas possible pour retrouver le nombre de maille indiqué. Il ne faut pas tricoter 1maille après l’augmentation. Comme pour les autres augmentations du model, l’augmentation se fait en fin de motif. (10M tricotés, 1M augmenté X19).
25.09.2022 - 12:33DROPS Design answered:
Bonjour Chacha, au 15ème rang augmentez ainsi: (tricotez 10 mailles endroit, 1 jeté, 1 maille endroit) répétez de (à) tout le tour; vous augmentez 1 maille par motif comme avant, m ais effectivement, pas à la fin du motif, vous aurez ainsi 11 mailles entre chaque augmentation. Bon tricot!
26.09.2022 - 11:53
![]() De Man wrote:
De Man wrote:
Moet je de mouwen minderen of niet
21.12.2021 - 21:34DROPS Design answered:
Dag De Man,
Je mindert inderdaad midden onder de mouw vanaf 3 cm waar het werk gescheiden is. Bij de paragraaf MOUW staat aangegeven hoeveel je moet minderen in iedere maat.
23.12.2021 - 15:08
![]() Monica Gustavsson wrote:
Monica Gustavsson wrote:
Hej. Frågan är inte specifik för det här mönstret - hoppas det går bra ändå. Ser i mönstret att det finns en notering om att en uppdatering är gjord. Jag saknar/kan inte hitta den lista ni hade på er förra hemsida där alla uppdateringar kunde ses under en flik och inte endast vid varje mönster. Om den inte finns (och jag bara inte kan hitta den) önskar jag att den tas tillbaka. Adventshälsningar Monica
07.12.2021 - 02:44DROPS Design answered:
Hej Monica, tak for dit synspunkt, vi tager det med os i kommende opdateringer! God Jul :)
09.12.2021 - 09:16
![]() De Man wrote:
De Man wrote:
Volgens mij zit een fout in het patroon als je harten gebreid is heb je 336 steken dat klopt toch niet lees het patroon eens goed door
25.11.2021 - 10:04
|
||||||||||
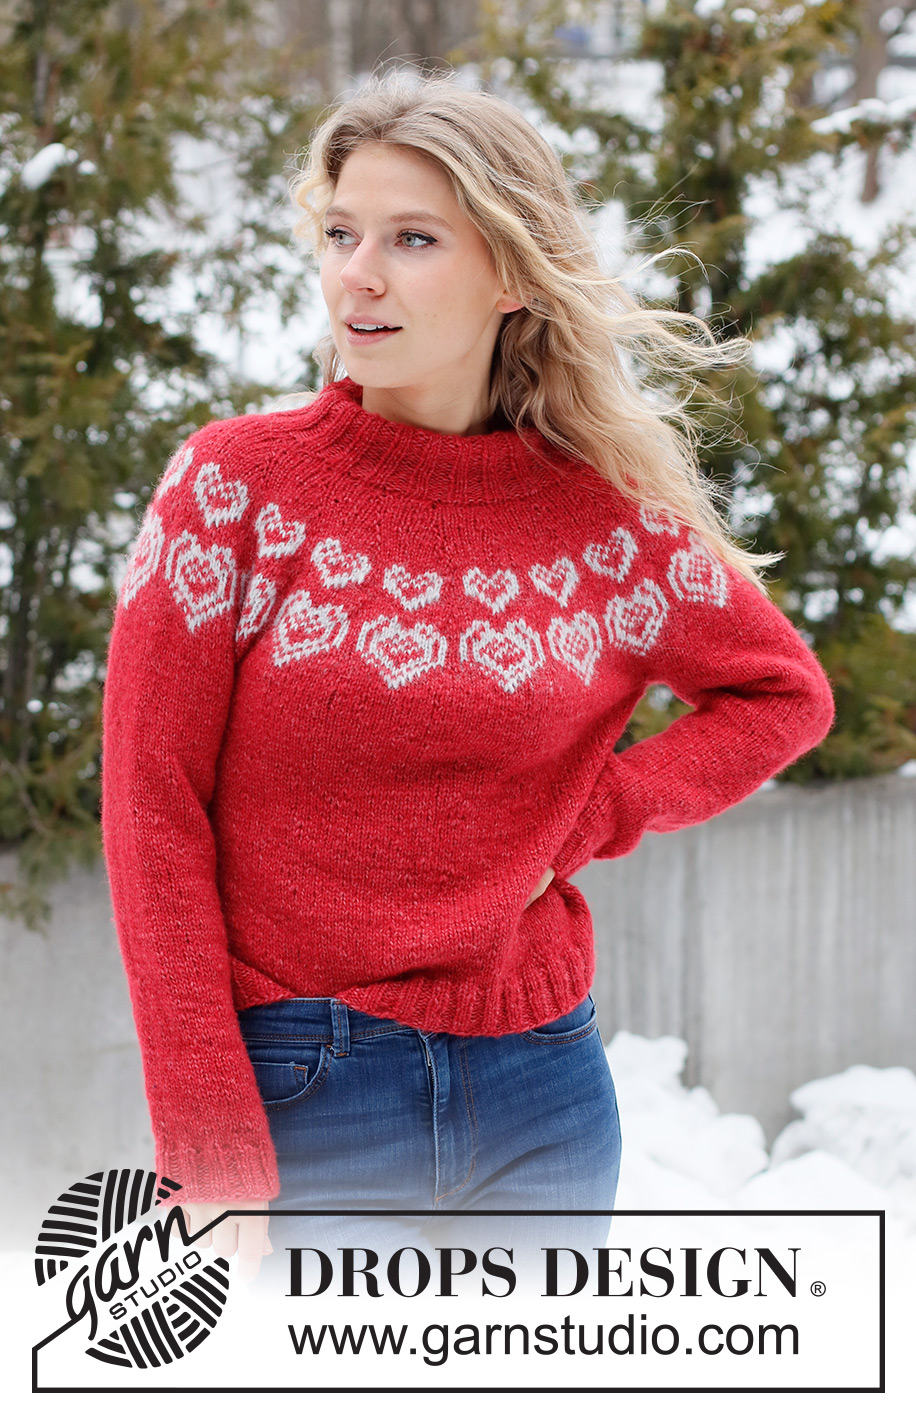
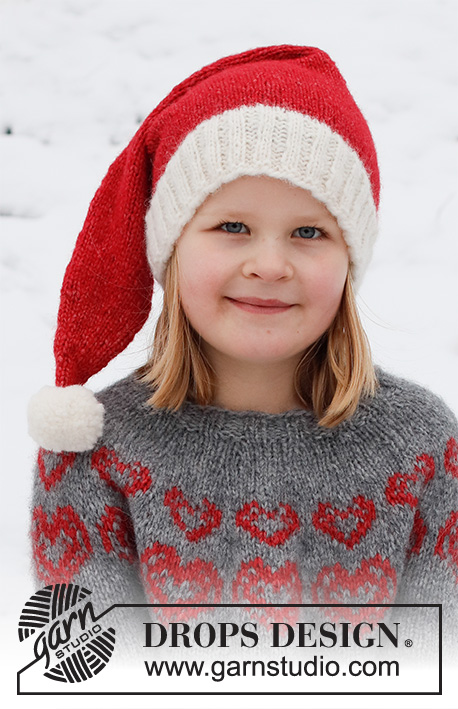
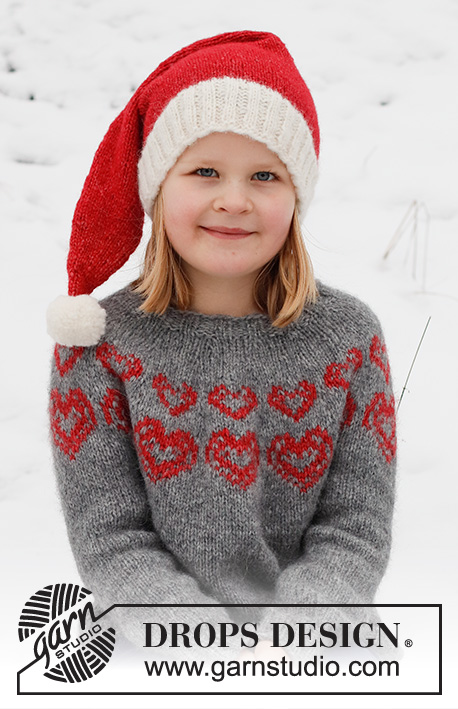
Merry Hearts#merryheartssweater |
||||||||||
 |
 |
|||||||||
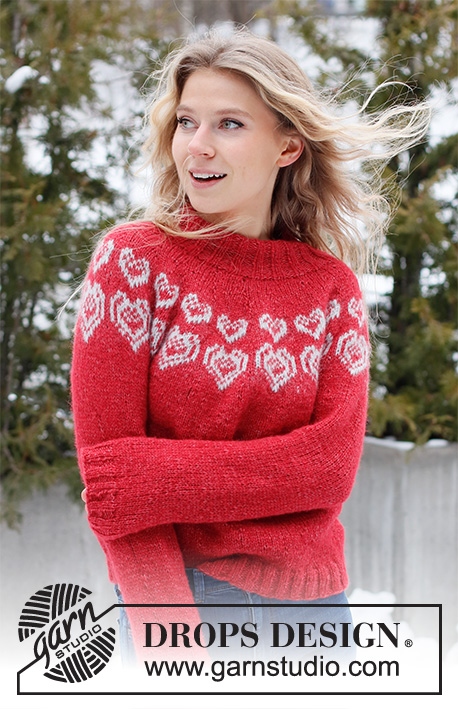
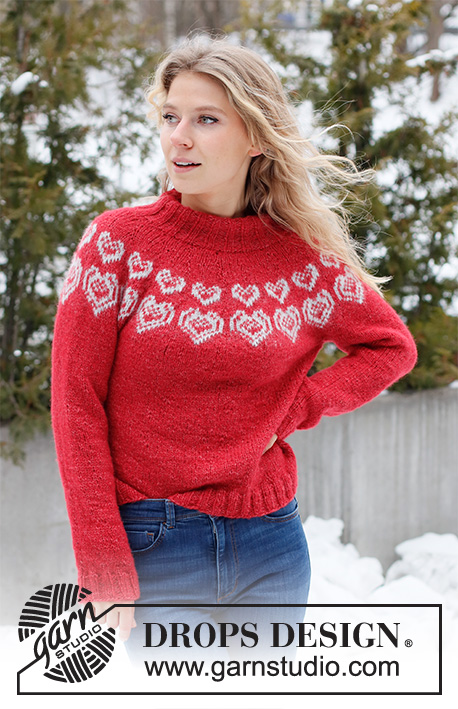
Knitted Christmas jumper in DROPS Air. Piece is knitted top down with round yoke and heart pattern. Size XS – XXL. Theme: Christmas.
DROPS 228-50 |
||||||||||
|
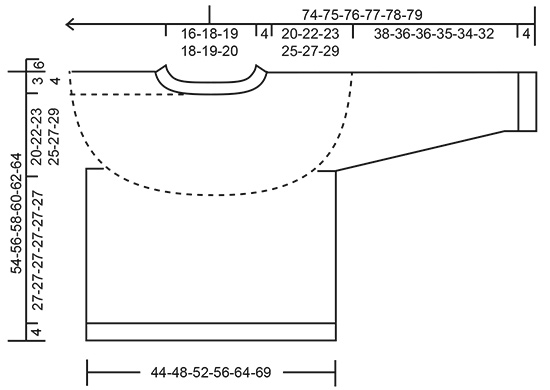
---------------------------------------------------------- EXPLANATION FOR THE PATTERN: ---------------------------------------------------------- INCREASE TIP (evenly): To calculate how to increase evenly, use the total number of stitches on row (e.g. 80 stitches) and divide stitches by number of increases to be done (e.g. 16) = 5. In this example increase by making 1 yarn over after every 5th stitch. On next round knit yarns over twisted to avoid holes. PATTERN: See diagram A.1. Choose diagram for your size. Work the entire pattern in stocking stitch. KNITTING TIP: To avoid the garment losing elasticity when working pattern, it is important not to tighten the strands on back side of piece. Switch to a higher needle number when working pattern if the pattern is somewhat tight. DECREASE TIP (applies to sleeves): Decrease 1 stitch on each side of marker thread as follows: Work until 3 stitches remain before marker thread and knit 2 together, knit 2 (marker thread is between these 2 stitches), slip 1 stitch knitwise, knit 1, pass slipped stitch over stitch worked. CAST-OFF TIP: To avoid a tight cast-off edge when casting off, you may use a larger needle. If this still is too tight make 1 yarn over after approx. every 4th stitch while casting off (cast off yarn overs as stitches). ---------------------------------------------------------- START THE PIECE HERE: ---------------------------------------------------------- JUMPER - SHORT OVERVIEW OF THE PIECE: Work neck edge and yoke in the round on circular needle from mid back, top down. Now divide yoke for body and sleeves. Work body in the round on circular needle, top down. Work sleeves in the round on double pointed needles/a short circular needle, top down. NECK EDGE: Cast on 95-100-105-110-115-120 stitches on short circular needle size 4 mm with colour raspberry in DROPS Air. Knit 1 round. Work rib (knit 2/purl 3) for 4 cm. Now decrease 1 stitch in every purl section, decrease by purling 2 together = 76-80-84-88-92-96 stitches. Continue with rib = knit 2/purl 2. Work until rib measures 12 cm in total. Continue with circular needle size 5 mm. YOKE: Insert 1 marker at beginning of round, measure yoke from this marker! Knit 1 round while increasing 8-16-18-26-28-30 stitches evenly - read INCREASE TIP = 84-96-102-114-120-126 stitches. Now work according to diagram A.1 (= 14-16-17-19-20-21 repetitions of 6 stitches). NOTE: Choose diagram for your size and read KNITTING TIP. REMEMBER THE KNITTING TENSION! When A.1 has been worked vertically, there are 224-256-272-304-320-336 stitches on round. Knit 1 round with colour raspberry while increasing 8-0-0-0-4-8 stitches evenly = 232-256-272-304-324-344 stitches. Continue in raspberry and stocking stitch until piece measures approx. 20-22-23-25-27-29 cm from marker. Now divide yoke for body and sleeves as follows: Knit 34-38-40-44-49-53 (= half back piece), slip the next 48-52-56-64-64-66 stitches on 1 thread for sleeve, cast on 6-6-8-8-10-12 new stitches on row (= in the side under sleeve), knit 68-76-80-88-98-106 (= front piece), slip the next 48-52-56-64-64-66 stitches on 1 thread for sleeve, cast on 6-6-8-8-10-12 new stitches on row (= in the side under sleeve) and knit the remaining 34-38-40-44-49-53 stitches (= half back piece). Finish body and sleeves separately. NOW MEASURE THE PIECE FROM HERE! BODY: There are now 148-164-176-192-216-236 stitches on round. Continue with stocking stitch and colour raspberry. Work until piece measures approx. 27-27-27-27-27-27 cm from division (or desired length, approx. 4 cm remain until finished measurements). Switch to circular needle size 4 mm and work rib = knit 2/purl 2 in the round. Work rib for 4 cm. Cast off loosely with knit over knit and purl over purl - read CAST-OFF TIP. Jumper measures approx. 54-56-58-60-62-64 cm from shoulder and down. SLEEVE: Slip the 48-52-56-64-64-66 stitches from thread in one side of piece on double pointed needles or a short circular needle size 5 mm and pick up 1 stitch in each of the 6-6-8-8-10-12 new stitches cast on under sleeve = 54-58-64-72-74-78 stitches. Insert 1 marker thread mid under sleeve, i.e. in the middle of the 6-6-8-8-10-12 stitches that were cast on under sleeves. Move the marker thread upwards when working; it should be used for decrease mid under sleeve. Begin round at the marker thread and work stocking stitch in the round with raspberry. When sleeve measures 3 cm from division, decrease 2 stitches mid under sleeve - read DECREASE TIP. Decrease like this every 8-6-4-3-2½-2½ cm 5-6-8-11-11-12 times in total = 44-46-48-50-52-54 stitches. Work without decreases until sleeve measures 38-36-36-35-34-32 cm from division (approx. 4 cm remain before finished measurements, try the jumper on and work to desired length). Shorter measurements in the larger sizes because of wider neck and longer yoke. Knit 1 round while increasing 4-2-4-2-4-2 stitches evenly = 48-48-52-52-56-56 stitches. Switch to double pointed needles size 4 mm. Work rib in the round = knit 2/purl 2 for 4 cm. Cast off with knit over knit and purl over purl - remember CAST-OFF TIP. Sleeve measures approx. 42-40-40-39-38-36 cm from division. Work the other sleeve the same way. ASSEMBLY: The neck edge can be folded and sewn into a double neck edge or use it as a high collar. If you want a double neck edge do the following: Fold rib at the top of neck down on inside of garment. Fasten rib to get a double neck edge. To avoid a tight neck edge that sticks out it is important to keep the seam elastic. |
||||||||||
Diagram explanations |
||||||||||
|
||||||||||
 |
||||||||||
 |
||||||||||
Have you finished this pattern?Tag your pictures with #dropspattern #merryheartssweater or submit them to the #dropsfan gallery. Do you need help with this pattern?You'll find 31 tutorial videos, a Comments/Questions area and more by visiting the pattern on garnstudio.com. © 1982-2026 DROPS Design A/S. We reserve all rights. This document, including all its sub-sections, has copyrights. Read more about what you can do with our patterns at the bottom of each pattern on our site. |
||||||||||


With over 40 years in knitting and crochet design, DROPS Design offers one of the most extensive collections of free patterns on the internet - translated to 17 languages. As of today we count 324 catalogues and 12290 patterns translated into English (UK/cm). 12290
We work hard to bring you the best knitting and crochet have to offer, inspiration and advice as well as great quality yarns at incredible prices! Would you like to use our patterns for other than personal use? You can read what you are allowed to do in the Copyright text at the bottom of all our patterns. Happy crafting!
Post a comment to pattern DROPS 228-50
We would love to hear what you have to say about this pattern!
If you want to leave a question, please make sure you select the correct category in the form below, to speed up the answering process. Required fields are marked *.