
Popular categories
Looking for a yarn?


Comments / Questions (25)
![]() Jeannette wrote:
Jeannette wrote:
Ik ben begonnen met het rugpand maar als ik het patroon volg klopt er niks van als je kijkt naar de foto. Ik denk dat er goed moet worden gekeken naar de volgorde in het patroon. Ik wil hem heel graag maken maar dan moet hij wel kloppen
26.03.2023 - 11:42
![]() Jessica wrote:
Jessica wrote:
What is the purpose of skipping chains in the beginning of each piece? As here: “Work 80-93-104 chain stitches (including 3 chain stitches to turn with) on hook size 4 mm = US 6 with Cotton Merino. Turn and work 1 double crochet in 4th chain stitch from hook (= 2 double crochets), 1 double crochet in each of the next 4-5-4 chain stitches, * skip 1 chain stitch, 1 double crochet in each of the next 5 chain stitches”.
25.08.2022 - 04:33DROPS Design answered:
Dear Jessica, most of the time the foundation chain is tighter than the rest of the piece, working more chain stitches at the beginning and then skipping chains evenly will allow to give a loose edge. If your chain stitches are as large as 1 stitch in width, you can cast on the number of sts required - just make sure your foundation chain won't be tight. Happy crocheting!
25.08.2022 - 09:42
![]() Jessica wrote:
Jessica wrote:
I’ve gone over the FAQ and the lessons but I have no idea what this means “ Work A.1 over the first 3 stitches – read CROCHET INFORMATION, repeat A.3a until 3 stitches remain (= 7-8-9 times in width), finish by working A.1 over the last 3 stitches. When A.3a has been worked, continue A.3b and then on A.3c, repeat A.1 vertically until finished measurements.”….. A.1 seems to be a stack of multiple rows and I don’t understand how it could be worked three times in one row to being with.
18.08.2022 - 22:38DROPS Design answered:
Dear Jessica, this lesson explains how to read crochet diagrams, Work A.1 over the first 3 sts means to repeat A.1 3 times (= 1 double crochet (US-English) x 3 ), then repeat 7,8 or 9 times the 20 sts in A.3, 3 sts remain on row which you work as shown in A.1 ( = 3 double crochets). Happy crocheting!
19.08.2022 - 08:59
![]() Ann wrote:
Ann wrote:
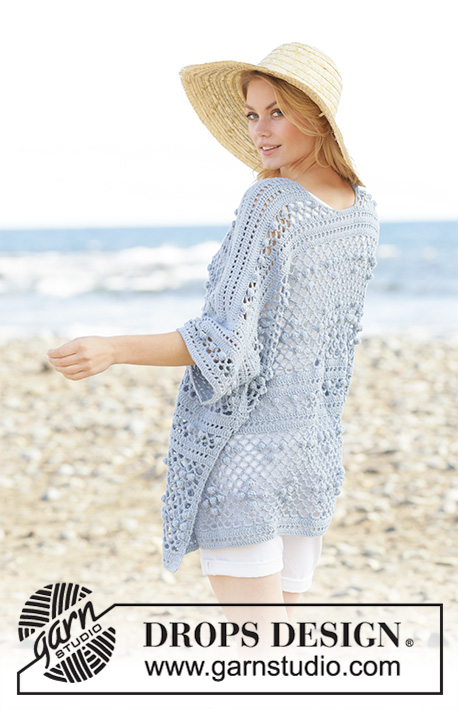
Hej Jag undrar om måtten på den vackra kofta. Modellen ser ut att drunkna i den hon har på sig… vilken storlek har hon på sig?
11.07.2022 - 12:44DROPS Design answered:
Hej Ann. Modellen har oftast storlek S eller M på sig. Det bästa är om du tar mått på ett plagg du redan har och jämför med måtten på måttskissen längst ner på mönstret och väljer den storlek som ligger närmast. Mvh DROPS Design
11.07.2022 - 14:23
![]() Sandra Langer wrote:
Sandra Langer wrote:
Leider komme ich beim Rückenteil mit dem Muster nicht hin mit 71 cm. Scheint eine andere Baumwolle zu sein auf dem Bild. Wenn ich alles gehäkelt habe sind es nur53cm.
04.07.2022 - 22:07
![]() Deb wrote:
Deb wrote:
Is this pattern written any differently?? I purchased the yarn to make this sweater but I don’t read diagrams and I don’t understand the A6… Ab and all that lingo. I just need rows and stitch instructions. Is there any help?? I can follow patterns usually but this one is difficult for me. Thank you for your help.
17.08.2021 - 22:49DROPS Design answered:
Dear Deb we usually do not give written out patterns not only because our patterns are available in several languages, but also because we believe that as opposed to written out patterns with diagrams you not only see the very next step, but the "bigger picture", how the stitches and also rows relate to each other. However, we do have a lesson on how to read knitting charts HERE, and you can always ask for help (either in person, or over the phone) in the store where youu bought your DROPS yarn from. Happy Stitching!
17.08.2021 - 23:27
![]() Andrea wrote:
Andrea wrote:
Dieses Modell finde ich sehr hübsch und möchte es gern nachhäkeln. Allerdings mag ich Noppen nicht und möchte sie womöglich vermeiden. Daher die Frage: Gibt es eine weniger plastische, also flache Alternative? Wenn ja, bin ich für einen Hinweis sehr dankbar! Die Wolle liegt schon bereit... :-)
01.07.2021 - 16:07DROPS Design answered:
Liebe Andrea, Sie können entweder gar keine Noppen stricken, oder vielleicht einfach nur 4 Stäbchen oder 4 Doppelstäbchen zusammenhäkeln (und vielleicht eben nur 1 Stb/1 DStb in A.3b z.B.) ? Am besten häkeln Sie eine Maschenprobe mit unterschiedlichen Möglichkeiten, so können Sie entscheiden. Viel Spaß beim häkeln!
01.07.2021 - 16:50
![]() Freja wrote:
Freja wrote:
Hej. På billedet af bagsiden, kan jeg se at der skal være en nedringning ved nakken. Hvordan skal den laves? Det virker som om, bagstykket bare hækles fuldkommen lige i toppen og så ender man ikke med det samme, som på billedet, hvilket jeg synes ville være meget ærgerligt. Men det kan også være, at den laves senere i opskriften?
19.06.2021 - 09:50DROPS Design answered:
Hei Freja. Her står modellen med svai i ryggen og jakken har nok glidd bakover slik at det ser ut som om det er en nedringning ved nakken. Det er ikke forklart noen nedringning bak i nakken i oppskriften. mvh DROPS design
21.06.2021 - 11:01
![]() Patrizia Locatelli wrote:
Patrizia Locatelli wrote:
Gent.mo Staff Garnstudio, grazie per la solerte risposta, ma nel modello non sono indicati gli aumenti relativi alle taglie, soprattutto per lo schema A 3 b / A 3 c. In attesa di una gentile risposta porgo cordiali saluti. Patrizia Locatelli
24.08.2019 - 21:18DROPS Design answered:
Buongiorno, il numero di maglie da diminuire è indicato nelle spiegazioni: ad esempio sulla riga indicata dal simbolo Ø-3 deve aumentare 10 maglie per la taglia S/M, mentre sulla riga indicata da Ø-4 deve aumentare 3 maglie sempre per la taglia S/M. Buon lavoro!
25.08.2019 - 11:10
![]() Patrizia Locatelli wrote:
Patrizia Locatelli wrote:
Gent.mo Staff Garnstudio, sto realizzando questo modello ma non riesco a capire se devo aumentare o diminuire nello schema A3 b e A3 c dove c’ è il simbolo corrispondente, non mi sembra ben spiegato. Ringraziando anticipatamente porgo cordiali saluti.
24.08.2019 - 00:14DROPS Design answered:
Buongiorno Patrizia. Sulle righe indicate dai simboli Ø-3 e Ø-4, aumenta ad intervalli regolari il numero di maglie indicate per la sua taglia. Per aumentare, lavora due maglie nella stessa maglia. Buon lavoro!
24.08.2019 - 15:56
|
||||||||||||||||||||||||||||||||||||||||
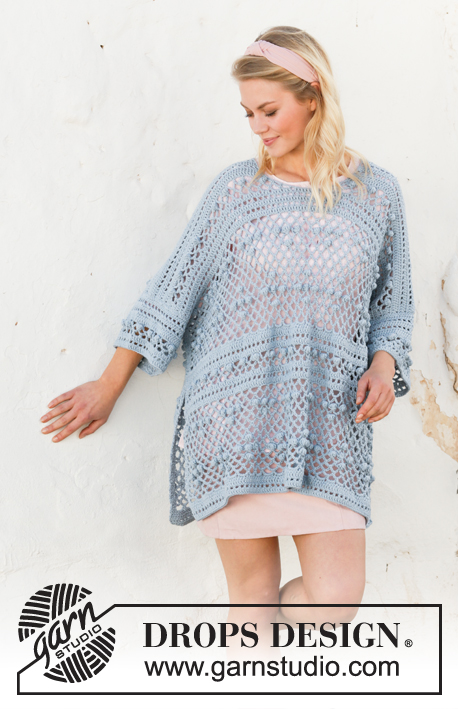
Blue Annabelle#blueannabellejacket |
||||||||||||||||||||||||||||||||||||||||
 |
 |
|||||||||||||||||||||||||||||||||||||||
Crocheted long jacket in DROPS Cotton Merino. Piece is crocheted top down with lace pattern and bobbles. Size: S - XXXL
DROPS 199-33 |
||||||||||||||||||||||||||||||||||||||||
|
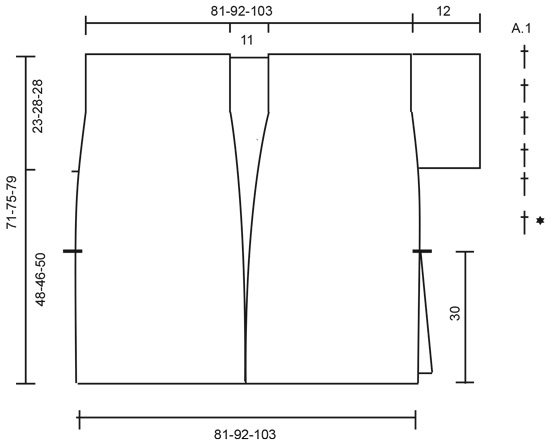
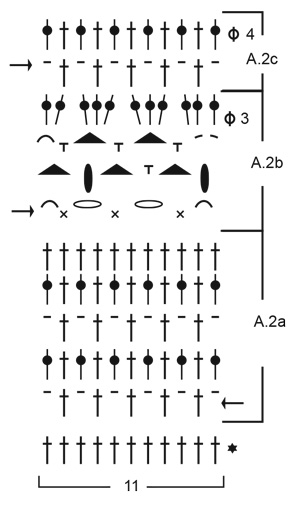
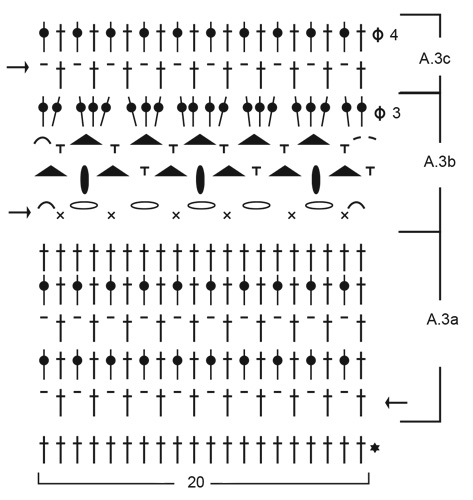
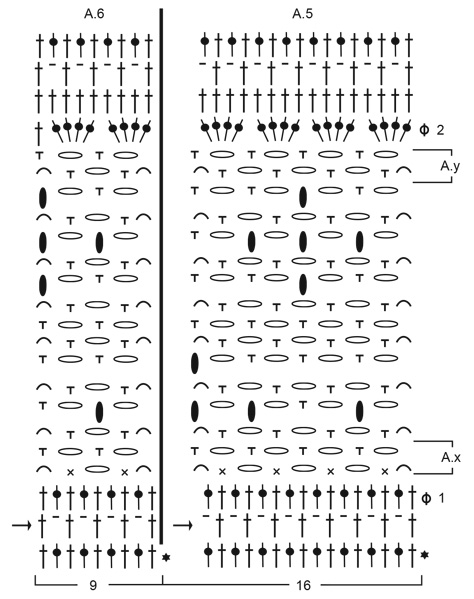
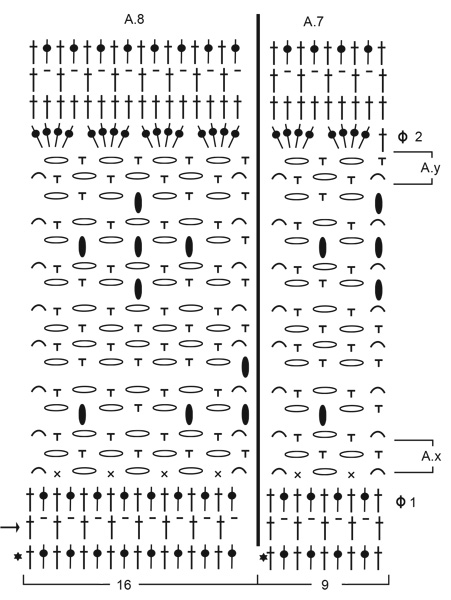
---------------------------------------------------------- EXPLANATION FOR THE PATTERN: ---------------------------------------------------------- PATTERN: See diagrams A.1 to A.8. CROCHET INFORMATION: At the beginning of every row replace first double crochet with 3 chain stitches. INCREASE/DECREASE TIP: Increase 1 stitch by working 2 double crochets in same stitch. Decrease 1 stitch by working 2 double crochets together as follows: * Make 1 yarn over, insert hook in next stitch, get yarn, make 1 yarn over and pull yarn through the 2 first loops on hook *, repeat from *-* 1 more time, make 1 yarn over and pull yarn through all 3 loops on hook. ---------------------------------------------------------- START THE PIECE HERE: ---------------------------------------------------------- JACKET - SHORT OVERVIEW OF THE PIECE: Work piece back and forth in parts, top down and sewn together when finished. Work the sleeves back and forth, top down and sew together when finished. BACK PIECE: Work 176-200-224 chain stitches (including 3 chain stitches to turn with) on hook size 4 mm = US 6 with Cotton Merino. Turn and work 1 double crochet in 4th chain stitch from hook (= 2 double crochets), 1 double crochet in each of the next 4 chain stitches, * skip 1 chain stitch, 1 double crochet in each of the next 5 chain stitches *, work from *-* the entire row = 146-166-186 double crochets. Work A.1 over the first 3 stitches – read CROCHET INFORMATION, repeat A.3a until 3 stitches remain (= 7-8-9 times in width), finish by working A.1 over the last 3 stitches. When A.3a has been worked, continue A.3b and then on A.3c, repeat A.1 vertically until finished measurements. REMEMBER THE CROCHET GAUGE! When entire A.3 has been worked, continue as follows (begin first row from wrong side): Work A.1 over the first 3 stitches, repeat A.5 until 3 stitches remain (= 9-10-11 times in width), finish with A.1 over the last 3 stitches – AT THE SAME TIME adjust number of stitches by increasing/decreasing evenly to 150-166-182 stitches on row marked with Ø-1 – read INCREASE/DECREASE TIP. When A.x has been worked vertically, repeat A.x 0-0-1 more times vertically. When A.y has been worked vertically, repeat A.y 0-0-1 more times vertically. On row marked with Ø-2 adjust number of stitches by increasing/decreasing evenly to 146-166-186 stitches. When entire A.5 has been worked, continue as follows (begin first row from wrong side): Work A.1 over the first 3 stitches, repeat A.3b until 3 stitches remain (= 7-8-9 times in width), finish with A.1 over the last 3 stitches. When entire A.3b has been worked, continue as follows (begin first row from wrong side): Work A.1 over the first 3 stitches, repeat A.5 until 3 stitches remain (= 9-10-11 times in width), finish with A.1 over the last 3 stitches – AT THE SAME TIME adjust number of stitches by increasing/decreasing evenly to 150-166-182 stitches on row marked with Ø-1. When A.x has been worked vertically, repeat A.x 0-1-1 more times vertically. When A.y has been worked vertically, repeat A.y 0-1-1 more times vertically. On row marked with Ø-2 adjust number of stitches by increasing/decreasing evenly to 146-166-186 stitches. When entire A.5 are done vertically, fasten off. Piece measures approx. 71-75-79 cm = 28"-29½"-31". RIGHT FRONT PIECE: Work 80-93-104 chain stitches (including 3 chain stitches to turn with) on hook size 4 mm = US 6 with Cotton Merino. Turn and work 1 double crochet in 4th chain stitch from hook (= 2 double crochets), 1 double crochet in each of the next 4-5-4 chain stitches, * skip 1 chain stitch, 1 double crochet in each of the next 5 chain stitches *, work from *-* the entire row = 66-77-86 double crochets. Work A.1 over the first 3 stitches – read CROCHET INFORMATION, repeat A.3a until 3-14-3 stitches remain (= 3-3-4 times in width), work A.4a (= 11 stitches) 0-1-0 times in total and finish by working A.1 over the last 3 stitches. When A.3a and A.4a have been worked, continue on A.3b and A.4b, repeat A.1 vertically until finished measurements – AT THE SAME TIME increase 10-7-6 stitches evenly on row marked with Ø-3 = 76-84-92 stitches. When A.3b and A.4b have been worked, continue on A.3c and A.4c – AT THE SAME TIME increase 3-2-3 stitches evenly on row marked with Ø-4 = 79-86-95 stitches. When entire A.3 and A.4 have been worked, continue as follows (begin first row from wrong side): Work A.1 over the first 3 stitches, repeat A.5 until 12-3-12 stitches remain (= 4-5-5 times in width), work A.6 (= 9 stitches) 1-0-1 times in total and finish with A.1 over the last 3 stitches. When A.x has been worked vertically, repeat A.x 0-0-1 more times vertically. When A.y has been worked vertically, repeat A.y 0-0-1 more times vertically. On row marked with Ø-2 adjust number of stitches by increasing/decreasing evenly to 77-86-97 stitches. When entire A.5 and A.6 have been worked, continue as follows (begin first row from wrong side): Work A.1 over the first 3 stitches, work A.4b (= over 11 stitches) 1-0-1 times in total, repeat A.3b until 3 stitches remain (= 3-3-4 times in width), finish by working A.1 over the last 3 stitches. When entire A.3b and A.4b have been worked, continue as follows (begin first row from wrong side): Work A.1 over the first 3 stitches, work A.6 (= 9 stitches) 1-0-1 times in total, repeat A.5 until 3 stitches remain (= 4-5-5 times in width), finish with A.1 over the last 3 stitches – AT THE SAME TIME adjust number of stitches by increasing/decreasing evenly to 79-86-95 stitches on row marked with Ø-1 – read INCREASE/DECREASE TIP. When A.x has been worked vertically, repeat A.x 0-1-1 more times vertically. When A.y has been worked vertically, repeat A.y 0-1-1 more times vertically. On row marked with Ø-2 adjust number of stitches by increasing/decreasing evenly to 77-86-97 stitches. When entire A.5 and A.6 are done vertically, fasten off. Piece measures approx. 71-75-79 cm = 28"-29½"-31". LEFT FRONT PIECE: Work 80-93-104 chain stitches (including 3 chain stitches to turn with) on hook size 4 mm = US 6 with Cotton Merino. Turn and work 1 double crochet in 4th chain stitch from hook (= 2 double crochets), 1 double crochet in each of the next 4-5-4 chain stitches, * skip 1 chain stitch, 1 double crochet in each of the next 5 chain stitches *, work from *-* the entire row = 66-77-86 double crochets. Work A.1 over the first 3 stitches - remember CROCHET INFORMATION, work A.2b (= 11 stitches) 0-1-0 times in total, repeat A.3a until 3 stitches remain (= 3-3-4 times in width), finish by working A.1 over the last 3 stitches. When A.2a and A.3a have been worked, continue on A.2b and A.3b, repeat A.1 vertically until finished measurements – AT THE SAME TIME increase 10-7-6 stitches evenly on row marked with Ø-3 = 76-84-92 stitches. When A.2b and A.3b have been worked, continue on A.2c and A.3c – AT THE SAME TIME increase 3-2-3 stitches evenly on row marked with Ø-4 = 79-86-95 stitches. When entire A.2 and A.3 have been worked, continue as follows (begin first row from wrong side): Work A.1 over the first 3 stitches, repeat A.8 until 12-3-12 stitches remain (= 3-3-4 times in width), work A.7 (= 9 stitches) 1-0-1 times in total and finish with A.1 over the last 3 stitches. When A.x has been worked vertically, repeat A.x 0-0-1 more times vertically. When A.y has been worked vertically, repeat A.y 0-0-1 more times vertically. On row marked with Ø-2 adjust number of stitches by increasing/decreasing evenly to 77-86-97 stitches. When entire A.7 and A.8 have been worked, continue as follows (begin first row from wrong side): Work A.1 over the first 3 stitches, repeat A.3b until 14-3-14 stitches remain (= 3-3-4 times in width), work A.2b (= over 11 stitches) 1-0-1 times in total and finish with A.1 over the last 3 stitches. When entire A.2b and A.3b have been worked, continue as follows (begin first row from wrong side): Work A.1 over the first 3 stitches, repeat A.8 until 12-3-12 stitches remain (= 4-5-5 times in width), work A.7 (= 9 stitches) 1-0-1 times in total and finish with A.1 over the last 3 stitches – AT THE SAME TIME adjust number of stitches by increasing/decreasing evenly to 79-86-95 stitches on row marked with Ø-1. When A.x has been worked vertically, repeat A.x 0-1-1 more times vertically. When A.y has been worked vertically, repeat A.y 0-1-1 more times vertically. On row marked with Ø-2 adjust number of stitches by increasing/decreasing evenly to 77-86-97 stitches. When entire A.5 and A.6 are done vertically, fasten off. Piece measures approx. 71-75-79 cm = 28"-29½"-31". SLEEVE: Work 99-123-123 chain stitches on hook size 4 mm = US 6 with Cotton Merino. Turn and work 1 double crochet in 4th chain stitch from hook (= 2 double crochets), 1 double crochet in each of the next 5-3-3 chain stitches, * skip 1 chain stitch, 1 double crochet in each of the next 5 chain stitches *, work from *-* the entire row = 82-102-102 double crochets. Work as follows (first row from right side): Work A.1 over the first stitch, repeat A.3b until 1 stitch remains (= 4-5-5 times in width), finish with A.1 over the last stitch. When A.3a has been worked, continue A.3b and then on A.3c, repeat A.1 vertically until finished measurements. When entire A.3 are done vertically, fasten off. Work the other sleeve the same way. ASSEMBLY: Sew the shoulder seams. Begin approx. 23-28-28 cm = 9"-11"-11" down from shoulder and sew side seams, leave approx. 30 cm = 11¾" at the bottom for vent. Sew underarm seams and sew in sleeves. TWINED STRING: Cut 2 lengths Cotton Merino yarn of 6 metres = 240" each. Twine the strands tog until they resist, fold the string double so that it twines again. Make a knot at each end. Place string double, thread the loop through one of the holes on front right piece (approx. 25-26-27 cm = 9¾"-10¼"-10⅝" down from shoulder). Then pull yarn ends through loops and tighten. Make another string and fasten it at the front on left front piece. |
||||||||||||||||||||||||||||||||||||||||
Diagram explanations |
||||||||||||||||||||||||||||||||||||||||
|
||||||||||||||||||||||||||||||||||||||||
 |
||||||||||||||||||||||||||||||||||||||||
 |
||||||||||||||||||||||||||||||||||||||||
 |
||||||||||||||||||||||||||||||||||||||||
 |
||||||||||||||||||||||||||||||||||||||||
 |
||||||||||||||||||||||||||||||||||||||||
 |
||||||||||||||||||||||||||||||||||||||||
Have you finished this pattern?Tag your pictures with #dropspattern #blueannabellejacket or submit them to the #dropsfan gallery. Do you need help with this pattern?You'll find 11 tutorial videos, a Comments/Questions area and more by visiting the pattern on garnstudio.com. © 1982-2026 DROPS Design A/S. We reserve all rights. This document, including all its sub-sections, has copyrights. Read more about what you can do with our patterns at the bottom of each pattern on our site. |
||||||||||||||||||||||||||||||||||||||||


With over 40 years in knitting and crochet design, DROPS Design offers one of the most extensive collections of free patterns on the internet - translated to 17 languages. As of today we count 324 catalogs and 12290 patterns - 12280 of which are translated into English (US/in).
We work hard to bring you the best knitting and crochet have to offer, inspiration and advice as well as great quality yarns at incredible prices! Would you like to use our patterns for other than personal use? You can read what you are allowed to do in the Copyright text at the bottom of all our patterns. Happy crafting!
Post a comment to pattern DROPS 199-33
We would love to hear what you have to say about this pattern!
If you want to leave a question, please make sure you select the correct category in the form below, to speed up the answering process. Required fields are marked *.