
Popular categories
Looking for a yarn?


Comments / Questions (31)
![]() Yvonne Hovland wrote:
Yvonne Hovland wrote:
Hei igjen. Fant ut av det forrige spørsmålet mitt, men nå sitter jeg fast igjen. Altså; har kommet til forstykket der jeg har strikket til arbeidet måler 42 cm (jeg strikker str. Xl). Men hva skjer etterpå? Hvis jeg følger oppskriften sitter jeg igjen med ustrikkede masker på pinnen, og der jeg skal felle en maske blir ikke i midten av arbeidet?
25.03.2018 - 07:46
![]() Yvonne Hovland wrote:
Yvonne Hovland wrote:
De 9 m i rille i begynnelsen og slutten vil jo forsvinne hvis jeg skal felle 1m for hver rettside oppover? Det stemmer vel ikke? Hva skal jeg da gjøre?
14.03.2018 - 06:49DROPS Design answered:
Hei Yvonne, Du skal bare felle 1 maske 1 gang over de rille-maskene i sidene og strikke videre med mønster til arbeidet måler 34-35-36-37-38-39 cm. Da skal du felle 3 masker på begynnelsen av neste 2 pinner også strikke videre. Håper dette hjelper og god fornøyelse!
14.03.2018 - 07:54
![]() Catherine wrote:
Catherine wrote:
Bonjour, Quand je lis que le pull se tricote en "aller-retour sur aiguilles circulaires" est-ce que cela veut dire qu'il peut se tricoter sur aiguilles droites aussi ? Merci. Le modèle est très joli mais je ne sais pas encore tricoter en rond. Catherine.
14.02.2018 - 07:57DROPS Design answered:
Bonjour Catherine, c'est exact, on utilise ici des aiguilles circulaires pour tricoter en allers et retours (et non en rond) pour avoir suffisamment de place pour y loger toutes les mailles. Vous pouvez tricoter sur aiguilles droites, pensez juste à bien vérifier votre tension, les mailles seront plus serrées. N'hésitez pas à consulter nos vidéos pour savoir comment faire. Bon tricot!
14.02.2018 - 09:01
![]() Asia wrote:
Asia wrote:
Går det fint å strikke denne rundt?
03.02.2018 - 09:32DROPS Design answered:
Hej Asia, du er velkommen til at strikke den rundt, men vi har dog ikke mulighed for at ändre i opskriften. God fornöjelse !
12.02.2018 - 15:55
![]() Germana wrote:
Germana wrote:
Salve non riesco a capire come lavorare il ferro sul dietro al punto di quando misura49 cm .....lavorare2 coste sulle 13 maglie centrali....mi sono persa quali sono le2 coste? Grazieeee
02.02.2018 - 21:48DROPS Design answered:
Buonasera Germana. Abbiamo aggiunto le indicazioni mancanti all'inizio delle spiegazioni. Sulle 13 maglie deve lavorare 2 coste a legaccio, quindi quattro ferri a diritto. Buon lavoro!
02.02.2018 - 22:54Silvana Carotenuto wrote:
Vorrei essere aiutata a realizzare il capo
23.01.2018 - 15:58Silvana Carotenuto wrote:
Sono italiana e non so lavorare con i ferri circolari il modello è realizzabile anche a ferri normali o lunghi? potete aiutarmi?
23.01.2018 - 15:53DROPS Design answered:
Buongiorno Silvana. Il capo viene lavorato avanti e indietro sui ferri, in parti separate e cucite alla fine. Può lavorare con i ferri dritti al posto dei ferri circolari e seguire le spiegazioni così come riportate. Buon lavoro!
23.01.2018 - 15:57
![]() Cécile wrote:
Cécile wrote:
J'adore ce modèle et cette couleur, quand le modèle sera t-il disponible ? Merci et meilleurs voeux
03.01.2018 - 11:25
![]() Kjersti Stenstad wrote:
Kjersti Stenstad wrote:
For oss som er medlemmer og daglige bruker av Ravelery, og som følger litt med på strikkemote, er dette skremmende Gannigenserene, og resten av kolleksjonen 2018 er veldig likt mye som allerde ligger ute ferdig desigenet.
19.12.2017 - 15:26
![]() VU Anna wrote:
VU Anna wrote:
J'adore ce modèle qui est très séduisant. Pourriez-vous m'indiquer combien de pelotes il nécessite pour que je puisse commander la laine dès maintenant, car Drops air est en promotion actuellement. Merci.
14.12.2017 - 10:14
|
||||||||||
Spring Peach#springpeachsweater |
||||||||||
 |
 |
|||||||||
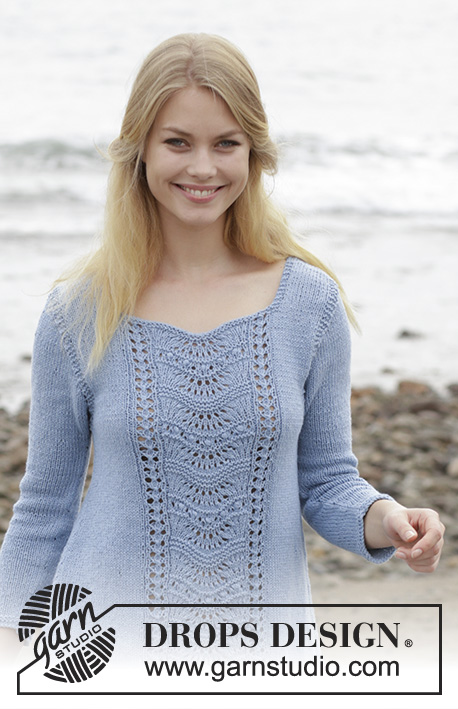
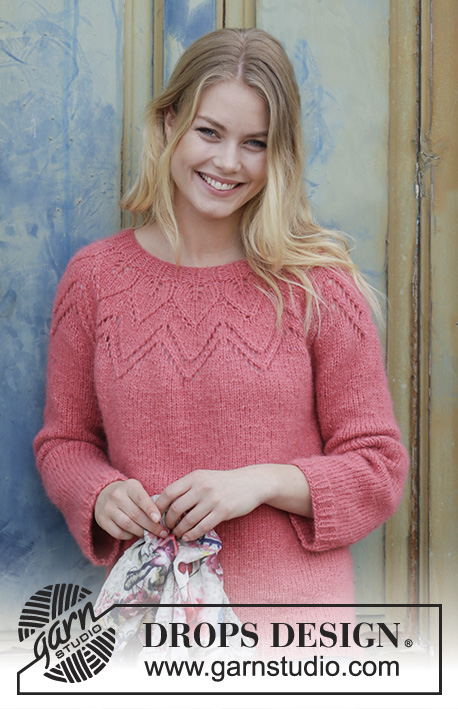
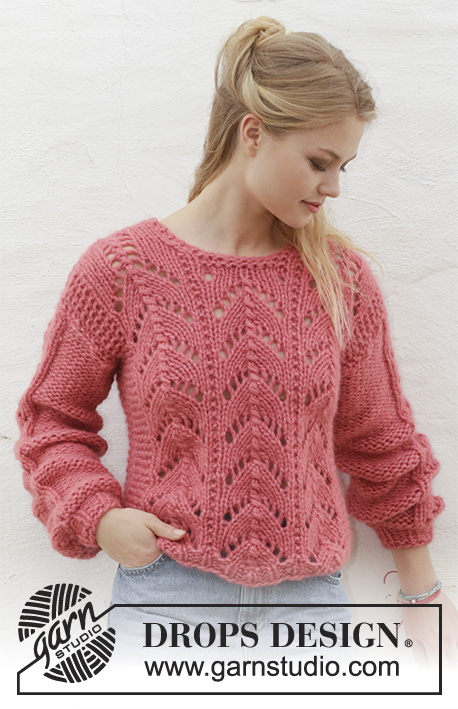
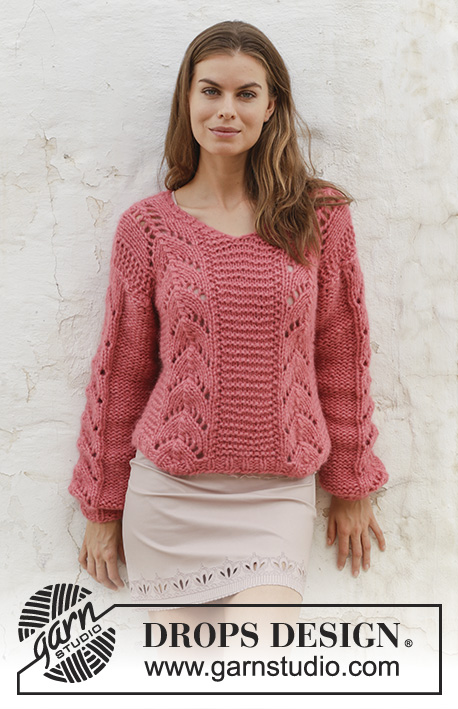
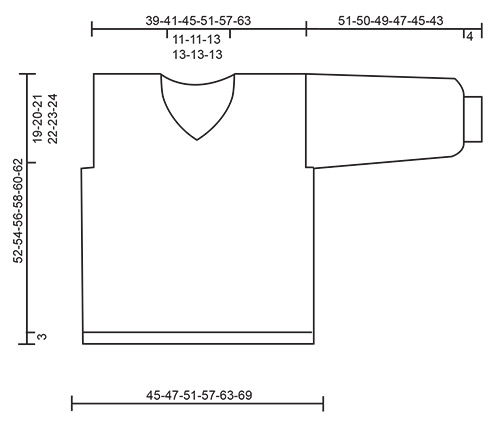
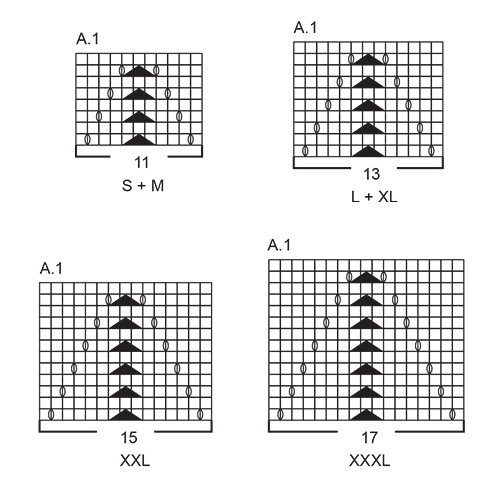
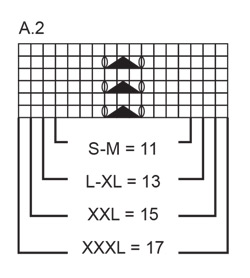
Knitted sweater with V-neck and lace pattern. Sizes S - XXXL. The piece is worked in 2 strands DROPS Air.
DROPS 186-9 |
||||||||||
|
INFORMATION FOR THE PATTERN: RIDGE/GARTER STITCH (worked back and forth): 1 ridge = Knit 2 rows. PATTERN: See diagrams A.1 and A.2. Choose diagram for your size. The diagrams show all the rows in the pattern from the right side. DECREASE TIP (for neck): Decrease for neck inside the 2 edge stitches in garter stitch. All decreases are worked from the right side! Decrease as follows after the 2 edge stitches: Slip 1 stitch as if to knit, knit 1, pass the slipped stitch over the knitted stitch. Decrease as follows before the 2 edge stitches: Knit 2 together. INCREASE TIP (for sleeve): Increase 1 stitch inside 1 edge stitch in garter stitch by making 1 yarn over. On next row work the yarn over twisted to avoid a hole. ---------------------------------------------------------- SWEATER: The piece is worked back and forth with circular needle. Front and back pieces are worked separately. The sleeves are worked back and forth with circular needle. BACK PIECE: Cast on 47-47-53-59-65-71 stitches with circular needle size 8 mm / US 11 and 2 strands Air. Purl 1 row from the wrong side. Then work 4 rows rib (= knit 1 / purl 2) with 1 edge stitch in GARTER STITCH - see description above, in each side. Change to circular needle size 9 mm / US 13. On next row decrease as follows - from the right side: Work 6-6-6-9-9-9 stitches in garter stitch - and decrease 1-0-1-1-1-1 stitches over these stitches, A.1 (= 11-11-13-13-15-17 stitches), purl 1 stitch from right side (purl from wrong side), 11-11-13-13-15-17 stitches in garter stitch, purl 1 stitch from right side (purl from wrong side), work A.1 (= 11-11-13-13-15-17 stitches), 6-6-6-9-9-9 stitches in garter stitch - and decrease 1-0-1-1-1-1 stitches over these stitches = 45-47-51-57-63-69 stitches. Continue the pattern like this - REMEMBER THE GAUGE! When the piece measures 34-35-36-37-38-39 cm / 13⅜"-13¾"-14¼"-14½"-15"-15¼" (measure along the one stitch in garter stitch in the side of A.1) bind off 3 stitches at the beginning of the next 2 rows = 39-41-45-51-57-63 stitches. When the piece measures approx. 42-44-46-47-49-51 cm / 16½"-17¼"-18"-18½"-19¼"-20" - adjust so that you have worked the last row in the diagram, work A.2 (= 11-11-13-13-15-17 stitches) over A.1 to finished length. AT THE SAME TIME when the piece measures 49-51-53-55-57-59 cm / 19¼"-20"-21"-21⅝"-22½"-23¼", work 2 ridges over the middle 13-13-15-15-15-15 stitches on the row; the other stitches are continued as before. On the first row from the right side after the 2 ridges, bind off the middle 9-9-11-11-11-11 stitches for neck. Place the 15-16-17-20-23-26 stitches on the right side of the needle (seen from the right side) on 1 thread or leave them un-worked on a needle. Continue back and forth over the remaining 15-16-17-20-23-26 stitches with pattern and 2 edge stitches in garter stitch towards the neck - AT THE SAME TIME on the next row from the right side decrease 1 stitch for neck - read DECREASE TIP = 14-15-16-19-22-25 stitches on needle. Continue working until the piece measures 52-54-56-58-60-62 cm / 20½"-21¼"-22"-22¾"-23⅝"-24⅜". Then loosely bind off. Work the other shoulder in the same way. FRONT PIECE: Cast on and work in the same way as for the back piece until the piece measures 37-39-40-42-43-45 cm / 14½"-15¼"-15¾"-16½"-17"-17¾". The next row from the right side is worked as follows: Work 19-20-22-25-28-31 stitches as before, knit 2 stitches, pass stitch 1 over stitch 2 of these 2 stitches (= 1 stitch decreased mid front), work 18-19-21-24-27-30 stitches as before. Place the 19-20-22-25-28-31 stitches on the right side of the piece (seen from the right side) on 1 thread or leave them un-worked on a needle. Now decrease for V-neck and change diagram at the same time as follows: Continue back and forth with pattern over the remaining 19-20-22-25-28-31 stitches as before, with 2 stitches garter stitch towards mid front - when you have worked 1 row after the division and the next row is from the right side, decrease for V-neck from mid front - remember DECREASE TIP. Decrease in this way every 2nd row a total of 4-4-5-5-5-5 times, then every 4th row 1 time = 14-15-16-19-22-25 stitches on row - AT THE SAME TIME when the piece measures approx. 42-44-46-47-49-51 cm / 16½"-17¼"-18"-18½"-19¼"-20" - adjust so that you have worked the last row in the diagram, work A.2 (= 11-11-13-13-15-17 stitches) over A.1 to finished length. Continue working until the piece measures 52-54-56-58-60-62 cm / 20½"-21¼"-22"-22¾"-23⅝"-24⅜". Then loosely bind off. Continue working over the stitches on the right side of the piece in the same way as the left side, but reversed; i.e. the first row is worked as follows from the wrong side: Place the bind-off stitch mid front on the left needle and knit it together with the next stitch on the left needle (this is done to avoid a "jump" at the bottom of the V-neck), work the other stitches as before - when you have worked 1 row after the division and the next row is from the right side, decrease for V-neck as for the left side. A.1 changes to A.2 as in the left side. SLEEVE: Cast on 17-17-20-20-20-23 stitches (including edge stitch in each side) with circular needle size 8 mm / US 11 and 2 strands Air. Purl 1 row from the wrong side. Then work 6 rows rib (= knit 1 / purl 2) with 1 edge stitch in garter stitch in each side. Change to circular needle size 9 mm / US 13. The next row is worked as follows - from the right side: Work 1 edge stitch in garter stitch, * knit 1, 1 yarn over *, work from *-* until there are 2 stitches left, knit 1 stitch and work 1 edge stitch in garter stitch = 31-31-37-37-37-43 stitches (on the next row, work the yarn overs twisted to avoid holes). Knit 1 row from the wrong side where you increase 2-4-0-2-4-0 stitches evenly on row = 33-35-37-39-41-43 stitches. The next row is worked as follows - from the right side: 1 edge stitch in garter stitch, purl 10-11-11-12-12-12 (knit from wrong side), A.1 (= 11-11-13-13-15-17 stitches), purl 10-11-11-12-12-12 stitches (knit from wrong side) and 1 edge stitch in garter stitch. Continue the pattern like this. When the piece measures 14 cm / 5½" increase 1 stitch in each side - read INCREASE TIP (= 2 stitches increased). Increase like this every 16-16-15-14-13-12 cm / 6¼"-6¼"-6"-5½"-5"-4¾" a total of 3 times = 39-41-43-45-47-49 stitches. Continue working until piece measures 51-50-49-47-45-43 cm / 20"-19¾"-19¼"-18½"-17¾"-17" (shorter measurements in larger sizes due to broader shoulders). Then loosely bind off. Work the other sleeve in the same way. ASSEMBLY: Sew shoulder seams inside the bind-off edge – make sure the seam is not tight. Sew the side seams in the outermost loop of the outermost stitch. Sew in the sleeves – sew the 2 cm on each side of sleeve so that it fits into the armhole, then sew the sleeve seams inside the 1 edge stitch |
||||||||||
Diagram explanations |
||||||||||
|
||||||||||
 |
||||||||||
 |
||||||||||
 |
||||||||||
Have you finished this pattern?Tag your pictures with #dropspattern #springpeachsweater or submit them to the #dropsfan gallery. Do you need help with this pattern?You'll find 25 tutorial videos, a Comments/Questions area and more by visiting the pattern on garnstudio.com. © 1982-2026 DROPS Design A/S. We reserve all rights. This document, including all its sub-sections, has copyrights. Read more about what you can do with our patterns at the bottom of each pattern on our site. |
||||||||||


With over 40 years in knitting and crochet design, DROPS Design offers one of the most extensive collections of free patterns on the internet - translated to 17 languages. As of today we count 324 catalogs and 12245 patterns - 12235 of which are translated into English (US/in).
We work hard to bring you the best knitting and crochet have to offer, inspiration and advice as well as great quality yarns at incredible prices! Would you like to use our patterns for other than personal use? You can read what you are allowed to do in the Copyright text at the bottom of all our patterns. Happy crafting!
Post a comment to pattern DROPS 186-9
We would love to hear what you have to say about this pattern!
If you want to leave a question, please make sure you select the correct category in the form below, to speed up the answering process. Required fields are marked *.