DROPS Air
DROPS Air
65% Alpaca, 28% Polyamide, 7% Wool
from 6.45 $ /50g
Get the yarn to make this pattern from 38.70$.

The yarn cost is calculated from the pattern’s smallest size and the yarn’s cheapest product type. Looking for an even better price? You might find it on the DROPS Deals!

DROPS SS24

Spring Peach

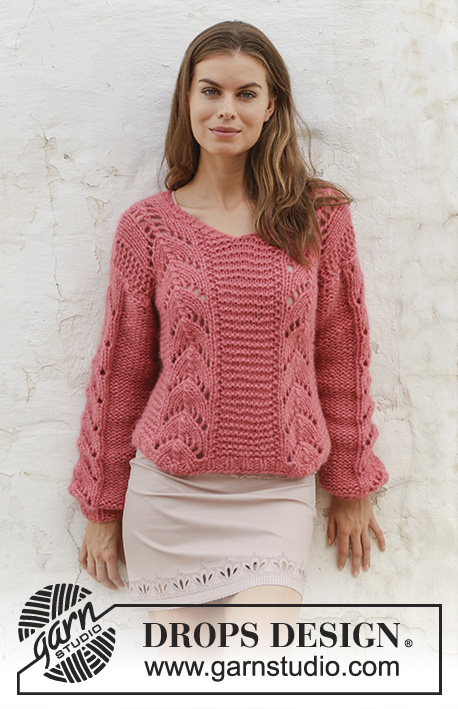
Knitted sweater with V-neck and lace pattern. Sizes S - XXXL. The piece is worked in 2 strands DROPS Air.

DROPS 186-9
DROPS Design: Pattern no ai-102
Yarn group C + C or E
-----------------------------------------------------------
Sizes: S - M - L - XL - XXL - XXXL
Materials:
DROPS AIR from Garnstudio (belongs to yarn group C)
300-350-400-400-450-500 g color 20, rose

The piece can also be knitted with yarn from:
"Alternative yarn (Yarn group C)" – see link below.

DROPS CIRCULAR NEEDLE (80 cm / 32") SIZE 9 mm/US 13 – or the size needed to get 10 stitches and 14 rows stockinette stitch with 2 strands on 10 cm / 4" in width and 10 cm / 4" in height.

DROPS CIRCULAR NEEDLE (80 cm / 32") size 8 mm / US 11 for rib - or the size needed to get 11 stitches and 15 rows stockinette stitch with 2 strands on 10 cm / 4" in width and 10 cm / 4" in height.

-------------------------------------------------------

Alternative Yarn – See how to change yarns here
Yarn Groups A to F – Use the same pattern and change the yarn here
Yarn usage using an alternative yarn – Use our yarn converter here

-------------------------------------------------------

DROPS Air
DROPS Air
65% Alpaca, 28% Polyamide, 7% Wool
from 6.45 $ /50g
Get the yarn to make this pattern from 38.70$.

The yarn cost is calculated from the pattern’s smallest size and the yarn’s cheapest product type. Looking for an even better price? You might find it on the DROPS Deals!

Pattern instructions

NOTE: This pattern is written in American English. All measurements in charts are in cm. For conversion from inches to cm - click here. There are different terms for crocheting in American and British English. If this pattern includes crochet, click for "crochet terms" here. For this pattern in British English, please click here.
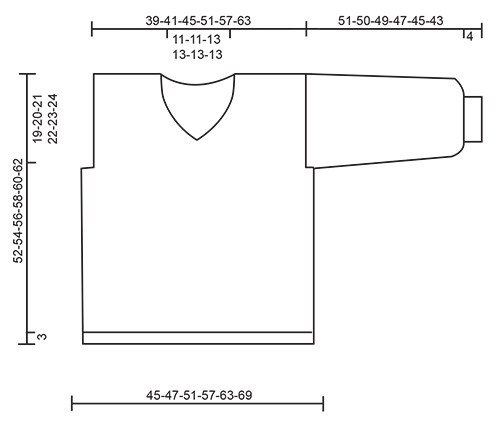
INFORMATION FOR THE PATTERN:

RIDGE/GARTER STITCH (worked back and forth):
1 ridge = Knit 2 rows.

PATTERN:
See diagrams A.1 and A.2. Choose diagram for your size.
The diagrams show all the rows in the pattern from the right side.

DECREASE TIP (for neck):
Decrease for neck inside the 2 edge stitches in garter stitch. All decreases are worked from the right side!
Decrease as follows after the 2 edge stitches: Slip 1 stitch as if to knit, knit 1, pass the slipped stitch over the knitted stitch.
Decrease as follows before the 2 edge stitches: Knit 2 together.

INCREASE TIP (for sleeve):
Increase 1 stitch inside 1 edge stitch in garter stitch by making 1 yarn over. On next row work the yarn over twisted to avoid a hole.
----------------------------------------------------------

SWEATER:
The piece is worked back and forth with circular needle. Front and back pieces are worked separately. The sleeves are worked back and forth with circular needle.

BACK PIECE:
Cast on 47-47-53-59-65-71 stitches with circular needle size 8 mm / US 11 and 2 strands Air. Purl 1 row from the wrong side. Then work 4 rows rib (= knit 1 / purl 2) with 1 edge stitch in GARTER STITCH - see description above, in each side. Change to circular needle size 9 mm / US 13. On next row decrease as follows - from the right side: Work 6-6-6-9-9-9 stitches in garter stitch - and decrease 1-0-1-1-1-1 stitches over these stitches, A.1 (= 11-11-13-13-15-17 stitches), purl 1 stitch from right side (purl from wrong side), 11-11-13-13-15-17 stitches in garter stitch, purl 1 stitch from right side (purl from wrong side), work A.1 (= 11-11-13-13-15-17 stitches), 6-6-6-9-9-9 stitches in garter stitch - and decrease 1-0-1-1-1-1 stitches over these stitches = 45-47-51-57-63-69 stitches. Continue the pattern like this - REMEMBER THE GAUGE!
When the piece measures 34-35-36-37-38-39 cm / 13⅜"-13¾"-14¼"-14½"-15"-15¼" (measure along the one stitch in garter stitch in the side of A.1) bind off 3 stitches at the beginning of the next 2 rows = 39-41-45-51-57-63 stitches.
When the piece measures approx. 42-44-46-47-49-51 cm / 16½"-17¼"-18"-18½"-19¼"-20" - adjust so that you have worked the last row in the diagram, work A.2 (= 11-11-13-13-15-17 stitches) over A.1 to finished length. AT THE SAME TIME when the piece measures 49-51-53-55-57-59 cm / 19¼"-20"-21"-21⅝"-22½"-23¼", work 2 ridges over the middle 13-13-15-15-15-15 stitches on the row; the other stitches are continued as before. On the first row from the right side after the 2 ridges, bind off the middle 9-9-11-11-11-11 stitches for neck. Place the 15-16-17-20-23-26 stitches on the right side of the needle (seen from the right side) on 1 thread or leave them un-worked on a needle.
Continue back and forth over the remaining 15-16-17-20-23-26 stitches with pattern and 2 edge stitches in garter stitch towards the neck - AT THE SAME TIME on the next row from the right side decrease 1 stitch for neck - read DECREASE TIP = 14-15-16-19-22-25 stitches on needle. Continue working until the piece measures 52-54-56-58-60-62 cm / 20½"-21¼"-22"-22¾"-23⅝"-24⅜". Then loosely bind off. Work the other shoulder in the same way.

FRONT PIECE:
Cast on and work in the same way as for the back piece until the piece measures 37-39-40-42-43-45 cm / 14½"-15¼"-15¾"-16½"-17"-17¾".
The next row from the right side is worked as follows: Work 19-20-22-25-28-31 stitches as before, knit 2 stitches, pass stitch 1 over stitch 2 of these 2 stitches (= 1 stitch decreased mid front), work 18-19-21-24-27-30 stitches as before. Place the 19-20-22-25-28-31 stitches on the right side of the piece (seen from the right side) on 1 thread or leave them un-worked on a needle.
Now decrease for V-neck and change diagram at the same time as follows:
Continue back and forth with pattern over the remaining 19-20-22-25-28-31 stitches as before, with 2 stitches garter stitch towards mid front - when you have worked 1 row after the division and the next row is from the right side, decrease for V-neck from mid front - remember DECREASE TIP. Decrease in this way every 2nd row a total of 4-4-5-5-5-5 times, then every 4th row 1 time = 14-15-16-19-22-25 stitches on row - AT THE SAME TIME when the piece measures approx. 42-44-46-47-49-51 cm / 16½"-17¼"-18"-18½"-19¼"-20" - adjust so that you have worked the last row in the diagram, work A.2 (= 11-11-13-13-15-17 stitches) over A.1 to finished length. Continue working until the piece measures 52-54-56-58-60-62 cm / 20½"-21¼"-22"-22¾"-23⅝"-24⅜". Then loosely bind off.
Continue working over the stitches on the right side of the piece in the same way as the left side, but reversed; i.e. the first row is worked as follows from the wrong side: Place the bind-off stitch mid front on the left needle and knit it together with the next stitch on the left needle (this is done to avoid a "jump" at the bottom of the V-neck), work the other stitches as before - when you have worked 1 row after the division and the next row is from the right side, decrease for V-neck as for the left side. A.1 changes to A.2 as in the left side.

SLEEVE:
Cast on 17-17-20-20-20-23 stitches (including edge stitch in each side) with circular needle size 8 mm / US 11 and 2 strands Air. Purl 1 row from the wrong side. Then work 6 rows rib (= knit 1 / purl 2) with 1 edge stitch in garter stitch in each side. Change to circular needle size 9 mm / US 13. The next row is worked as follows - from the right side: Work 1 edge stitch in garter stitch, * knit 1, 1 yarn over *, work from *-* until there are 2 stitches left, knit 1 stitch and work 1 edge stitch in garter stitch = 31-31-37-37-37-43 stitches (on the next row, work the yarn overs twisted to avoid holes). Knit 1 row from the wrong side where you increase 2-4-0-2-4-0 stitches evenly on row = 33-35-37-39-41-43 stitches.
The next row is worked as follows - from the right side: 1 edge stitch in garter stitch, purl 10-11-11-12-12-12 (knit from wrong side), A.1 (= 11-11-13-13-15-17 stitches), purl 10-11-11-12-12-12 stitches (knit from wrong side) and 1 edge stitch in garter stitch. Continue the pattern like this. When the piece measures 14 cm / 5½" increase 1 stitch in each side - read INCREASE TIP (= 2 stitches increased). Increase like this every 16-16-15-14-13-12 cm / 6¼"-6¼"-6"-5½"-5"-4¾" a total of 3 times = 39-41-43-45-47-49 stitches. Continue working until piece measures 51-50-49-47-45-43 cm / 20"-19¾"-19¼"-18½"-17¾"-17" (shorter measurements in larger sizes due to broader shoulders). Then loosely bind off. Work the other sleeve in the same way.

ASSEMBLY:
Sew shoulder seams inside the bind-off edge – make sure the seam is not tight. Sew the side seams in the outermost loop of the outermost stitch. Sew in the
sleeves – sew the 2 cm on each side of sleeve so that it fits into the armhole,
then sew the sleeve seams inside the 1 edge stitch

Diagram

All measurements in charts are in cm.

symbols = knit from right side, purl from wrong side
symbols = between 2 stitches make 1 yarn over
symbols = slip 1 stitch as if to knit, knit 2 together, pass the slipped stitch over the knitted together stitches
diagram
diagram
diagram

Each of our patterns has specific tutorial videos to help you.

Do you have a question? See a list of frequently asked questions (FAQ)

Knitting tension is what determines the final measurements of your work, and is usually measured per 10 x 10 cm. It is provided like so: number of stitches in width x number of rows in height - eg: 19 stitches x 26 rows = 10 x 10 cm.

The knitting tension is very individual; some people knit/crochet loosely while others work tightly. You adjust the knitting tension with the needle size, which is why the suggested needle size only serve as a guide! You need to adjust this (up or down) to ensure that YOUR knitting tension matches the knitting tension provided in the pattern. If you work with a different knitting tension than provided you will have a different yarn consumption, and your work will have different measurements than what the pattern suggests.

The knitting tension also determines which yarns can replace each other. As long as you achieve the same knitting tension you can replace one yarn with another.

See DROPS lesson: How to measure your tension/gauge

See DROPS video: How to make a gauge tension swatch

The required amount of yarn is provided in grams, eg: 450 g. To calculate how many balls you’ll need you first need to know how many grams are in 1 ball (25g, 50g or 100g). This information is available if you click on the individual yarn quality on our pages. Divide the amount required with the amount of each ball. For example, if each ball is 50g (the most common amount), the calculation will be as follows: 450 / 50 = 9 balls.

The important thing when changing from one yarn to another is that the knitting/crochet tension remains the same. This is so that the measurements of the finished piece will be the same as on the sketch provided. It is easier to achieve the same knitting tension using yarns from the same yarn group. It is also possible to work with multiple strands of a thinner yarn to achieve the knitting tension of a thicker one. Please try our yarn converter. We recommend you to always work a test swatch.

Please NOTE: when changing yarn the garment might have a different look and feel to the garment in the photo, due to individual properties and qualities of each yarn.

See DROPS lesson: Can I use a different yarn than the one mentioned in the pattern?

All our yarns are categorised into yarn groups (from A to F) according to thickness and knitting tension – group A contains the thinnest yarns and group F the thickest. This makes it easier for you to find alternative yarns to our patterns, should you wish to switch yarn. All yarns within the same group have a similar knitting tension and can easily replace each other. However, different yarn qualities have different structures and properties which will give the finished work a unique look and feel.

Click here for an overview of the yarns in each yarn group

At the top of all our patterns you’ll find a link to our yarn converter, which is a helpful tool should you wish to use a different yarn than suggested. By filling in the yarn quality you wish to replace, the amount (in your size) and number of strands, the converter will present good alternative yarns with the same knitting tension. Additionally it will tell you how much you’ll require in the new qualities and whether you’ll need to work with multiple strands. Most skeins are 50g (some are 25g or 100g).

If the pattern is worked with multiple colours, every colour will have to be converted separately. Similarly, if the pattern is worked with several strands of different yarns (for example 1 strand Alpaca and 1 strand Kid-Silk) you will have to find alternatives for each, individually.

Click here to see our yarn converter

Since different yarns have different qualities and textures we have chosen to keep the original yarn in our patterns. However, you can easily find options among our available qualities by using our yarn converter, or simply pick a yarn from the same yarn group.

It is possible that some retailers still have discontinued yarns in stock, or that someone has a few skeins at home that they would like to find patterns for.

The yarn converter will provide both alternative yarn as well as required amount in the new quality.

If you think it's hard to decide what size to make, it can be a good idea to measure a garment you own already and like the size of. Then you can pick the size by comparing those measures with the ones available in the pattern's size chart.

You'll find the size chart at the bottom of the pattern.

See DROPS lesson: How to read size chart

The needle size provided in the pattern serves only as a guide, the important thing is to follow the knitting tension. And since knitting tension is very individual, you will have to adjust the needle size to ensure that YOUR tension is the same as in the pattern – maybe you’ll have to adjust 1, or even 2 needle sizes, up or down to achieve the correct tension. For this, we recommend that you work test swatches.

Should you work with a different knitting tension than the one provided, the measurements of the finished garment might deviate from the measurement sketch.

See DROPS lesson: How to measure your tension/gauge

See DROPS video: How to make a gauge tension swatch

Working a garment top-down provides more flexibility and room for personal adjustment. For example it is easier to try the garment on while working, as well as making adjustments to length of yoke and shoulder caps.

The instructions are carefully explaining every step, in the correct order. Diagrams are adjusted to the knitting direction and are worked as usual.

The diagram depicts all rows/rounds, and every stitch seen from the right side. It is read from bottom to top, from right to left. 1 square = 1 stitch.

When working back and forth, every other row is worked from the right side and every other row is worked from the wrong side. When working from the wrong side, the diagram will have to be worked reversed: from left to right, knit stitches are purled, purl stitches are knit etc.

When working in the round every round is worked from the right side and the diagram are worked from right to left on all rounds.

See DROPS lesson: How to read knitting diagrams

The diagram depicts all rows/rounds, and every stitch seen from the right side. It is worked from bottom to top, from right to left.

When working back and forth every other row is worked from the right side: from right to left and every other row is worked from the wrong side: from left to right.

When working in the round, every row in the diagram are worked from the right side, from right to left.

When working a circular diagram you start in the middle and work your way outwards, counter clockwise, row by row.

The rows usually start with a given number of chain stitches (equivalent to the height of the following stitch), this will either be depicted in the diagram or explained in the pattern.

See DROPS lesson: How to read crochet diagrams

Instructions for working several diagrams after each other on the same row/round, will often be written like so: “work A.1, A.2, A.3 a total of 0-0-2-3-4 times". This means you work A.1 once, then A.2 is worked once, and A.3 is repeated (in width) the number of times provided for your size – in this case like so: S = 0 times, M = 0 times, L=2 times, XL= 3 times and XXL = 4 times.

The diagrams are worked as usual: begin with the first row in A.1, then work the first row in A.2 etc.

See DROPS lesson: How to read knitting diagrams

See DROPS lesson: How to read crochet diagrams

The total width of the garment (from wrist-to-wrist) will be larger in the larger sizes, despite the actual sleeves being shorter. The larger sizes have longer sleeve caps and wider shoulders, so there will be a good fit in all sizes.

The measurement sketch/schematic drawing provides information regarding the full length of the garment. If it’s a jumper or a jacket the length is measured from the highest point on the shoulder (usually closest to the neckline), and straight down to the bottom of the garment. It is NOT measured from the tip of shoulder. Similarly, the length of yoke is measured from the highest point on the shoulder and down to where yoke is split into body and sleeves.

See DROPS lesson: How to read a schematic drawing

Diagrams are often repeated on the round or in height. 1 repeat is the diagram the way it appears in the pattern. If it says to work 5 repeats of A.1 in the round, then you work A.1 a total of 5 times after/next to each other in the round. If it says to work 2 repeats of A.1 vertically/in height you work the entire diagram once, then begin again at the start and work the entire diagram one more time.

Chain stitches are slightly narrower than other stitches and to avoid working the cast-on edge too tight, we simply chain more stitches to begin with. The stitch count will be adjusted on the following row to fit the pattern and measurement sketch.

The rib edge is more elastic and will contract slightly compared to, for example, stocking stitch. By increasing before the rib edge, you avoid a visible difference in width between the rib edge and the rest of the body.

It’s very easy to cast off too tightly, and by making yarn overs while casting off (and simultaneously casting these off) you avoid a too tight cast off edge.

See DROPS video: How to bind off with yarn overs (yo)

To achieve an even increase (or decrease) you can increase on, for example: every 3rd and 4th row alternately, like so: work 2 rows and increase on the 3rd row, work 3 rows and increase on the 4th. Repeat this until the increase is complete.

See DROPS lesson: Increase or decrease 1 st on every 3rd and 4th row alternately

Should you prefer to work in the round instead of back and forth, you may of course adjust the pattern. You’ll need to add steeks mid-front (usually 5 stitches), and follow the instructions. When you would normally turn and work from the wrong side, simply work across the steek and continue in the round. At the end you’ll cut the piece open, pick up stitches to work bands, and cover the cut edges.

See DROPS video: How to knit steeks and cut open

Should you prefer to work back and forth instead of in the round, you may of course adjust the pattern so you work the pieces separately and then assemble them at the end. Divide the stitches for the body in 2, add 1 edge stitch in each side (for sewing) and work the front and back pieces separately.

See DROPS lesson: Can I adapt a pattern for circular needles into straight needles?

Pattern repeats can vary slightly in the different sizes, in order to get the correct proportions. If you’re not working the exact same size as the garment in the photo, yours might deviate slightly. This has been carefully developed and adjusted so that the complete impression of the garment is the same in all sizes.

Make sure to follow instructions and diagrams for your size!

If you have found a pattern you like which is available in women’s size it’s not very difficult to convert it to men’s size. The biggest difference will be the length of sleeves and body. Start working on the women size that you think would fit across the chest. The additional length will be worked right before you cast off for the armhole/sleeve cap. If the pattern is worked top-down you can add the length right after the armhole or before the first decrease on sleeve.

Regarding additional yarn amount, this will depend on how much length you add, but it is better with a skein too many than too few.

All yarns will have excess fibres (from production) that might come off as lint or shedding. Brushed yarns (ie hairier yarns) have more of these loose, excess fibres, causing more shedding.

Shedding also depends on what is worn under or over the garment, and whether this pulls at the yarn fibres. It’s therefore not possible to guarantee that there will be no shedding

Below are some tips on how to get the best result when working with hairier yarns:

1. When the garment is finished (before you wash it) shake it vigorously so the looser hairs come off. NOTE: do NOT use a lint roller, brush or any method that pulls at the yarn.

2. Place the garment in a plastic bag and put it in your freezer - the temperature will cause the fibres to become less attached to each other, and excess fibres will come off easier.

3. Leave in the freezer for a few hours before taking it out and shaking it again.

4. Wash the garment according to the instructions on the yarn label.

Pilling is a natural process that happens to even the most exclusive of fibers. It's a natural sign of wear and tear that is hard to avoid, and that is most visible in high friction areas of your garment like a sweater's arms and cuffs.

You can make your garment look as new by removing the pilling, using a fabric comb or a pill/lint remover.

Still can't find the answer you need? Then scroll down and leave your question so one of our experts can try to help you. This will be done normally within 5 to 10 working days.
In the meantime, you can read the questions and answers that others have left to this pattern or join the DROPS Workshop on Facebook to get help from fellow knitters/crocheters!

You might also like...

Spring Peach

Laura, Germany

Spring Peach

Emilie, Norway

Post a comment to pattern DROPS 186-9

We would love to hear what you have to say about this pattern!

If you want to leave a question, please make sure you select the correct category in the form below, to speed up the answering process. Required fields are marked *.

Comments / Questions (30)

country flag Katharina wrote:

How would you rate the difficulty level of this pattern? Beginner, intermediate or advanced?

28.08.2019 - 19:56

DROPS Design answered:

Dear Katharina , we do not give any difficulty level since our patterns are for a wide range of users thanks to the internet and they are available in 17 languages, the difficulty level could be different from one to another person. Read carefully the pattern, look at our FAQ, and should you have any question, please feel free to ask them here; or contact your DROPS store for any individual assistance. Happy knitting!

29.08.2019 - 09:05

country flag Amélie wrote:

Bonjour, qu'appelez vous côtes mousse ? Je trouve ce point sur le net mais El quel format faut il le faire ? Côté 2/2,3/2 ou autre ? Merci d'avance

16.03.2019 - 16:38

DROPS Design answered:

Bonjour Amelie. Ce que vous expliquez, ce sont les cotes (p.ex. 2/2 signifie 2 mailles endroit, 2 mailles envers). Le point mousse est tricote toujours a l'endroit (comme au milieu devant de ce pull). Comment le faire vous trouverez ICI. Bon travail!

18.03.2019 - 08:08

country flag Alba wrote:

Hermoso trabajo para hacerlo ya. Todos los trabajos son muy buenos. Gracias por compartir y enseñar. Bendiciones desde Argentina

03.02.2019 - 23:21

country flag Anna-Karin Persson Borg wrote:

Hej! Undrar varför en ska använda rundsticka och sticka fram och tillbaka - går det inte lika bra med vanliga stickor i så fall?

04.12.2018 - 19:32

DROPS Design answered:

Hei Anna-Karin. Du kan gjerne strikke med vanlige pinner om du ønsker det. Vi anbefaler rundpinne fordi maskeantallet er så høyt og tråden så tykk at vanlige pinner ofte blir for korte. God fornøyelse.

05.12.2018 - 07:54

country flag Colle wrote:

Bonsoir, Je vais commander du fil Air pour ce modèle. Dans les fournitures je vois M, 350 grammes. Or on doit doubler le fil, est ce que cela est compris dans le poids indique ? Merci. Cordialement. Catherine.

28.10.2018 - 17:36

DROPS Design answered:

Bonjour Mme Colle, il faut bien 350 g DROPS Air en taille M et on tricote ensuite le fil en double. Bon tricot!

29.10.2018 - 08:27

country flag Věra wrote:

Dobrý den...prosím na celý svetr velikost s stačí 300gr příze při pletení dvojitě?,?…...děkuji za odpověd…...Věra

20.10.2018 - 10:21

DROPS Design answered:

Dobrý den, Věro, ano - DROPS Air je velmi lehoučká dutinková příze. Má díky tomu velký návin (150 m příze na 50 g klubíčku), ačkoli patří mezi silnější. Na svetr velikost S proto i při pletení dvojitou přízí stačí jen 300 g. Hodně zdaru! Hana

22.10.2018 - 18:24

country flag Paule wrote:

Bonjour, Je voûdrais tricoter ce pull en Kid Silk mais je n'arrive pas à calculer la quantité de pelotes. Pour un 38 combien m'en faudrait il?

05.10.2018 - 05:58

DROPS Design answered:

Bonjour Paule, pour remplacer Air par Kid-Silk, il vous faudra remplacer 1 fil Air par 2 fils Kid-Silk (= 1 fil du groupe A = 2 fils du groupe C), Comme on tricote ce pull avec 2 fils Air, il vous faudra utiliser 4 fils Kid-Silk. Vous trouverez ici comment choisir une alternative, et/ou utilisez notre convertisseur. Bon tricot!

05.10.2018 - 07:45

country flag Kirsten Mogensen wrote:

Hej, Jeg har strikket mange af jeres opskrifter, men nogle af dem mangler jeg billeder af trøjerne bagfra.

16.05.2018 - 20:04

country flag Linda wrote:

Thank you for sharing this lovely pattern with me. I can't wait to wear it - first I have to decide what colour I wish to make it in. Decisions, Decisions. (Chuckles)

20.04.2018 - 02:58

country flag Yvonne Hovland wrote:

Hei igjen. Fant ut av det forrige spørsmålet mitt, men nå sitter jeg fast igjen. Altså; har kommet til forstykket der jeg har strikket til arbeidet måler 42 cm (jeg strikker str. Xl). Men hva skjer etterpå? Hvis jeg følger oppskriften sitter jeg igjen med ustrikkede masker på pinnen, og der jeg skal felle en maske blir ikke i midten av arbeidet?

25.03.2018 - 07:46