
Popular categories
Looking for a yarn?


Comments / Questions (222)
Coral Vorster wrote:
Please advise where i find the 13th, 14th & 15th symbol under diagram text. I see A.1a, A.2a, A,2b, A.1b etc
05.09.2016 - 14:26DROPS Design answered:
Dear Mrs Vorster, you will find all symbols and the st they are matching at the end of writen pattern, just above diagrams, ie just below "Diagram" you will see a list of symbol with the st/group of st they are refering too. Happy crocheting!
05.09.2016 - 15:19Coral Vorster wrote:
The terminology of "work AROUND ch-space" Should it be " work IN a ch space" The word AROUND is often used and HOW does one work "AROUND " a ch? 2nd question. I have completed the top bit i.e. Mesh pattern and tr row with the increases at mid front, mid back & shoulders. In the pattern i have a photo of the crochet i need to do before starting the diagram which is1 row with 1 tr, 1 ch. HOWEVER when i look at the photo of the poncho i do not see this row.
05.09.2016 - 14:23DROPS Design answered:
Dear Mrs Vorster, when you crochet "in" the ch-space, you will crochet in the chain, when you have to crochet around ch-space, insert crochet in ch-space so that the st is worked around the ch-space and not in the chain. After mespattern and when inc are done, work 1 row with tr as explained in written pattern (= 1st row in diagrams, row with a star). Happy crocheting!
05.09.2016 - 15:18
![]() Michal Levy wrote:
Michal Levy wrote:
Ik ben klaar met het netpatroon en ik heb de toer gehaakt met alleen stk en meerderen op midden-achter en midden-voor. Ik volg het patroon voor L/XL. Ik zou nu uit moeten komen met 133 stk tussen beide l-lussen maar ik heb er maar 125. Ik heb geen idee wat ik nu fout heb gedaan.
29.08.2016 - 23:56DROPS Design answered:
Hoi Michal. We zijn druk bezig met een aanpassing op dit patroon o.a. met een telpatroon van de meerdering van het netpatroon. Dan zou het makkelijker worden om het juiste aantal st te krijgen. Ik hoop dat we dit binnen een paar weken kunnen plaatsen :)
20.10.2016 - 17:00
![]() Camilla Andersen wrote:
Camilla Andersen wrote:
Omg. 10 i a-delen står der man skal havde 147 st tilbage på hver side af lm, dette passer kun hvor de 8 st trækkes fra frem for at tilføje dem. Ved at regne lidt kommer man frem til 163 hvis de 8 st tilføjes, men fjernes de komme det ned på 147, men så er der ikke plads til de 17 gentagelse.
28.08.2016 - 13:51Rahel wrote:
Liebe Claudia, vielen Dank für deine Infos ! Ich hab ein wenig Angst weiterzuhäkeln da ja dann alle Stäbchenangaben zur Kontrolle nicht mehr stimmen... Und ich kontrolliere wahnsinnig gerne :) . Ich finde auch dass dies nicht die Übersichtlichste Häkelanleitung ist...
22.08.2016 - 17:53
![]() Claudia wrote:
Claudia wrote:
Liebe Rahel, mein Poncho ist fertig, ich habe die 16 Maschen so wie in der Anleitung beschrieben,zugenommen und festgestellt, dass das Muster dann auch die späteren Reihen aufgeht. Aber ich finde die Anleitung insegesamt sehr unübersichtlich mit wenig Kontrollmöglichkeiten, ob man noch richtig liegt und habe viel geribbelt. Gruß, Claudia
22.08.2016 - 09:27Coral Vorster wrote:
Thank you for your response. We do not have a DROPS store in Cape Town. However i have printed out all the comments of the ladies and your response to them. I will watch the videos and hopefully it will help.
19.08.2016 - 18:05Coral Vorster wrote:
I sincerely request is that you give us the crochet garments in a written pattern. (NOT DIAGRAMS) I cannot read diagrams and from what i have read with most of the comments ladies have made they are also requesting this.
19.08.2016 - 11:47Coral Vorster wrote:
I have completed the first part successfully. However from the 4th paragraph which starts with ' Work 1 sl st in 12th tr from ch-space mid back and work pattern as follows: Work A.1a etc' I cannot read diagrams which are very confusing to me so i cannot proceed crocheting the garment. Can you PLEASE let me have the written pattern (NOT DIAGRAMS) of this beautiful poncho. Many thanks Coral Vorster from Cape Town South Africa
19.08.2016 - 10:50DROPS Design answered:
Dear Mrs Vorster, you will find below a video showing how to crochet the diagrams A.1a, A.2a and A.3a. For any further individual assistance, you will get tips & advices from your DROPS store. Happy crocheting!
19.08.2016 - 11:57
![]() Rahel wrote:
Rahel wrote:
Liebes Drops Team, am 3.8. haben Sie mich informiert dass meine Frage vom 27.7 an das Designteam weitergeleitet wurde. Bis jetzt habe ich nichts mehr von Ihnen gehört... Danke für weitere Infos !
16.08.2016 - 23:04DROPS Design answered:
Liebe Rahel, ich muss Sie leider noch um etwas Geduld bitten, da wir noch keine Antwort vom Designteam erhalten haben.
17.08.2016 - 13:31
|
|||||||||||||||||||||||||||||||||||||||||||||||||
Light's Embrace#lightsembraceponcho |
|||||||||||||||||||||||||||||||||||||||||||||||||
 |
 |
||||||||||||||||||||||||||||||||||||||||||||||||
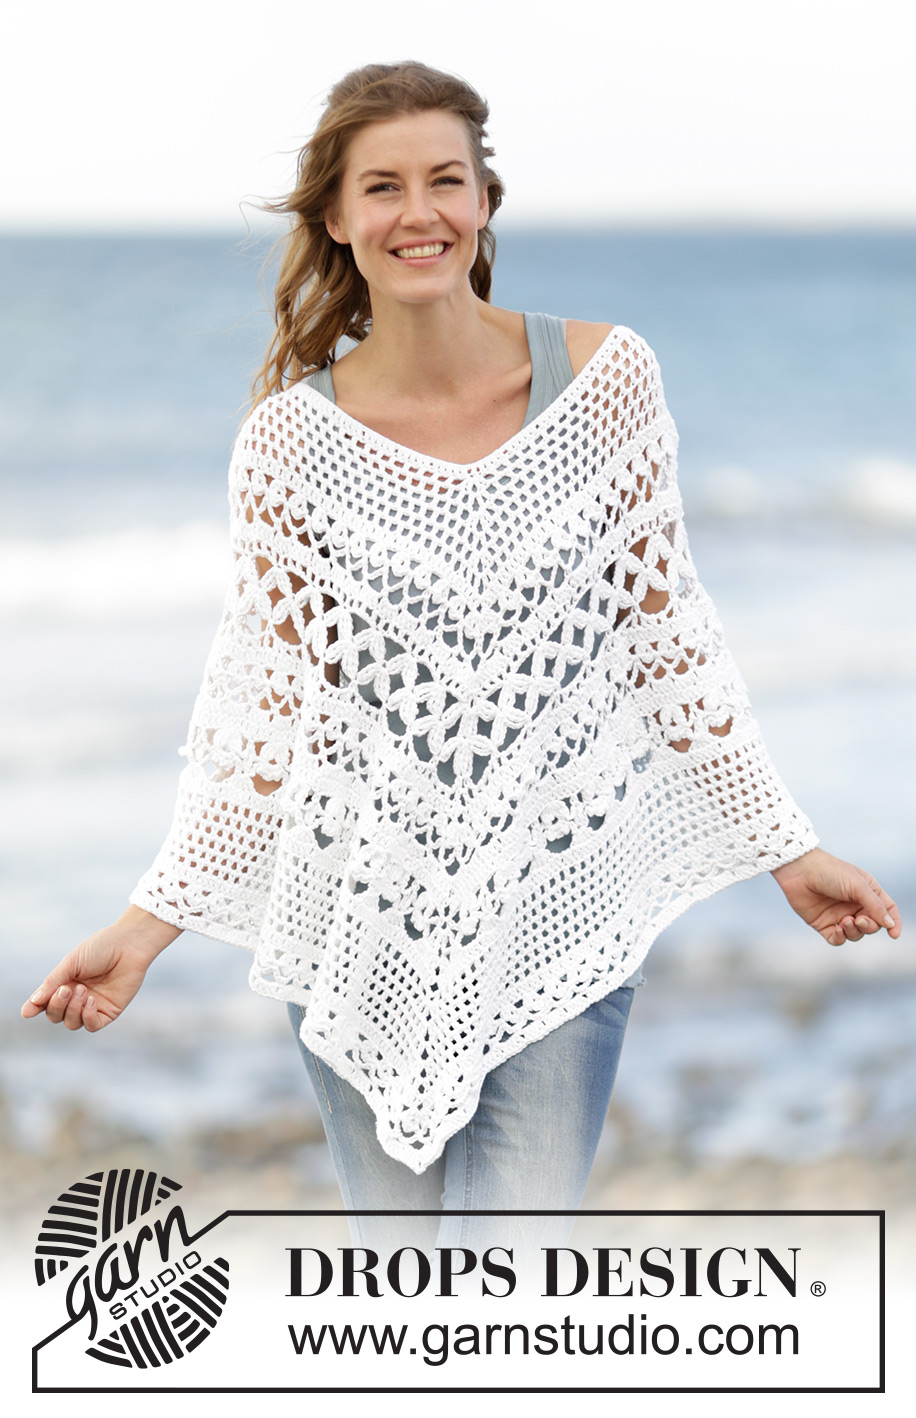
Crochet DROPS poncho with lace pattern, worked top down in ”Paris”. Size S-XXXL.
DROPS 169-4 |
|||||||||||||||||||||||||||||||||||||||||||||||||
|
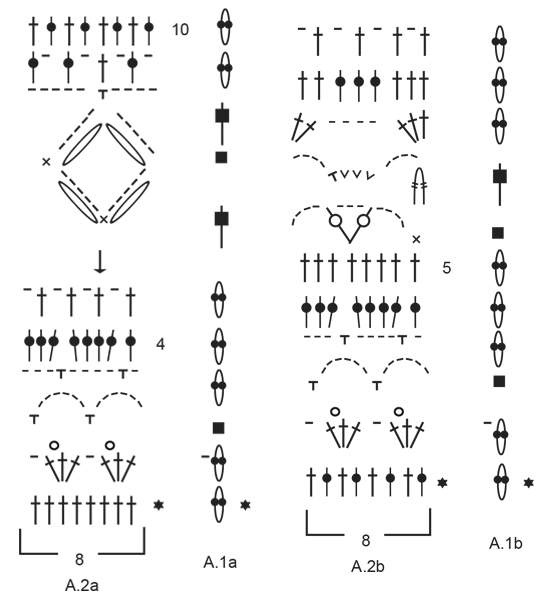
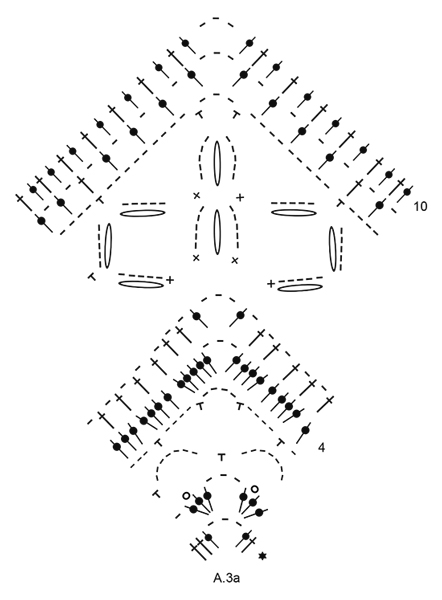
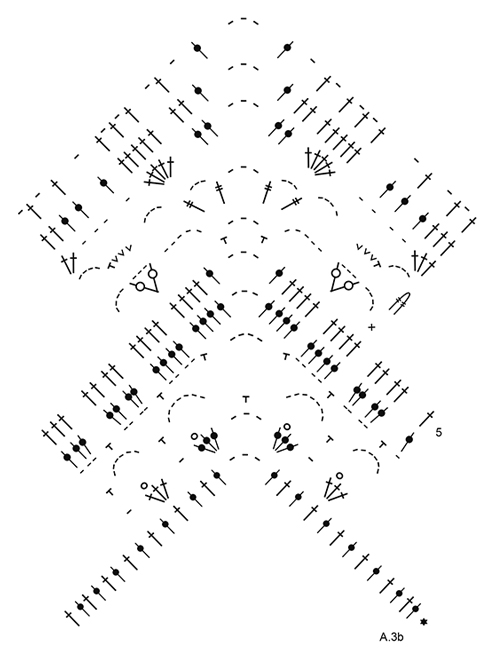
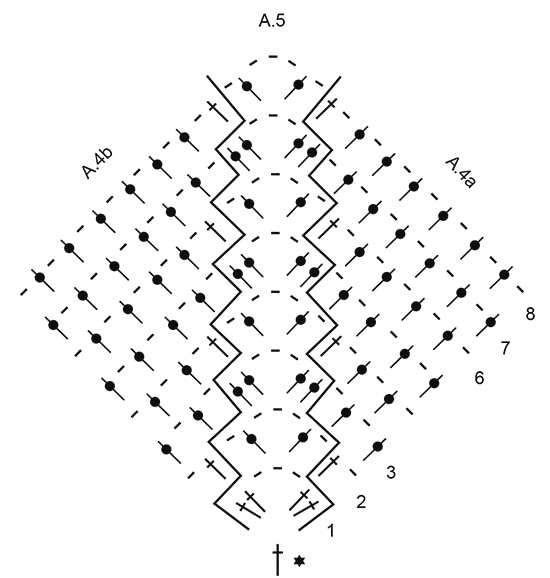
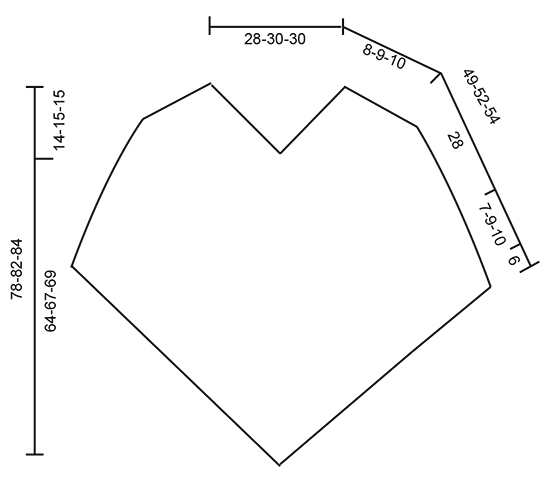
PATTERN: See diagrams A.1 to A.5. Diagrams A.1a and A.1b show how round beg and ends. CROCHET INFO: Beg every dc round with 3 ch (these ch do not replaces first dc). At the end of round work 1 sl st in 3rd ch at beg of round. NOTE: When working A.5 beg round with 3 ch. At the end of round work 1 dc in first st worked on round (i.e. st with the 3 ch in), then 1 sl st in 3rd ch at beg of round. WORK 2 TR TOG: Work 1 tr around ch-space below but wait with last pull through (= 2 loops on hook), skip 1 sc and work 1 tr around next ch-space but on last pull through, pull yarn through all loops on hook. WORK 3 TR TOG: Work 1 tr but wait with last pull through (= 2 sts on hook), work 1 more tr but wait with last pull through (= 3 loops on hook), work 1 more tr but on last pull through, pull yarn through all loops on hook. MESH PATTERN: ROUND 1: * Start with 1st row of A.5, work the 4 dc in first/next dc with marker, work (1 ch, ship 1 dc, 1 dc in next dc) until 1 dc remains before next marker, work 1 ch, skip next dc *, repeat from *-* 3 times more. There is now 4 repeats of A.5 on round. ROUND 2: * Work A.5 around first/next ch-space with marker, then work 1 dc in next dc, 1 ch, 1 dc around first ch-space, (1 ch, skip 1 dc, 1 dc in next ch-space) until 1 ch-space remains before next repeat of A.5, work 1 ch, 1 dc in next dc *, repeat from *-* 3 times more. ROUND 3: * Work A.5 around first/next ch-space with marker, then work (1 ch, skip 1 dc, 1 dc around next ch-space) until next repeat of A.5, 1 ch *, repeat from *-* 3 times more. ---------------------------------------------------------- PONCHO: Worked in the round, top down. First inc mid front, mid back and on each shoulder, then inc only mid front and mid back. Work 153-163-163 ch on hook size 4.5 mm/US 7 with Paris and form a ring with 1 sl st. Work 3 ch – see CROCHET INFO! Then work 1 dc in each of the next 3-1-1 ch, * skip ch 1, 1 dc in each of the next 5 ch *, repeat from *-* 24-26-26 more times on round = 128-136-136 dc + 3 ch on round. Now insert 4 markers from beg of round without working: Insert 1 marker in 1st dc on round (= mid back), skip 31-33-33 dc, insert 1 marker in next dc (= shoulder), skip 31-33-33 dc, insert 1 marker in next dc (= mid front), skip 31-33-33 dc, insert 1 marker in next dc (= shoulder), there are now 31-33-33 dc between last marker and beg of round. Now work MESH PATTERN - see explanation above. When 1st- 3rd round have been worked, repeat 2nd and 3rd round until 6-7-8 rounds with mesh pattern have been worked - see diagram A.4a and A.4b to see how to work the whole inc in each side of A.5. REMEMBER THE CROCHET GAUGE! Piece measures approx. 8-9-10 cm / 3"-3½"-4". Work next round as follows AT THE SAME TIME dec 0-8-8 dc evenly (= 0-4-4 dc dec on each side of mid back and mid front): *Work (2 dc, ch 3, 2 dc) around ch-space (= mid back on 1st repetition and mid front on 2nd repetition), then work 1 dc in every dc and 1 dc around every ch until next inc dc-group, work 3 dc around ch-space (= shoulder), work 1 dc in every dc and 1 dc around every ch until inc dc-group (mid front on 1st repetition and mid back on 2nd repetition)*, repeat from *-* 1 more time. There are now 117-125-133 dc between ch-space mid front and mid back (= 234-250-266 dc in total on round + 2 ch-space). Cut the yarn. NOTE: Then do not inc on each shoulder but only mid front and mid back on poncho. Work 1 sl st in 10th st from ch-space mid back and work pattern as follows: Work A.1a (shows how round beg and end, does not replace first st), A.2a (= 8 dc) 13-14-15 times in width, A.3a (= inc mid front), continue with A.2a 14-15-16 times in width, A.3a (= inc mid back) and A.2a 1 time in all sizes. On 4th round in A.3a there are 133-141-149 dc between ch-space mid front and mid back. Continue with pattern as before (there is now room for 16-17-18 repetitions A.2a on each side of A.3a). On 10th round inc 8 dc evenly on each side of A.3a (= 16 dc in total on round) = 163-171-179 dc on each side of ch-space mid front and mid back. Continue with pattern as before, but now work A.1b over A.1a, A.2b over A.2a and A.3b over A.3a (there is now room for 19-20-21 repetitions A.2 on each side of A.3). On 4th round inc 3 dc evenly between every repetitions of A.3 (i.e. 6 dc in total on round) = 169-177-185 dc between each ch-space mid front and mid back. Continue pattern (there is now room for 21-22-23 repetitions A.2 on each side of A.3). When entire diagram has been worked vertically, piece measures 36-37-38 cm / 14 ¼"-14½"-15". Cut the yarn. Now work mesh pattern as at beg of piece. Beg in ch-space mid back, and work mesh pattern from 3rd round in mesh pattern. Repeat 2nd and 3rd round until 6-8-10 rounds in total have been worked (includes last round in A.2 and A.3). Work next round as follows: * Work (2 dc, ch 3, 2 dc) around ch-space (= mid back), then work 1 dc in every dc and 1 dc around every ch until next rep of A.5 *, repeat from *-* 1 more time = 193-209-225 dc between ch-space mid front and mid back. Cut the yarn. Now work pattern A.1a, A.2a and A.3a as follows: Work 1 sl st in 12th dc from ch-space mid back and work pattern as follows: Work A.1a (shows how round beg and end, does not replace first st), A.2a until 2 dc remain before ch-space mid front, A.3a (= inc mid front), continue with A.2a until 2 dc remain before ch-space mid back, A.3a (= inc mid back) and A.2a 1 time in all sizes. When 4th row has been worked vertically, poncho measures 49-52-54 cm / 19 ¼"-20½"-21 ¼". Fasten off. |
|||||||||||||||||||||||||||||||||||||||||||||||||
Diagram explanations |
|||||||||||||||||||||||||||||||||||||||||||||||||
|
|||||||||||||||||||||||||||||||||||||||||||||||||
 |
|||||||||||||||||||||||||||||||||||||||||||||||||
 |
|||||||||||||||||||||||||||||||||||||||||||||||||
 |
|||||||||||||||||||||||||||||||||||||||||||||||||
 |
|||||||||||||||||||||||||||||||||||||||||||||||||
 |
|||||||||||||||||||||||||||||||||||||||||||||||||
Have you finished this pattern?Tag your pictures with #dropspattern #lightsembraceponcho or submit them to the #dropsfan gallery. Do you need help with this pattern?You'll find 13 tutorial videos, a Comments/Questions area and more by visiting the pattern on garnstudio.com. © 1982-2026 DROPS Design A/S. We reserve all rights. This document, including all its sub-sections, has copyrights. Read more about what you can do with our patterns at the bottom of each pattern on our site. |
|||||||||||||||||||||||||||||||||||||||||||||||||


With over 40 years in knitting and crochet design, DROPS Design offers one of the most extensive collections of free patterns on the internet - translated to 17 languages. As of today we count 324 catalogs and 12285 patterns - 12275 of which are translated into English (US/in).
We work hard to bring you the best knitting and crochet have to offer, inspiration and advice as well as great quality yarns at incredible prices! Would you like to use our patterns for other than personal use? You can read what you are allowed to do in the Copyright text at the bottom of all our patterns. Happy crafting!
Post a comment to pattern DROPS 169-4
We would love to hear what you have to say about this pattern!
If you want to leave a question, please make sure you select the correct category in the form below, to speed up the answering process. Required fields are marked *.