
Popular categories
Looking for a yarn?


Comments / Questions (234)
![]() Maria wrote:
Maria wrote:
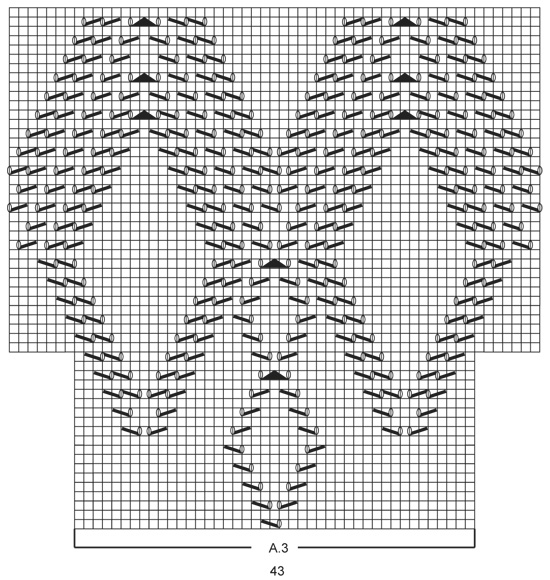
Nachdem ich dieses Modell nun schon öfter gestrickt habe und das Muster gut kenne, ist mir aufgefallen, dass es mehr Sinn ergeben würde, wenn in Reihe 9 von Muster A.3 unter den neuen Rauten noch ein yo,ssk eingefügt werden würde. Die anderen neuen Rauten beginnen auch alle damit, und es würde schöner aussehen. Aus dem gleichen Grund sähe es auch schöner aus, nach A.6 noch zwei Reihen einzufügen, eine mit k2tog,yo als Abschluss der Rauten und danach noch eine Reihe glatt rechts.
14.06.2020 - 09:21
![]() Bets wrote:
Bets wrote:
Leuk patronen
14.05.2020 - 00:14
![]() Linnaea Hutton wrote:
Linnaea Hutton wrote:
Hello, I am knitting size XL , so am following the 4th numbers I'm having a problem with the following; Work half the raglan inc for 1st marker (see explanation above) K 13-14-14-17-22-25 K 14-15-16-19-24-27 sts, A.2 (= 17 sts), K until 1-1-2-2-2-2 st remains before 2nd marker I think that is should be " knit 17, then A.2, then Knit 17. after 1st raglan worked (half) then that should work out to the 56 stitches on the front as originally marked. Am i correct? Thank you!!
12.04.2020 - 23:19DROPS Design answered:
Dear Mrs Hutton, on first round you will work first increase (2 sts increasing 2 sts), then K17, A.2 (= 17 sts), K17, and first increase (= 2 sts increasing 2 sts). Hope this help. Happy knitting!
14.04.2020 - 12:20
![]() Sara wrote:
Sara wrote:
I am knitting size L, I have inserted my markers. But I can\'t understand this sentence. \" Work half the raglan inc for 1st marker (see explanation above) K 13-14-14-17-22-25 K 14-15-16-19-24-27 sts, A.2 (= 17 sts), K until 1-1-2-2-2-2 st remains before 2nd marker, work RAGLAN - see explanation above, K until 1-1-2-2-2-2 sts remain before 3rd marker, work raglan, K 0-1-1-4-9-12 sts, A.3 (= 43 sts).\" How do I knitting this?
29.03.2020 - 11:08DROPS Design answered:
Dear Sara, working half the raglan dec means to work as explained under RAGLAN for your size, ie from the stitch wir marker = K 1 twisted, 1 YO, K 1, 1 YO then work RAGLAN as explained, ie whole text this time: 1 YO, K 1, 1 YO, K 1 twisted, K 1(= st with marker), K 1 twisted, 1 YO, K 1, 1 YO (first and last YO is worked twisted on next round, it should not make a hole but, the 2 midle YO should be K as normal and make a hole) and finish round with last inc before first marker: 1 YO, K 1, 1 YO, K 1 twisted, K 1(= st with marker), . Happy knitting!
30.03.2020 - 11:52
![]() KEY wrote:
KEY wrote:
Hello, I don't understand something to these. I1 YO, K 1 twisted, K 1 1. Is 'I1 YO' mean YO? 2. K 1 twisted? Is that K1, and back twist loop?
26.03.2020 - 14:51DROPS Design answered:
Dear Key, there is just a typo there, it's supposed to be: Inc 1 sts on each side of each marker (= 8 sts inc in total) as follows: 1 YO, K 1 twisted, K 1 (= st with marker), K 1 twisted, 1 YO. - US pattern will be edited, thanks for your feedback. Happy knitting!
26.03.2020 - 15:11
![]() Ingeborg wrote:
Ingeborg wrote:
Hej! I am wondering if you think it would be possible to sew lining into dress. I love it but do not care to show so much skin.
28.02.2020 - 06:50DROPS Design answered:
Dear Ingeborg, I guess you could - should you need any assistance or advices feel free to ask your DROPS store or our DROPS Workshop. Happy knitting!
28.02.2020 - 09:10
![]() Grey wrote:
Grey wrote:
Hi! If I wanted to make this so that the beginning of the bottom border design fell at knee length, approximately how much yarn would I need? I am 5'7"
09.02.2020 - 04:37DROPS Design answered:
Dear Mrs Grey, we are unfortunately not able to adjust every pattern to every single request, for any individual assistance, please contact your DROPS store. Happy knitting!
10.02.2020 - 08:59
![]() Lilly wrote:
Lilly wrote:
Hi is it a problem if my measurements are off by a few centimeters?
29.01.2020 - 05:46DROPS Design answered:
Dear Lilly, this can be a problem with the raglan, the yoke could be then either tighter or longer - try to block your swatch first. Should this not help, you can then work either more or less rounds without increases between with rounds with increases. Happy knitting!
29.01.2020 - 08:53
![]() Krys wrote:
Krys wrote:
Hi, currently working on the dress and wanted clarification. When it comes to the sleeve am I casting on another 6 stitches for a M size or am I picking up 6 stitches in order to do the sleeves? I know it says cast on but I just wanted to be sure. Thanks in advance and sorry if it’s a dumb question
12.01.2020 - 08:50DROPS Design answered:
Dear Krys, in this pattern you cast on 6 new stitches under sleeve. These stitches will be then sewn together with the 6 new stitches cast on on body. Happy knitting!
13.01.2020 - 09:41
![]() Lara wrote:
Lara wrote:
Bom dia, estou a fazer este modelo e não estou a compreender como vou fazer as diminuições de cada lado do marcador, depois de ter colocado em espera as malhas para as mangas. O que me confude é que pedem para colocar marcadores entre as malhas das mangas, a seguir pedem para fazer diminuições de cada lados dos marcadores no entanto o número de malhas para as mangas continua a ser mesmo.
01.12.2019 - 13:58DROPS Design answered:
As malhas colocadas em espera são as malhas para as mangas. O marcador é colocado de cada lado das novas malhas que se montam fdepois de colocar as malhas de uma manga em espera. Essas novas malhas fecham a cava e vão unir o corpo. O marcador que se coloca entre essas novas malhas montadas marca os lados do corpo (costas + frente) do vestido e são essas malhas que vai tricotar, Só depois de tricotar o corpo do vestido é que vai tricotar cada manga. Bom Tricô!
03.12.2019 - 09:43
|
|||||||||||||||||||
Summer Feeling#summerfeelingdress |
|||||||||||||||||||
 |
 |
||||||||||||||||||
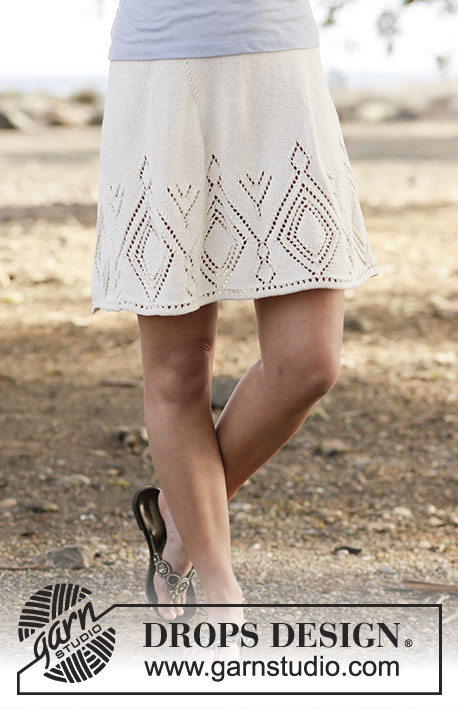
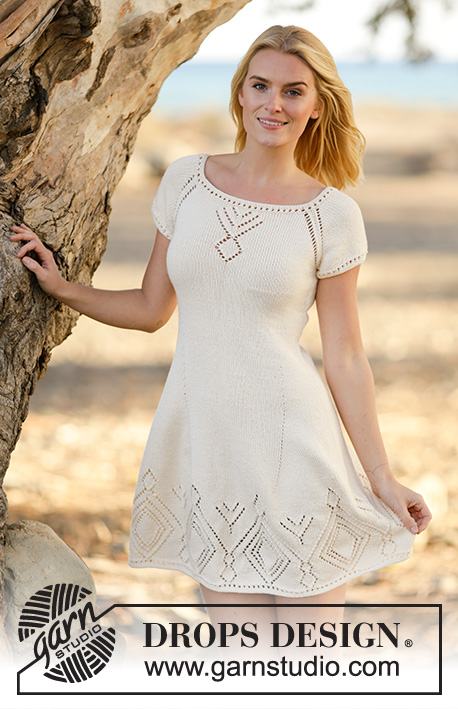
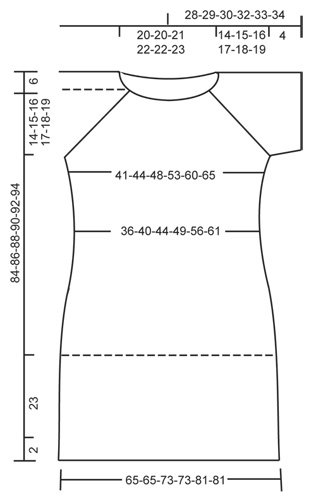
Knitted DROPS dress with lace pattern and raglan in ”Muskat” or "Belle". Worked top down. Size: S - XXXL.
DROPS 160-1 |
|||||||||||||||||||
|
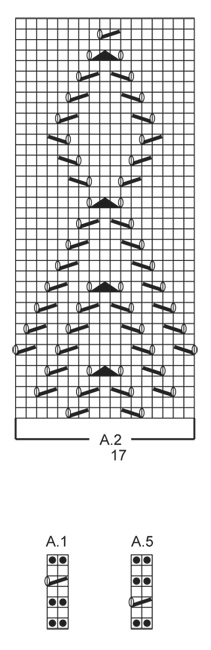
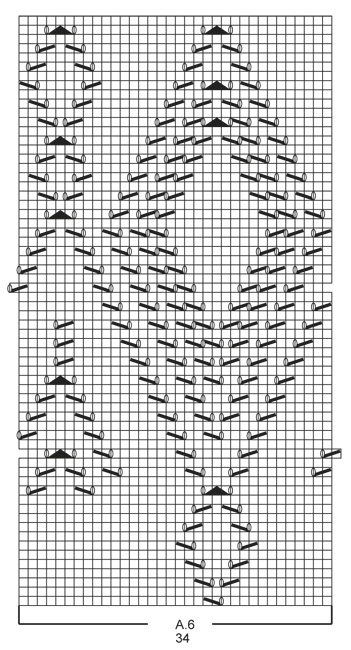
PATTERN: See diagrams A.1 to A.6. DECREASE TIP: Dec 1 st before marker as follows: Work until 2 sts remain before marker, slip 1 st as if to K, K 1, psso. Dec 1 st after marker as follows: K 2 tog. RAGLAN: Inc differently for raglan in the different sizes: SIZE S-M: Inc 1 sts on each side of each marker (= 8 sts inc in total) as follows: 1 YO, K 1 twisted, K 1 (= st with marker), K 1 twisted, 1 YO. NOTE: The inc on each sides of 1st marker (= in the last st on round) is worked as follows: at beginning of round, K 1 twisted, 1 YO. At the end of round: 1 YO, K 1 twisted, K.1 (= st with marker) Do not work YOs twisted on next round, they should make holes, repeat inc every other round 17-19 more times. SIZE L-XL-XXL-XXXL: Inc 2 sts on each side of each marker (= 16 sts inc in total each round) as follows: 1 YO, K1, 1 YO, K 1 twisted, K 1(= st with marker), K 1 twisted, 1 YO, K 1, 1 YO (first and last YO is worked twisted on next round, it should not make a hole but, the 2 midle YO should be K as normal and make a hole). Repeat inc on every other round 1-1-1-3 more times. NOTE: The inc on eich side of 1st marker(= in the last st on round) is worked as follows: at beginning of round, K 1 twisted, 1 YO, K 1, 1 YO. At the end of round: 1 YO, K 1, 1 YO, K 1 twisted, K.1 (= st with marker) Then inc like as follows: Inc 1 sts at each side of each marker (= 8 sts inc in total) as follows: 1 YO, K 1 twisted, K 1(= st with marker), K 1 twisted, 1 YO. Do not K YOs twisted on next round, they should make holes. Repeat inc every other round 19-20-22-21 more times in total. INCREASE TIP: Inc 1 st by making a YO. On next round K YO twisted to avoid holes. ---------------------------------------------------------- YOKE: Worked in the round on circular needle, top down. Cast on 134-134-140-144-144-148 sts on circular needle size 3.5 mm / US 4 with Muskat or "Belle". Work A.1 (= 2 sts) over all sts. When A.1 has been worked 1 time vertically, switch to circular needle size 4 mm / US 6. On next round K all sts and inc 16-20-14-22-42-46 sts evenly = 150-154-154-166-186-194 sts. On next round insert 4 markers in the midle st of each raglan as follows: Insert 1st in last st on round, K 45-47-49-55-65-71 sts (= front piece), K 1 sts and insert 2nd marker in this st, K 28-28-26-26-26-24 sts (= sleeve), K 1 sts and insert 3rd marker in this st, K 45-47-49-55-65-71 sts (= back piece), K 1 st and insert 4th marker in this st, K 28-28-26-26-26-24 sts (= sleeve). K 1 sts (1st marker is placed in this st). REMEMBER THE KNITTING GAUGE Then work as follows - AT THE SAME TIME inc for RAGLAN - see explanation above. Work half the raglan inc for 1st marker (see explanation above) K 13-14-14-17-22-25 K 14-15-16-19-24-27 sts, A.2 (= 17 sts), K until 1-1-2-2-2-2 st remains before 2nd marker, work RAGLAN - see explanation above, K until 1-1-2-2-2-2 sts remain before 3rd marker, work raglan, K 0-1-1-4-9-12 sts, A.3 (= 43 sts), K until 1-1-2-2-2-2 st remains before 4th marker, work raglan, K until 1-1-2-2-2-2 sts remain before 1st marker, work raglan. Work the inc sts in stockinette st until they can be worked in pattern as shown in A.3. When A.2 has been worked 1 time vertically, work in stockinette st over all these sts. When A.3 has been worked 1 time vertically, work A.4 (= 57 sts) over A.3. After all inc are done there are 294-314-338-358-394-426 sts on needle. Piece measures approx. 14-15-16-17-18-19 cm / 5½"-6"-6¼"-6¾"-7"-7½". Continue with pattern and stockinette st as before AT THE SAME TIME work as follows: Work the first 81-87-95-103-117-129 sts (= front piece), slip the next 66-70-74-76-80-84 sts on a stitch holder for sleeve, cast on 6-6-6-8-8-8 sts under sleeve (insert a marker in the middle of the new sts), work the next 81-87-95-103-117-129 sts (= back piece), slip the next 66-70-74-76-80-84 sts on a stitch holder for sleeve, cast on 6-6-6-8-8-8 sts under sleeve (insert a marker in the middle of the new sts) = 174-186-202-222-250-274 sts remain on needle. Insert 1 marker in piece, NOW MEASURE PIECE FROM HERE. Continue to work A.4 and stockinette st over the remaining sts. When piece measures 3 cm / 1", dec 1 st on each side of each markers in the sides (= 4 sts dec) - READ DECREASE TIP! Repeat dec every 2½-4-4-4-4-4 cm / ⅞"-1½"-1½"-1½"-1½"-1½" 5-3-3-3-3-3 more times = 150-170-186-206-234-258 sts. When A.4 has been worked 1 time vertically, work in stockinette st over all sts. When piece measures 18-19-20-21-22-23 cm / 7"-7½"-8"-8¼"-8¾"-9" insert 4 markers as follows: Work 15-17-19-21-25-27 sts, insert 1st marker, work 45-51-55-61-67-75 sts, insert 2nd marker, work 30-34-38-42-50-54 sts, insert 3rd marker, work 45-51-55-61-67-75 sts, insert 4th marker, work the remaining 15-17-19-21-25-27 sts. 1st and 2nd marker are on front piece, and 3rd and 4th marker are on back piece. Move the markers upwards when working. On next round inc 1 st before 1st and 3rd marker and 1 st after 2nd and 4th marker (= 4 sts inc) - READ INCREASE TIP. NOTE: No of sts mid front and mid back is the same, inc in side sts. Repeat inc every 6th round 1 more time, then every 4th round 6-5-6-5-6-10 times, then every other round 22-18-22-18-18-8 times = 270-270-306-306-338-338 sts. On next round, inc 2-2-0-0-2-2 sts evenly = 272-272-306-306-340-340 sts. Work in stockinette st until piece measures 45-46-47-48-49-50 cm / 17¾"-18"-18½"-19"-19¼"-19¾" (or desired length, approx. 25 cm / 9¾" remain). Then work A.6 (= 34 sts) 8-8-9-9-10-10 times in total in width. When A.6 has been worked 1 time vertically, switch to circular needle size 3.5 mm / US 4. Work A.5 over all sts. Bind off. SLEEVE: Worked in the round on double pointed needles. Slip sts from stitch holder back on double pointed needles size 4 mm / US 6 and cast on 6-6-6-8-8-8 sts under sleeve = 72-76-80-84-88-92 sts. Work in stockinette st for 2 cm / ¾", on next round dec 8 sts evenly = 64-68-72-76-80-84 sts. Switch to double pointed needles size 3.5 mm / US 4. Work A.5 over all sts. Bind off. Work the other sleeve the same way. |
|||||||||||||||||||
Diagram explanations |
|||||||||||||||||||
|
|||||||||||||||||||
 |
|||||||||||||||||||
 |
|||||||||||||||||||
 |
|||||||||||||||||||
 |
|||||||||||||||||||
 |
|||||||||||||||||||
Have you finished this pattern?Tag your pictures with #dropspattern #summerfeelingdress or submit them to the #dropsfan gallery. Do you need help with this pattern?You'll find 23 tutorial videos, a Comments/Questions area and more by visiting the pattern on garnstudio.com. © 1982-2026 DROPS Design A/S. We reserve all rights. This document, including all its sub-sections, has copyrights. Read more about what you can do with our patterns at the bottom of each pattern on our site. |
|||||||||||||||||||


With over 40 years in knitting and crochet design, DROPS Design offers one of the most extensive collections of free patterns on the internet - translated to 17 languages. As of today we count 324 catalogs and 12278 patterns - 12268 of which are translated into English (US/in).
We work hard to bring you the best knitting and crochet have to offer, inspiration and advice as well as great quality yarns at incredible prices! Would you like to use our patterns for other than personal use? You can read what you are allowed to do in the Copyright text at the bottom of all our patterns. Happy crafting!
Post a comment to pattern DROPS 160-1
We would love to hear what you have to say about this pattern!
If you want to leave a question, please make sure you select the correct category in the form below, to speed up the answering process. Required fields are marked *.