
Popular categories
Looking for a yarn?


Comments / Questions (183)
![]() Cattaneo wrote:
Cattaneo wrote:
Je reviens concernant le début du rang fantaisie, il est écrit : "3 B, A.1 (= 3 B), *5 B, A.1*, répéter de *-* jusqu'à ce qu'il reste 2 ms, 2 B", donc il y a 3 brides non travaillées en début de rang et 2 brides en fin de rang = 5 brides où il faudra faire les augmentations à partir de 15 cm (2 augm.) : 2 brides +3 ml en l'air+2 brides. Est ce bien ça ?
05.09.2023 - 09:43DROPS Design answered:
Bonjour Mme Cattaneo, effectivement, vous avez bien 3 brides au début + 2 brides à la fin du tour pour en avoir 5 comme partout autour; et vous augmentez ensuite 4 brides au milieu dos (d'abord 1 bride puis 2 de chaque côté du milieu dos, soit d'abord 2 brides au total puis 4 brides). En même temps, vous augmenterez sur les côtés (2 brides de chaque côté). Bon crochet!
05.09.2023 - 13:46
![]() LES GRANDS CHAMPS wrote:
LES GRANDS CHAMPS wrote:
Bonjour, j'ai dû redefaire car le nb de mailles n allait pas. Du coup, je repars sur A1 (5 brides, 3 brides). Il faut donc faire un rang de brides ? Après ce rang, on fait le point fantaisie Ax : "5 brides et sur les 3 brides du rand précédent on fait les 2 x 2 brides écoulées ensemble" ? J ai du mal à être conforme au modèle mais je voudrais vraiment y arriver pour faire ce short pour ma fille ! Merci beaucoup.
05.09.2023 - 08:20DROPS Design answered:
Bonjour Les grands champs, pour être certaine que vous aurez bien les mêmes mesures que dans le schéma pour la taille choisie, pensez à bien vérifier votre échantillon et en largeur et en hauteur et adaptez la taille du crochet si besoin. Le 2ème rang de A.1 (= 2ème rang de A.1X) se crochète ainsi: *sautez 1 bride, dans la bride suivante, crochetez: 2 brides écoulées ensemble, 1 maille en l'air, 2 brides écoulées ensemble, sautez 1 bride*, répétez de *à* pour chaque A.1X; au 2ème tour et suivants, crochetez de (à) dans l'arceau entre les 2 brides écoulées ensemble du tour précédent. Bon crochet!
05.09.2023 - 13:42
![]() Cattaneo wrote:
Cattaneo wrote:
En recomptant les rangs de brides pour connaître la hauteur en cm, avec 4 rangs de brides j ai presque 4 cm de hauteur. Du coup je suis embêtée car je n'arriverai pas à 10 cm quand j'aurais 16 rangs de brides. Que me conseilleriez vous (1 rang de brides = presque 1 cm !
31.08.2023 - 09:02DROPS Design answered:
Bonjour Mme Cattaneo, essayez de tirer vos brides un peu moins en hauteur pour coller un peu plus à la tension du modèle, et/ou ajustez la fréquence des augmentations pour que l'ouvrage mesure bien 22-24-27 cm au milieu devant et 27-29-32 cm au milieu dos quand toutes les augmentations sont faites. Bon crochet!
31.08.2023 - 09:32
![]() Cattaneo wrote:
Cattaneo wrote:
Bonjour, toujours pour le short Elly May, concernant le Point fantaisie 1 (côté) les augmentations sont à faire tous les 4 tours 7x, à partir de la 1ere augm. (1er tour d aug.) faut il compter le tour suivant comme tour 2 où on le compte à partir de 1 ? Je me suis rendue compte que ça ne coïncidait pas avec vos mesures pour séparer les jambes ) j ai l'impression que j'aurais dû compter le tour suivant en tout 2, je le serai trompée). Pouvez vous me confirmer avant que je refasse ?
30.08.2023 - 11:14DROPS Design answered:
Bonjour Mme Cattaneo, pour augmenter tous les 4 tours, crochetez ainsi: *1 tour avec augmentations, 3 tours sans augmentations*, crochetez 7 fois de *-* au total, puis augmentez encore 1 fois au tour suivant - pensez aussi à bien vérifier votre tension en hauteur (16 rangs de brides = 10 cm) et ajustez les augmentations si besoin en fonction de votre propre tension. Bon crochet!
30.08.2023 - 16:12
![]() So wrote:
So wrote:
Bonjour, doit-on crocheter le motif A1 sur les mailles augmentées ou crochète t’on ces nouvelles mailles en brides? Merci!!
14.08.2023 - 18:56DROPS Design answered:
Bonjour So, crochetez les augmentations d'abord en brides, puis quand il y en a suffisamment, commencez un nouveau motif de A.1. Bon crochet!
15.08.2023 - 09:00
![]() Cattaneo wrote:
Cattaneo wrote:
Bonjour, concernant le short Elly May : quand on augmente sur les côtés et au milieu du dos, pour compter les mailles avec les augmentations, faut il compter les 3 ml en l air du début du tour, car ça me fait une maille en "trop" ? Ensuite, je ne comprends pas les augmentations 1 (milieu dos) : comme le marqueur du milieu dos est situé sur la maille coulée qui ferme le tour, on se retrouve avec 1 ml augmentée à la fin du tour et une autre sur le tour suivant.
13.08.2023 - 15:53DROPS Design answered:
Bonjour Mme Cattaneo, les 3 ml du début du tour remplacent la 1ère bride, on doit les compter dans le nombre de mailles (cf INFO CROCHET); effectivement, pour faire les augmentations du milieu dos sur le même rang, crochetez les 2 premières brides, augmentez dans la bride suivante, crochetez le tour comme il se doit et, quand il reste 3 brides avant la fin du tour, augmentez dans la bride suivante et terminez le tour par 1 bride dans chacune des 2 dernières brides (vous avez ainsi bien 4 brides entre les augmentations du milieu dos, dont 3 ml pour remplacer la 1ère bride). Bon crochet!
14.08.2023 - 10:00
![]() Cattaneo wrote:
Cattaneo wrote:
Bonjour, concernant le short Elly May, explications sur l'augmentation 2 (sur les côtés) : il faut augmenter d 1 ml entre le marqueur, tous les 4 tours 7 fois au total, mais où se situe l augmentation ? Toujours sur la ml avant et après du marqueur ? Merci beaucoup.
09.08.2023 - 09:20DROPS Design answered:
Bonjour Mme Cattaneo, vous augmentez sur les côtés du short, de chaque côté de la bride avec un marqueur = vous augmentez ainsi 4 brides à chaque fois (1 bride de chaque côté de celle avec le marqueur) 7 fois au total = 28 brides en plus. Bon crochet!
09.08.2023 - 16:56
![]() Camilla Jørgensen wrote:
Camilla Jørgensen wrote:
Hej... Jeg er ved at hækle i xxl, men forstå ikke helt hvordan udtagningen kan går fra 208 til 288 når der kun skal tages 2 m ud? Nu hækles der 1 omg rundt med fm Samtidig med at der tages 28-16-2 fm ud jævnt fordelt = 224-256-288 fm. Bedste hilsner Camilla
04.08.2023 - 12:11DROPS Design answered:
Hej Camilla, i den største størrelse starter du med 286 masker, dem har du stadigvæk efter at du har lavet vendepinde. Når du er midt bagpå hækler du hele vejen rundt og tager 2 masker ud til 288 fm :)
10.08.2023 - 13:39
![]() Betti wrote:
Betti wrote:
Hello! Thank you for this wonderful pattern! I have a question: when we start increasing the sides and the mid back part, do we make 2dc ch1 2dc at the mid back’s increasing? Because i just increased the rounds without putting the A1 stitches there and it looks weird. I saw in earlier comments that on the sides after the increasing rows we can put the A1 stitch but what about the mid back increasing rows? Thank you
30.07.2023 - 14:20DROPS Design answered:
Dear Betti, work the new stitches by and by in pattern so that you will have more A.1 on back piece. Happy crocheting!
31.07.2023 - 11:25
![]() Cattaneo wrote:
Cattaneo wrote:
Bonjour, je renouvelle ma demande. Je suis en train de crocheter le short Elly May, je 'e comprends pas le point fantaisie Ax : les 2 brides sont écoulées ensemble ?
18.07.2023 - 12:06
|
||||||||||||||||||||||||||||
Elly May#ellymayshorts |
||||||||||||||||||||||||||||
 |
 |
|||||||||||||||||||||||||||
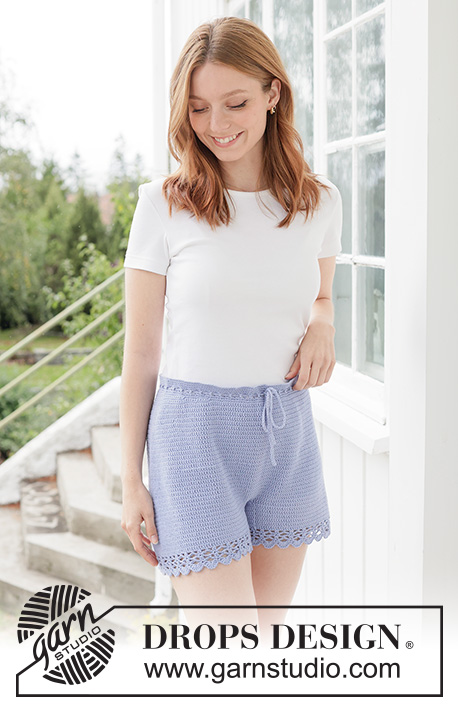
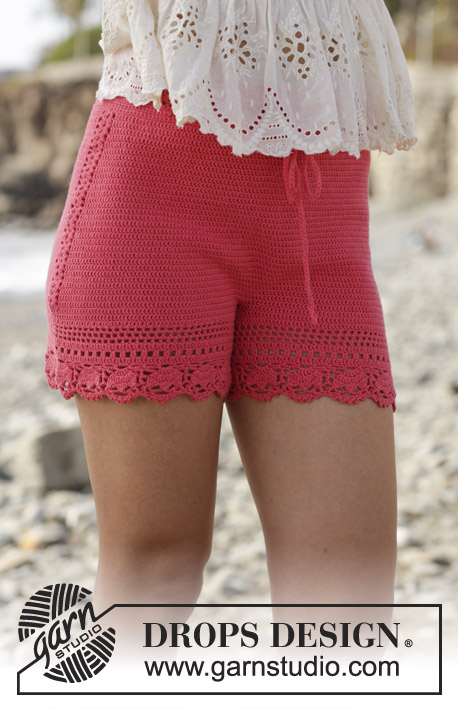
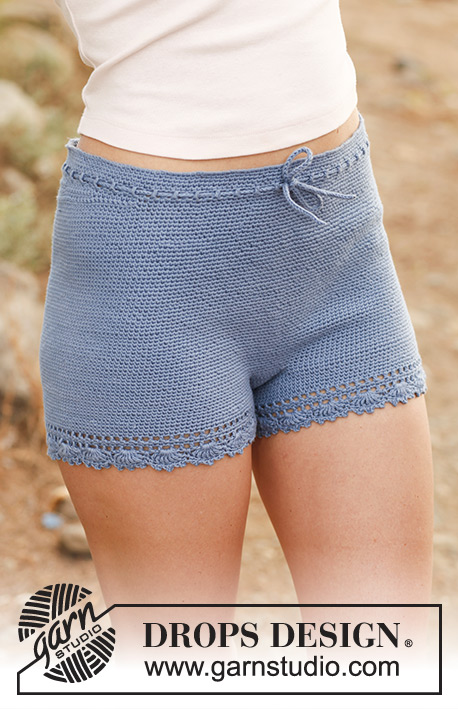
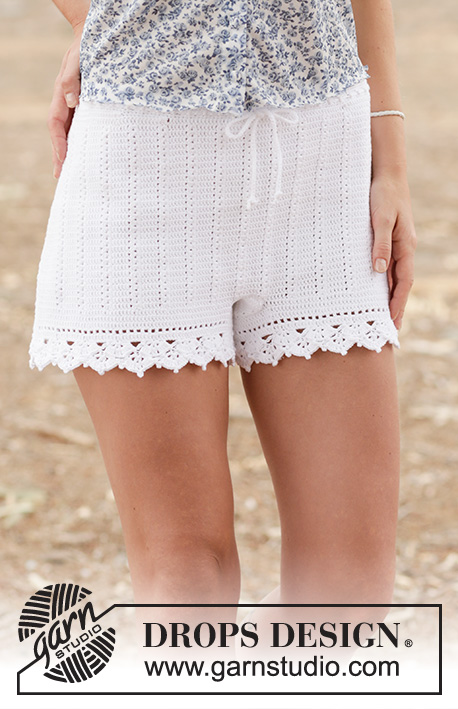
Crochet DROPS shorts with double crochet and lace pattern in ”Safran”. Size: S - XXL.
DROPS 162-19 |
||||||||||||||||||||||||||||
|
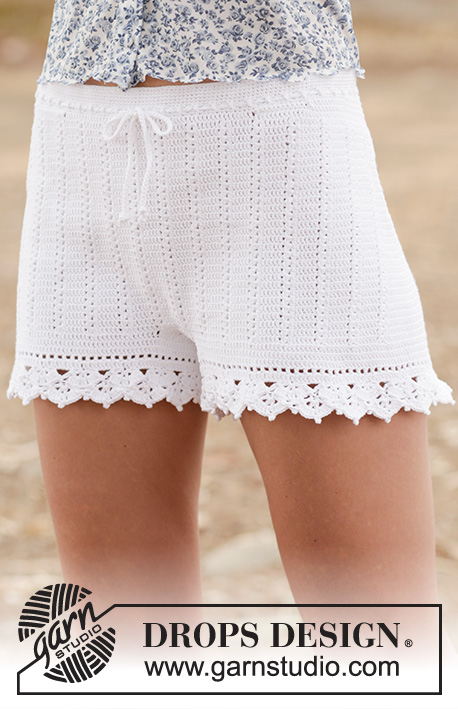
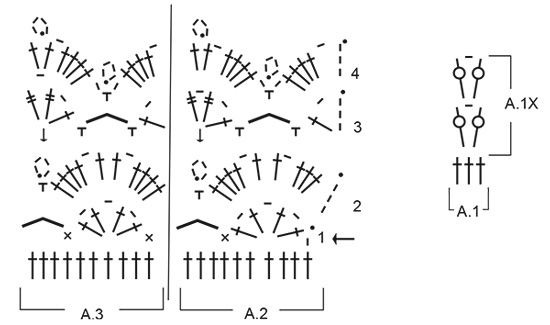
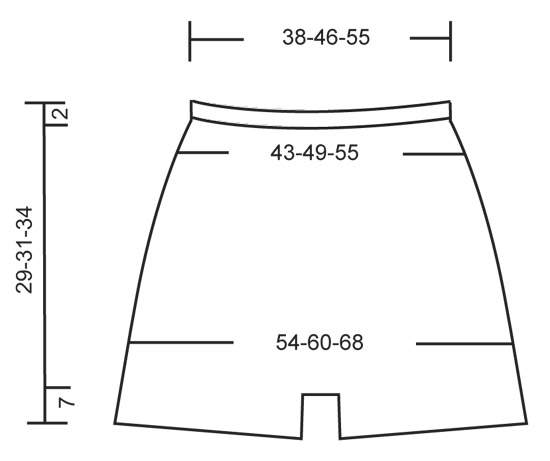
CROCHET INFO: Replace first sc at beg of every sc round with 1 ch. Finish round with 1 sl st in 1st ch at beg of round. Replace first dc at beg of every dc round with 3 ch. Finish round with 1 sl st in 3rd ch at beg of round. PATTERN: See diagrams A.1 to A.3. INCREASE TIP 1: Inc 2 dc mid back as follows: Work until 2 dc remain before marker mid back, work 2 dc in first dc, 1 dc in each of the next 2 dc (marker is between these) and 2 dc in next dc (= 2 dc inc). Inc 4 dc mid back as follows: Work until 4 dc remain before marker mid back, work 2 dc in first dc, 1 dc in next dc, 2 dc in next dc, 1 dc each of the next 2 dc (marker is between these) and 2 dc in next dc, 1 dc in next dc, 2 dc in next dc (= 4 dc inc). INCREASE TIP 2: Work until 1 dc remains before marker in the side, work 2 dc in first dc, 1 dc in next dc (marker is in this dc) and 2 dc in next dc (= 2 dc inc). Repeat the same inc in the other side = 4 sts inc on round. ---------------------------------------------------------- SHORTS: The piece is worked top down. Work 224-274-326 ch on hook size 2.5 mm / C with Safran and form a ring with 1 sl st in first ch. Insert 1 marker at beg of round = mid back. Work first round as follows: ch 1, * skip ch 1, 1 sc in each of the next 7 ch *, repeat from *-* until 0-2-6 ch remain, work 1 sc in each of these ch = 196-240-286 sc. READ CROCHET TIP! Continue working 1 sc in every sc until piece measures 2 cm / ¾". REMEMBER THE CROCHET GAUGE! Now work an eyelet row as follows: ch 4, skip 1 sc, * 1 dc in next sc, ch 1, skip 1 sc *, repeat from *-* the entire round, finish with 1 sl st in 3rd ch from beg of round. On next round work 1 sc in every dc and every ch. Then work the shorts higher in the back as follows: Work 11-12-13 sc past the marker mid back, turn and work 1 sl st in first st, then 1 sc in each of the next 21-23-25 sc, turn and work 1 sl st in first st, then 1 sc in each of the next 32-35-38 sts (sl sts are also worked). Continue like this by working 11-12-13 sts more on every turn until a total of 154-192-208 sts have been worked. Turn again and work until marker mid back. Continue to work 1 round with sc while AT THE SAME TIME inc 28-16-2 sc evenly = 224-256-288 sc. Then work pattern (and insert markers) as follows from mid back: 3 dc, A.1 (= 3 dc), * 5 dc, A.1*, repeat from *-* until 2 dc remain, 2 dc, AT THE SAME TIME insert a marker in each side as follows: Insert a marker in the 3rd dc after 7th-8th-9th repetition A.1, and insert a marker in 3rd dc after 21th-24th-27th repetition with A.1 (i.e. 1 marker in each side). When A.1 has been worked 1 time vertically, continue pattern A.1X - AT THE SAME TIME inc mid back and in the sides as follows: SIDES: Inc on each side of dc with marker, in each side as follows - READ INCREASE TIP 2. Repeat inc every 4th round 7-7-8 times in total = 28-28-32 dc inc. MID BACK: AT THE SAME TIME when piece measures 15-17-19 cm / 6"-6¾"-7½" (measured mid front), inc mid back as follows – Read INCREASE TIP-1. Repeat inc with 2 dc mid back every round 10 times in total, and repeat inc with 4 dc every round 2-2-3 times = 28-28-32 dc inc. There are now 280-312-352 dc on round. Now piece measures approx. 22-24-27 cm / 8¾"-9½"-10½" mid front and 27-29-32 cm / 10½"-11½"-12½" mid back. Now divide for legs as follows: Work 1 sl st in each of the first 5-6-6 dc on round, turn and work 1 dc in each of the first 10-12-12 dc (i.e. 5-6-6 sts on each side of marker mid back). These 10-12-12 dc = gusset. Work dc back and forth over these dc. When piece measures 4-5-6 cm / 1½"-2"-2½", dec 1 dc in each side, repeat dec when piece measures 8-9-10 cm / 3"-3½"-4" = 6-8-8 dc. Continue with 1 dc in every dc until gusset measures 11-12-13 cm / 4½"-4¾"-5", cut the yarn. Fasten gusset edge to edge to the middle 6-8-8 sts towards mid front. Then work the legs. LEG: Work 1 dc in each of the 132-146-166 dc around one leg (i.e. work 1 dc in every dc in A.1X and 1 dc in ch-space = 3 dc), in addition work 28-31-34 dc along the gusset = 160-177-200 dc. Work 2 rounds with dc AT THE SAME TIME on last round inc 0-3-0 dc evenly by working 2 dc in 1 dc = 160-180-200 dc. Continue to work as follows: ROUND 1: 3 ch (= 1 dc), * ch 1, skip 1 dc, 1 dc in next dc * , repeat from *-* until 1 dc remains, ch 1, skip 1 dc, 1 sl st in 3rd ch at beg of round. ROUND 2: 3 ch (= 1 dc), * 1 dc in ch-space, 1 dc in next dc *, repeat from *-* the entire round until 1 ch-space remains, 1 dc in ch-space, finish with 1 sl st in 3rd ch on round. ROUND 3: Now work pattern as follows: Work pattern according to diagram A.2 over the first 10 dc, continue with A.3 the entire round. Finish every round with 1 sl st at beg of round. REMEMBER CROCHET INFO! Continue like this until pattern A.2-A.3 have been worked vertically. Fasten off. Work the other leg the same way. TIES: Work 130-140-150 cm / 51"-55"-60" with LOOSE ch, turn and work 1 sl st in every ch. Thread the tie in the row with eyelet holes at the top of shorts – start mid front. |
||||||||||||||||||||||||||||
Diagram explanations |
||||||||||||||||||||||||||||
|
||||||||||||||||||||||||||||
 |
||||||||||||||||||||||||||||
 |
||||||||||||||||||||||||||||
Have you finished this pattern?Tag your pictures with #dropspattern #ellymayshorts or submit them to the #dropsfan gallery. Do you need help with this pattern?You'll find 13 tutorial videos, a Comments/Questions area and more by visiting the pattern on garnstudio.com. © 1982-2026 DROPS Design A/S. We reserve all rights. This document, including all its sub-sections, has copyrights. Read more about what you can do with our patterns at the bottom of each pattern on our site. |
||||||||||||||||||||||||||||


With over 40 years in knitting and crochet design, DROPS Design offers one of the most extensive collections of free patterns on the internet - translated to 17 languages. As of today we count 324 catalogs and 12285 patterns - 12275 of which are translated into English (US/in).
We work hard to bring you the best knitting and crochet have to offer, inspiration and advice as well as great quality yarns at incredible prices! Would you like to use our patterns for other than personal use? You can read what you are allowed to do in the Copyright text at the bottom of all our patterns. Happy crafting!
Post a comment to pattern DROPS 162-19
We would love to hear what you have to say about this pattern!
If you want to leave a question, please make sure you select the correct category in the form below, to speed up the answering process. Required fields are marked *.