DROPS Safran
DROPS Safran
100% Cotton
from 2.05 $ /50g
Get the yarn to make this pattern from 12.30$.

The yarn cost is calculated from the pattern’s smallest size and the yarn’s cheapest product type. Looking for an even better price? You might find it on the DROPS Deals!

DROPS SS24

Elly May

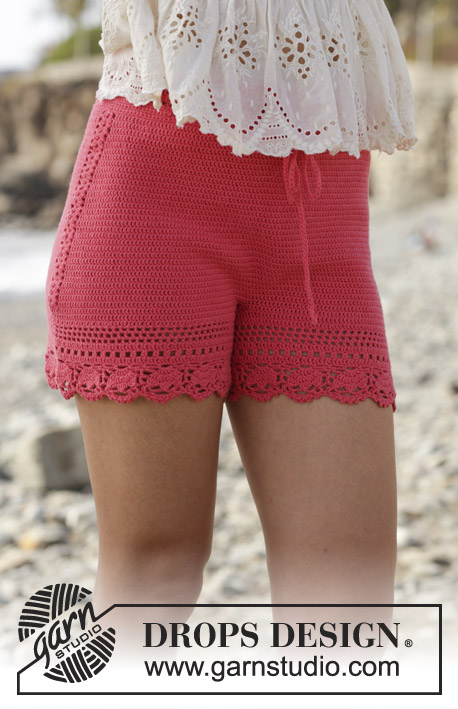
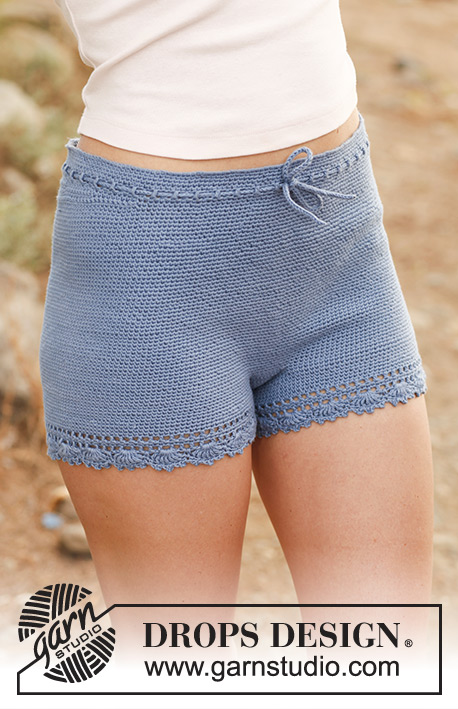
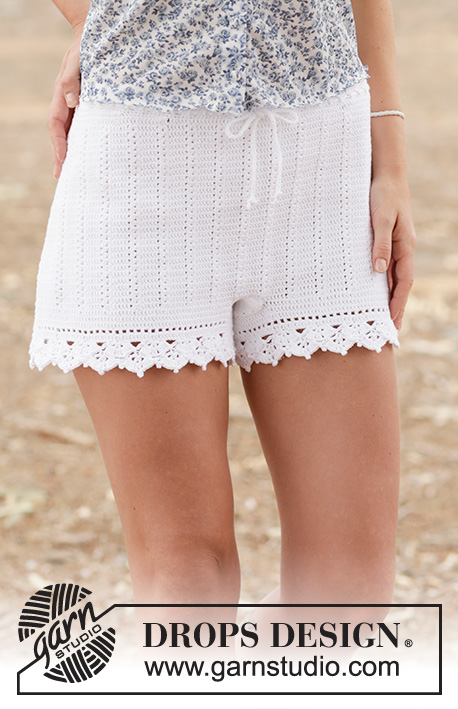
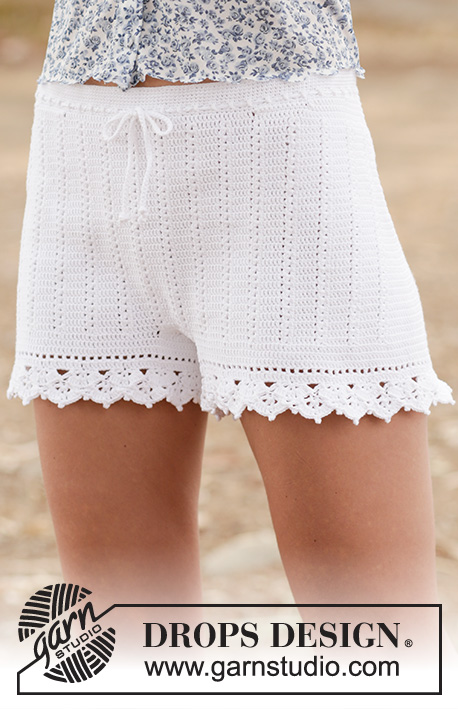
Crochet DROPS shorts with double crochet and lace pattern in ”Safran”. Size: S - XXL.

DROPS 162-19
DROPS design: Pattern no e-231
Yarn group A
----------------------------------------------------------
Size: S/M – L – XL/XXL

Materials:
DROPS SAFRAN from Garnstudio
300-350-350 g color no 17, white

DROPS CROCHET HOOK SIZE 2.5 mm/C – or size needed to get 26 dc x 16 rows with dc = 4" x 4" (10 x 10 cm).

-------------------------------------------------------

Alternative Yarn – See how to change yarns here
Yarn Groups A to F – Use the same pattern and change the yarn here
Yarn usage using an alternative yarn – Use our yarn converter here

-------------------------------------------------------

DROPS Safran
DROPS Safran
100% Cotton
from 2.05 $ /50g
Get the yarn to make this pattern from 12.30$.

The yarn cost is calculated from the pattern’s smallest size and the yarn’s cheapest product type. Looking for an even better price? You might find it on the DROPS Deals!

Pattern instructions

NOTE: This pattern is written in American English. All measurements in charts are in cm. For conversion from inches to cm - click here. There are different terms for crocheting in American and British English. If this pattern includes crochet, click for "crochet terms" here. For this pattern in British English, please click here.
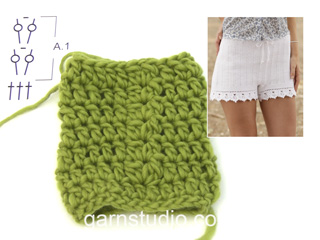
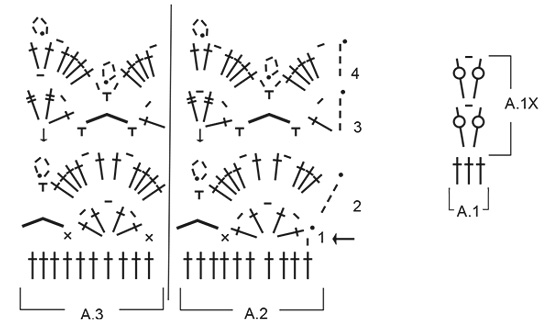
CROCHET INFO:
Replace first sc at beg of every sc round with 1 ch. Finish round with 1 sl st in 1st ch at beg of round.
Replace first dc at beg of every dc round with 3 ch. Finish round with 1 sl st in 3rd ch at beg of round.

PATTERN:
See diagrams A.1 to A.3.

INCREASE TIP 1:
Inc 2 dc mid back as follows:
Work until 2 dc remain before marker mid back, work 2 dc in first dc, 1 dc in each of the next 2 dc (marker is between these) and 2 dc in next dc (= 2 dc inc).

Inc 4 dc mid back as follows:
Work until 4 dc remain before marker mid back, work 2 dc in first dc, 1 dc in next dc, 2 dc in next dc, 1 dc each of the next 2 dc (marker is between these) and 2 dc in next dc, 1 dc in next dc, 2 dc in next dc (= 4 dc inc).

INCREASE TIP 2:
Work until 1 dc remains before marker in the side, work 2 dc in first dc, 1 dc in next dc (marker is in this dc) and 2 dc in next dc (= 2 dc inc). Repeat the same inc in the other side = 4 sts inc on round.
----------------------------------------------------------

SHORTS:
The piece is worked top down.
Work 224-274-326 ch on hook size 2.5 mm / C with Safran and form a ring with 1 sl st in first ch. Insert 1 marker at beg of round = mid back.
Work first round as follows: ch 1, * skip ch 1, 1 sc in each of the next 7 ch *, repeat from *-* until 0-2-6 ch remain, work 1 sc in each of these ch = 196-240-286 sc.
READ CROCHET TIP! Continue working 1 sc in every sc until piece measures 2 cm / ¾". REMEMBER THE CROCHET GAUGE!
Now work an eyelet row as follows: ch 4, skip 1 sc, * 1 dc in next sc, ch 1, skip 1 sc *, repeat from *-* the entire round, finish with 1 sl st in 3rd ch from beg of round. On next round work 1 sc in every dc and every ch.
Then work the shorts higher in the back as follows: Work 11-12-13 sc past the marker mid back, turn and work 1 sl st in first st, then 1 sc in each of the next 21-23-25 sc, turn and work 1 sl st in first st, then 1 sc in each of the next 32-35-38 sts (sl sts are also worked). Continue like this by working 11-12-13 sts more on every turn until a total of 154-192-208 sts have been worked. Turn again and work until marker mid back.
Continue to work 1 round with sc while AT THE SAME TIME inc 28-16-2 sc evenly = 224-256-288 sc. Then work pattern (and insert markers) as follows from mid back: 3 dc, A.1 (= 3 dc), * 5 dc, A.1*, repeat from *-* until 2 dc remain, 2 dc, AT THE SAME TIME insert a marker in each side as follows: Insert a marker in the 3rd dc after 7th-8th-9th repetition A.1, and insert a marker in 3rd dc after 21th-24th-27th repetition with A.1 (i.e. 1 marker in each side). When A.1 has been worked 1 time vertically, continue pattern A.1X - AT THE SAME TIME inc mid back and in the sides as follows:

SIDES:
Inc on each side of dc with marker, in each side as follows - READ INCREASE TIP 2. Repeat inc every 4th round 7-7-8 times in total = 28-28-32 dc inc.

MID BACK:
AT THE SAME TIME when piece measures 15-17-19 cm / 6"-6¾"-7½" (measured mid front), inc mid back as follows – Read INCREASE TIP-1. Repeat inc with 2 dc mid back every round 10 times in total, and repeat inc with 4 dc every round 2-2-3 times = 28-28-32 dc inc.

There are now 280-312-352 dc on round. Now piece measures approx. 22-24-27 cm / 8¾"-9½"-10½" mid front and 27-29-32 cm / 10½"-11½"-12½" mid back. Now divide for legs as follows: Work 1 sl st in each of the first 5-6-6 dc on round, turn and work 1 dc in each of the first 10-12-12 dc (i.e. 5-6-6 sts on each side of marker mid back). These 10-12-12 dc = gusset. Work dc back and forth over these dc. When piece measures 4-5-6 cm / 1½"-2"-2½", dec 1 dc in each side, repeat dec when piece measures 8-9-10 cm / 3"-3½"-4" = 6-8-8 dc. Continue with 1 dc in every dc until gusset measures 11-12-13 cm / 4½"-4¾"-5", cut the yarn. Fasten gusset edge to edge to the middle 6-8-8 sts towards mid front. Then work the legs.


LEG:
Work 1 dc in each of the 132-146-166 dc around one leg (i.e. work 1 dc in every dc in A.1X and 1 dc in ch-space = 3 dc), in addition work 28-31-34 dc along the gusset = 160-177-200 dc. Work 2 rounds with dc AT THE SAME TIME on last round inc 0-3-0 dc evenly by working 2 dc in 1 dc = 160-180-200 dc.

Continue to work as follows:
ROUND 1: 3 ch (= 1 dc), * ch 1, skip 1 dc, 1 dc in next dc * , repeat from *-* until 1 dc remains, ch 1, skip 1 dc, 1 sl st in 3rd ch at beg of round.
ROUND 2: 3 ch (= 1 dc), * 1 dc in ch-space, 1 dc in next dc *, repeat from *-* the entire round until 1 ch-space remains, 1 dc in ch-space, finish with 1 sl st in 3rd ch on round.
ROUND 3: Now work pattern as follows: Work pattern according to diagram A.2 over the first 10 dc, continue with A.3 the entire round. Finish every round with 1 sl st at beg of round. REMEMBER CROCHET INFO! Continue like this until pattern A.2-A.3 have been worked vertically. Fasten off. Work the other leg the same way.


TIES:
Work 130-140-150 cm / 51"-55"-60" with LOOSE ch, turn and work 1 sl st in every ch. Thread the tie in the row with eyelet holes at the top of shorts – start mid front.

This pattern has been corrected.

Updated online: 16.02.2015
Edited info on where to place markers each side.
Updated online: 01.06.2015
under SHORTS (...until 2 sc remain, 2 dc..., NOT, ...until 2 dc remain, 2 dc...):

....Then work pattern (and insert markers) as follows from mid back: 3 dc, A.1 (= 3 dc), * 5 dc, A.1*, repeat from *-* until 2 sc remain, 2 dc, AT THE SAME TIME insert a marker in each side as follows:..
Updated online: 03.06.2015
Correction: SHORTS:
The piece is worked top down. Work 224-274-326 ch on hook size 2,5 mm/C with Safran and form a ring with 1 sl st in first ch. Insert 1 marker at beg of round = mid back.
Updated online: 07.05.2019
Correction: Diagram A.1 has been edited to A.1 and A.1X "When A.1 has been worked 1 time vertically, continue with pattern A.1X"

Diagram

All measurements in charts are in cm.

symbols = dc around ch-space (1st round= dc in dc)
symbols = sc in dc
symbols = ch
symbols = 7 ch
symbols = sc around ch-space
symbols = sl st in ch
symbols = 1st round beg here
symbols = Work 1 dc but wait with last pull through, work 1 dc more in same dc. On last pull through, pull yarn through all YOs on hook
symbols = tr
diagram
diagram
Do you have a question? See a list of frequently asked questions (FAQ)

Knitting tension is what determines the final measurements of your work, and is usually measured per 10 x 10 cm. It is provided like so: number of stitches in width x number of rows in height - eg: 19 stitches x 26 rows = 10 x 10 cm.

The knitting tension is very individual; some people knit/crochet loosely while others work tightly. You adjust the knitting tension with the needle size, which is why the suggested needle size only serve as a guide! You need to adjust this (up or down) to ensure that YOUR knitting tension matches the knitting tension provided in the pattern. If you work with a different knitting tension than provided you will have a different yarn consumption, and your work will have different measurements than what the pattern suggests.

The knitting tension also determines which yarns can replace each other. As long as you achieve the same knitting tension you can replace one yarn with another.

See DROPS lesson: How to measure your tension/gauge

See DROPS video: How to make a gauge tension swatch

The required amount of yarn is provided in grams, eg: 450 g. To calculate how many balls you’ll need you first need to know how many grams are in 1 ball (25g, 50g or 100g). This information is available if you click on the individual yarn quality on our pages. Divide the amount required with the amount of each ball. For example, if each ball is 50g (the most common amount), the calculation will be as follows: 450 / 50 = 9 balls.

The important thing when changing from one yarn to another is that the knitting/crochet tension remains the same. This is so that the measurements of the finished piece will be the same as on the sketch provided. It is easier to achieve the same knitting tension using yarns from the same yarn group. It is also possible to work with multiple strands of a thinner yarn to achieve the knitting tension of a thicker one. Please try our yarn converter. We recommend you to always work a test swatch.

Please NOTE: when changing yarn the garment might have a different look and feel to the garment in the photo, due to individual properties and qualities of each yarn.

See DROPS lesson: Can I use a different yarn than the one mentioned in the pattern?

All our yarns are categorised into yarn groups (from A to F) according to thickness and knitting tension – group A contains the thinnest yarns and group F the thickest. This makes it easier for you to find alternative yarns to our patterns, should you wish to switch yarn. All yarns within the same group have a similar knitting tension and can easily replace each other. However, different yarn qualities have different structures and properties which will give the finished work a unique look and feel.

Click here for an overview of the yarns in each yarn group

At the top of all our patterns you’ll find a link to our yarn converter, which is a helpful tool should you wish to use a different yarn than suggested. By filling in the yarn quality you wish to replace, the amount (in your size) and number of strands, the converter will present good alternative yarns with the same knitting tension. Additionally it will tell you how much you’ll require in the new qualities and whether you’ll need to work with multiple strands. Most skeins are 50g (some are 25g or 100g).

If the pattern is worked with multiple colours, every colour will have to be converted separately. Similarly, if the pattern is worked with several strands of different yarns (for example 1 strand Alpaca and 1 strand Kid-Silk) you will have to find alternatives for each, individually.

Click here to see our yarn converter

Since different yarns have different qualities and textures we have chosen to keep the original yarn in our patterns. However, you can easily find options among our available qualities by using our yarn converter, or simply pick a yarn from the same yarn group.

It is possible that some retailers still have discontinued yarns in stock, or that someone has a few skeins at home that they would like to find patterns for.

The yarn converter will provide both alternative yarn as well as required amount in the new quality.

If you think it's hard to decide what size to make, it can be a good idea to measure a garment you own already and like the size of. Then you can pick the size by comparing those measures with the ones available in the pattern's size chart.

You'll find the size chart at the bottom of the pattern.

See DROPS lesson: How to read size chart

The needle size provided in the pattern serves only as a guide, the important thing is to follow the knitting tension. And since knitting tension is very individual, you will have to adjust the needle size to ensure that YOUR tension is the same as in the pattern – maybe you’ll have to adjust 1, or even 2 needle sizes, up or down to achieve the correct tension. For this, we recommend that you work test swatches.

Should you work with a different knitting tension than the one provided, the measurements of the finished garment might deviate from the measurement sketch.

See DROPS lesson: How to measure your tension/gauge

See DROPS video: How to make a gauge tension swatch

Working a garment top-down provides more flexibility and room for personal adjustment. For example it is easier to try the garment on while working, as well as making adjustments to length of yoke and shoulder caps.

The instructions are carefully explaining every step, in the correct order. Diagrams are adjusted to the knitting direction and are worked as usual.

The diagram depicts all rows/rounds, and every stitch seen from the right side. It is read from bottom to top, from right to left. 1 square = 1 stitch.

When working back and forth, every other row is worked from the right side and every other row is worked from the wrong side. When working from the wrong side, the diagram will have to be worked reversed: from left to right, knit stitches are purled, purl stitches are knit etc.

When working in the round every round is worked from the right side and the diagram are worked from right to left on all rounds.

See DROPS lesson: How to read knitting diagrams

The diagram depicts all rows/rounds, and every stitch seen from the right side. It is worked from bottom to top, from right to left.

When working back and forth every other row is worked from the right side: from right to left and every other row is worked from the wrong side: from left to right.

When working in the round, every row in the diagram are worked from the right side, from right to left.

When working a circular diagram you start in the middle and work your way outwards, counter clockwise, row by row.

The rows usually start with a given number of chain stitches (equivalent to the height of the following stitch), this will either be depicted in the diagram or explained in the pattern.

See DROPS lesson: How to read crochet diagrams

Instructions for working several diagrams after each other on the same row/round, will often be written like so: “work A.1, A.2, A.3 a total of 0-0-2-3-4 times". This means you work A.1 once, then A.2 is worked once, and A.3 is repeated (in width) the number of times provided for your size – in this case like so: S = 0 times, M = 0 times, L=2 times, XL= 3 times and XXL = 4 times.

The diagrams are worked as usual: begin with the first row in A.1, then work the first row in A.2 etc.

See DROPS lesson: How to read knitting diagrams

See DROPS lesson: How to read crochet diagrams

The total width of the garment (from wrist-to-wrist) will be larger in the larger sizes, despite the actual sleeves being shorter. The larger sizes have longer sleeve caps and wider shoulders, so there will be a good fit in all sizes.

The measurement sketch/schematic drawing provides information regarding the full length of the garment. If it’s a jumper or a jacket the length is measured from the highest point on the shoulder (usually closest to the neckline), and straight down to the bottom of the garment. It is NOT measured from the tip of shoulder. Similarly, the length of yoke is measured from the highest point on the shoulder and down to where yoke is split into body and sleeves.

See DROPS lesson: How to read a schematic drawing

Diagrams are often repeated on the round or in height. 1 repeat is the diagram the way it appears in the pattern. If it says to work 5 repeats of A.1 in the round, then you work A.1 a total of 5 times after/next to each other in the round. If it says to work 2 repeats of A.1 vertically/in height you work the entire diagram once, then begin again at the start and work the entire diagram one more time.

Chain stitches are slightly narrower than other stitches and to avoid working the cast-on edge too tight, we simply chain more stitches to begin with. The stitch count will be adjusted on the following row to fit the pattern and measurement sketch.

The rib edge is more elastic and will contract slightly compared to, for example, stocking stitch. By increasing before the rib edge, you avoid a visible difference in width between the rib edge and the rest of the body.

It’s very easy to cast off too tightly, and by making yarn overs while casting off (and simultaneously casting these off) you avoid a too tight cast off edge.

See DROPS video: How to bind off with yarn overs (yo)

To achieve an even increase (or decrease) you can increase on, for example: every 3rd and 4th row alternately, like so: work 2 rows and increase on the 3rd row, work 3 rows and increase on the 4th. Repeat this until the increase is complete.

See DROPS lesson: Increase or decrease 1 st on every 3rd and 4th row alternately

Should you prefer to work in the round instead of back and forth, you may of course adjust the pattern. You’ll need to add steeks mid-front (usually 5 stitches), and follow the instructions. When you would normally turn and work from the wrong side, simply work across the steek and continue in the round. At the end you’ll cut the piece open, pick up stitches to work bands, and cover the cut edges.

See DROPS video: How to knit steeks and cut open

Should you prefer to work back and forth instead of in the round, you may of course adjust the pattern so you work the pieces separately and then assemble them at the end. Divide the stitches for the body in 2, add 1 edge stitch in each side (for sewing) and work the front and back pieces separately.

See DROPS lesson: Can I adapt a pattern for circular needles into straight needles?

Pattern repeats can vary slightly in the different sizes, in order to get the correct proportions. If you’re not working the exact same size as the garment in the photo, yours might deviate slightly. This has been carefully developed and adjusted so that the complete impression of the garment is the same in all sizes.

Make sure to follow instructions and diagrams for your size!

If you have found a pattern you like which is available in women’s size it’s not very difficult to convert it to men’s size. The biggest difference will be the length of sleeves and body. Start working on the women size that you think would fit across the chest. The additional length will be worked right before you cast off for the armhole/sleeve cap. If the pattern is worked top-down you can add the length right after the armhole or before the first decrease on sleeve.

Regarding additional yarn amount, this will depend on how much length you add, but it is better with a skein too many than too few.

All yarns will have excess fibres (from production) that might come off as lint or shedding. Brushed yarns (ie hairier yarns) have more of these loose, excess fibres, causing more shedding.

Shedding also depends on what is worn under or over the garment, and whether this pulls at the yarn fibres. It’s therefore not possible to guarantee that there will be no shedding

Below are some tips on how to get the best result when working with hairier yarns:

1. When the garment is finished (before you wash it) shake it vigorously so the looser hairs come off. NOTE: do NOT use a lint roller, brush or any method that pulls at the yarn.

2. Place the garment in a plastic bag and put it in your freezer - the temperature will cause the fibres to become less attached to each other, and excess fibres will come off easier.

3. Leave in the freezer for a few hours before taking it out and shaking it again.

4. Wash the garment according to the instructions on the yarn label.

Pilling is a natural process that happens to even the most exclusive of fibers. It's a natural sign of wear and tear that is hard to avoid, and that is most visible in high friction areas of your garment like a sweater's arms and cuffs.

You can make your garment look as new by removing the pilling, using a fabric comb or a pill/lint remover.

Still can't find the answer you need? Then scroll down and leave your question so one of our experts can try to help you. This will be done normally within 5 to 10 working days.
In the meantime, you can read the questions and answers that others have left to this pattern or join the DROPS Workshop on Facebook to get help from fellow knitters/crocheters!

You might also like...

Elly May

Dagmar, Germany

Elly May

Hanna, Poland

162-19 Elly May

joywiths, United Kingdom

Elly May

A1001stitches, United Kingdom

Post a comment to pattern DROPS 162-19

We would love to hear what you have to say about this pattern!

If you want to leave a question, please make sure you select the correct category in the form below, to speed up the answering process. Required fields are marked *.

Comments / Questions (158)

country flag Ghislaine wrote:

Merci pour votre réponse. Oui les explications ont été vues et lues mais j'obtiens ce que j'ai mis sur ma question précédente d'où mon interrogation. Pouvez-vous m'en dire davantage ? Cdt.

23.03.2020 - 20:12

DROPS Design answered:

Bonjour Ghislaine, vos marqueurs doivent être dans une bride, au milieu des 5 brides entre chaque A.1, il vous suffit ensuite de suivre simplement l'astuce "augmentation": pour celles des côtés, vous aurez: 1 bride dans la 1ère des 5 brides, 2 brides dans la bride suivante, 1 bride dans la bride suivante (= celle avec le marqueur), 2 brides dans la bride suivante et 1 bride dans la 5ème des 5 brides. Bon crochet!

24.03.2020 - 09:57

country flag Ghislaine wrote:

Suite du message précédent .... Existe-t-il une vidéo montrant ces augmentations ???? Les neurones ont beau chauffer, je n'y arrive pas

23.03.2020 - 15:32

DROPS Design answered:

Bonjour Ghislaine, les augmentations des côtés vont se faire comme expliqué sous AUGMENTATIONS-2 et celles du milieu dos comme sous AUGMENTATIONS-1 au niveau des explications, les aviez-vous vues? Crochetez simplement comme expliqué sous ses paragraphes pour augmenter soit sur les côtés soit au mi lieu dos. Bon crochet!

23.03.2020 - 16:36

country flag Ghislaine wrote:

Bonjour, j\'essaie de réaliser ce modèle non sans mal. J\'ai positionné mes marques sur la 3ème B après le 7ème et 21ème motif A1(taille S). Je bloque au niveau des augm. des côtés. Il faut augmenter 1B de chaque côté de la B marquée. Si je fais ça, l\'augm. est sur la B du motif A1, la B marquée est au rg précédent, donc je fais la B dans l\'espace au-dessus et la 2ème augm sur le 1ère B des 5 à réaliser. Est-ce comme cela ? J'en doute. Cdt

23.03.2020 - 15:28

country flag Diane wrote:

LOST AND CONFUSED with reading and trying to crochet with DROPS patterns as written ... very confusing! What's wrong with patterns written as Row 1, Row 2, Row 3, and/or Rnd 1, Rnd 2, Rnd 3, etc.?! Giving up on DROPS patterns! More frustration then success!

04.09.2019 - 01:25

DROPS Design answered:

Dear Diane, The DROPS patterns are knitted and crocheted by thousands and thousands of people  around the world. We understand however that in certain countries, with different knitting/crochet traditions than Scandinavia, our patterns might be written in a way that differs from what some are used to. But of course we want everyone to understand our patterns, so that’s why we have created an extensive library of tutorial videos as well as step by step lessons that explain how to follow the techniques we use and how to read the diagrams in our patterns. Give them a try!

04.09.2019 - 09:13

country flag Cristina wrote:

Buongiorno, sono arrivata ad eseguire i pantaloni fino alla fine dell'alzata. Ora non riesco a capire come proseguire.... Le istruzioni parlano di aumentare 28-16-2 maglie ad intervalli regolari. Cosa significa? Quando si lavora Il motivo? Durante o dopo questi aumenti? lavorazione quando

25.07.2019 - 16:36

DROPS Design answered:

Buongiorno Cristina. Dopo l’alzata, lavora 1 giro di maglie basse, aumentando. P.es, per la taglia S/M, ha 196 m.b e deve aumentare 28 m.b. Aumenta ogni 7 m.b (196 : 28 = 7). E per aumentare lavora 2 m.b nella stessa maglia. Al giro ancora successivo, inizia a lavorare il motivo (diagramma A.1). Buon lavoro!

25.07.2019 - 20:13

country flag Cristina wrote:

I due video che ci sono non spiegano il pantalone....

24.07.2019 - 16:36

DROPS Design answered:

Buongiorno Cristina. Questo è l’elenco completo dei video predisposti come aiuto per questo modello. Un video completo non è disponibile. Può provare a spiegarci più in dettaglio dove incontra difficoltà e cercheremo di aiutarla oppure può chiedere aiuto (per mail allegando eventualmente foto del lavoro o per telefono) al suo rivenditore Drops di fiducia. Buon lavoro!

24.07.2019 - 17:13

country flag Cristina wrote:

Non riesco a trovare il video tutorial perché le istruzioni non sono molto chiare. Dov'è?

24.07.2019 - 07:33

DROPS Design answered:

Buongiorno Cristina. Trova i link ai video che possono aiutarla a realizzare il modello, sotto la fotografia. Buon lavoro!

24.07.2019 - 09:42

country flag Karen wrote:

Is there a video tutorial that I could follow? Absolutely love these shorts and would like to make some. However not very good at reading patterns. Find them very confusing. So beautiful. Thank you

09.07.2019 - 10:07

DROPS Design answered:

Dear Karen, you can find the relevant videos for this modell, if you click on the links just below the picture. Happy Crafting!

09.07.2019 - 11:58

country flag Ingunn Seilfaldet wrote:

Hei Jeg har komt til mønsteret der A,1X jeg får ikke dette tl slik jeg leser mønstert, kan dere forklare meg bedre hva jeg skal gjøre. Det blir seende ut som et karusellskjørt og ligner ikke i det hel tatt på mønsteret

01.07.2019 - 17:05

DROPS Design answered:

Hej Ingunn. Hoppas att denna video kan hjälpa dig att komma vidare. (Det finns även videor för diagram A.2 och A.3). Lycka till!

02.07.2019 - 08:26

country flag Synnøve wrote:

Hei! Skal det strikkes mønster i økingen i sidene og bak? Og hvordan gjør man evt. Dette?

19.06.2019 - 01:46