
Popular categories
Looking for a yarn?


Comments / Questions (41)
![]() Angelica wrote:
Angelica wrote:
Hallo, Op het patroon staat het volgende: "Work back and forth with dc AT THE SAME TIME inc 1 dc at all markers as follows: Inc every other row 5-6-6-5-5-6 times, and every 4th row 2-2-2-3-3-3 times" Zou het mogelijk zijn om dit uit te leggen, want het is niet duidelijk hoeveel keer je moet vermeerderen per rij. Dank u
29.06.2016 - 16:00Lesley wrote:
Hi, Can you help me out with the decreasing at the sleeve. I am finding it difficult to understand how to do this. I have managed the whole jacket fine up to here. The problem is that it is over pattern and not over straight trebles. Look forward to your advice. Many thanks - Lesley (Scotland)
16.05.2016 - 23:07DROPS Design answered:
Dear Lesley, you are working tr (UK-English) mid under arm, and dec in sleeve will be done in tr, not in pattern. Happy crocheting!
17.05.2016 - 11:40
![]() Christina Bøhm wrote:
Christina Bøhm wrote:
Hej, hvad menes der lige når der skal tages ud....skal der ikke tages ud ved alle mærketråde....eller skal der springes nogen over....snotforvirret desværre....ellers en fed trøje.
07.04.2016 - 11:24DROPS Design answered:
Hej Christina, Jo første gang du tager ud, tager du ud på højre side af alle mærketråde og næste gang du skal tage ud ifølge opskriften så tager du ud på venstre side af alle mærketråde. Således fortsætter du på skiftevis højre og venstre side af mærketrådene. God fornøjelse!
07.04.2016 - 13:55
![]() Silvia wrote:
Silvia wrote:
Salve, non ho capito come devo aumentare in questo passo: "Lavorare avanti e indietro a m.a e, ALLO STESSO TEMPO, aumentare 1 m.a in corrispondenza di ogni segno, come segue: aumentare ogni 2 righe 5-6-6-5-5-6 volte, e ogni 4 righe 2-2-2-3-3-3 volte" Se aumento in ogni segno e ho 23 segni come faccio ad aumentare ogni due righe 5 volte??? Grazie della spiegazione.
02.02.2016 - 22:55DROPS Design answered:
Buongiorno Silvia, deve aumentare 1 m.a in corrispondenza di ogni segnapunti, quindi se ha 23 segnapunti nel lavoro farà 23 aumenti, poi deve lavorare 1 riga senza aumenti e sulla riga successiva farà ancora 23 aumenti: questo per 5 volte, poi deve aumentare ogni 4 righe, cioè lavorare 3 righe senza aumenti e aumentare sulla 4°, per 3 volte. Ci riscriva se ha ancora dubbi. Buon lavoro!
03.02.2016 - 11:33
![]() Katja wrote:
Katja wrote:
Ik heb denk ik dezelfde vraag als Siru, maar mijn Duits is zo slecht dat ik het antwoord niet begrijp.
30.06.2015 - 15:19DROPS Design answered:
Hoi Katja. Mijn Duits is ook niet perfect, dus zou je de vraag even willen stellen in het Nederlands? Alvast bedankt.
02.07.2015 - 12:33
![]() Siru wrote:
Siru wrote:
Hallo! Leider verstehe ich diesen Teil nicht richtig "dabei GLEICHZEITIG an allen Markierern je 1 Stb wie folgt zunehmen: In jeder 2. R 5-6-6-5-5-6 x und in jeder 4. R 2-2-2-3-3-3 x – ZUNAHMETIPP lesen" Soll ich in jeder 2. R an allen Stb zunehmen oder nur an 5 bzw. 6 und nehme ich in jeder 4.R zusätzlich 2-3 zu oder nur 2-3? Wieviele Reihen werden insgesamt auf diese Weise gehäkelt? Leider gibt es auf deutsch auch weder eine Häkelinfo noch einen Zunahmetipp. Vielen Dank, Siru
11.06.2015 - 12:20DROPS Design answered:
Sie nehmen immer an allen Markierern zu. Und zwar machen Sie die Zunahmen zuerst immer in jeder 2. R. Sie nehmen in 5 bzw. 6 Reihen zu, dazwischen ist immer eine Reihe ohne Zunahmen. Dann nehmen Sie nur noch in jeer 4. R zu. Sie nehmen also noch in weiteren 2 bzw. 3 Reihen zu, aber immer mit 3 R ohne Zunahmen dazwischen. Der fehlende Text wurde ergänzt, er befindet sich über der eigentlichen Anleitung.
21.06.2015 - 21:56
![]() Vera wrote:
Vera wrote:
Diagram: Man skal starte ved stjernen=1.rad. Det er angitt at 1.rad/omg er forklart i oppskriften. Denne forklaringen finner jeg ikke i oppskriften.
19.10.2014 - 09:23DROPS Design answered:
Hei Vera. Jo, for indtil du starter med diagrammet har du kun heklet st = det er det samme som förste rad. God fornöjelse med den.
21.10.2014 - 13:33
![]() Miiru wrote:
Miiru wrote:
A classic!
13.06.2014 - 08:01
![]() Mette wrote:
Mette wrote:
En super flot hæklet trøje. Håber meget den kommer med!
03.06.2014 - 21:12
![]() Ida Kaståd Svendsen wrote:
Ida Kaståd Svendsen wrote:
Syns det er en flott jakke. Må nok strikke den :)
02.06.2014 - 21:24
|
|||||||||||||||||||
Yesterday Cardigan#yesterdaycardigan |
|||||||||||||||||||
 |
 |
||||||||||||||||||
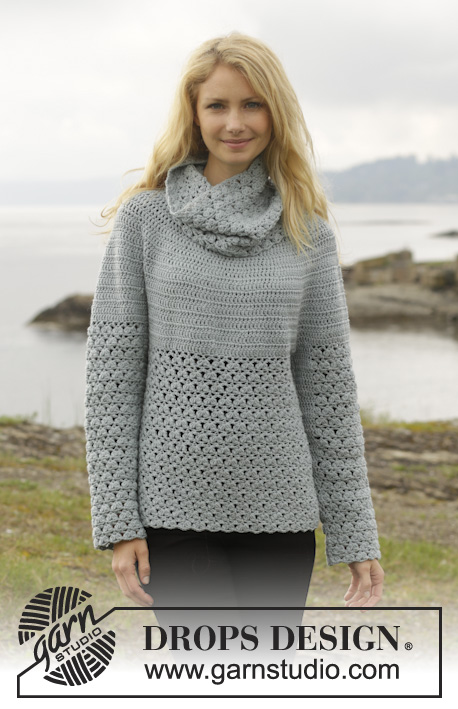
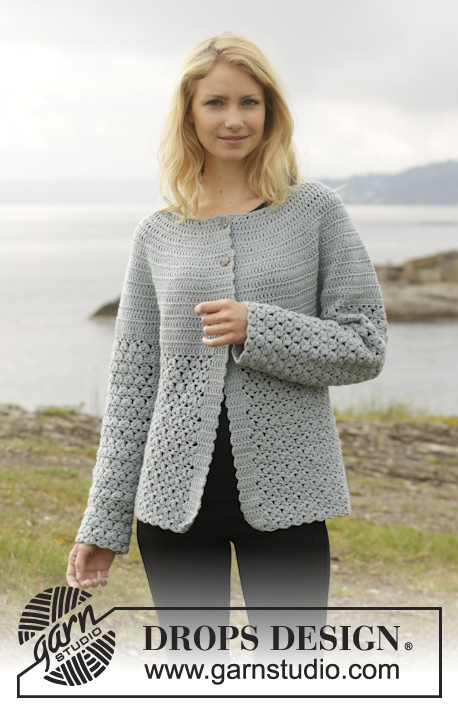
Crochet DROPS jacket with round yoke and lace pattern, worked top down in ”Merino Extra Fine”. Size: S - XXXL.
DROPS 156-17 |
|||||||||||||||||||
|
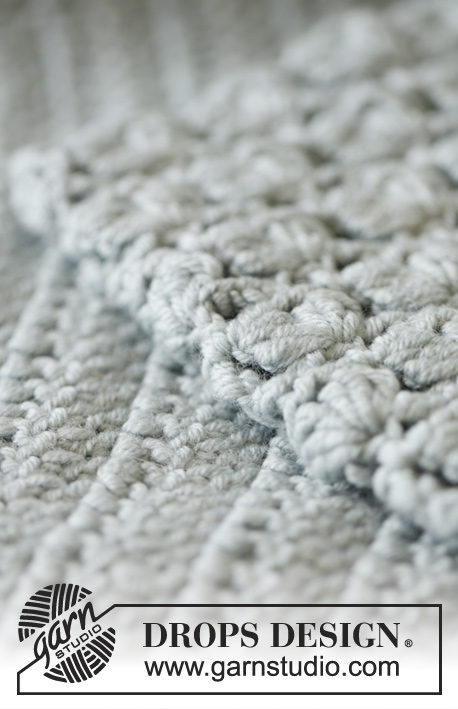
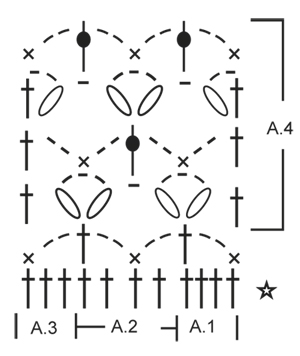
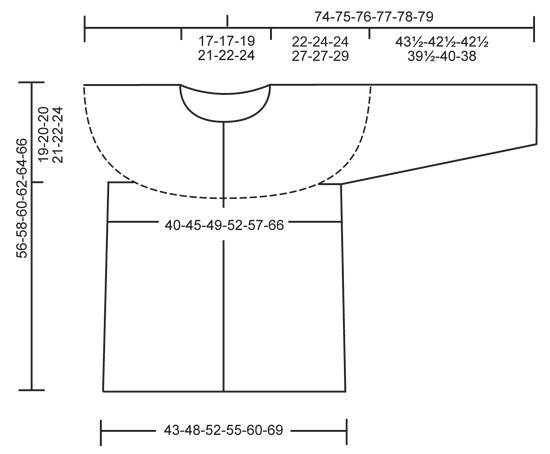
PATTERN: See diagrams A.1-A.4. The diagrams show all rows in pattern seen from RS. CROCHET INFO: Replace first dc on every round/row with 3 ch. Replace first sc on every round/row with 1 ch. Finish every dc round with 1 sl st in 3rd ch from beg of round. Finish every sc round with 1 sl st in 1st ch on round. INCREASE TIP: Inc 1 st by working 2 dc in 1 dc, first on one side of all markers on row, next time on the other side of all markers on row, continue inc like this. DECREASE TIP: Work 1 dc but wait with last pull through (= 2 sts on hook), then work next dc but on last pull through, pull yarn through all sts on hook = 1 st dec. ---------------------------------------------------------- BODY: The piece is worked top down. Worked back and forth from mid front. Work 111-116-121-131-136-146 ch (includes 3 ch to turn with) on hook size 4.5 mm with Merino Extra Fine. Work next row as follows: 1 dc in 4th ch (= 2 dc), 1 dc in each of the next ch 2, * skip ch 1, 1 dc in each of the next 4 ch *, repeat from *-* = 88-92-96-104-108-116 dc - READ CROCHET INFO. Insert 19-20-21-23-24-26 markers in the piece as follows: Insert 1st marker after 8th dc, then insert 18-19-20-22-23-25 markers 4 dc apart, after last marker there are 8 dc. Work back and forth with dc AT THE SAME TIME inc 1 dc at all markers as follows: Inc every other row 5-6-6-5-5-6 times, and every 4th row 2-2-2-3-3-3 times - READ INCREASE TIP = 221-252-264-288-300-350 dc. Work a row and inc 14-7-7-7-19-5 dc evenly (do not inc over the first and last 6 dc = band) = 235-259-271-295-319-355 dc. REMEMBER THE CROCHET GAUGE! On next round work as follows: 36-40-43-47-51-58 dc (front piece), 8 ch (under sleeve), skip 52-56-56-60-64-68 dc from previous row (to be used for sleeve later), 59-67-73-81-89-103 dc (back piece), 8 ch (under sleeve), skip 52-56-56-60-64-68 dc from previous row (to be used for sleeve later) and 36-40-43-47-51-58 dc (front piece). Insert a marker, now measure piece from here! Work 1 dc in every dc/ch AT THE SAME TIME dec 8-8-8-12-12-12 sts evenly – READ DECREASE TIP = 139-155-167-179-195-223 dc. Continue to work as follows: Work 1 dc in each of the first 6 dc (= band), A.1, A.2 30-34-37-40-44-51 repetitions in total in width, finish with A.3 and 1 dc in each of the last 6 dc. Continue pattern like this. When A.1-A.3 have been worked 1 time vertically, repeat A.4 vertically until finished measurements. When piece measures 14-14-14-15-15-15 cm / 5½"-5½"-5½"-6"-6"-6" from marker, adjust so that next row is last row in A.4, inc 1 repetition of A.2 in 8th-9th-9th-10th-11th-13th repetition in ch-space as follows: Work ch 2, 1 sc in ch-space, ch 2, 1 dc in same ch-space, ch 2, 1 sc in same ch-space. Work 14-16-19-20-22-25 repetitions of A.2, in next repetition of A.2 inc the same way. Then continue as before = 32-36-39-42-46-53 repetitions of A.2 in width. Fasten off when piece measures 34-34-36-35-37-37 cm / 13½"-13½"-14¼"-13¾"-14½"-14½" from marker, adjust to finish with next to last row in A.4, piece measures 56-58-60-62-64-66 cm / 22"-22¾"-23⅝"-24⅜"-25¼"-26" in total. SLEEVE: Sleeve is worked in the round, top down. Insert a marker, now measure piece from here! Beg by working mid under sleeve as follows: Work 1 sc in 5th ch of the 8 ch work in armhole on body, 3 ch (= 1 dc), work 1 dc in each of the next ch 3, 1 dc in every dc over sleeve, then work 1 dc in each of the remaining 4 ch under sleeve = 60-64-64-68-72-76 dc. Insert 1 marker mid under sleeve. Continue to work as follows: 1 dc in each of the first 11-11-11-13-13-15 dc AT THE SAME TIME dec 1 dc (= 10-10-10-12-12-14 dc), A.1, A.2 8-9-9-9-10-10 times in width, A.3, work 1 dc in each of the last 10-10-10-12-12-14 dc. Continue with 1 dc in each of the 20-20-20-24-24-28 dc mid under sleeve and A.1-A.3 over sleeve. When A.1-A.3 have been worked 1 time vertically, repeat A.4 vertically until finished measurements. Continue this pattern AT THE SAME TIME when piece measures 4 cm / 1½", dec 1 dc on each side of marker - Remember DECREASE TIP. Repeat dec every 3½-3½-3½-2½-2½-2 cm / 1¼"-1¼"-1¼"-⅞"-⅞"-¾" 9-9-9-11-11-13 more times. Now work only A.1-A.3 over sleeve. Fasten off when sleeve measures 43½-42½-42½-39½-40-38 cm / 17"-16¾"-16¾"-15½"-15¾"-15", adjust to finish with next to last round in A.4 – NOTE – shorter measurements in the larger sizes because of wider neck and shoulders. Work the other the same way. NECK EDGE: Work neck edge in ch-row. Work on hook size 4.5 mm / US 7 with Merino Extra Fine as follows: 1 sc in 1st st, * ch 2, skip 2 sts, 1 sc in next st *, repeat from *-* around the entire neck. Fasten off. ASSEMBLY: Fasten the buttons on left front piece, the top button approx. 1 cm / ⅜" from neck edge, the bottom button in transition between dc and pattern. Button between 2 dc on right front piece. |
|||||||||||||||||||
Diagram explanations |
|||||||||||||||||||
|
|||||||||||||||||||
 |
|||||||||||||||||||
 |
|||||||||||||||||||
Have you finished this pattern?Tag your pictures with #dropspattern #yesterdaycardigan or submit them to the #dropsfan gallery. Do you need help with this pattern?You'll find 11 tutorial videos, a Comments/Questions area and more by visiting the pattern on garnstudio.com. © 1982-2026 DROPS Design A/S. We reserve all rights. This document, including all its sub-sections, has copyrights. Read more about what you can do with our patterns at the bottom of each pattern on our site. |
|||||||||||||||||||


With over 40 years in knitting and crochet design, DROPS Design offers one of the most extensive collections of free patterns on the internet - translated to 17 languages. As of today we count 324 catalogs and 12278 patterns - 12268 of which are translated into English (US/in).
We work hard to bring you the best knitting and crochet have to offer, inspiration and advice as well as great quality yarns at incredible prices! Would you like to use our patterns for other than personal use? You can read what you are allowed to do in the Copyright text at the bottom of all our patterns. Happy crafting!
Post a comment to pattern DROPS 156-17
We would love to hear what you have to say about this pattern!
If you want to leave a question, please make sure you select the correct category in the form below, to speed up the answering process. Required fields are marked *.