
Popular categories
Looking for a yarn?


Comments / Questions (78)
![]() Joan Bengtson wrote:
Joan Bengtson wrote:
Jeg kan ikke finde,den 'røde tråd', i denne opskrift,øv. Kan man strikke i et af mønstrene i 1A og så må det også være udt.på hver 2og 4omg ?Jeg vil så gerne strikke den som der står😍
19.04.2016 - 14:02DROPS Design answered:
Hej Joan. Du har 3 glatstrik m i hver overgang. Du laver et omslag paa hver side af disse og strikker dem drejet ret i naeste pind for at lukke hullet. Herefter strikker du de ny masker löbende ind i mönstret (A.1). 1 rapport af A.1 er to masker, saa vent til du har 2 nye masker för du strikker dem med i mönstret.
21.04.2016 - 16:00
![]() Joan Bengtson wrote:
Joan Bengtson wrote:
Der står i opskriften,at man skal strikke 3m.ret og slå om p.til raglan udt.før og efter,men ift.A 1 er der også omslag ,altså 2omslag ,hvad gør man?Mvh.
13.04.2016 - 11:21DROPS Design answered:
Hej Joan, Du kan godt lave 2 omslag efter hinanden hvis du skal det ifølge opskriften. Det omslag som hører til raglanudtagningen strikker du og det som "udligner" de 2 m du strikker sammen slipper du af pinden som den øvrige del af mønsteret. Sørg for at du altid udligner dine udtagninger ved at strikke 2 sammen ifølge diagrammet, så du kun får udtagningerne i selve raglanovergangen. God fornøjelse!
13.04.2016 - 11:45
![]() Kirstina Mowers wrote:
Kirstina Mowers wrote:
Thank you for the link. I am working the pattern correctly, but it looks different from your swatch, perhaps because it is worked in the round for the pattern
25.03.2016 - 18:42DROPS Design answered:
Dear Mrs Mowers, the only difference with the video is that the rows from WS are purled while you will K the row after the yos from RS (= in the round), but you should alternate both kind of yos every other row as shown in the video. Happy knitting!
29.03.2016 - 11:54
![]() Anne wrote:
Anne wrote:
Hej Kan man strikke denne trøje i DROPS muskat? Hilsen Anne
23.03.2016 - 17:14DROPS Design answered:
Hej Anne. Muskat er tyndere end Paris, saa strikkefastheden/pindetykkelsen vil vaere anderledes. Du kan se alternativer til Paris her
24.03.2016 - 14:44
![]() Marita wrote:
Marita wrote:
Ok kul tänkte jag att sticka denna. Mötte på problem direkt. Det står att man ska sticka 4 v rätstickning runt. När man tittar på bilden så ser inte halsen ut som den är slätstickad. Om man ska sticka 4 v rätstickning runt så blir det slätstickning.
29.01.2016 - 22:24
![]() Thea wrote:
Thea wrote:
Bij dit patroon (en bij de meeste breipatronen van jullie) wordt er gewerkt met een rondbreinaald, dit vind ik erg lastig. Is er een mogelijkheid deze patronen met rechte naalden te breien? Want ik vind de patronen erg leuk.
06.01.2016 - 13:15DROPS Design answered:
Hoi Thea. Kijk hier hoe je het patroon kan aanpassen naar rechte naalden. Veel breiplezier.
06.01.2016 - 16:32
![]() Eva wrote:
Eva wrote:
Hej! När man sätter markörerna på det sista av rätstickningsvarven i början står det att den första sätts bak vid höger axel. Betyder det att jag ska sticka från avigsidan? När jag vänder arbetet rätt blir början av varvet vänster bak (inte höger). Tänker jag galet? Å andra sidan kanske det inte spelar någon roll i slutändan.
22.07.2015 - 13:30DROPS Design answered:
Hej Eva, Nej men du sticar runt uppifrån och ned från mitt bak, dvs 1:a markör blir automatiskt vid höger axel bak. Lycka till!
29.07.2015 - 12:45
![]() Carla Camilloni wrote:
Carla Camilloni wrote:
Aiuto! È la prima volta che uso i ferri circolari e quindi che inizio un maglione dal collo. Nelle spiegazioni non mi dice quando è come iniziare con i ferri a doppia punta. Mi aiutate? Grazie
22.10.2014 - 19:01DROPS Design answered:
Buonasera Carla, solitamente i ferri a doppia punta vengono utilizzati per le maniche, per il collo si inizia con i ferri circolari da 40 cm e quando aumenta il n° di m si passa al cavo più lungo. Può iniziare anche con i ferri a doppia punta ma avrà un n° elevato di m su ogni f. Ci riscriva se ha altri dubbi. Buon lavoro!!!
22.10.2014 - 22:12
![]() Carla wrote:
Carla wrote:
Buongiorno come ci si regola con le misure? Ossia, una M a che taglia europea corrisponde? Grazie Carla Camilloni
07.10.2014 - 11:37DROPS Design answered:
Buongiorno Carla. Dopo le spiegazioni del modello, trova il grafico con riportate le misure in cm. Confrontando queste misure con quelle di un suo capo analogo della misura corretta, riesce ad individuare quale taglia seguire. Buon lavoro!
07.10.2014 - 12:09
![]() Dajana wrote:
Dajana wrote:
Hallo, wo genau nehme ich die 8 maschen zu, bei den 3 glatt rechts maschen..weil wenn ich ja am ende zunehme, habe ich ja gleich zwei Umschläge am anfang.
03.09.2014 - 21:27DROPS Design answered:
Sie nehmen jeweils rechts und links von den 3 M je 1 M zu, die 3 M befinden sich also zwischen 2 Zunahme-Umschlägen. Es stimmt, dass an einigen Stellen der Zunahme-Umschlag auf den Umschlag von A.1 trifft, Sie haben dann also 2 Umschläge nacheinander. Das macht aber nichts, denn den einen Umschlag von A.1 stricken Sie in der nächsten Rd normal rechts ab, den Zunahme-Umschlag stricken Sie hingegen re verschränkt.
09.09.2014 - 22:15
|
|||||||||||||
Long Beach#longbeachsweater |
|||||||||||||
|
|
|||||||||||||
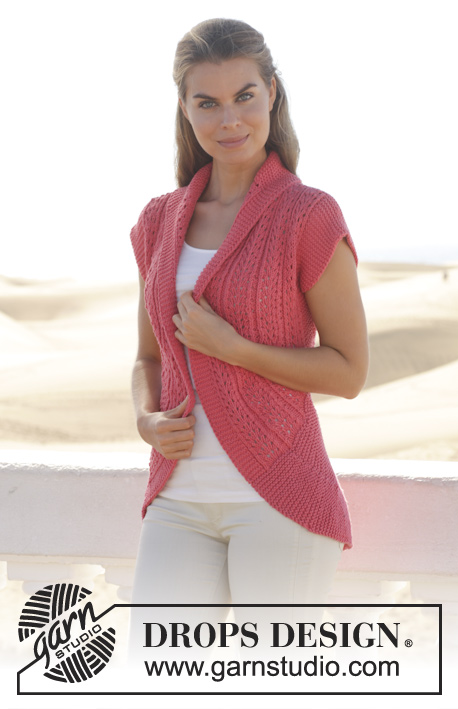
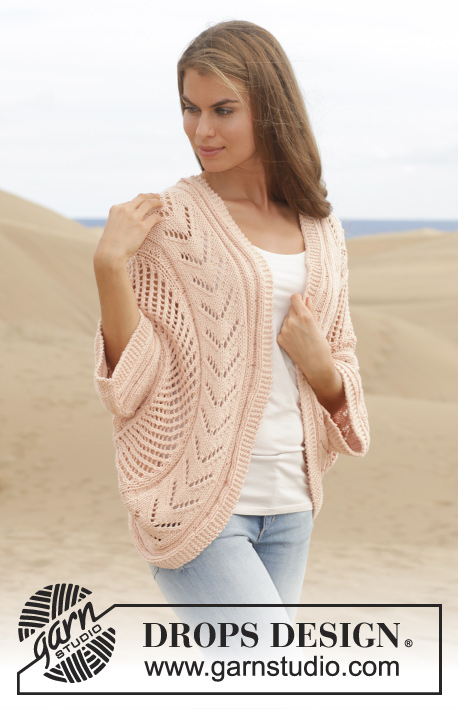
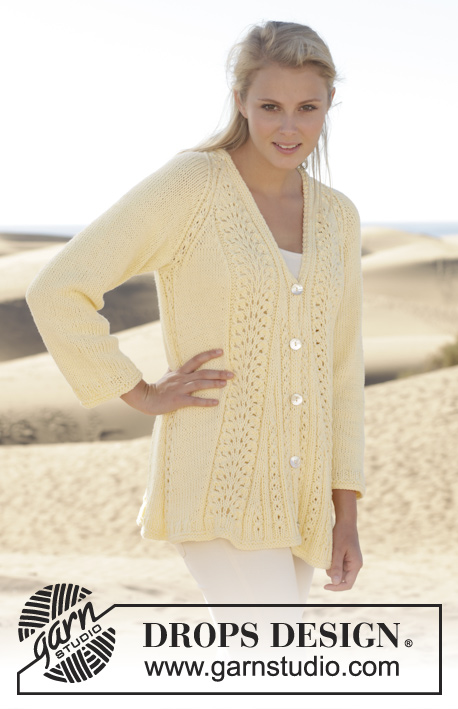
Knitted DROPS jumper with lace pattern, worked top down in ”Paris”. Size: S - XXXL.
DROPS 154-2 |
|||||||||||||
|
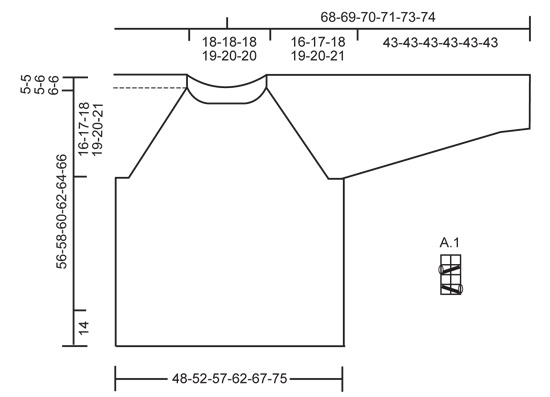
GARTER ST (in the round on circular needle/double pointed needles): * K 1 round and P 1 round *, repeat from *-*. 1 ridge = 2 rounds. GARTER ST (back and forth on needle): K all rows. PATTERN: See diagram A.1. The diagram shows all rows in pattern seen from RS. RAGLAN: Inc 8 sts on every round with inc. Inc on each side of the 3 sts in stockinette st which separate back piece, front piece and sleeves. Inc by making 1 YO, K YO twisted on next row to avoid holes. Work the inc sts in the pattern A.1: Inc every 2nd and 3rd round 20-20-22-20-22-14 times in total. Then work and inc differently on sleeves and front/back piece in the different sizes as follows: SIZE S: Work 3 more rounds without inc = 232 sts on needle. SIZE M: Inc every round on front/back piece 3 times and inc on 3rd round 1 time on sleeves. Work 2 rounds without inc = 248 sts on needle. SIZE L: Inc every round 4 times on front/back piece, no inc on sleeves = 264 sts on needle. SIZE XL: Inc every round 9 times on front/back piece and inc every 3rd round 3 times on sleeves = 288 sts on needle. SIZE XXL: Inc every round 9 times on front/back piece and inc every 3rd round 2 times on sleeves = 304 sts on needle. SIZE XXXL: Inc every round 23 times on front/back piece and inc every other round 11 times on sleeves = 332 sts on needle. DECREASE TIP: Dec on each side of 3 sts in stockinette st mid under sleeve. Dec as follows before sts: Work until 2 sts remain before the 3 sts, slip 1 st, K 1, psso. Dec as follows after sts: K 2 tog. ---------------------------------------------------------- JUMPER: The piece is worked top down. Cast on 84-84-84-92-96-96 sts on circular needle size 5.5 and work 2 ridges in the round. K 1 round and dec 12 sts evenly in all sizes = 72-72-72-80-84-84 sts. P 1 round - AT THE SAME TIME insert markers in the piece as follows: 1st marker at beg of round (= beg of back piece), 2nd marker after 18-18-18-18-20-20 sts (= end of back piece), 3rd marker after 3 sts, 4th marker after 12-12-12-16-16-16 sts (= left sleeve), 5th marker after 3 sts, 6th marker after 18-18-18-18-20-20 sts (= end of front piece), 7th marker after 3 sts, 8th marker after 12-12-12-16-16-16 sts (= right sleeve). Then work according to diagram A.1 over front piece, back piece and sleeves AT THE SAME TIME inc for RAGLAN - see explanation above on each side of the 3 sts in stockinette st that separate the sleeves, front and back piece. After raglan inc there are 232-248-264-288-304-332 sts on needle. On next round work A.1 over the 58-64-70-76-82-94 sts on back piece, bind off 3 sts, work A.1 over the 52-54-56-62-64-66 sts on right sleeve, slip sts from sleeve on a stitch holder. Bind off 3 sts, work A.1 over the 58-64-70-76-82-94 sts on front piece and bind off 3 sts, work A.1 over the 52-54-56-62-64-66 sts on left sleeve, slip sts from sleeve on a stitch holder and bind off 3 sts. Then work body and sleeves separately. BODY: Work next row as follows: A.1 over the next 58-64-70-76-82-94 sts (= back piece), cast on 4 new sts under right sleeve, A.1 over the next 58-64-70-76-82-94 sts (= front piece) and cast on 4 new sts under left sleeve = 124-136-148-160-172-196 sts. insert marker in the middle of the 4 new sts under each sleeve and move these when working. Put piece tog and work in the round according to A.1 over all sts until piece measures 41-43-45-47-49-51 cm / 16⅛"-17"-17¾"-18½"-19¼"-20". Work 2 ridges over 4 sts on each side of markers and A.1 over the other sts as before. (= 8 sts in each side in garter st). On next round divide the piece at the markers and work front and back piece separately until finished measurements with 4 sts in garter st in each side = 62-68-74-80-86-98 sts on needle. Work until piece measures 54-56-58-60-62-64 cm / 21¼"-22"-22¾"-23⅝"-24⅜"-25¼" and work 2 ridges. K 1 row while AT THE SAME TIME inc 10-10-12-14-14-14 sts evenly = 72-78-86-94-100-112 sts. K 1 row and loosely bind off. Piece measures approx. 56-58-60-62-64-66 cm / 22"-22¾"-23⅝"-24⅜"-25¼"-26". SLEEVE: Slip sts for sleeve back on needle = 52-54-56-62-64-66 sts, cast on 3 new sts and put piece tog and continue in the round on circular needle/double pointed needles = 55-57-59-65-67-69 sts. Work the 3 new sts under sleeve in stockinette st and work the other sts according to diagram A.1 as before. Insert a marker mid under sleeve, measure piece from here. When piece measures 2 cm / ¾", dec 1 st on each side of the 3 sts in stockinette st mid under sleeve - READ DECREASE TIP ABOVE, repeat dec every 2½-2-2-2-1½-1½ cm / ⅞"-¾"-¾"-¾"-½"-½" 15-16-16-18-19-19 more times (16-17-17-19-20-20 dec in total ) = 23-23-25-27-27-29 sts. Work until piece measures approx. 41 cm / 16" from marker, K 1 round, P 1 round, K 1 round and P 1 round. K 1 round while AT THE SAME TIME inc 4 sts evenly = 27-27-29-31-31-33 sts, P 1 round and loosely bind off. Piece measures approx. 43 cm / 17" (same length for all sizes because of wider body in the larger sizes). ASSEMBLY: Sew the openings under sleeves. |
|||||||||||||
Diagram explanations |
|||||||||||||
|
|||||||||||||
 |
|||||||||||||
Have you finished this pattern?Tag your pictures with #dropspattern #longbeachsweater or submit them to the #dropsfan gallery. Do you need help with this pattern?You'll find 21 tutorial videos, a Comments/Questions area and more by visiting the pattern on garnstudio.com. © 1982-2026 DROPS Design A/S. We reserve all rights. This document, including all its sub-sections, has copyrights. Read more about what you can do with our patterns at the bottom of each pattern on our site. |
|||||||||||||


With over 40 years in knitting and crochet design, DROPS Design offers one of the most extensive collections of free patterns on the internet - translated to 17 languages. As of today we count 324 catalogs and 12278 patterns - 12268 of which are translated into English (US/in).
We work hard to bring you the best knitting and crochet have to offer, inspiration and advice as well as great quality yarns at incredible prices! Would you like to use our patterns for other than personal use? You can read what you are allowed to do in the Copyright text at the bottom of all our patterns. Happy crafting!
Post a comment to pattern DROPS 154-2
We would love to hear what you have to say about this pattern!
If you want to leave a question, please make sure you select the correct category in the form below, to speed up the answering process. Required fields are marked *.