
Popular categories
Looking for a yarn?


Comments / Questions (84)
![]() Satu Sukanen wrote:
Satu Sukanen wrote:
En löytänyt silmukkamäärissä eroa S ja M koon välissä. Mittataulukon mukaan leveydessä kuitenkin pitäisi olla 8cm ero (S-koossa 51cm ja M-koossa 59cm)Millä silmukkamäärällä teen M-koon?
27.04.2014 - 18:30DROPS Design answered:
Hei! Tässä on luultavasti vika ruutupiirroksessa. Tarkistamme ja korjaamme!
12.05.2014 - 12:27
![]() Martin Geneviève wrote:
Martin Geneviève wrote:
Bonjour à toute l'équipe, je désire tricoter le modèle 152-18 mais je comprend mal pour l'empiècement car le nombre de mailles ne correspond pas : 46m demi-dos, 11 fois A2 ( 231m )puis A1 ( 7m ) puis A3 (21m ) ,puis 92 m puis les points fantaisies comme précédemment, puis 46m pour le second demi-dos = trop de mailles ! je les prend où, toutes ces mailles ? Merci de m'aider . Cordialement . Geneviève Martin
27.04.2014 - 18:26DROPS Design answered:
Bonjour Mme Martin, vous tricotez la moitié des mailles du dos (46 m), puis la 1ère manche (119 m) avec A.2, 7x A.1 et A.3, puis le devant (92 m), la 2ème manche (119m) et le demi-dos (46 m) = 422 m. Bon tricot!
28.04.2014 - 10:27
![]() Martin Geneviève wrote:
Martin Geneviève wrote:
Bonjour à toute l'équipe et félicitations pour vos beaux modèles . Pour celui-ci, je rame un peu au niveau de l'empiècement puisqu'il faut après les 46 m du demi-dos,tricoter 11 fois le motif A2 ce qui fait en tout 231m, puis AI (7m ) et A3 (21 m ),92m, les points fantaisies comme précédemment,puis les 46 m du demi-dos =beaucoup trop de mailles ! ( je les prend où ? ) Merci d'avance pour vos conseils . Cordialement . Geneviève Martin
27.04.2014 - 18:17
![]() Mona Lien wrote:
Mona Lien wrote:
Får ikke maskeantallet til å stemme etter alle fellingene på bærestykket. Strikker str. XL, skal det felles en ekstra maske hver 6 felling eller bare de to gangene som er på diagram A.2 og A3. Fint om dere kan se på det snart ellers kommer jeg ikke videre.
23.04.2014 - 17:37DROPS Design answered:
Hei Mona. Du skal fortsaette med at tage ind som i mönstret, saa du fortsaetter ogsaa med den ekstra maske i hver 6 pind.
25.04.2014 - 13:01Bronwyn wrote:
Please could you help with the yoke? I'm struggling to understand the part after reaching 174 stitches, when I have to leave 30 front stitches on the needle. I can't work out the rest. completely confused and desperate to finish it so I can wear it and then make another one!!! Many thanks, Bronwyn
30.03.2014 - 11:16DROPS Design answered:
Dear Bronwyn, after you have slipped 30 front sts onto a st holder, continue back and forth on remaining sts as before, but at the same time, you will work short rows to create a higher neckline on back piece, ie work now in rows until 3 sts remain at the end of row (other side of neckline), turn, work until 3 sts remain at the other side (other side of neckline), and continue that way working 3 sts less each row as stated. Happy knitting!
31.03.2014 - 09:18Renee Hawkins wrote:
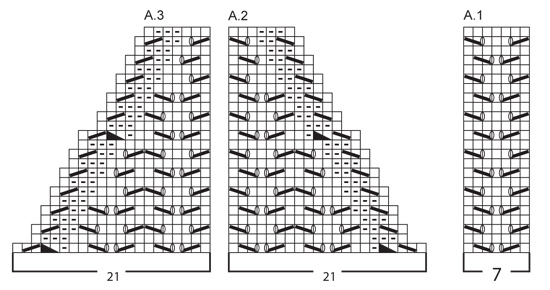
Hi, I am a little confused as to read the A2 and A3 diagrams. When knitting the decrease in the sleeve, should the pearl stitches be closest to the main body or towards the middle of the sleeve? Thank you :)
19.03.2014 - 13:52DROPS Design answered:
Dear Mrs Hawkins, diagrams are read from RS from right towards left, you start working sleeve with A.2 (beg with K1, P3 on odd rounds), and end sleeve with A.3 (end with P3, K1 on odd rounds). Happy knitting!
19.03.2014 - 15:58
![]() Teresa wrote:
Teresa wrote:
Muito original; quero ter
13.03.2014 - 14:39
![]() Laura wrote:
Laura wrote:
Ich würde gerne den Rumpfteil in zwei Teilen, also Hin- und Rück stricken, da ich aufgrund der Vielzahl der Maschen immer einen Achter in die Strickarbeit bekomme. Wie rechne ich die Anleitung am besten um?
24.02.2014 - 20:44DROPS Design answered:
Liebe Laura, die Passe müssen Sie trotz der Vielzahl der M in Rd auf der Rundnadel stricken. Sie könnten das Rumpfteil zwar halbieren und so aufteilen, dass sich an Vorder- und Rückenteil beidseitig je 7 M A.1 befinden, aber das ist bei diesem Modell nicht empfehlenswert, da die Passe sehr lang ist und Sie ohnehin lange rund stricken müssen.
24.02.2014 - 23:04
![]() Karolina wrote:
Karolina wrote:
Jag instämmer med Karin Ström nedan, att maskantalet inte stämmer efter mina 31 varv av raglanminskningar. Jag får ihop det till att det i mönstret inte räknats med att det stickas 2 maskor aviga tillsammans på vart tolfte varv. Ska dessa inte stickas ihop, eller ska det vara ett lägre maskantal i slutet?
21.02.2014 - 14:40DROPS Design answered:
Der er lagt en rettelse ud på opskriften. God fornøjelse!
30.05.2014 - 07:26
![]() Meme wrote:
Meme wrote:
First sorry for asking to many questions and thank you for answering me i cant understand that section (NOTE! Stop after a round with stockinette st that is after a round like 3rd row in A.1 (i.e after round 4, 8, 12 etc), ) this means i have to make 3 round of stockinette sts fter 5 cm of the pttern??
18.02.2014 - 22:14DROPS Design answered:
Dear Meme, this means you continue until piece measures a total of 5 cm, but stop after a round worked in st st, i.e. either after a round 4, or 8, or 12 etc. Happy knitting!
19.02.2014 - 09:37
|
|||||||||||||||||||
Florentina#florentinasweater |
|||||||||||||||||||
|
|
|||||||||||||||||||
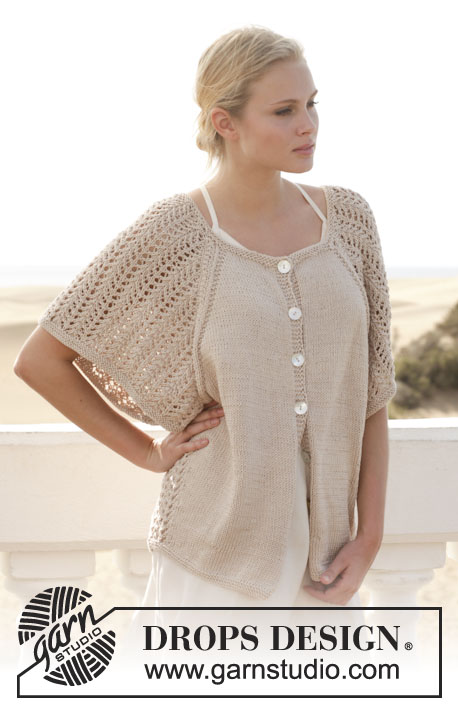
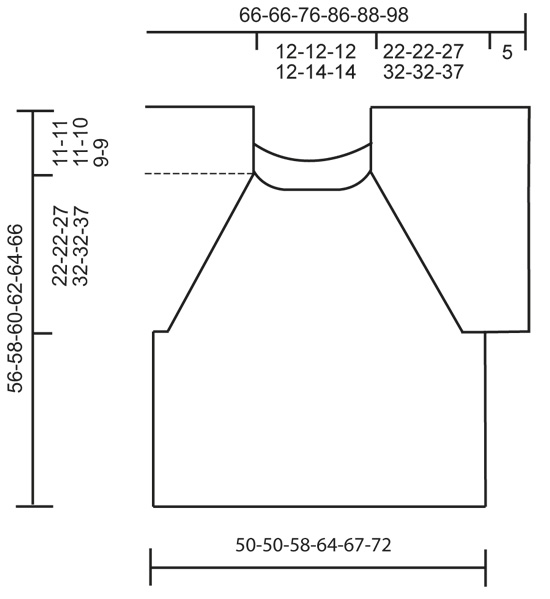
Knitted DROPS jumper with lace pattern and raglan in ”Muskat”. Size: S - XXXL.
DROPS 152-18 |
|||||||||||||||||||
|
GARTER ST (in the round on circular needle): * K 1 round and P 1 round *, repeat from *-*. 1 ridge = 2 rounds. PATTERN: See diagrams A.1-A.3. INCREASE TIP: Inc 1 st by getting yarn between 2 sts from previous round - K this st twisted, i.e. work in back loop of st instead of front to avoid holes. RAGLAN BODY: Dec as follows before marker: Beg 4 sts before marker, P 2, K 2 tog (= 1 st dec). Dec as follows after marker: Beg on 1st st after marker, slip 1 st as if to K, K 1, psso, P 2 (= 1 st dec). ---------------------------------------------------------- BODY: Worked in the round on circular needle. Cast on 212-212-244-268-280-304 sts on circular needle size 3.5 mm / US 4 with Muskat. Work 3 ridges in GARTER ST - see explanation above. Then switch to circular needle size 4 mm / US 6 and work as follows from mid back: Stockinette st over the next 46-46-54-60-63-69 sts (= back piece), A.1 (= 7 sts) over the next 14 sts, stockinette st over the next 92-92-108-120-126-138 sts (= front piece), A.1 over the next 14 sts, stockinette st over the next 46-46-54-60-63-69 m (= back piece). Continue in stockinette st, pattern according to diagram A.1 in each side until piece measures 23-25-22-21-23-20 cm / 9"-9¾"-8¾"-8¼"-9"-8". REMEMBER THE GAUGE! On next round bind off for armholes in each side as follows: Work until the 2 repetitions in left side and bind off the 14 sts over A.1, work stockinette st over all sts on front piece, and bind off the 14 sts over A.1 in right side, work the rest of row and put piece aside (= 28 sts in total bind off) = 92-92-108-120-126-138 sts on back and front piece = 184-184-216-240-252-276 sts in total remain on needle. SLEEVE: Worked in the round on circular needle. Cast on 133-133-147-161-154-168 sts on circular needle size 3.5 mm / US 4 with Muskat. Work 3 ridges in garter st - see explanation above. Insert a marker at beg of round = mid under sleeve. Then switch to circular needle size 4 mm / US 6 and work pattern as follows: A.1 (= 7 sts) over all sts on round = 19-19-21-23-22-24 repetitions on round. Continue like this with pattern until piece measures 5 cm / 2" from cast-on edge. NOTE! Stop after a round with stockinette st that is after a round like 3rd row in A.1 (i.e after round 4, 8, 12 etc), AT THE SAME TIME on this round bind off one whole repetition of A.1 on each side of marker (= 14 sts bind off in total mid under sleeve) = 119-119-133-147-140-154 sts remain on needle. Put piece aside and Make another sleeve. YOKE: Read all of the following section before continuing! Slip sleeves on to same circular needle as body where armholes were bound off = 422-422-482-534-532-584 sts, insert 1 marker in all transitions between body and sleeves (= 4 markers). Continue like this on next round: 46-46-54-60-63-69 sts in stockinette st (= back piece), insert a marker here, A.2 (= 21 sts), A.1 11-11-13-15-14-16 times in total, A.3 (= 21 sts), insert a marker here, stockinette st over the next 92-92-108-120-126-138 (= front piece), insert a marker here, A.2 (= 21 sts), A.1 11-11-13-15-14-16 times in total, A.3 (= 21 sts), insert a marker here, 46-46-54-60-63-69 sts stockinette st (= back piece), AT THE SAME TIME beg dec for RAGLAN BODY on body – see explanation above = 4 sts dec. Repeat the same dec every other round 30-30-37-44-44-51 more times, 31-31-38-45-45-52 times in total, AT THE SAME TIME continue working pattern with dec for raglan on sleeves. NOTE! When A.2 and A.3 have been worked 1 time vertically, continue with the same dec in pattern on sleeves and the same dec for raglan on body as before. When all dec are done, 154-154-154-146-144-136 sts remain on needle. Then work as follows on next round from mid back: Continue as before with stockinette st over sts on back piece, and pattern over left sleeve. Work stockinette st over the 30-30-32-30-36-34 sts on front piece before slipping front piece on a stitch holder. Then work an elevation back and forth in neck as follows: On the next 6 rows continue with pattern over sleeves, stockinette st on back piece and dec as before, AT THE SAME TIME work an elevation in the back of neck as follows: Reduce no of sts worked as follows: Work until 3 sts remain on row, turn, work until 3 sts remain, turn, work until 6 sts remain, turn, work until 6 sts remain, turn, work until 9 sts remain, turn, work until 9 sts remain. Then slip sts from stitch holder back on needle, switch to circular needle size 3.5 mm / US 4 and work 3 ridges in the round over all sts, AT THE SAME TIME on 1st round on edge in garter st dec 11-11-11-12-10-2 sts evenly on needle = 143-143-143-134-134-134 sts remain on needle. Loosely bind off. ASSEMBLY: Sew the openings under the sleeves tog. |
|||||||||||||||||||
Diagram explanations |
|||||||||||||||||||
|
|||||||||||||||||||
 |
|||||||||||||||||||
 |
|||||||||||||||||||
Have you finished this pattern?Tag your pictures with #dropspattern #florentinasweater or submit them to the #dropsfan gallery. Do you need help with this pattern?You'll find 23 tutorial videos, a Comments/Questions area and more by visiting the pattern on garnstudio.com. © 1982-2026 DROPS Design A/S. We reserve all rights. This document, including all its sub-sections, has copyrights. Read more about what you can do with our patterns at the bottom of each pattern on our site. |
|||||||||||||||||||


With over 40 years in knitting and crochet design, DROPS Design offers one of the most extensive collections of free patterns on the internet - translated to 17 languages. As of today we count 324 catalogs and 12245 patterns - 12235 of which are translated into English (US/in).
We work hard to bring you the best knitting and crochet have to offer, inspiration and advice as well as great quality yarns at incredible prices! Would you like to use our patterns for other than personal use? You can read what you are allowed to do in the Copyright text at the bottom of all our patterns. Happy crafting!
Post a comment to pattern DROPS 152-18
We would love to hear what you have to say about this pattern!
If you want to leave a question, please make sure you select the correct category in the form below, to speed up the answering process. Required fields are marked *.