
Popular categories
Looking for a yarn?


Comments / Questions (189)
![]() Aonik wrote:
Aonik wrote:
Bonjour Pouvez vous m'expliquer SVP les diminutions à 8cm. Je comprends 14 dims les 2rgs puis 6 dims tous à les 5,5 cm soit (14+6)*2=40 m. Hors il est indiqué je l'on passe de 330 à 246 m soit - 84m Il y a sans doute qqchose que je n'ai pas vu. Merci de votre retour.
24.11.2018 - 16:36DROPS Design answered:
Bonjour Mme Aonik, vous avez 330 m avant les diminutions et diminuez 6 fois au total 14 mailles (= 1 m dans les sections envers) soit 6 x 14 m = 84 m diminuées, il reste: 330-84= 246 m. Bon tricot!
26.11.2018 - 08:26Mrs G Ellingham wrote:
Can I make this garment with out the shaping. It's knitting up nicely.
05.11.2018 - 16:54DROPS Design answered:
Dear Mrs Ellingham, you could, but you will loose the waist shaping as shown in the picture. Happy knitting!
06.11.2018 - 08:12
![]() Luisa Altenrath wrote:
Luisa Altenrath wrote:
Ich habe mich genau an die Anleitung gehalten und der Mustersatz entspricht nicht dem wie auf dem Foto, in keinster Weise. Ich war sehr enttäuscht. Ich habe mich an die Größe gehalten, die dann viel zu groß ausfiel, so dass ich alles noch einmal auf machen musste. Ich habe eine kleine Größe gewählt, was sich im ersten Moment schmeichelhaft anhört, aber eigentlich nur nervig ist. Wie gesagt, Muster und Größen stimmen nicht mit dem Foto überein. Schlechte Wahl!!!!
21.09.2018 - 16:23DROPS Design answered:
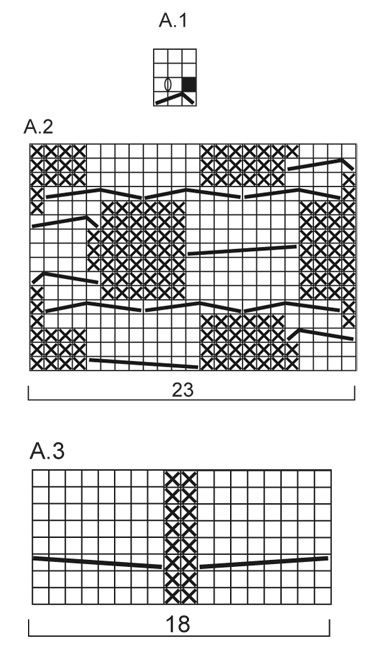
Liebe Frau Altenrath, beachten Sie, daß im Diagram alle Reihen gezeigt sind, dh die Hinreihen lesen Sie rechts nach links und die Rückreihen links nach rechts = 1 Kästchen = 1 M x 1 Reihe. Viel Spaß beim stricken!
24.09.2018 - 11:20
![]() Lorena wrote:
Lorena wrote:
Hola no me cuadra la imagen con las explicaciones de los diagramas viatos del lado derecho se comienza con 18 puntos de cenefa y 8 revés luego A1 al parecer en el delantero se repite aA1 por 2 veces es correcto esto ?
12.07.2018 - 22:41
![]() B Ruijs wrote:
B Ruijs wrote:
Waarom zijn de patronen van al die mooie vesten niet gewoon op twee breinaalden gr
06.07.2018 - 18:49DROPS Design answered:
Dag B. Ruis, Het is in Noorwegen gebruikelijker om met rondbreinaalden te breien, maar veel patronen kun je ook omzetten om met rechte naalden te breien. In deze instructie vind je meer informatie daarover.
09.07.2018 - 10:01
![]() Mari Jose wrote:
Mari Jose wrote:
Hola,en la imagen parece que sobre la cenefa se haya tenido vueltas cortas sobre 8 puntos, además de las vueltas cortas cada 10 vueltas, desde la altura de los botones?? Un saludo
26.03.2018 - 21:39DROPS Design answered:
Hola Mari Jose. El patrón es correcto. Las filas cortas se trabajan según las explicaciones.
29.03.2018 - 18:20Sharon Young wrote:
Thank you for your reply to my question on 24/11/17, unfortunately I'm still stuck, I have cast on 290 stitches, I then worked 3 rows of garter stitch over 18 stitches ( working back and forth on the circular needle) on the last row I cannot increase by 40 stitches as the last row will only have 18 stitches, I hope that's made it clearer as to how I've interpreted the pattern.
26.11.2017 - 17:44DROPS Design answered:
Dear Mrs Young, you cast on 290 sts and work 2 ridges over these 290 sts while increasing 40 sts on last row = 290+40 = 330 sts. Then work in pattern as explain starting with 18 sts in garter st, then P sts, A.1, A.2 etc. Happy knitting!
27.11.2017 - 10:29Sharon Young wrote:
In the first pattern instruction after casting on, do you work the 2 ridges (4 rows) adding 40 stitches to the 18 stitches of the last row and then continue working on the right side starting with the 18 stitches in garter stitch. The is how I read the pattern but I think I have misunderstood it as the 4 ridge rows are now higher than the cast on row.
24.11.2017 - 20:00DROPS Design answered:
Hi Sharon, You work 2 ridges and on the last row of the ridges (i.e. the 4th row, you increase 40 stitches evenly on the row, so approx. every 6th stitch. Then you start the pattern with 18 stitches in garter stitch etc. Hope this helps and happy knitting!
25.11.2017 - 07:25
![]() Gina Jarvis wrote:
Gina Jarvis wrote:
There should be a pattern row for instance......and this is size med/large WS- garter 18, k8 A1 K12 A2 K12 A1 K12 A1 K12 A2 K12 A1 K12 A3 K12 A1 k12 a2 k12 a1 k12 a1 k12 a2 k12 a1 k8 garter 18 ****this would eliminate us having to write it out!!--
01.07.2017 - 16:42
![]() Valeria wrote:
Valeria wrote:
Sono piuttosto esperta nel lavoro a maglia ed ho già fatto molti lavori a partire dai vostri modelli con soddisfazione e senza problemi. Nel caso di questo modello temo ci sia un errore nello schema A2 in quanto ho provato più volte a seguire le indicazioni ma non viene come da fotografia ed esteticamente brutto. Potete verificare che sia corretto quanto pubblicato sul sito italiano e darmi indicazioni? Vi ringrazio e faccio i complimenti per il sito
26.01.2017 - 11:45DROPS Design answered:
Buongiorno Valeria, questo modello è stato ampiamente realizzato e i diagrammi sono corretti. Ci può illustrare nel dettaglio il suo problema, così possiamo aiutarla meglio? si ricordi che i diagrammi si leggono dal basso verso l'alto e da destra verso sinistra. Buon lavoro!
26.01.2017 - 12:19
|
||||||||||||||||||||||||||||||||||
Gwendolen#gwendolencardigan |
||||||||||||||||||||||||||||||||||
 |
 |
|||||||||||||||||||||||||||||||||
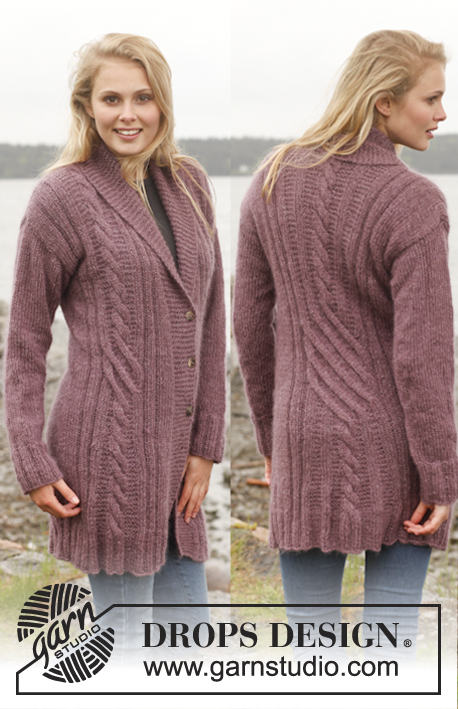
Knitted DROPS jacket with cables and shawl collar in ”Karisma”. Size: S - XXXL.
DROPS 151-1 |
||||||||||||||||||||||||||||||||||
|
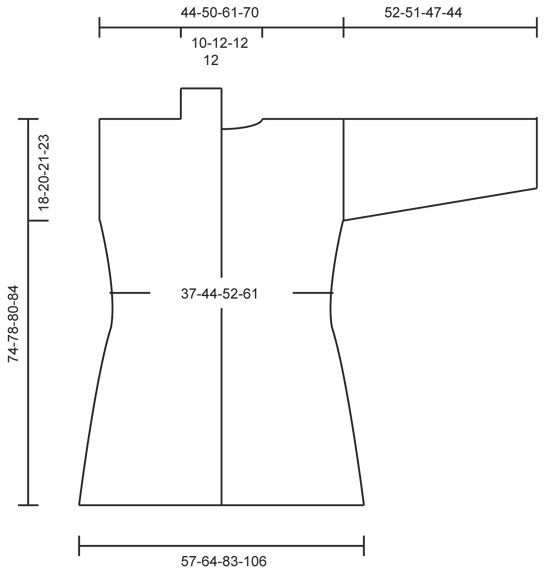
GARTER ST (back and forth on needle): K all rows. 1 ridge = K 2 rows. PATTERN: See diagrams A.1 to A.3. Diagrams show all rows in pattern from RS. SHORT ROWS IN BAND: Work short rows over sts in band to avoid it contracting vertically. Work like this every 10th row – from RS: Work 18 sts (= right band), turn and work back. Work 1 row over all sts as before. Turn and work 18 sts (= left band), turn and work back. Turn and work 1 row over all sts as before. BUTTONHOLES: Dec for buttonholes on right band. 1 buttonhole = K tog 3rd and 4th st from mid front, make 1 YO, K 8, K tog 13th and 14th st from mid front, make 1 YO (= 2 buttonholes). Dec for buttonholes when piece measures: SIZE S: 29 and 37 cm / 11½" and 14½". SIZE M/L: 30 and 38 cm / 11¾" and 15". SIZE XL: 31 and 39 cm / 12¼" and 15¼". SIZE XXL/XXXL: 33 and 41 cm / 13" and 16". ---------------------------------------------------------- BODY: Worked back and forth on circular needle to make room for all the sts. Cast on 266-290-350-386 sts (includes 18 band sts in each side towards mid front) on circular needle size 4 mm / US 6 with Karisma. Work 2 RIDGES in garter st - see explanation above AT THE SAME TIME on last row inc 40 sts evenly = 306-330-390-426 sts. Then work as follows from RS: 18 sts in garter st (= band), P 8-8-8-10, * A.1 (= 3 sts), P 10-12-12-14 *, repeat from *-* 1-1-2-2 times in total, A.2 (= 23 sts), P 10-12-12-14, * A.1, P 10-12-12-14 *, repeat from *-* 2-2-2-2 times in total, A.2, * P 10-12-12-14, A.1 *, repeat from *-* 1-1-2-2 times in total, P 10-12-12-14, A.3 (= 18 sts), P 10-12-12-14, * A.1, P 10-12-12-14 *, repeat from *-* 1-1-2-2 times in total, A.2, P 10-12-12-14, * A.1, P 10-12-12-14 *, repeat from *-* 2 times in total, A.2, * P 10-12-12-14, A.1 *, repeat from *-* 1-1-2-2 times in total, P 8-8-8-10, 18 sts in garter st (= band). Continue this pattern AT THE SAME TIME work short rows over sts in band – see explanation above. AT THE SAME TIME when piece measures 8 cm / 3", dec 1 st at beg of every P-section, P the first 2 sts tog (= 14-14-18-18 dec sts). Repeat dec every 5-5½-5½-6 cm / 2"-2¼"-2¼"-2⅜", dec alternately at beg and end of all P-sections 5 more times (= 6 dec in total) = 222-246-282-318 sts. Remember to dec for BUTTONHOLES on right band - see explanation above. When piece measures 40-41-42-44 cm / 15¾"-16⅛"-16½"-17¼", on next RS row inc 1 st at beg of every P-section, inc with a YO and K yo twisted on next row from WS (= 14-14-18-18 inc sts). Repeat inc but at the end of every P-section when piece measures 50-52-53-55 cm / 19¾"-20½"-21"-21½" = 250-274-318-354 sts. When piece measures 56-58-59-61 cm / 22"-22¾"-23¼"-24", divide the piece, finish front and back piece separately as follows: Slip the first and last 66-71-82-91 sts on a stitch holder for front piece, cut the yarn, then work only over the middle 118-132-154-172 sts (= back piece). BACK PIECE: = 118-132-154-172 sts. Continue pattern as before. When piece measures 72-76-78-82 cm / 28½"-30"-30¾"-32¼", bind off the middle 22-26-26-26 sts for neck = 48-53-64-73 sts remain on each shoulder. Finish each part separately. Continue with pattern until piece measures 74-78-80-84 cm / 29"-30¾"-31½"-33", bind off. RIGHT FRONT PIECE: Slip the first 66-71-82-91 sts back on needle. Continue pattern as before. When piece measures 74-78-80-84 cm / 29"-30¾"-31½"-33", bind off the first 48-53-64-73 sts from WS for shoulder = 18 sts remain on needle. Work the rest of row. Then work short rows over the 18 sts as follows - beg from RS: * Work 2 rows back and forth over the first 9 sts, work 2 rows over all sts *, repeat from *-* until neck edge measures 7-8-8-8 cm / 2¾"-3"-3"-3" at the shortest. Bind off. LEFT FRONT PIECE: Work as right but reversed. Bind off for shoulder from RS and beg short rows from WS. SLEEVE: Worked in the round on double pointed needles. Cast on 56-60-64-68 sts on double pointed needles size 3.5 mm / US 4 with Karisma. Work rib = K 2/P 2. When piece measures 16-16-16-14 cm / 6¼"-6¼"-6¼"-5½", switch to double pointed needles size 4 mm / US 6, continue in stockinette st AT THE SAME TIME on 1st round dec 8-8-10-10 sts evenly = 48-52-54-58 sts. Insert 1 marker at the beg of round. AT THE SAME TIME inc 1 st on each side of marker, repeat inc every 2½-2-1½-1½ cm / ⅞"-¾"-½"-½" 13-15-16-18 more times (14-16-17-19 inc in total) = 76-84-88-96 sts. When piece measures 52-51-47-44 cm / 20½"-20"-18½"-17¼" (shorter measurements in the larger sizes because of wider shoulders), bind off all sts. Knit another sleeve. ASSEMBLY: Sew the shoulder seams. Sew in sleeves. Sew the collar tog mid back and sew it to the neckline. Sew the buttons on to left band. |
||||||||||||||||||||||||||||||||||
Diagram explanations |
||||||||||||||||||||||||||||||||||
|
||||||||||||||||||||||||||||||||||
 |
||||||||||||||||||||||||||||||||||
 |
||||||||||||||||||||||||||||||||||
Have you finished this pattern?Tag your pictures with #dropspattern #gwendolencardigan or submit them to the #dropsfan gallery. Do you need help with this pattern?You'll find 24 tutorial videos, a Comments/Questions area and more by visiting the pattern on garnstudio.com. © 1982-2026 DROPS Design A/S. We reserve all rights. This document, including all its sub-sections, has copyrights. Read more about what you can do with our patterns at the bottom of each pattern on our site. |
||||||||||||||||||||||||||||||||||


With over 40 years in knitting and crochet design, DROPS Design offers one of the most extensive collections of free patterns on the internet - translated to 17 languages. As of today we count 324 catalogs and 12272 patterns - 12262 of which are translated into English (US/in).
We work hard to bring you the best knitting and crochet have to offer, inspiration and advice as well as great quality yarns at incredible prices! Would you like to use our patterns for other than personal use? You can read what you are allowed to do in the Copyright text at the bottom of all our patterns. Happy crafting!
Post a comment to pattern DROPS 151-1
We would love to hear what you have to say about this pattern!
If you want to leave a question, please make sure you select the correct category in the form below, to speed up the answering process. Required fields are marked *.