
Popular categories
Looking for a yarn?


Comments / Questions (81)
![]() Mélanie wrote:
Mélanie wrote:
Bonjour, Quelqu'un sait combien de "pelotes" il faut pour ce modèle ? Merci pour l'info...
17.09.2013 - 18:34DROPS Design answered:
Bonjour Mélanie, les quantités de laine nécessaire sont indiquées par taille à droite de la photo, soit en taille S/M : 800 g / 50 g la pelote de Merino Extra Fine = 16 pelotes. Bon crochet!
17.09.2013 - 19:48
![]() Jessica wrote:
Jessica wrote:
Ganz schön. Hätte mir aber viel mehr Häkelmodelle für Damen in der neuen Kollektion gewünscht!
14.08.2013 - 15:44
![]() Isabelle wrote:
Isabelle wrote:
Ik wil dit vest gaan haken voor mijzelf. Kan ik ook ergens een maattabel vinden, zodat ik weet welke maat ik moet gaan maken? Alvast bedankt. Groetjes, Isabelle
31.07.2013 - 10:52DROPS Design answered:
De maten van het vest staan onderaan het patroon bij de tekening. Wij raden u aan deze maten te vergelijken met een vest of trui van dezelfde vorm die u goed past. Dit model valt zeer ruim, dus kies de maat die het dichtst bij uw wensen komt.
31.07.2013 - 12:02Diane wrote:
Québec, Canada. Un article indispensable pour notre climat - vraiment très joli.
30.06.2013 - 17:49
![]() Esther wrote:
Esther wrote:
Zou dit vest ook gehaakt kunnen worden met drops love you garen? en hoeveel bollen zou je dan ongeveerd nodig hebben?
27.06.2013 - 12:38DROPS Design answered:
Hoi Esther. Ja, dat zou je zeker kunnen. Maar maak altijd eerst een proeflapje zodat de stekenverhouding klopt. En je berekent het aantal bollen met de looplengte. Voorbeeld maat S/M 16 bollen Merino a 105 m = 1680 m/150 m (looplengte DLY3) = 11,20 = 12 strengen DLY3. Veel plezier.
27.06.2013 - 19:12
![]() Renate Deppisch wrote:
Renate Deppisch wrote:
Dieses Modell ist super! Wie komme ich an das Muster Renate Deppisch
26.06.2013 - 22:25
![]() Silvia wrote:
Silvia wrote:
So pretty - can we have the pattern for this please?!
18.06.2013 - 22:47
![]() Demarcy wrote:
Demarcy wrote:
Bravo modèle au crochet, plus de modèles pour expertes
18.06.2013 - 13:51
![]() Demarcy wrote:
Demarcy wrote:
Enfin du crochet,
18.06.2013 - 13:45
![]() Gunnel wrote:
Gunnel wrote:
Mycket Snygg
13.06.2013 - 14:23
|
|||||||||||||
Waterfall#waterfalljacket |
|||||||||||||
|
|
|||||||||||||
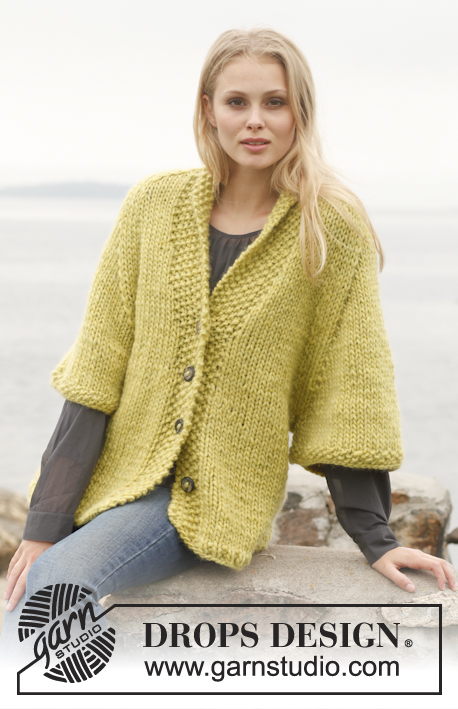
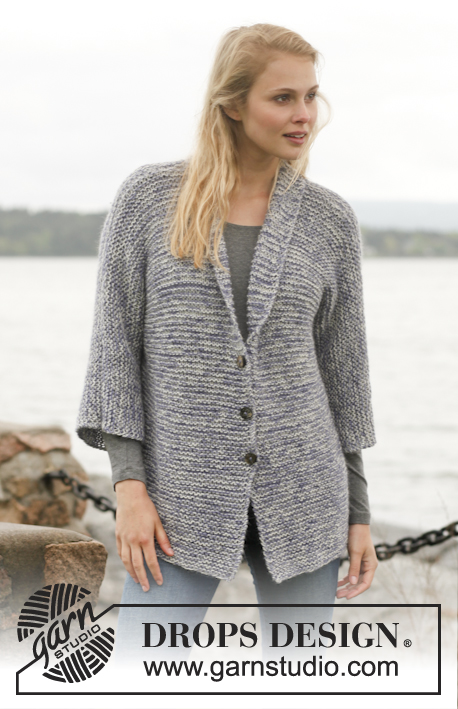
Crochet DROPS jacket with shawl collar in ”Merino Extra Fine”. Size: S - XXXL.
DROPS 149-37 |
|||||||||||||
|
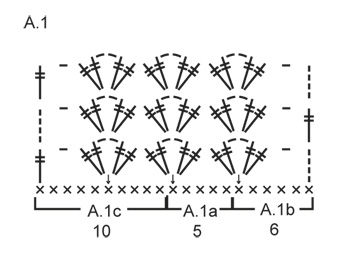
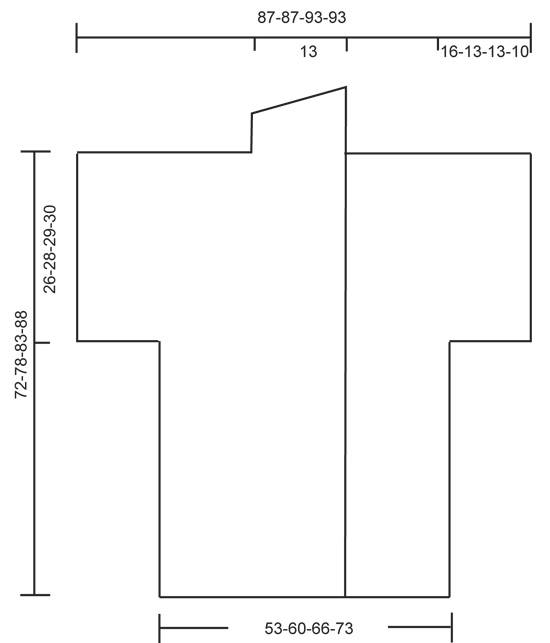
TR-GROUPS: 1 tr-group = 2 tr + ch 2 + 2 tr. PATTERN: See diagram A.1. ---------------------------------------------------------- BACK PIECE: Worked back and forth. Ch 108-120-133-145 on hook size 5 mm / H/8 with Merino Extra Fine. Work first row as follows (= WS): 1 sc in 2nd ch from hook and then 1 sc in each of the next 3 ch, * skip 1 ch, 1 sc in each of the next 4 ch *, repeat from *-* until 3-5-3-5 ch remain, skip 1 ch, 1 sc in each of the next 2-4-2-4 ch = 86-96-106-116 sc. Continue to work as follows: ROW 1 (= RS): Work A.1b 1 time, then work A.1a until 10 sc remain (= 14-16-18-20 times in width) and finish with A.1c 1 time. REMEMBER THE CROCHET GAUGE! ROW 2 (= WS): Turn piece and work A.1c 1 time, A.1a (= 14-16-18-20 times in width), A.1b 1 time. ROW 3 (= RS): Turn piece and work A.1b 1 time, A.1a (= 14-16-18-20 times in width), A.1c 1 time. Repeat 2nd and 3rd row until piece measures approx. 46-50-54-58 cm / 18"-19¾"-21¼"-22¾" – make sure to finish with 3rd row (= RS). Fasten off. Ch 30-25-25-20 loosely, beg from WS and continue A.1 over back piece as before and finish with 34-29-29-24 loose ch, turn piece. Continue to work as follows: ROW 1 (= RS): In 10th ch from hook work 2 tr + 2 ch + 2 tr (= A.1b), work A.1a 4-3-3-2 times in total, skip the last 4 ch, in tr at beg of back piece work 2 tr + 2 ch + 2 tr (= 1 tr-group), then work A.1a over back piece as before but in last tr at end of back piece work 2 tr + 2 ch + 2 tr, then work over the last 30-25-25-20 ch as follows: Skip the next 4 ch, A.1a 4-3-3-2 times in total and then A.1c 1 time, turn piece. ROW 2 (= WS): Turn piece and work A.1c 1 time, A.1a 24-24-26-26 times and finish with A.1b 1 time. ROW 3 (= RS): Turn piece and work A.1b 1 time, A.1a 24-24-26-26 times and finish with A.1c 1 time. Repeat 2nd and 3rd row until piece measures approx. 70-76-81-86 cm / 27½"-30"-32"-34" – make sure to finish with 3rd row (= RS). Work 11-11-12-12 tr-groups, finish with 1 ch and 1 tr in ch-space on next tr-group. Fasten off. Skip 2 tr-groups (= neck). Work 1 sl st in ch-space on next tr-group, then ch 5. Work 11-11-12-12 tr-groups. Fasten off. RIGHT FRONT PIECE: Worked back and forth. Ch 98-104-110-117 on hook size 5 mm / H/8 with Merino Extra Fine. Work 1 sc in 2nd ch from hook and then 1 sc in each of the next 3 ch, * skip 1 ch, 1 sc in each of the next 4 ch *, repeat from *-* until 3-4-5-2 ch remain, skip 1 ch, work 1 sc in each of the next 2-3-4-1 ch = 78-83-88-93 sc. ROW 1 (= RS): 4 ch (= 1 tr), 1 tr in each of the next 32 sc (= 33 tr for band) NOTE: Work band with every other row tr and dtr. Then ch 1, skip 4 sc, 2 tr + 2 ch + 2 tr in next sc, then work A.1a 6-7-8-9 times in total, finish with A.1c 1 time. ROW 2 (= WS): Turn piece and work A.1c 1 time, A.1a 6-7-8-9 times, 2 tr + 2 ch + 2 tr in next tr-group, 1 ch, work 1 dtr in each of the next 33 tr. ROW 3 (= RS): 4 ch (= 1 tr), 1 tr in each of the next 32 dtr (= 33 tr), 1 ch, 2 tr + 2 ch + 2 tr in first tr-group, then work A.1a 6-7-8-9 times in total, finish with A.1c 1 time. Repeat 2nd and 3rd row until piece measures 46-50-54-58 cm / 18"-19¾"-21¼"-22¾". Make sure to finish after 3rd row (= RS). Fasten off. Ch 30-25-25-20 loosely, beg from WS and then work A.1 and dtr over band as before, turn piece. Continue to work as follows: ROW 1 (= RS): 4 ch (= 1 tr), 1 tr in each of the next 32 tr (= 33 tr), 1 ch, 2 tr + 2 ch + 2 tr in ch-space in next tr-group, work A.1a until 1 tr remains on front piece, work 2 tr + 2 ch + 2 tr in tr, then work over the last 30-25-25-20 ch as follows: A.1a 4-3-3-2 times in total and then A.1c 1 time. ROW 2 (= WS): Turn piece and work A.1c 1 time, A.1a 11-11-12-12 times, 2 tr + 2 ch + 2 tr in next tr-group, 1 ch, then 1 dtr in each of the last 33 tr. ROW 3 (= RS): 4 ch (= 1 tr), 1 tr in each of the next 32 tr (= 33 tr), 1 ch, 2 tr + 2 ch + 2 tr in first tr-group, then work A.1a 11-11-12-12 times in total, finish with A.1c 1 time. Repeat 2nd and 3rd row until piece measures 72-78-83-88 cm / 28½"-30¾"-32¾"-34½". Finish with 2nd row. SHAWL COLLAR: When piece measures 72-78-83-88 cm / 28½"-30¾"-32¾"-34½", only work over band sts (= 32 tr/dtr). Then work short rows over band sts as follows: ROW 1 (RS): 32 tr, turn piece. ROW 2 (WS): 11 sc, 5 hdc, 5 dc, 11 tr, turn piece. Repeat these 2 rows until piece measures 10-10-11-11 cm / 4"-4"-4½"-4½" on the most narrow part – make sure to finish with 1st row (RS). LEFT FRONT PIECE: Work as right but reversed. NOTE: When piece measures approx. 46-50-54-58 cm / 18"-19¾"-21¼"-22¾" (make sure that last row is from RS), work next row from WS as follows: 33 dtr, work tr-groups as before over front piece and finish with 34-29-29-24 ch, turn piece and beg row as on back piece. Work band sts as on right front piece, finish shawl collar with 1st row (from WS instead of RS). ASSEMBLY: Work collar tog mid back as follows: 1 sc, *1 ch, 1 sc in next st*, repeat *-*. Place front piece on top of back piece and work the shoulders and band sts tog for neckline at the back as follows: * 1 sc through both layers, 3 ch, skip 2 dc *, repeat *-*. Work the sides tog as follows: 1 sc, *3 ch,1 sc in ch on next row*, repeat *-*. Work tog under sleeves as follows: * 1 sc in next ch with tr-group, 3 ch *, repeat *-* and end with 1 sc. |
|||||||||||||
Diagram explanations |
|||||||||||||
|
|||||||||||||
 |
|||||||||||||
 |
|||||||||||||
Have you finished this pattern?Tag your pictures with #dropspattern #waterfalljacket or submit them to the #dropsfan gallery. Do you need help with this pattern?You'll find 5 tutorial videos, a Comments/Questions area and more by visiting the pattern on garnstudio.com. © 1982-2026 DROPS Design A/S. We reserve all rights. This document, including all its sub-sections, has copyrights. Read more about what you can do with our patterns at the bottom of each pattern on our site. |
|||||||||||||


With over 40 years in knitting and crochet design, DROPS Design offers one of the most extensive collections of free patterns on the internet - translated to 17 languages. As of today we count 324 catalogs and 12290 patterns - 12280 of which are translated into English (US/in).
We work hard to bring you the best knitting and crochet have to offer, inspiration and advice as well as great quality yarns at incredible prices! Would you like to use our patterns for other than personal use? You can read what you are allowed to do in the Copyright text at the bottom of all our patterns. Happy crafting!
Post a comment to pattern DROPS 149-37
We would love to hear what you have to say about this pattern!
If you want to leave a question, please make sure you select the correct category in the form below, to speed up the answering process. Required fields are marked *.