
Popular categories
Looking for a yarn?


Comments / Questions (54)
![]() Sacha wrote:
Sacha wrote:
Hi I dont get the last triple tr on row 1. Where do I insert this? Also in the 12th ch?
24.05.2014 - 21:09DROPS Design answered:
Dear Sacha, you work the last triple tr on row 1 in first ch of foundation ch (ie in same ch as the 3rd tr). Happy crocheting!
26.05.2014 - 09:04
![]() Elke Lawrenz wrote:
Elke Lawrenz wrote:
Also mache bei JEDER REIHE zu beginn 9 statt 11 LM??????
12.04.2014 - 12:17Dana answered:
Jawohl, wo steht denn 11 LM?
12.04.2014 - 16:34
![]() Elke Lawrenz wrote:
Elke Lawrenz wrote:
Wieso werden bei der Anleitung für Reihe 2 zu beginn 9 LM angegeben wenn doch laut Diagramm immer 11 LM am anfang stehen???Außer in der 1. Reihe,da sind es 12. LG Elke Lawrenz
11.04.2014 - 18:02DROPS Design answered:
Liebe Frau Lawrenz, es sind tatsächlich nur 9 Lm - Sie haben wahrscheinlich übersehen, dass noch ein Dreifach-Stb dazwischen ist. Sie häkeln am Ende der R nach dem letzten Stb also 2 Lm, dann 1 Dreifach-Stb und dann zu Beginn der neuen R 9 Lm. Viel Spaß dabei!
12.04.2014 - 10:53
![]() Elke Lawrenz wrote:
Elke Lawrenz wrote:
Danke für die Hilfe lg Elke
05.03.2014 - 18:28
![]() Elke Lawrenz wrote:
Elke Lawrenz wrote:
Habe Diagramm A1 fertig gehäkelt und weiter bei Diagramm A2 bis Reihe 16 gehäkelt, nun meine Frage,wiederhole ich nun fortlaufend Reihe 12-16??? Oder wie geht es weiter?? #Freue mich auf eine baldige antwort. lg Elke Lawrenz
05.03.2014 - 15:42DROPS Design answered:
Liebe Elke, ja, im Prinzip wiederholen Sie immer die 12.-16. R von A.1, in jedem dieser Mustersätze kommt ein Mustersatz dazu. Die Zunahmen arbeiten Sie weiter wie zuvor. Viel Spaß beim Weiterhäkeln!
05.03.2014 - 17:42
![]() Elke Lawrenz wrote:
Elke Lawrenz wrote:
Hallo liebes Team von Garnstudio, ich habe zu dieser Anleitung eine frage,ich habe das Tuch von Diagramm A1 bis zur letzten Reihe also Reihe 16 gehäkelt,wie und ab welcher Reihe mache ich weiter??? Diagramm A2 ist als Mustersatz vorgegeben,danach ist das Muster in Reihe 10 beendet,eigentlich müßte ich nach meiner Meinung in Reihe 12 wieder anfangen bis Reihe 16 und dann wieder Reihe 12-16 fortlaufend wiederholen,oder???? lg Elke Lawrenz Freue mich auf eine baldige antwort!
05.03.2014 - 14:46DROPS Design answered:
Liebe Elke, Antwort siehe oben! ;-)
05.03.2014 - 17:44
![]() Brenninger Renate wrote:
Brenninger Renate wrote:
Ist wunderschön geworden - danke für die schnelle Nachricht und die sehr gut verständliche Anleitung!
09.02.2014 - 13:48
![]() Wilna wrote:
Wilna wrote:
Volgens mij zit in het telpatroon een fout bij A1. In de op één na bovenste toer ontbreekt middenin het patroon 1 stokje aan beide kanten van de 3 lossen. Volgens mij moeten dat 5-3-5 i.p.v. 4-3-5 stokjes zijn, gelijk aan het patroon in het kader.
03.02.2014 - 16:35DROPS Design answered:
Hoi Wilna. Je hebt gelijk. We hebben het telpatroon nu aangepast. Bedankt voor het melden.
13.02.2014 - 10:45
![]() Susanne wrote:
Susanne wrote:
Hjælp. Det er jo en fuldstændig umulig opskrift! Jeg har nu lavet diagrammet, og sidder og forsøger at beregne mig frem til, hvordan jeg fortsætter, men er ved at give op!
01.02.2014 - 09:50DROPS Design answered:
Hej Susanne. Der var en fejl i diagrammet online (andensidste raekke), men det har vi rettet nu. Men hvad er det du ikke forstaar for at komme videre?
14.02.2014 - 11:30
![]() Lucia wrote:
Lucia wrote:
Vorrei fare un bordino intorno per rifinirlo: cosa mi consigliate?
30.01.2014 - 17:11DROPS Design answered:
Buonasera Lucia. Un bordo a pippiolini potrebbe essere un modo per rifinire in maniera elegante il suo scialle. Buon lavoro!
04.02.2014 - 19:15
|
|||||||||||||||||||||||||
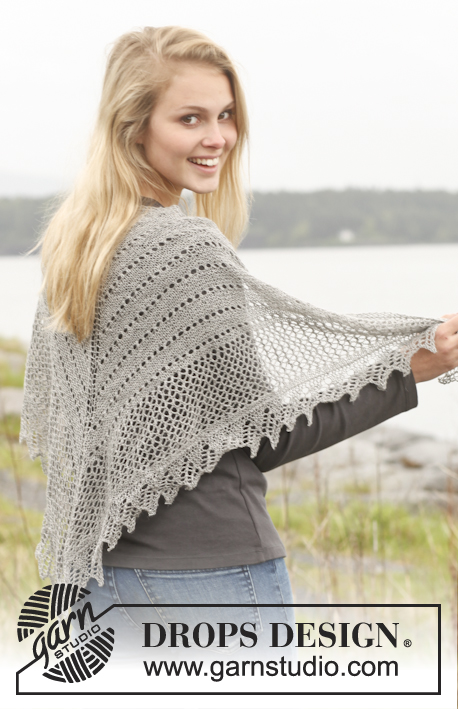
Nostalgy#nostalgyshawl |
|||||||||||||||||||||||||
|
|
|||||||||||||||||||||||||
Crochet DROPS shawl in ”Alpaca”.
DROPS 150-9 |
|||||||||||||||||||||||||
|
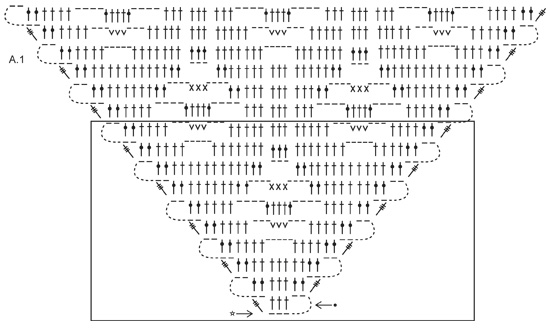
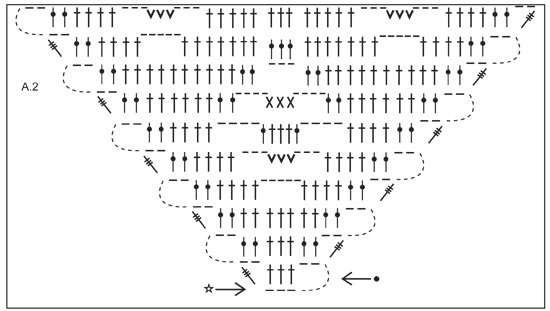
PATTERN: See diagrams A.1 and A.2. Diagram A.2 shows a enlarged square of A.1. The first 2 rows are explained below: ROW 1: 12 ch. Work 1 dc in the 10th and 11th ch from hook, in the 12th ch from hook work 1 dc, ch 2, 1 dtr. ROW 2: 9 ch, 2 dc in 1st ch-space below, 1 dc in each of the next 3 dc, 2 dc in ch-space below, ch 2, 1 dtr in ch-space on previous row. MEASURING TIP: Because of the weight of the yarn, all measurements should be done when the shawl is held up. ---------------------------------------------------------- SHAWL: Worked from the tip and up. Use 1 strand Alpaca on hook size 4 mm / G/6. Work PATTERN according to diagram A.1/A.2, see explanation above. REMEMBER THE CROCHET GAUGE! Continue inc in the sides and work according to diagram A.1. When piece measures approx. 56 cm / 22" in the middle, continue with 1 dc in every st below until finished measurements while AT THE SAME TIME continuing inc in each side = approx. 283 dc on last row. Fasten off when piece measures approx. 58 cm / 22¾" vertically and approx. 141 cm / 55½" in width at the top. |
|||||||||||||||||||||||||
Diagram explanations |
|||||||||||||||||||||||||
|
|||||||||||||||||||||||||
 |
|||||||||||||||||||||||||
 |
|||||||||||||||||||||||||
Have you finished this pattern?Tag your pictures with #dropspattern #nostalgyshawl or submit them to the #dropsfan gallery. Do you need help with this pattern?You'll find 4 tutorial videos, a Comments/Questions area and more by visiting the pattern on garnstudio.com. © 1982-2026 DROPS Design A/S. We reserve all rights. This document, including all its sub-sections, has copyrights. Read more about what you can do with our patterns at the bottom of each pattern on our site. |
|||||||||||||||||||||||||


With over 40 years in knitting and crochet design, DROPS Design offers one of the most extensive collections of free patterns on the internet - translated to 17 languages. As of today we count 325 catalogs and 12298 patterns - 12288 of which are translated into English (US/in).
We work hard to bring you the best knitting and crochet have to offer, inspiration and advice as well as great quality yarns at incredible prices! Would you like to use our patterns for other than personal use? You can read what you are allowed to do in the Copyright text at the bottom of all our patterns. Happy crafting!
Post a comment to pattern DROPS 150-9
We would love to hear what you have to say about this pattern!
If you want to leave a question, please make sure you select the correct category in the form below, to speed up the answering process. Required fields are marked *.