
Popular categories
Looking for a yarn?


Comments / Questions (101)
Laura wrote:
Hola; queria preguntarles cuando en el patron dicen insertar MARCAPUNTOS. Que son? Como se hacen? ya que es la primera vez que empese a tejer con los patrones de ustedes. y ya he tejido y destejido varias veces el tejido ya que no me sale. Desde ya muchas gracias! Soy Laura de Argentina
06.08.2014 - 12:13DROPS Design answered:
Hola Laura Los Marcapuntos no se hacen, son unas piezas generalmente de plástico que enganchamos o insertamos en alguna parte de la labor para marcar un punto de referencia.
10.08.2014 - 12:25
![]() Beda wrote:
Beda wrote:
Det finns inga knapphål. Se sista meningen i mönstret.
01.08.2014 - 18:51
![]() Catarina wrote:
Catarina wrote:
Hittar inte i mönstret var och hur man gör knapphålen.
01.08.2014 - 15:34DROPS Design answered:
Hej Catarina. Der laves ikke knapphuller. Knäpp genom m på höger framkant.
04.08.2014 - 15:50
![]() Glenna wrote:
Glenna wrote:
This is my first pattern with a diagram. I understand what the symbols mean, but don't have a clue where to start and which way to go. I ordered my yarn online and live in a rural area where help isn't available. Thank you for your help.
30.07.2014 - 06:54DROPS Design answered:
Dear Glenna, start at the bottom corner on the right side and read towards the left from RS and from right towards the right from WS. In A.2 work a on the first/last sts, repeat b and finish/start with c from RS/WS. Happy crocheting!
30.07.2014 - 09:37
![]() Nathalie wrote:
Nathalie wrote:
Bonjour, vous parlez de réaliser un échantillon d'après le diagramme A1 c'est à dire 17m par 15 rangs. Il faut compter chaque ligne du diagramme ou non pour faire 15 rangs ? Par avance merci de votre réponse
16.07.2014 - 14:44DROPS Design answered:
Bonjour Nathalie, A.1 doit être répété en largeur et en hauteur (6 rangs= 1 rang ms, 1 rang B, 2 rangs ms, 1 rang B, 1 rang ms) donc 2 fois le diagramme en hauteur + les 3 premiers rangs = 15 rangs. Bon crochet!
16.07.2014 - 15:42
![]() Jeanne wrote:
Jeanne wrote:
Hej, jeg er ved at hækle denne helt vildt søde trøje i str. 3/4 år, men jeg kan simpelthen ikke få plads til 14 mærkerne. Jeg sætter første tråd efter 5 maske altså i Nr. 6 fra nålen og herefter lader jeg der være 4 masker imellem trådene. Det stemmer fint med de 6 masker til sidst, men jeg har kun fået sat 11 tråde. Kan I hjælpe mig med, hvad der går galt? Mvh Jeanne
08.07.2014 - 13:47DROPS Design answered:
Hej Jeanne. Du skal sætte mærkerne imellem maskerne og ikke i masken. Du har 63 fm på rækken, dvs, du har 58 tilovers når du har sat den første. Sætter du nu mærker med 4 m imellem (dvs, over de næste 52) og så har du også 6 til sidst.
15.07.2014 - 16:42
![]() Angela Lassen wrote:
Angela Lassen wrote:
"Tipps zur Aufnahme" ist schlechtes deutsch. Verständlicher wäre "Tipps zur Zunahme", denn Aufnahme bedeutet eher "Luftmaschen häkeln" und das verwirrt nur.
03.05.2014 - 16:48
![]() Joan Meade wrote:
Joan Meade wrote:
HI, having trouble with size 7/8. 16st inc3x alt row,then 2x every 4th.5x16=80. add the 69 st set-up is 149sts.I should have 165sts. please help. Such a cute sweater.
16.11.2013 - 22:29DROPS Design answered:
Dear Mrs Meade, you should inc a total of 4 times every other row + 2 times every 4th row, ie a total of 6 x 16 sts = 96 + 69 set up = 165 sts. Happy crocheting!
18.11.2013 - 10:48
![]() Christin Kroon wrote:
Christin Kroon wrote:
Nu har jag virkat oket på koftan och ska börja på bak- och framstycket. Men jag märker att mönstret är något förskjutet jämfört med mönstret på oket. Stolpgruppen ligger inte rakt under den förra.Ska det vara så? Beror det på att jag ökade på varv 7 på mönstret på oket?
23.07.2013 - 20:17DROPS Design answered:
Ja men det skall vara så. När du ökar vill m bli något förskjutet!
10.10.2013 - 08:32
![]() Maria Benedicte Andersen wrote:
Maria Benedicte Andersen wrote:
Som flere av deres andre oppskrifter, så syns jeg denne også er vanskelig å følge. Skulle ønske oppskriftene kunne vært litt mer steg for steg (rad for rad). Jeg heklet denne i muskat soft. Fikk den til tilslutt da, men ermene kunne ikke være så lange som oppskriften sier (ble ikke noe A.1 på slutten, og ermene er mer enn lange nok uten).
08.07.2013 - 19:43
|
||||||||||
Amelie Smiles#ameliesmilescardigan |
||||||||||
|
|
||||||||||
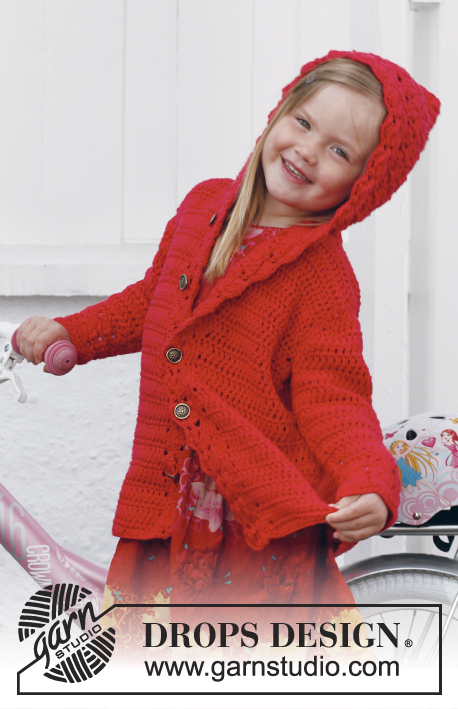
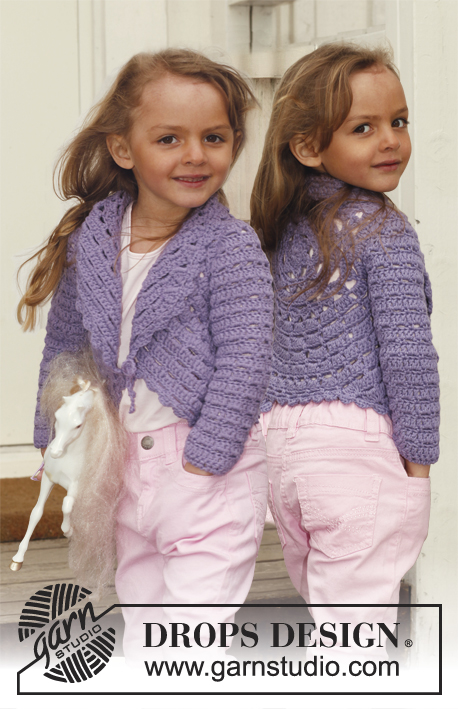
Crochet jacket with lace pattern and round yoke, worked top down in DROPS Karisma. Size children 3 - 12 years.
DROPS Children 24-38 |
||||||||||
|
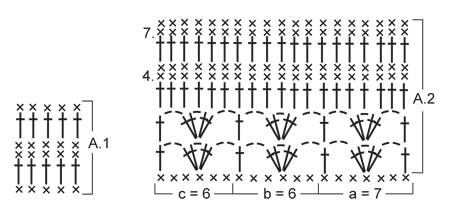
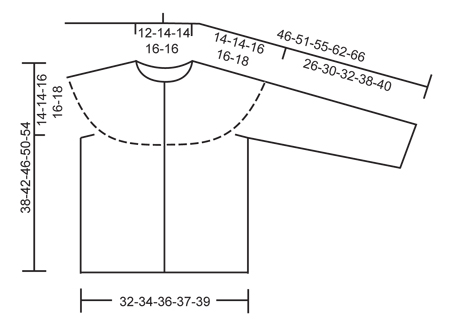
CROCHET INFO: Replace first sc on every sc row with 1 ch. Replace first dc on every dc row with 3 ch. PATTERN: See diagrams A.1 and A.2. INCREASE TIP: Inc by working 2 sts in 1 st, first on the one side of all markers on row, next time on the other side of all markers on row, continue inc like this alternately before and after markers. DECREASE TIP: Dec 1 st by working 2 sts tog. Work 2 sc tog as follows: Insert hook in first st and pull thread through, insert hook in next st and pull thread through, make 1 YO and pull yarn through all 3 loops on hook. Work 2 dc tog as follows: Work 1 dc in first st but wait with last pull through, work 1 dc in next st but on last pull through, pull yarn through all 3 loops on hook. ---------------------------------------------------------- BODY: The piece is worked top down. Worked back and forth from mid front. Ch 77-85-85-92-100 (includes 1 ch to turn with) on hook size 4 mm / G/6 with Karisma. Work next row as follows: 1 sc in 2nd ch, 1 sc in each of the next 5-3-3-5-3 ch, * skip ch 1, 1 sc in each of the next 4 ch *, repeat from *-* the entire row = 63-69-69-75-81 sc (ch at beg of row = 1 sc) – READ CROCHET INFO! Insert 14-15-16-17-18 markers in the piece as follows: First marker after 5-6-4-5-6 sts, then insert 13-14-15-16-17 markers 4 sts apart, after last marker there are 6-7-5-6-7 sts. Work back and forth according to diagram A.1 - AT THE SAME TIME on next row inc 1 st at all markers – READ INCREASE TIP! Repeat inc every other row 5-5-3-3-2 more times and then every 4th row 0-0-2-2-3 times = 147-159-165-177-189 sts. REMEMBER THE CROCHET GAUGE! Continue to work A.2 as follows: 1 dc in each of the first 4 sc (= band), a over the next 7 sc, then b until 10 sc remain, c over the next 6 sc and 1 dc in each of the last 4 sc (= band). Work diagram 1 time vertically – NOTE: On the first 2 rows work the four first and the last 4 sts in each side in dc, then work the pattern as before - inc at the markers as before on 4th row in diagram. On 7th row in diagram inc 16-13-16-15-12 sts evenly (do not inc over the first and last 4 band sts) = 177-187-197-209-219 sts. Work last row in A.2 as follows: 28-30-31-33-34 sc (= front piece), 6 ch (= under sleeve), skip 36-38-40-43-45 sc (to be used for sleeve later), work 49-51-55-57-61 sc (= back piece), 6 ch (= under sleeve), skip 36-38-40-43-45 sc (to be used for sleeve later) and work 28-30-31-33-34 sc (= front piece). There are now 117-123-129-135-141 sts on body. Remove all markers on yoke and insert a new marker in the middle of the 6 ch under each sleeve. Beg on 1st row in A.2 again and work a, b and c the same way as last time (every ch under sleeve = 1 sc) - the first and last 4 sts in each side = bands, only work these in dc on the first 2 rows. Continue A.2 until repetition has been worked 4-4-4-5-5 times in total after yoke, piece measures now approx. 24-24-24-30-30 cm / 9½"-9½"-9½"-11¾"-11¾" from armhole and down. The smallest size is now done. Continue with diagram A.1 for 0-4-6-4-6 cm / 0-1½"-2½"-1½"-2½", i.e. piece measures 24-28-30-34-36 cm / 9½"-11"-11¾"-13½"-14¼" from armhole and down. Fasten off. SLEEVE: To get the same texture as on body, work back and forth. There are now 42-44-46-49-51 sts in total on sleeve. Beg to work mid under sleeve in 3rd ch worked for armhole on body – work first row from WS. Work 1 row with 1 sc in every ch/sc, AT THE SAME TIME dec 6 sc evenly = 36-38-40-43-45 sc. Work next row as follows – from RS: Work 1 dc in each of the first 3-1-2-0-1 sc, then work diagram A.2 as follows: a over 7 sts, then b until 8-6-7-6-7 sts remain, c over 6 sts and finish with 1 dc in each of the last 2-0-1-0-1 sc. Turn and work as follows: On 4th row first time diagram is worked, dec 5-1-3-0-2 sts evenly – SEE DECREASE TIP = 31-37-37-43-43 sts. No of sts will now fit the repetition so next time you start A.2, no dc are worked mid under sleeve in any size. Continue with A.2 downwards 3-4-4-5-5 more times – AT THE SAME TIME, third time repetition is worked, dec 0-6-6-6-6 sts evenly = 31-31-31-37-37 sts. When A.2 are worked a total of 4-5-5-6-6 times on sleeve (piece measures approx. 24-30-30-36-36 cm / 9½"-11¾"-11¾"-14¼"-14¼"), continue with diagram A.1 until sleeve measures 26-30-32-38-40 cm / 10¼"-11¾"-12½"-15"-15¾". Cut the yarn – make it long and use it to sew tog sleeve mid under. Work the other sleeve the same way. ASSEMBLY: Sew sleeve seams edge to edge to avoid a chunky seam. Sew on buttons evenly down on left band – top button should be 1 cm / ½" from the top. Button through sts on right band. |
||||||||||
Diagram explanations |
||||||||||
|
||||||||||
 |
||||||||||
 |
||||||||||
Have you finished this pattern?Tag your pictures with #dropspattern #ameliesmilescardigan or submit them to the #dropsfan gallery. Do you need help with this pattern?You'll find 6 tutorial videos, a Comments/Questions area and more by visiting the pattern on garnstudio.com. © 1982-2026 DROPS Design A/S. We reserve all rights. This document, including all its sub-sections, has copyrights. Read more about what you can do with our patterns at the bottom of each pattern on our site. |
||||||||||


With over 40 years in knitting and crochet design, DROPS Design offers one of the most extensive collections of free patterns on the internet - translated to 17 languages. As of today we count 324 catalogs and 12290 patterns - 12280 of which are translated into English (US/in).
We work hard to bring you the best knitting and crochet have to offer, inspiration and advice as well as great quality yarns at incredible prices! Would you like to use our patterns for other than personal use? You can read what you are allowed to do in the Copyright text at the bottom of all our patterns. Happy crafting!
Post a comment to pattern DROPS Children 24-38
We would love to hear what you have to say about this pattern!
If you want to leave a question, please make sure you select the correct category in the form below, to speed up the answering process. Required fields are marked *.