
Popular categories
Looking for a yarn?


Comments / Questions (34)
![]() Paz wrote:
Paz wrote:
Gracias lo que sigo sin entender es que 1vueta pto del derecho y aumentos 2 vuelta reves y se tejen los aumentos 3 vuelta tocaria tejer derecho y la 4 vuelta q es en la que dice que se debe aumentar toca en este caso tejer del reves? Es correcto muchas gracias
18.05.2014 - 22:37
![]() Paz wrote:
Paz wrote:
Gracias lo que sigo sin entender es que 1vueta pto del derecho y aumentos 2 vuelta reves y se tejen los aumentos 3 vuelta tocaria tejer derecho y la 4 vuelta q es en la que dice que se debe aumentar toca en este caso tejer del reves? Es correcto muchas gracias
18.05.2014 - 22:36DROPS Design answered:
Hola Paz! Teniendo en cuenta que los aum son cada 4ª vuelta, tiene que haber 3 vueltas entre medio sin aumentos.
19.05.2014 - 10:21
![]() Paz wrote:
Paz wrote:
No entiendo muy bien el patron͵ en la vuelta del derecho se aumenta a cada lado del marcador un punto es decir tendriamos dos hebras a los lados del punto q hace de marcador, y en la siguiente vuelta tocaria de reves p lo tanto las hebras se tejen tn con punto del reves no??? No se si lo entendi bien asi o es de otra forma Gracias
11.05.2014 - 22:32DROPS Design answered:
Hola Paz. Exactamente las HEB (lazadas) que se han trabajado en la fila por el LD, por el LR las tejemos de revés para crear un agujero.
14.05.2014 - 10:11
![]() Paz wrote:
Paz wrote:
No entiendo muy bien el patron͵ en la vuelta del derecho se aumenta a cada lado del marcador un punto es decir tendriamos dos hebras a los lados del punto q hace de marcador, y en la siguiente vuelta tocaria de reves p lo tanto las hebras se tejen tn con punto del reves no??? No se si lo entendi bien asi o es de otra forma Gracias
11.05.2014 - 22:31
![]() Lola Ruiz. Acosta wrote:
Lola Ruiz. Acosta wrote:
Como hago el volante? Que significa 1d y 2d
29.09.2013 - 01:02DROPS Design answered:
Hola Lola. El volante se trabaja repitiendo * 1 pt de derecho (1 d.), tejer 2 pts de derecho (2 d.) en el pt sig *.
01.10.2013 - 09:14Rasha wrote:
Thanks for pattern but how i can make this Worked back and forth on circular needle to make room for all the sts. Cast on 256 sts on circular needle size 4 mm / US 6. Work 8 rows in garter st -
07.12.2011 - 08:11
![]() Elisabeth wrote:
Elisabeth wrote:
Romatisk :)
02.03.2011 - 20:00
![]() ELaina Mc wrote:
ELaina Mc wrote:
Beyond my beginners knitting talent, but wow I'd love to make this one.
06.02.2011 - 17:54
![]() Inger wrote:
Inger wrote:
Ja jeg synes også den ligner en hagesmæk
21.01.2011 - 09:36
![]() Baafje Begheijn wrote:
Baafje Begheijn wrote:
Lookes like a pattern I've recently seen and liked. Only this one is for free! Nice :)
18.01.2011 - 11:42
|
|
Rose Smiles#rosesmilesshawl |
|
 |
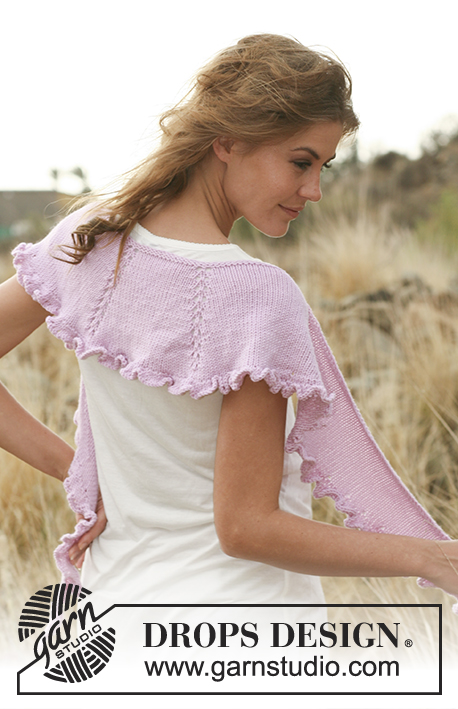 |
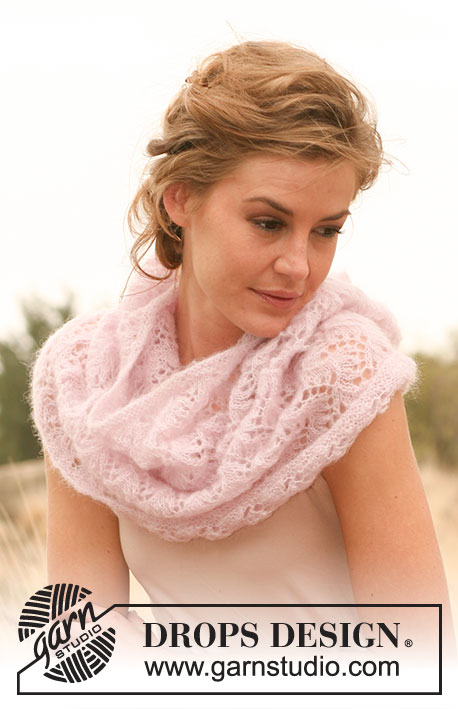
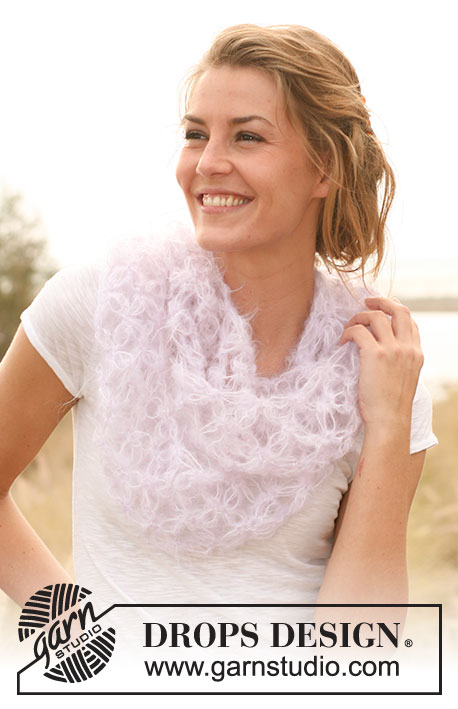
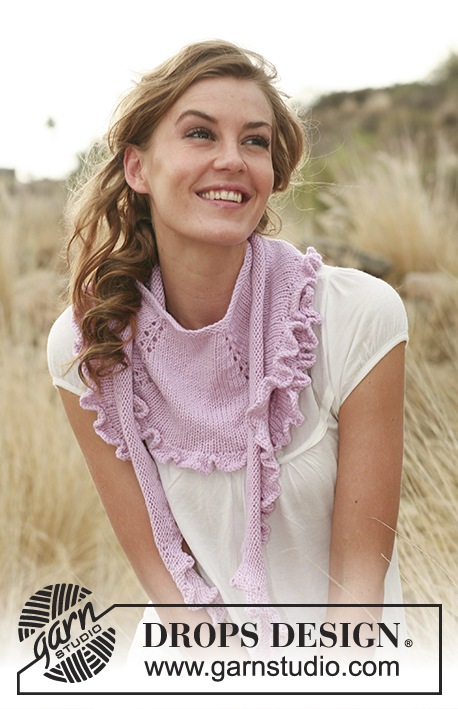
Knitted DROPS shawl with flounce in "Merino Extra Fine".
DROPS 127-29 |
|
|
GARTER ST (back and forth on needle): K all rows. INCREASE TIP: Inc from RS by making 1 YO on each side of 1 st with marker in stockinette st as follows: 1 YO, st with marker, 1 YO. P YO on next row to make a hole. SHORT ROWS: Work short rows at the end of each row as follows: work until 5 sts remain, slip these 5 sts on a stitch holder, turn and work back. -------------------------------------------------------- SHAWL: Worked back and forth on circular needle to make room for all the sts. Cast on 256 sts on circular needle size 4 mm / US 6. Work 8 rows in garter st - see explanation above. REMEMBER THE GAUGE! Insert a marker in the 121st st and 136th st (14 sts between markers). Switch to circular needle size 5 mm / US 8 and work stockinette st. Read all of the following section before continuing! On next row from RS work with short rows - see explanation above (continue slipping 5 new sts on the stitch holders 20 times each side until there are 100 sts on the stitch holders each side). AT THE SAME TIME inc 2 sts at each marker - Read INCREASE TIP - a total of 4 new sts on needle. Repeat inc on every 4th row a total of 10 times (= 34 sts between markers). When the last 5 sts in the right side have been slipped on a stitch holder (a total of 100 sts on stitch holders each side), work sts from the two stitch holders back on needle as follows: (1st row = RS) work all sts that are still on the needle and work all sts from the stitch holder in the left side back on needle. On next row (= WS) work all sts from the stitch holder in the right side back on needle, 296 sts on needle. On next row inc for flounce as follows: * K1 , K2 sts in next st *, repeat from *-* the rest of row. Work 3 rows in stockinette st. On next row (= from RS) inc as follows: K1, * 1 YO, K1 *, repeat from *-* the rest of row. Bind off with K sts on next row, bind off YO as sts. ASSEMBLY: Lightly steam the shawl with a steam iron to make the flounce pretty. Steam from cast on edge and out to approx. 1 cm / ⅜" inside the flounce (do not steam the bind off edge). |
|
Have you finished this pattern?Tag your pictures with #dropspattern #rosesmilesshawl or submit them to the #dropsfan gallery. Do you need help with this pattern?You'll find 14 tutorial videos, a Comments/Questions area and more by visiting the pattern on garnstudio.com. © 1982-2026 DROPS Design A/S. We reserve all rights. This document, including all its sub-sections, has copyrights. Read more about what you can do with our patterns at the bottom of each pattern on our site. |
|


With over 40 years in knitting and crochet design, DROPS Design offers one of the most extensive collections of free patterns on the internet - translated to 17 languages. As of today we count 324 catalogs and 12278 patterns - 12268 of which are translated into English (US/in).
We work hard to bring you the best knitting and crochet have to offer, inspiration and advice as well as great quality yarns at incredible prices! Would you like to use our patterns for other than personal use? You can read what you are allowed to do in the Copyright text at the bottom of all our patterns. Happy crafting!
Post a comment to pattern DROPS 127-29
We would love to hear what you have to say about this pattern!
If you want to leave a question, please make sure you select the correct category in the form below, to speed up the answering process. Required fields are marked *.