
Popular categories
Looking for a yarn?


Comments / Questions (82)
![]() Gineke Meinders wrote:
Gineke Meinders wrote:
De lengte van de trui vanaf de schouder zou volgens het patroon 96 cm zijn (72+24). Als ik dat bij mijzelf nameet zou de trui tot over mijn knieën komen! Ik ben 1.67 m. dus niet heel klein. Zelfs maat S zou meer richting jurk gaan. Kan toch niet kloppen?!
14.02.2025 - 12:00DROPS Design answered:
Dag Gineke,
De totale lengte van de trui staat onderaan bij de maattekening aan de linker kant aangegeven. Dit is voor de grootste maat 78 cm en voor de kleinste maat 68 cm.
02.03.2025 - 10:47
![]() Linda Laursen wrote:
Linda Laursen wrote:
Fin og tyk sweater. Jeg lavede næserne mindre, hvilket gjorde den knap så barnlig. Jeg får mange fine kommentarer for den.
29.01.2025 - 09:41
![]() Isabella Owens wrote:
Isabella Owens wrote:
What are the actual measurements (around chest ) for xs/s and m/l sizes, once knitted?
27.12.2024 - 17:17DROPS Design answered:
Dear Isabella, the measurements in the size chart at the bottom of the pattern are the finished measurements of the garment. Since the chest shows half the full circunference in the chart, the full chest of the garment should be: 84-100-116-132 cm. Happy knitting!
29.12.2024 - 22:17
![]() Woutje Delforno wrote:
Woutje Delforno wrote:
Voor de mouwen moet ik 36 st opzetten, met pen 8 maar dat wordt veel te groot. Wat doe ik fout?
02.12.2024 - 18:38DROPS Design answered:
Dag Woutje,
Heb je een proeflapje gemaakt in tricotsteek en komt de stekenverhouding overeen zoals aangegeven in het patroon? Misschien moet je dunnere naalden gebruiken. Je proeflapje maak je trouwens gewoon in tricotsteek met de grootste naald. Als je dan de boordsteek breit, neem je een naald kleiner dan die je voor de tricotsteek gebruikt (voor de boordsteek hoef je niet speciaal een proeflapje te maken).
04.12.2024 - 20:28
![]() Solveig Sivertsen wrote:
Solveig Sivertsen wrote:
Et nydelig mønster, passer perfekt til juleglade mennesker. Gøy å strikke. Skulle gjerne hatt tilbehør til denne, sånn som pannebånd, lue, sokker og votter.
25.11.2024 - 11:39
![]() Mascha wrote:
Mascha wrote:
Gibt es für die Noppen ein Erklärvideo? Nach der schriftlichen Anleitung hier bekomme ich nur ein flaches Gestrick, aber keine Noppe. Oder muss ich den Faden zum Schluss nochmal durch die zuerst angeschlagene Masche ziehen?
23.11.2024 - 21:41DROPS Design answered:
Liebe Mascha, schlagen Sie nur 1 Masche an; dann stricken Sie die Noppe wie in diesem Video (ohne die anderen Maschen beidseitig. Viel Spaß beim Stricken!
25.11.2024 - 08:38
![]() Suzanne Jones wrote:
Suzanne Jones wrote:
Love this sweater
16.11.2024 - 17:06
![]() Mascha wrote:
Mascha wrote:
Für den Ärmel soll man "nach 10 cm unter dem Ärmel 2 M. aufnehmen". Werden diese 10 cm vom Anschlag aus gemessen oder vom oberen Rand des Bündchens? Vielen Dank für Ihre Antwort!
15.11.2024 - 21:15DROPS Design answered:
Liebe Mascha, diese 10 cm messen Sie ab der Anschlagksante, dh 2 cm nach Bündchen. Viel Spaßß beim Stricken!
18.11.2024 - 07:16
![]() Mascha wrote:
Mascha wrote:
Wenn ich diesen Pulli (in XL) etwa 10 cm kürzer stricken möchte, wie viel Garn benötige ich dann? (Ich würde das Vorder- und Rückenteil unten nicht so lang stricken wie auf dem Foto, bräuchte also weniger von dem grauen Garn.)
03.10.2024 - 14:05DROPS Design answered:
Liebe Mascha, am besten lassen Sie sich von einem ähnlichen Pullover (mit der gewünschten Länge) auch mit Snow inspirieren, Ihr DROPS Händler kann Ihnen auch gerne damit - auch per Telefon oder per E-Mail - weiterhelfen. Viel Spaß beim Stricken!
03.10.2024 - 16:22
![]() Gillian Bryant wrote:
Gillian Bryant wrote:
Due to a wool allergy, I need to find an acrylic alternative to Drops Snow. What can you recommend? Thanks.
29.09.2024 - 20:17DROPS Design answered:
Dear Gillian, we don't work with fully acrylic yarns. You could work with 2 threads of a cotton yarn that is in Yarn Group C, like Paris or Bomull-Lin or 4 threads of a Yarn Group A cotton yarn, like DROPS Love You or Safran. Happy knitting!
29.09.2024 - 23:44
|
|||||||||||||
Rudolph#rudolphsweater |
|||||||||||||
 |
 |
||||||||||||
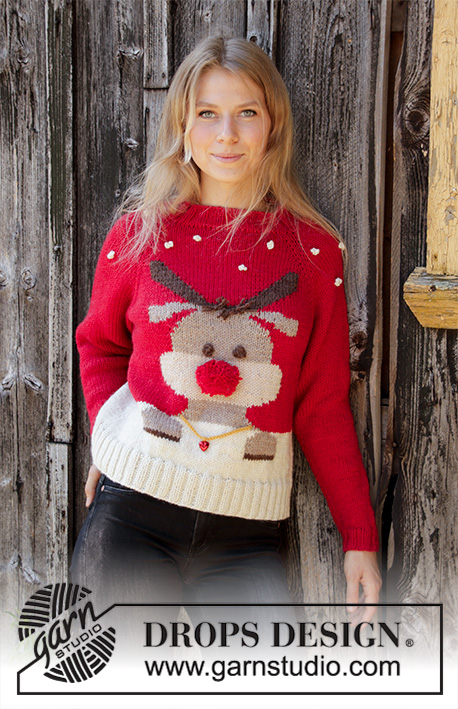
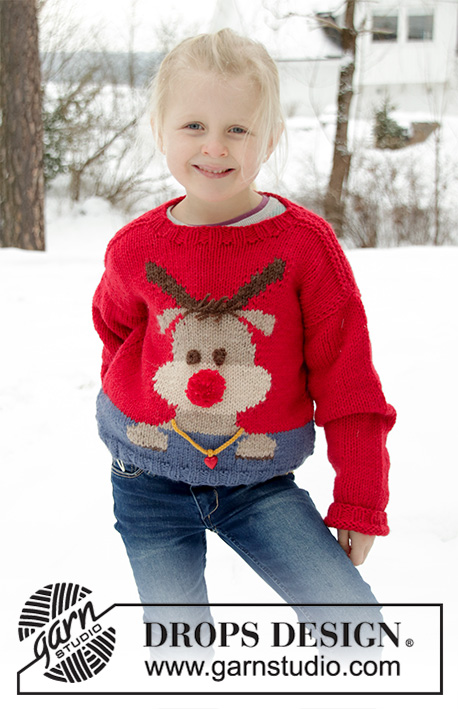
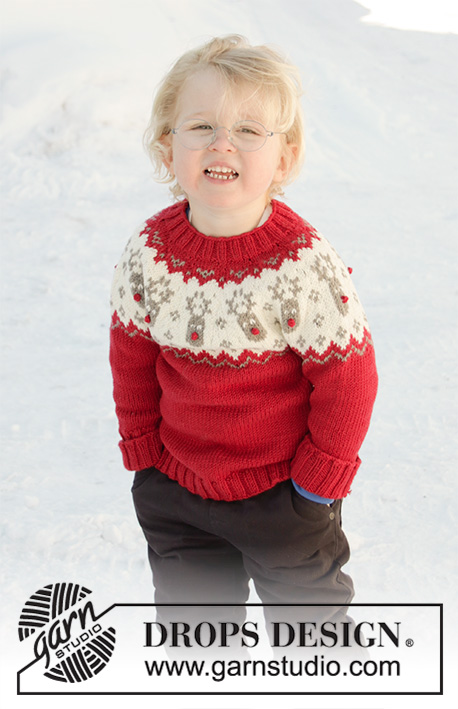
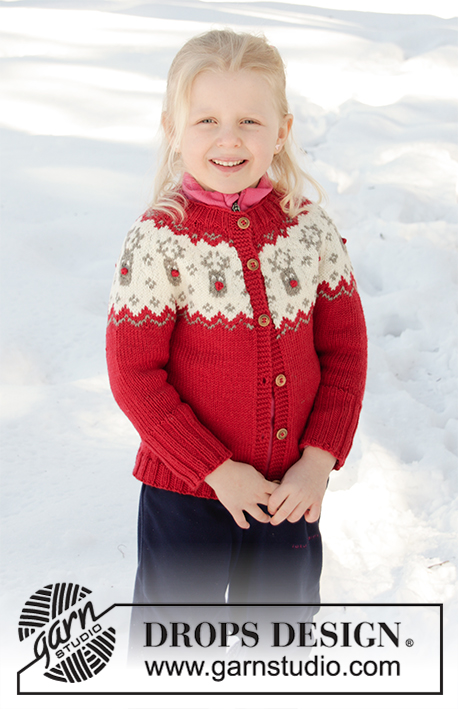
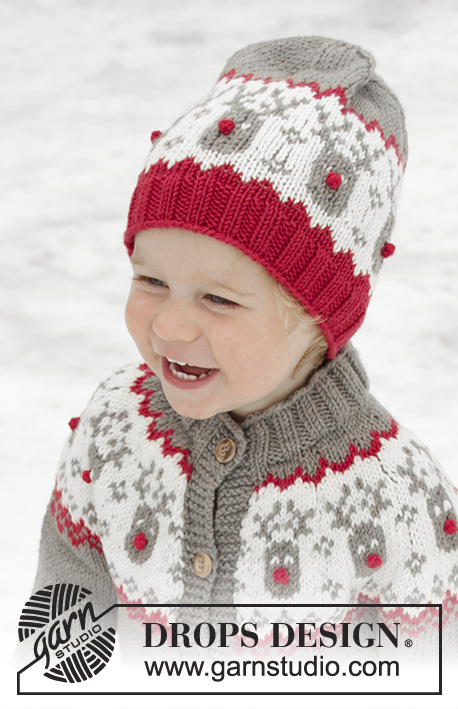
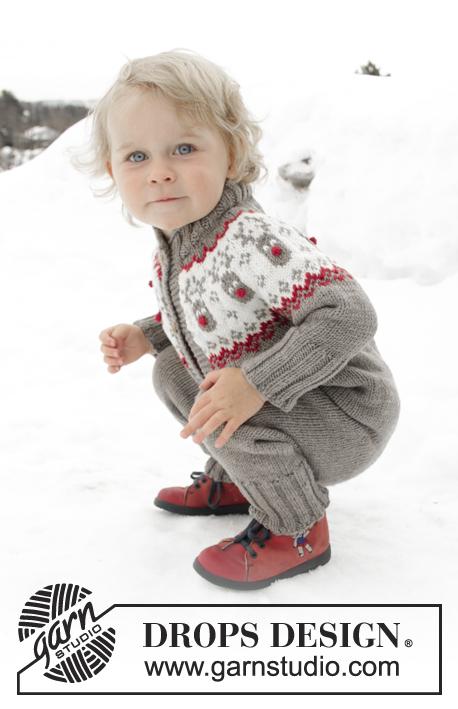
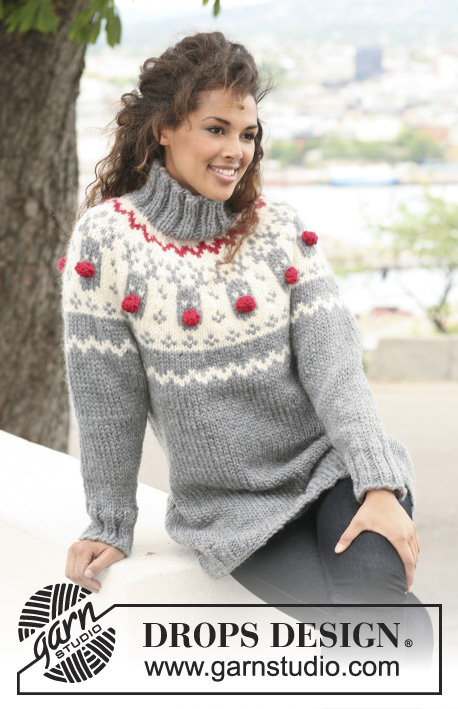
DROPS jumper with raglan and reindeer pattern on yoke in ”Snow”.
DROPS 122-1 |
|||||||||||||
|
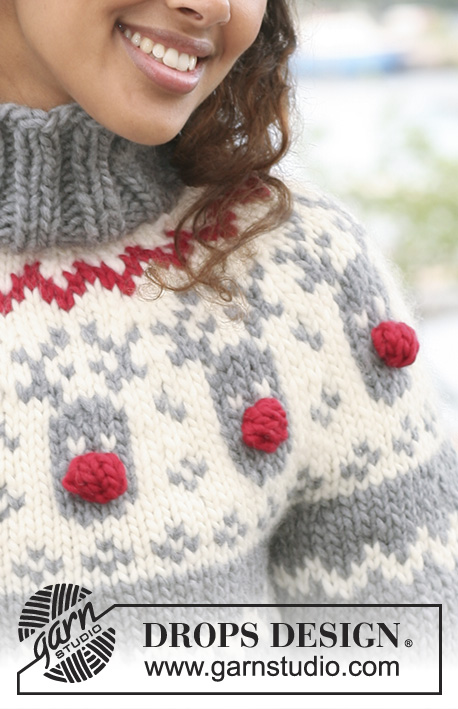
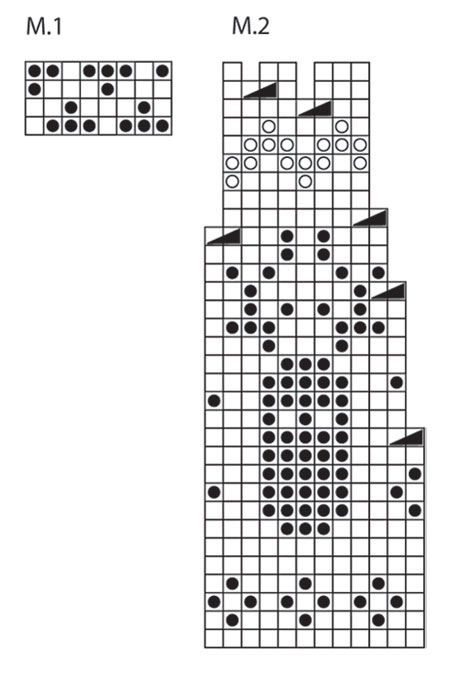
PATTERN: See diagram M.1 and M.2. Diagram shows the pattern from RS. DECREASING TIP: Dec as follows before marker: Beg 2 sts before marker. Slip 1 st as if to K, K1, psso. Dec as follows after marker: K2 tog. INCREASING TIP: Inc by making 1 YO. On next row work YO into back of loop to avoid a hole. -------------------------------------------------------- BODY PIECE: Worked in the round. Cast on 96-112-132-148 sts on circular needle size 8 mm / US 11 with medium gray. K 1 round and continue in rib K2/P2 until rib measures approx 6 cm / 2½". Now K 1 round, AT THE SAME TIME dec 8 sts evenly = 88-104-124-140 sts. Insert a marker at beg of round and 1 marker after 44-52-62-70 sts (= the sides). Change to circular needle size 9 mm / US 13. Continue in stockinette st. When piece measures approx 10 cm / 4" dec 2 sts each side (i.e. 1 st each side of marker) - See DECREASING TIP! Repeat the dec on every 7-8-13-13 cm / 2¾"-3⅛"-5⅛"-5⅛" a total of 4-4-3-3 times = 72-88-112-128 sts. Continue until piece measures 40-42-44-45 cm / 15¾"-16½"-17¼"-17¾". Now inc 2 sts each side (i.e. 1 st each side of marker) - See INCREASING TIP! SIZE XS/S and M/L: repeat the inc on every 2 cm / ¾" a total of 3-3 times = 84-100-116-132 sts. When piece measures 44-46-48-49 cm / 17¼"-18"-19"-19¼" (all inc are now complete) work M.1 on all sts (= 10.5-12.5-14.5-16.5 repeats). After M.1 work 1 round with medium gray on all sts and work next round with medium gray as follows: bind off 3 sts, work 36-44-52-60 sts, bind off 6 sts, work 36-44-52-60 sts and bind off the last 3 sts on round. Cut the thread and put piece aside. SLEEVE: Worked in the round. Cast on 32-32-36-36 sts on double pointed needles size 8 mm / US 11 with medium gray. K 1 round and continue in rib K2/P2 until rib measures approx 8 cm / 3⅛". Now K 1 round, AT THE SAME TIME dec 6-4-8-6 sts evenly = 26-28-28-30 sts. Insert a marker at beg of round (= mid under sleeve). Change to double pointed needles size 9 mm / US 13 and continue in stockinette st. When piece measures 10 cm / 4" inc 2 sts under sleeve (i.e. 1 st each side of marker) and repeat the inc on every 14-9-5.5-4.5 cm / 5½"-3½"-2¼"-1¾" a total of 3-4-6-7 times = 32-36-40-44 sts. When piece measures 40-40-39-39 cm / 15¾"-15¾"-15¼"-15¼" (all inc are now complete) work M.1 on all sts (= 4-4.5-5-5.5 repeats). After M.1 work 1 round with medium gray on all sts and work next round with medium gray as follows: bind off 3 sts, work 26-30-34-38 sts, bind off 3 sts. Cut the thread. Put piece aside and knit the other sleeve. YOKE: Slip sleeves on the same circular needle as body piece where bind off for armhole = 124-148-172-196 sts. Beg mid back on back piece (= after 18-22-26-30 sts). Work 1 round with medium gray on all sts, AT THE SAME TIME dec 4 sts evenly = 120-144-168-192 sts. Work 0-1-1-2 rounds with medium gray on all sts and then continue in M.2 on all sts (= 10-12-14-16 repeats). After M.2 there are 60-72-84-96 sts on needle. Now work 1 round with medium gray on all sts, AT THE SAME TIME dec 12-16-28-32 sts evenly = 48-56-56-64 sts. Continue with shortened rows mid back as follows, back and forth on needle (row 1 = RS): work 6 sts, turn and work 12 sts. Turn and work 18 sts, turn and work 24 sts. Turn and work 30 sts, turn and work 36 sts. Turn and work 1 row on all sts to mid back. Change to circular needle size 8 mm / US 11. Continue in the round in rib K2/P2 until rib measures approx 10 cm / 4". Bind off with K over K and P over P. BOBBLES: Work 10-12-14-16 bobbles on needle size 8 mm / US 11 with red as follows: Cast on 1 st. Work K1, 1 YO, K1, 1 YO, K1 in the same st (= 5 sts), turn piece. Work 4 rows stockinette st back and forth on these 5 sts. Then pass 2nd st over first st, 3rd st over first st, 4th st over first st and 5th st over first st (= 1 st left). Pull thread through the last st, leave approx 15 cm / 6" and use this when sewing on the bobble. ASSEMBLY: Sew openings under sleeves. Sew on bobbles. |
|||||||||||||
Diagram explanations |
|||||||||||||
|
|||||||||||||
 |
|||||||||||||
 |
|||||||||||||
Have you finished this pattern?Tag your pictures with #dropspattern #rudolphsweater or submit them to the #dropsfan gallery. Do you need help with this pattern?You'll find 20 tutorial videos, a Comments/Questions area and more by visiting the pattern on garnstudio.com. © 1982-2026 DROPS Design A/S. We reserve all rights. This document, including all its sub-sections, has copyrights. Read more about what you can do with our patterns at the bottom of each pattern on our site. |
|||||||||||||


With over 40 years in knitting and crochet design, DROPS Design offers one of the most extensive collections of free patterns on the internet - translated to 17 languages. As of today we count 324 catalogs and 12252 patterns - 12242 of which are translated into English (US/in).
We work hard to bring you the best knitting and crochet have to offer, inspiration and advice as well as great quality yarns at incredible prices! Would you like to use our patterns for other than personal use? You can read what you are allowed to do in the Copyright text at the bottom of all our patterns. Happy crafting!
Post a comment to pattern DROPS 122-1
We would love to hear what you have to say about this pattern!
If you want to leave a question, please make sure you select the correct category in the form below, to speed up the answering process. Required fields are marked *.